Installation and Setup
| Requirement | Details |
|---|---|
| Indigo | Indigo Domotics 2022.1 or newer (2025.x recommended) |
| Python | Python 3.10+ (bundled with modern Indigo) |
| Network | Indigo Mac and Envoy must be on the same LAN |
| Envoy IP | A static IP for the Envoy (set via your router's DHCP reservation) |
| Enphase account | Required only for firmware ≥7 token generation |
Tip: The Envoy's default mDNS name is
envoy.local, but a static IP is strongly recommended to prevent the plugin losing contact after a DHCP renewal.
- Download the latest release from the Indigo Plugin Store or from the GitHub releases page.
- Double-click
EnphaseEnvoy.indigoPlugin— Indigo will prompt to install it. - Click Install and Enable.
The plugin bundles all required Python packages (aiohttp, pyenphase, jwt, requests, flatdict) inside its Packages/ directory — no manual pip installs required.
Open Plugins → Enphase Envoy → Configure… to access global settings.
| Setting | Default | Description |
|---|---|---|
| Force clear all generated tokens on next startup | Off | Tick this to force all auto-generated tokens to be regenerated at next plugin reload. Resets itself automatically after clearing. |
| Enable/Disable Debugging | Off | Turns verbose logging on or off. |
| Indigo Log Debug Level | Informational | Controls how much detail goes to the Indigo event log. |
| File Debug Level | Detailed | Controls detail level saved to the plugin's log file. |
Always leave debugging off in normal operation. Turn it on temporarily when diagnosing an issue, then turn it off. Debug output may include sensitive headers.
- Go to Devices → New Device…
- Set Type to Enphase Envoy (Plugin device).
- Set Model to Enphase Envoy-S.
- Click Edit Device Settings…
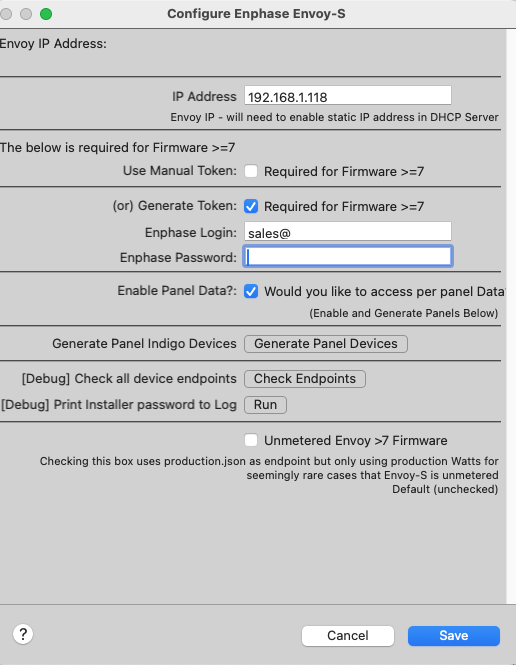
Enter the static LAN IP of your Envoy (e.g., 192.168.1.118).
See the Authentication page for which option to choose. For most modern installs (firmware ≥7):
- Use Generate Token (easiest) — enter your Enphase Enlighten email and password.
- Or use Manual Token — paste a token from entrez.enphaseenergy.com.
If you want per-inverter panel devices:
- Tick Enable Panel Data?
- Click Generate Panel Indigo Devices — the plugin queries the Envoy and creates one
Enphase Paneldevice per microinverter.
Click Save.
After saving, the plugin immediately polls the Envoy. Within 30 seconds the device state should show:
-
deviceIsOnline= True -
typeEnvoy= Metered (or Unmetered for older hardware) -
productionWattsNow= current watts
If the device stays offline, see Troubleshooting.
You can create these devices in any order; they work independently.
Required if you have Enphase Encharge batteries.
- Devices → New Device… → Model: Enphase Battery and Grid.
- No IP address needed — it pulls data from the first online
EnphaseEnvoyDevice. - The device updates automatically every time the parent Envoy device refreshes.
- Devices → New Device… → Model: Enphase Cost Device.
- Enter your Consumption Tariff ($/kWh) and Production Tariff ($/kWh).
- The plugin calculates today's/7-day/lifetime costs automatically.
Only for older Envoy-C hardware without metering support.
- Devices → New Device… → Model: Enphase Legacy.
- Enter IP address and (optionally) the Envoy serial number.
Create a device folder called Enphase to keep everything tidy:
Enphase/
  Enphase Envoy-S          (EnphaseEnvoyDevice)
  Enphase Battery & Grid   (EnphaseEnvoyBatteryDevice)
  Enphase Cost             (EnphaseEnvoyCostDevice)
  Enphase Panel 1          (EnphasePanelDevice)
  Enphase Panel 2
  …
When you click Generate Panel Devices, panels are created in the same folder as the parent Envoy device automatically.
Open the Envoy-S device settings and click Delete Panel Indigo Devices. All EnphasePanelDevice devices are removed from Indigo.
Panel devices do not need to be deleted when you re-generate them — duplicate serial numbers are automatically skipped.
A healthy startup with two Envoy devices, a Battery device, and a Cost device looks like this in the Indigo event log:
Enphase Envoy Plugin  ======== Initializing New Plugin Session =========
Enphase Envoy Plugin  Plugin name:     Enphase Envoy Plugin
Enphase Envoy Plugin  Plugin version:  1.8.0
Enphase Envoy Plugin  Plugin ID:       com.GlennNZ.indigoplugin.EnphaseEnvoy
Enphase Envoy Plugin  Indigo version:  2025.2.0
Enphase Envoy Plugin  Python version:  3.13.9 [Clang 16.0.0]
Enphase Envoy Plugin  Python Directory:/Library/Frameworks/Python.framework/Versions/3.13
Enphase Envoy Plugin  ====== End Initializing New Plugin Session =======
Started plugin "Enphase Envoy Plugin 1.8.0"

Enphase Envoy Plugin  Starting Enphase Battery & Grid device: Battery Device
Enphase Envoy Plugin  Starting Enphase/Envoy device: Enphase Envoy-S
Enphase Envoy Plugin  Starting Enphase/Envoy device: Envoy Cost Device
Enphase Envoy Plugin  Starting Enphase/Envoy device: Envoy S New IQ8HC

Enphase Envoy Plugin  [Enphase Envoy-S] Found Full Enphase Envoy Serial Number: 121639005898
Enphase Envoy Plugin  [Enphase Envoy-S] Envoy firmware: D8.3.5232
Enphase Envoy Plugin  [Enphase Envoy-S] Enphase Token Type: ** INSTALLER ** (saved/cached)  —  Expires: Wed May 27 02:22:03 2026
Enphase Envoy Plugin  [Enphase Envoy-S] Installer token detected — full Envoy API access including power control.
Enphase Envoy Plugin  [Enphase Envoy-S] Envoy polling interval: 900s

Enphase Envoy Plugin  [Envoy S New IQ8HC] Found Full Enphase Envoy Serial Number: 122412014451
Enphase Envoy Plugin  [Envoy S New IQ8HC] Envoy firmware: D8.3.5232
Enphase Envoy Plugin  [Envoy S New IQ8HC] Enphase Token Type: ** INSTALLER ** (saved/cached)  —  Expires: Wed May 27 02:22:22 2026
Enphase Envoy Plugin  [Envoy S New IQ8HC] Installer token detected — full Envoy API access including power control.
Enphase Envoy Plugin  [Envoy S New IQ8HC] Envoy polling interval: 900s
| Log Line | What It Confirms |
|---|---|
Plugin version: 1.8.0 |
Correct version installed |
Found Full Enphase Envoy Serial Number: 12xxxxxxxxxx |
Plugin auto-discovered the serial from /info.xml — no manual entry needed |
Envoy firmware: D8.3.5232 |
Firmware version read from the Envoy |
** INSTALLER ** (saved/cached) |
Installer-level token loaded from a previous session — full API access active |
** OWNER ** (saved/cached) |
Owner token — read-only; power control and DPEL actions will be unavailable |
(newly generated) |
Token was freshly fetched from Enphase cloud this startup |
Envoy polling interval: 900s |
The Envoy's own internal scan cadence (from /ivp/peb/newscan); requires installer token |
Two Envoys? The plugin fully supports multiple
EnphaseEnvoyDevicedevices — each gets its own serial number, firmware, and token logged independently at startup.
