Repository navigation
Claupet Terminal (EN)
English · Español
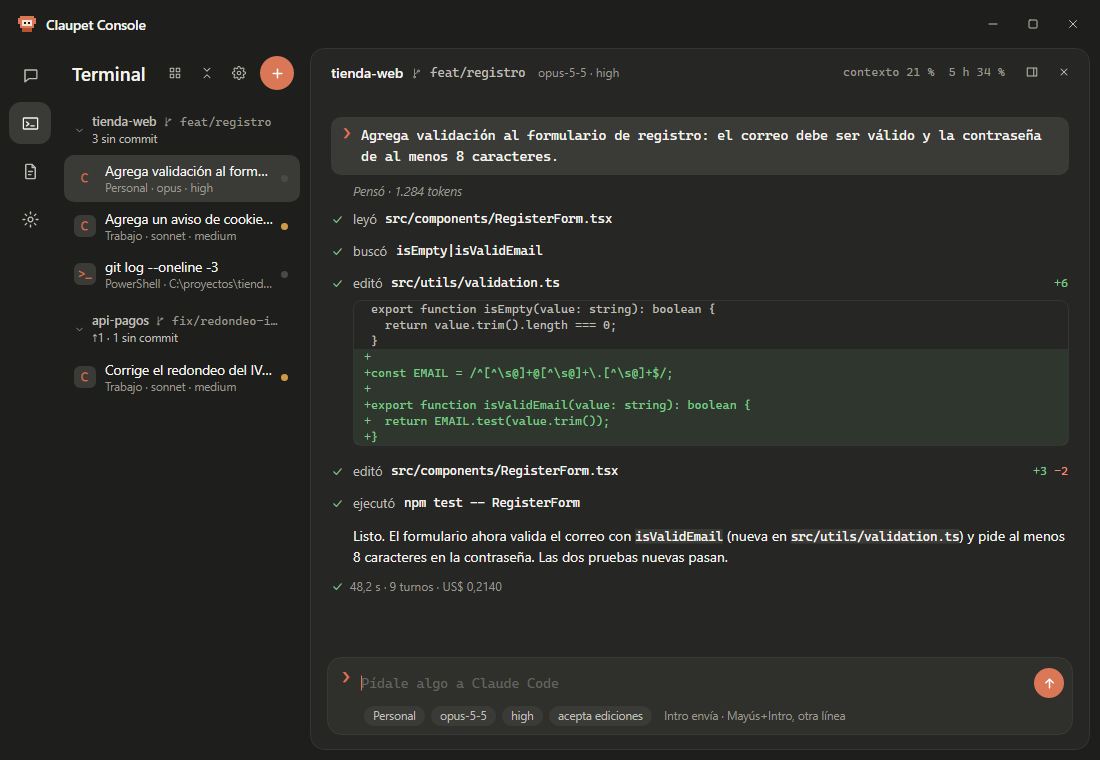
New in 2.5.0. Work with your agents in blocks instead of on a terminal screen: your prompt, what it's thinking, each step with its change, permissions and the end of the turn, all in view.
On this page: What it is · Open a session · The blocks · Permissions and questions · Change model, effort and permissions · Other agents · Shells · Projects · Branches, Changes and Processes · Settings › Terminal · Limits
Claupet Terminal is a view in Claupet Console (the Terminal button on the rail). It opens coding agents and shells in tabs and shows each thing in its own block:
- Claude Code, Codex, Gemini CLI and Copilot CLI: whichever are installed on your computer.
- Shells (Windows): PowerShell, Git Bash and WSL bash, each command with its output.
- Several sessions at once, grouped by project, each with its own account, model, effort and permissions.
-
In Claupet Console, press Terminal on the rail.
-
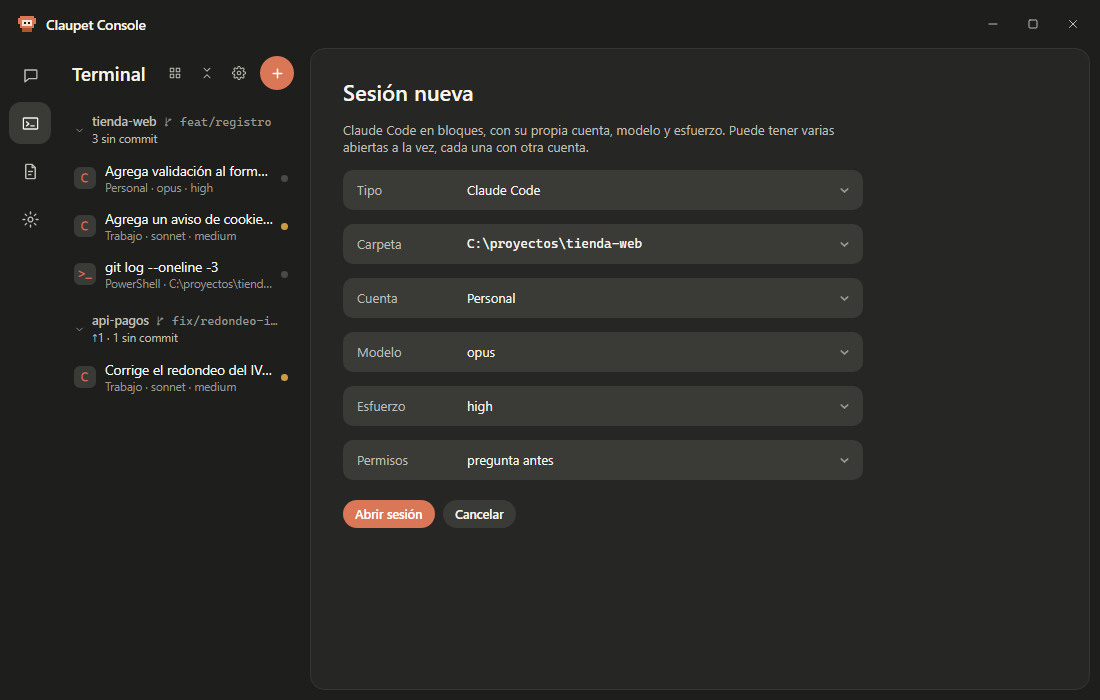
Press the + button (New session), above the list.
-
Fill in the form:
Field What it sets Folder Where the agent works. The list shows linked projects and recent folders first; Choose another folder… opens the picker. Account The Claude Code account for this session (only signed-in ones). Model opus,sonnet,fable,haiku,opusplanand the[1m]variants, or "default model".Effort low,medium,high,xhighormax, or "default effort".Permissions How much it asks before acting (see the table below). Type Claude Code, another installed agent or a shell. -
Press Open session.
Claude Code's Permissions modes:
| Mode | What it does |
|---|---|
| asks first | Asks for permission for whatever needs it (the usual one). |
| accepts edits | Edits files without asking; for anything else, it asks. |
| plans only | Thinks and proposes a plan, without changing anything. |
| automatic | Decides on its own when to ask. |
Tip
You can have several sessions open at once, each with a different account: for example, one with your personal account and another with your work one, in the same project.
Type in the box at the bottom, next to ❯. Enter sends and Shift+Enter adds a new line. While it's working, Interrupt (at the top) stops the turn.
At the top of the session you see the project, its branch, the model and effort, how much of the context it has used ("context 42%") and the account's 5-hour session usage ("5 h 18%").
| Block | What it shows |
|---|---|
| Your prompt | What you wrote, with ❯ in front. |
| Thinking… | While it thinks; when it's done, "Thought · 1,234 tokens". |
| The answer | The text, with code blocks set apart. |
| A step | What it did ("read", "edited", "created", "ran", "searched", "delegated"…) and on what, with lines added and removed (+12 −3). A click opens its diff or what it returned. |
| The task list | ☑ done, ◐ in progress, ☐ pending. |
| A permission or a question | Amber border until you answer. |
| End of turn | ✓ and how long it took, the turns and the cost if the agent reports them; or ✕ with the error. |
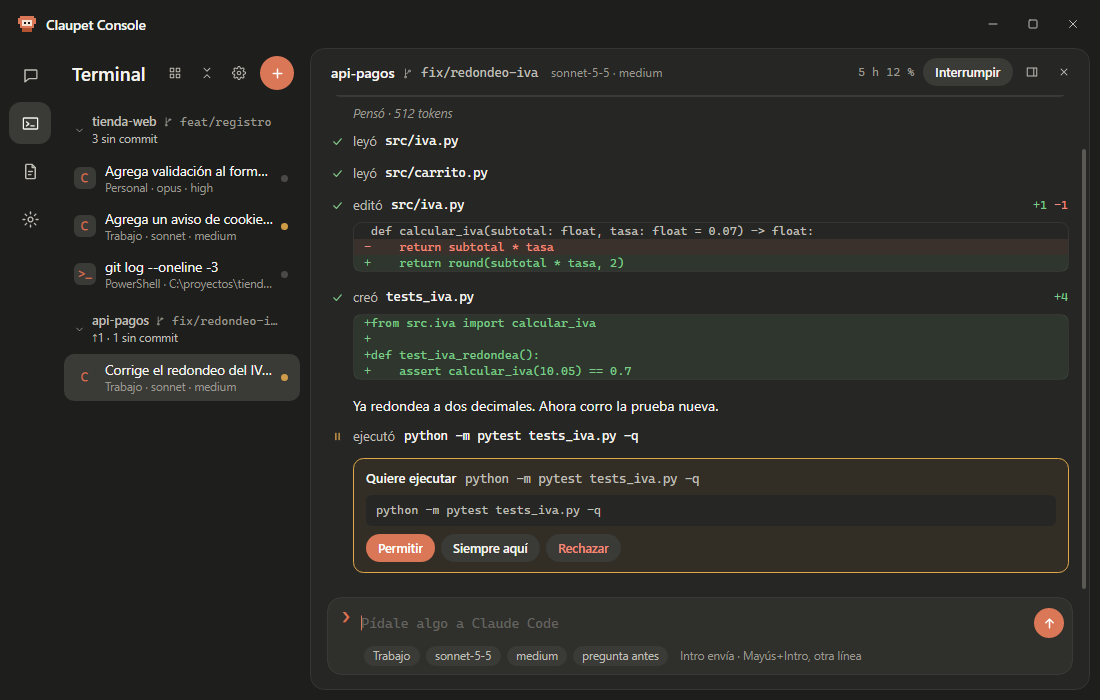
When the agent needs permission, its block says what it wants to do ("Wants to run", "Wants to edit"…), on what, and the beginning of the command or text. Choose:
- Allow: just this once.
- Always here: always allows it in this project (shows up when the agent offers it).
- Reject.
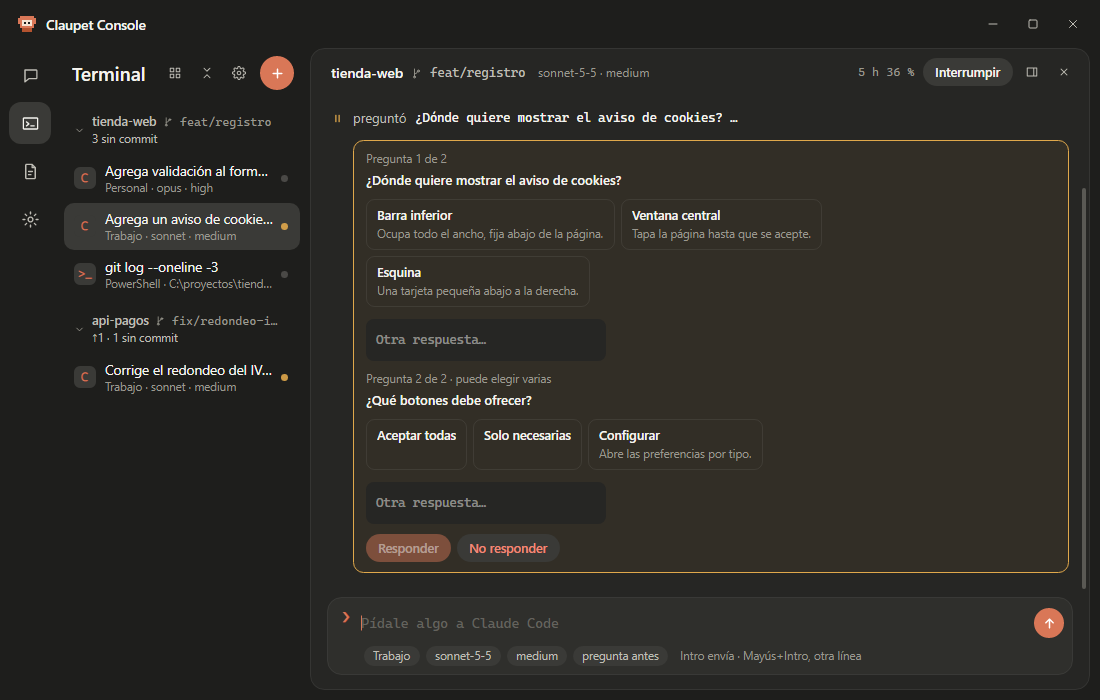
When it asks you something, the block shows each question ("Question 1 of 2") with its options and their explanation. Pick one (or several, if it says "you can pick several"), or type your own in Another answer…, and press Answer. With a single question that takes one choice, the click answers right away. Don't answer declines it.
Tip
On the island too. If the island is on, the permission or question shows up there as well, so you can answer without going back to the Console. The first answer wins: the block then says "Allowed on the island" or "Answered on the island".
In the list on the left, a tab waiting for permission gets an amber dot.
Below the box where you type there are a few chips: the account, the model, the effort and the permissions.
- Tap the chip you want to change.
- Pick another value from the list.
- It applies from the next turn.
The account can't be changed in an open session: for another account, open another session.
If they're installed (and on the PATH), they show up in Type when you open a session. They're shown in
blocks just like Claude Code, with their permissions here and on the island.
- The model, effort and permissions are chosen inside the session, with the chips, from what the agent reports when it opens.
- The tab's badge tells you what it is: C Claude Code, X Codex, G Gemini CLI, P Copilot CLI and >_ a shell.
Each agent has to be signed in. If it isn't, its session tells you, along with the command you need. Run it once in any terminal and then type in the session again:
| Agent | What to run |
|---|---|
| Gemini CLI |
gemini (and follow the steps to sign in) |
| Copilot CLI | copilot login |
| Codex |
codex login, or sign in to the Codex extension in your editor (VS Code, Cursor or Windsurf): if codex isn't on the PATH, Claupet uses the one that ships with that extension |
Note
If an agent doesn't show up or says "… was not found. Is it installed and on the PATH?", install it and check that it opens when you type its name in a terminal.
Windows 10 (1809) or newer only. In Type, choose PowerShell, Git Bash or bash (WSL): Claupet offers the ones it finds on your computer.
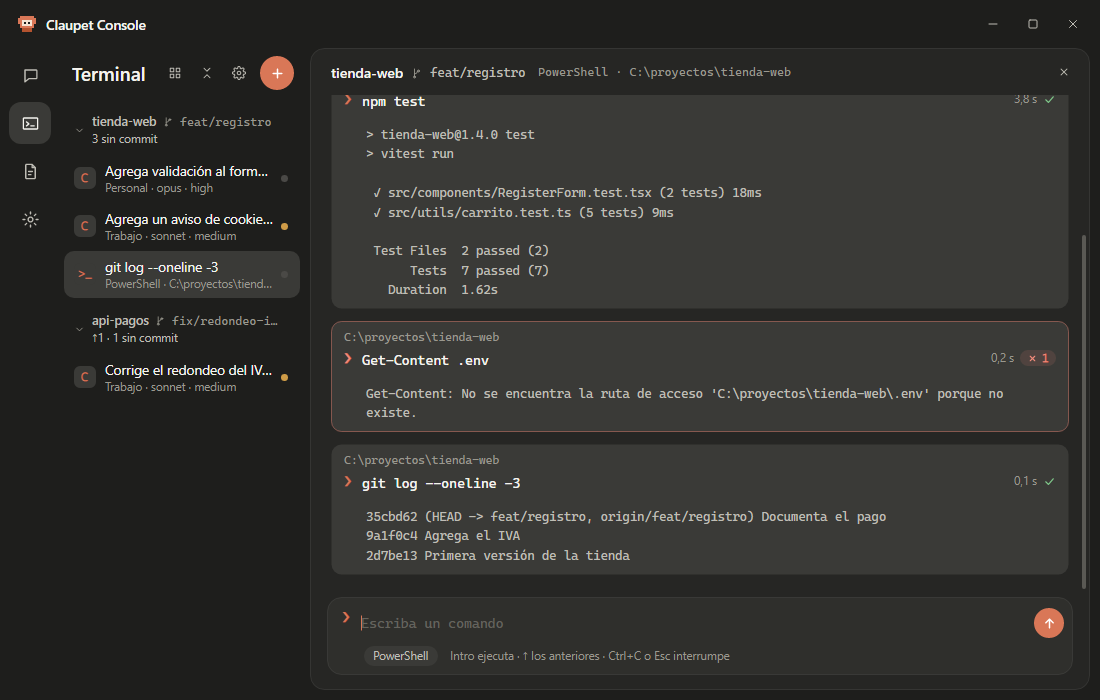
Each command stays in its own block, with its output, how it ended ("Finished fine (code 0)" or "Finished with code 1") and how long it took.
| Key | What it does |
|---|---|
| Enter | Runs the command. |
| ↑ / ↓ | Go through previous commands. |
| Ctrl+C or Esc | Interrupt the one that's running. |
- While a command is running, what you type goes to it (for example, to answer "Continue? [Y/N]").
- Hovering over a block shows Copy and Repeat.
- A block shows the first 30 lines; Show more lines opens the rest. The last 400 are kept.
The list on the left groups tabs by project (the folder). A project is linked automatically when you open a session in its folder.
- Expanded: its branch and the state of the repository (for example, "↑2 · 3 uncommitted"), with its tabs below.
- Collapsed: how many tabs it has and a dot for each one.
- Collapse all projects / Expand all projects: the button at the top of the list.
- The "⋯" menu on each project: New session here, Open the folder and Unlink.
Note
Unlinking only removes the project from the list: it doesn't delete the folder. If it had open sessions, it closes them.
Drag the edge of the list to widen it, and the button at the top switches it to Icons only.
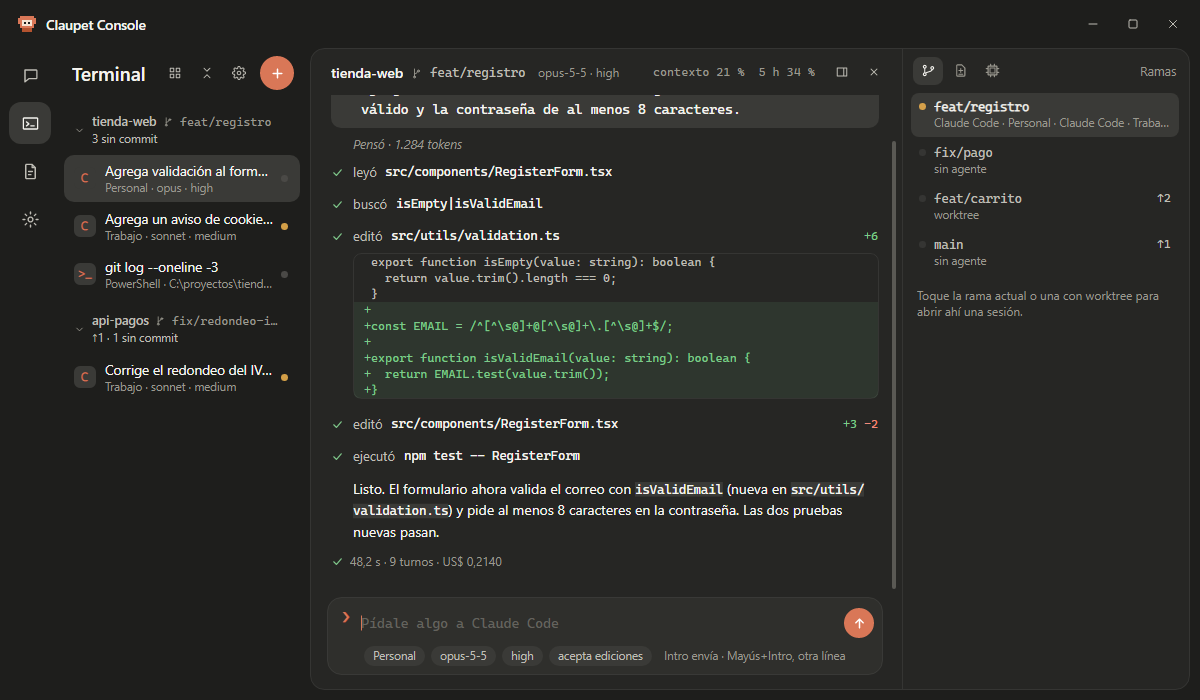
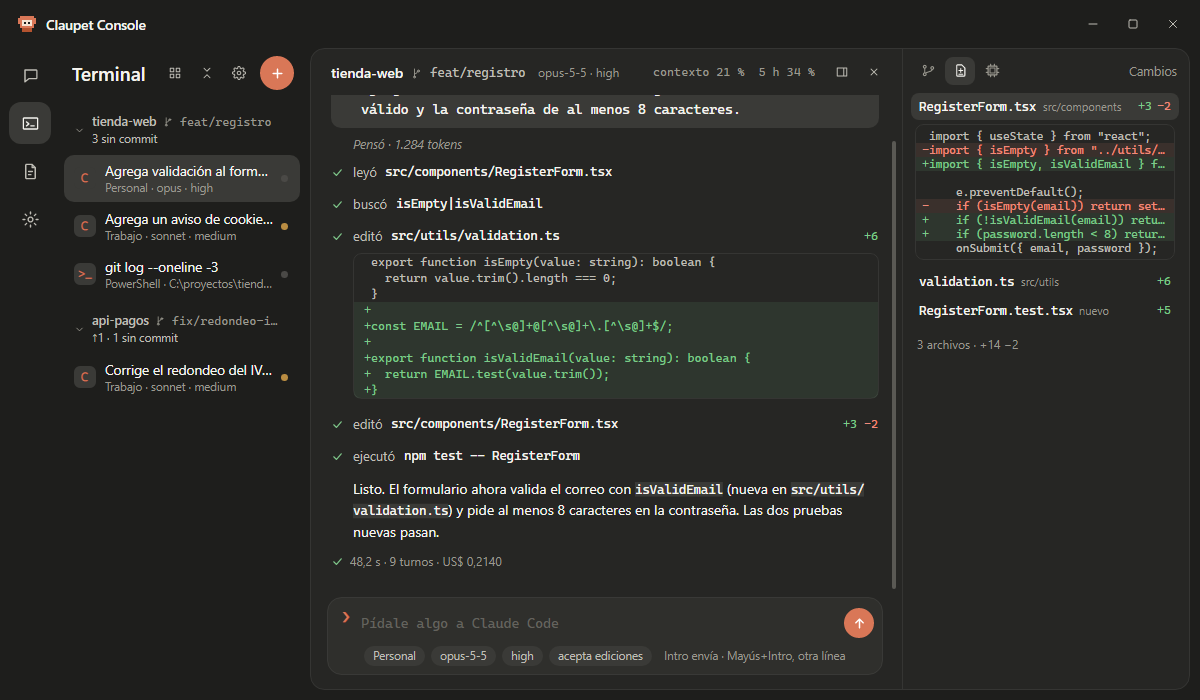
The Branches, changes and processes button, at the top of the session, opens a panel on the right with three tabs:
| Tab | What it shows |
|---|---|
| Branches | The repository's branches, which agent is working on each one, whether it has a worktree, what's left to commit and whether its remote is gone. Tap the current branch or one with a worktree to open a session there. |
| Changes | Uncommitted files with their added and removed lines. Tap one to see its diff. |
| Processes | What each session started, with its memory. Stop ends the process and whatever it started. Refreshes every 3 seconds. |
Note
Branches and Changes need the folder to be a git repository and git to be installed.
How sessions look. Open it with the gear (Terminal settings) at the top of the list, or from Settings › Terminal in the Console. It's saved on this computer and applies to every tab.
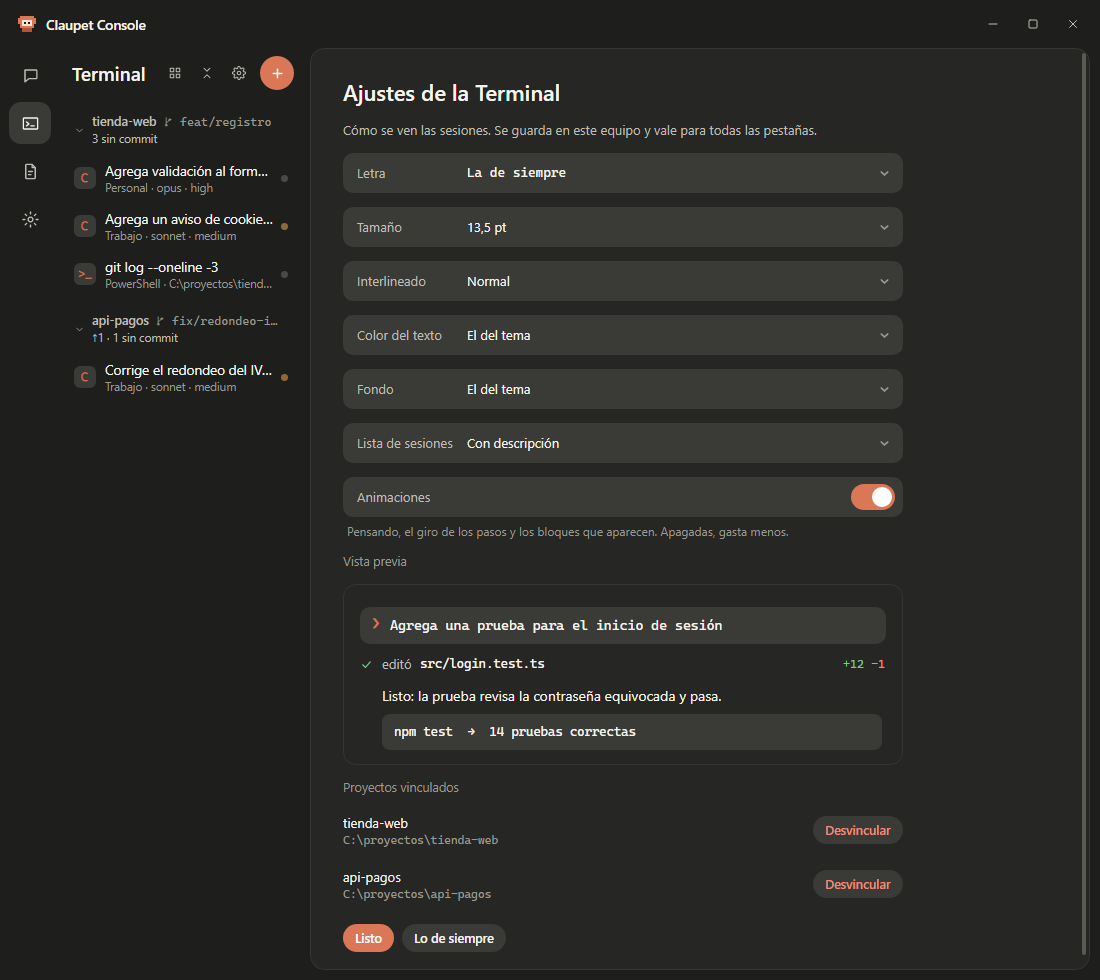
| Option | Values |
|---|---|
| Font | "The usual one" or an installed monospaced font (Cascadia Mono, Consolas, JetBrains Mono, Fira Code…). |
| Size | From 11.5 to 18 pt. |
| Line spacing | Tight, Normal or Wide. |
| Text color | The theme's, Amber, Green or Ice. |
| Background | The theme's, Deeper or Console black. |
| Session list | With description or Icons only. |
| Animations | "Thinking", the spinning steps and blocks fading in. Turned off, it uses less. |
Below, a Preview and the Linked projects, each with Unlink. Defaults goes back to the original values.
- Closing Claupet Console closes every Terminal session: no agent is left running.
- Shells in blocks don't exist yet on macOS or Linux, and they don't work for full-screen programs like
vimorhtop. - The other agents need to be installed and signed in.