Repository navigation
08. Guiding
Overview. Every control on this screen has detailed built-in help: hover it, press F1, or click the ? beside the title. See Built-in Help.
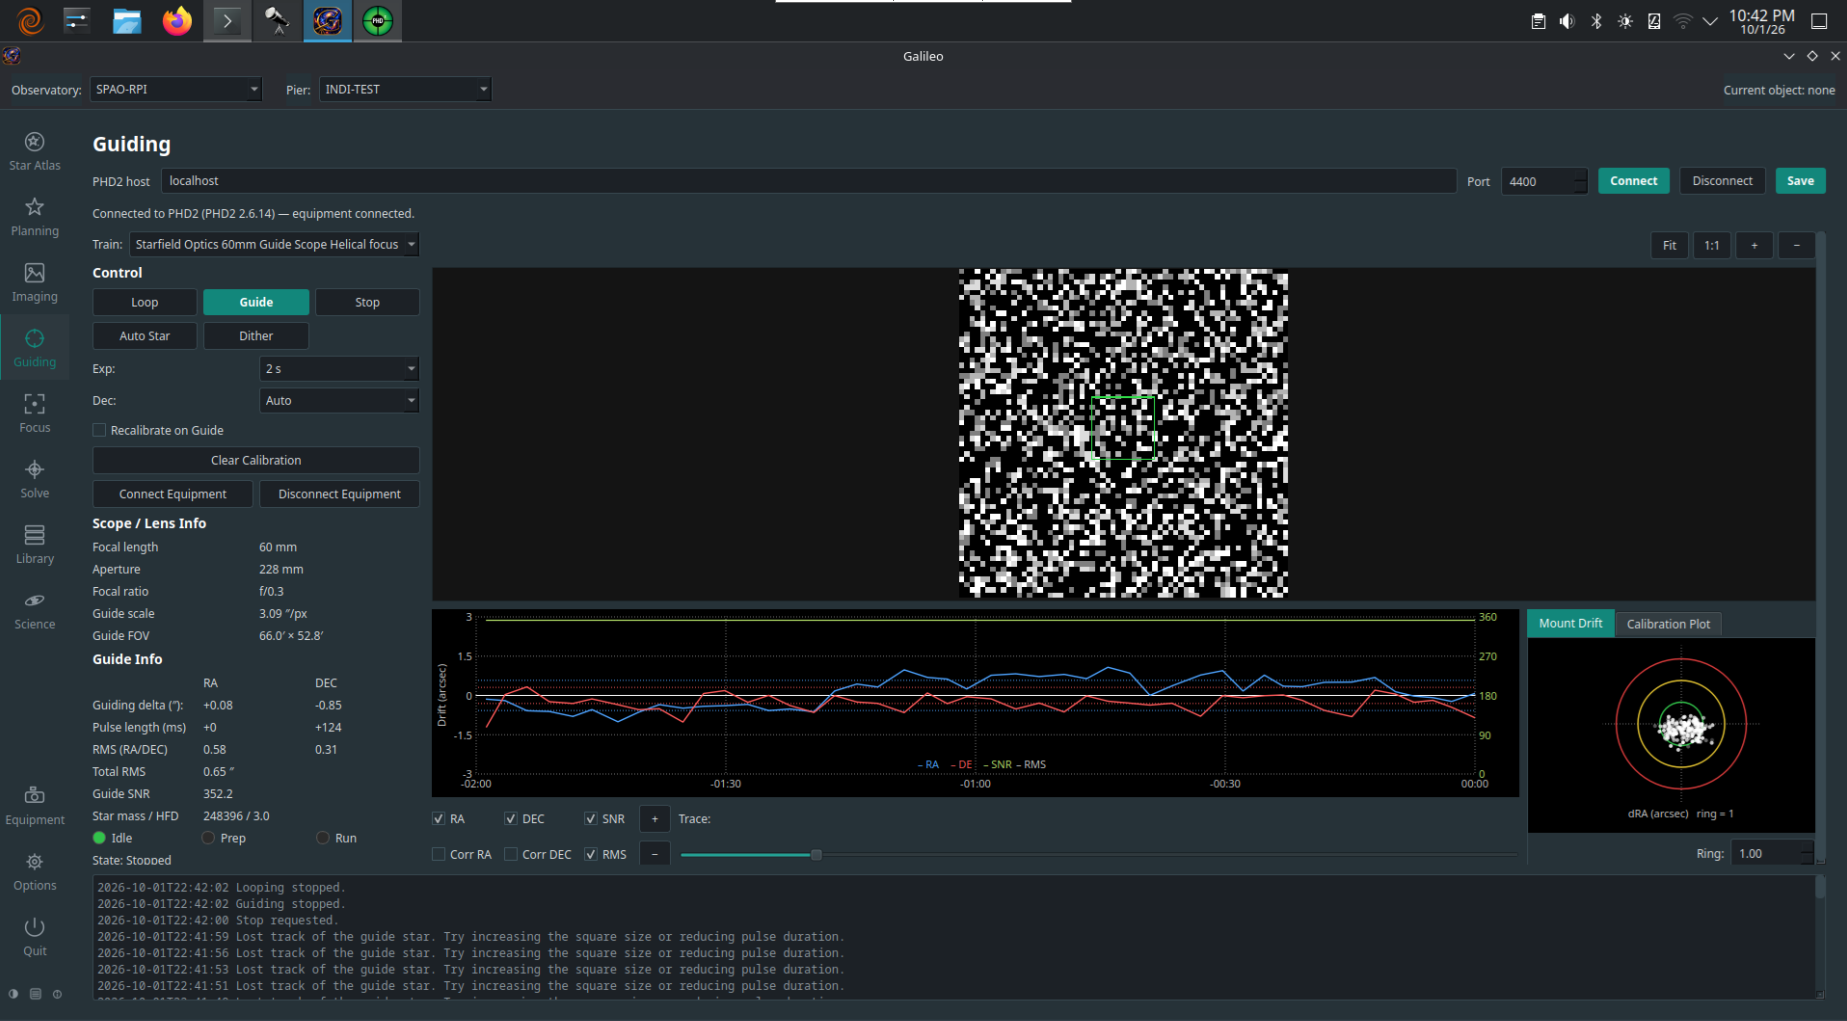
The Guiding screen connects to a running PHD2 instance and shows its live state: guide-star image, guide graph, drift and calibration plots, and statistics. All guiding logic runs inside PHD2; Galileo is a display and control front-end.
- PHD2 must be installed and running on your network (it can be on the same machine as Galileo or a different one).
- PHD2's server must be enabled (in PHD2: Tools > Enable Server). The default port is 4400.
- A guide camera and mount must be configured and connected inside PHD2 before starting a guide loop from Galileo.
- Open Guiding in the sidebar.
- Enter the Host (IP address or hostname of the machine running PHD2) and Port (default 4400).
- Click Connect. Galileo opens a socket connection to PHD2's server. The status bar confirms the connection.
The connection is remembered for the selected Pier. If PHD2 is on the same machine, use localhost.
| Control | Effect |
|---|---|
| Loop | PHD2 takes repeating guide exposures without guiding, so you can see the star and adjust focus or exposure |
| Guide | Start guiding (calibrating first if Recalibrate on Guide is ticked) |
| Stop | Stop looping or guiding |
| Auto Star | Ask PHD2 to pick the best guide star |
| Dither | Shift the guide position a small random amount so noise does not line up between frames |
| Exp, Dec | The guide exposure, and which Dec corrections may be sent (Off, Auto, North, South) |
| Clear Calibration | Discard PHD2's calibration so it is redone — after changing guide scope, camera angle or mount |
| Connect / Disconnect Equipment | Tell PHD2 to connect or disconnect its own camera and mount |
The guide camera's current frame is shown as it arrives from PHD2. A green box marks the guide star's lock position; a red cross marks where PHD2 is currently measuring it. The difference between the two is the guide error.
The guide graph plots RA and Dec guide error (in arcseconds) over time. Green is RA (right ascension) and blue is Dec (declination). The horizontal axis is time (most recent at the right); the vertical axis is error magnitude. A flat line centred on zero is perfect guiding.
Use this to tune PHD2's aggressiveness and minimum move settings — excessive correction shows as fast oscillation; insufficient correction shows as a slow drift.
The drift plot shows the cumulative offset of the guide star from its lock position. A large drift across the night may indicate polar alignment error (predominant in Dec) or periodic error (predominant in RA).
The calibration plot is only available after PHD2 has run a calibration step. It shows the measured RA and Dec response vectors used to compute correction magnitudes. A healthy calibration shows two roughly orthogonal lines; a skewed or short line suggests a mount response problem.
| Statistic | Meaning |
|---|---|
| RMS RA / Dec | Root-mean-square guide error in arcseconds for each axis |
| Total RMS | Combined RMS error |
| Peak RA / Dec | Worst-case single-frame error per axis |
| SNR | Signal-to-noise ratio of the guide star — below ~10 is unreliable |
| State | PHD2's current state (Idle, Looping, Guiding, Calibrating, …) |
Click Dither to move the guide-star lock position by a random small amount. This offsets the imaging frame slightly each time, so fixed-pattern noise (hot pixels, column defects) averages out when frames are stacked.
For automated dithering between every N frames, add a dither step to your Session blocks in Planning > Sessions. The sequencer calls PHD2's dither command and waits for settling before the next exposure.
How far a dither moves the star, whether it moves in RA only, and how PHD2 decides the star has settled again are set under Options > Guiding (every control has built-in help). They apply to the Guide and Dither buttons and to session dithers alike.