Audio and Video
RigControl Web supports two-way audio (transmit and receive) and a live video feed of your radio's front panel. These are now surfaced as two separate panels — Audio Feed and Video Feed — each with its own settings modal. You can place them independently in your layout, and the Audio Feed panel is useful even on rigs that have no video output.
The Audio Feed panel is a slim control strip. It has no expandable body — all of its controls live in the panel header:
- Join Audio button — appears when a backend audio session is running but you have not yet connected your local devices to it.
- Inbound mute (headphone icon) — mutes received audio in your local speakers; the radio keeps receiving.
- Outbound mute (microphone icon) — mutes your local mic so your voice is not sent to the radio even if you key PTT.
- Gear icon — opens Audio Settings.
The Audio Waterfall panel draws a spectrum line and scrolling waterfall from the received audio itself, so it works with any radio and needs no spectrum hardware. Add it with Add Panel (choose its height and whether it spans the full width). It requires inbound audio to be playing. Its gear icon opens Audio Waterfall Settings:
| Setting | What it does |
|---|---|
| Waterfall Style | Live scrolls quickly with fast time response. WSJT-X mimics WSJT-X's default Wide Graph for FT8 (4 bins/pixel, 2-frame averaging, flatten on) and scrolls about 6 rows per second, so it looks familiar next to WSJT-X and suits FT8 decoding. |
| Display Bandwidth | Audio bandwidth shown. Auto follows your mode's filter width (doubled in CW). |
| Color Map | Waterfall color scheme. |
| Noise Floor / Ceiling | Display contrast in dBFS. Tick Auto Floor / Auto Ceiling to track the signal automatically, and use Reset Auto-Scale to re-converge. |
The waterfall keeps drawing when your speaker is muted. Settings are saved in your browser.
Click the gear icon in the Audio Feed panel header to open Audio Settings. This is where you configure your microphone, speakers, volume, and the backend audio engine.
The audio system lets you speak into your microphone and hear received audio through your speakers — just like operating from the shack, even when you are accessing the app remotely. Audio uses the Opus codec, which provides good voice quality at low bandwidth.
This is the most important concept in the audio setup. RigControl Web has two separate audio configurations, and it is critical to understand what each one does:
Backend Audio Engine (Server Side)
This is the audio hardware physically connected to your radio on your shack computer — for example, a Digirig, a USB audio interface, or your radio's built-in USB audio device. The backend audio engine runs on the server and is always tied to the hardware in your shack, regardless of where you are connecting from.
- Backend Input (Mic/Line) — the audio coming from your radio into the computer (receive audio)
- Backend Output (Speakers) — the audio going to your radio from the computer (transmit audio)
Local Client Audio (Your System)
This is the microphone and speakers on whatever device you are using to access the app — your shack desktop, your laptop at a hotel, your phone in the other room. These are the devices you will actually speak into and listen through.
- Local Input (Microphone) — your mic; what you speak into to transmit
- Local Output (Speakers/Headphones) — your speakers or headphones; where you hear received audio
Think of it this way: backend audio = the radio's end; local audio = your end.
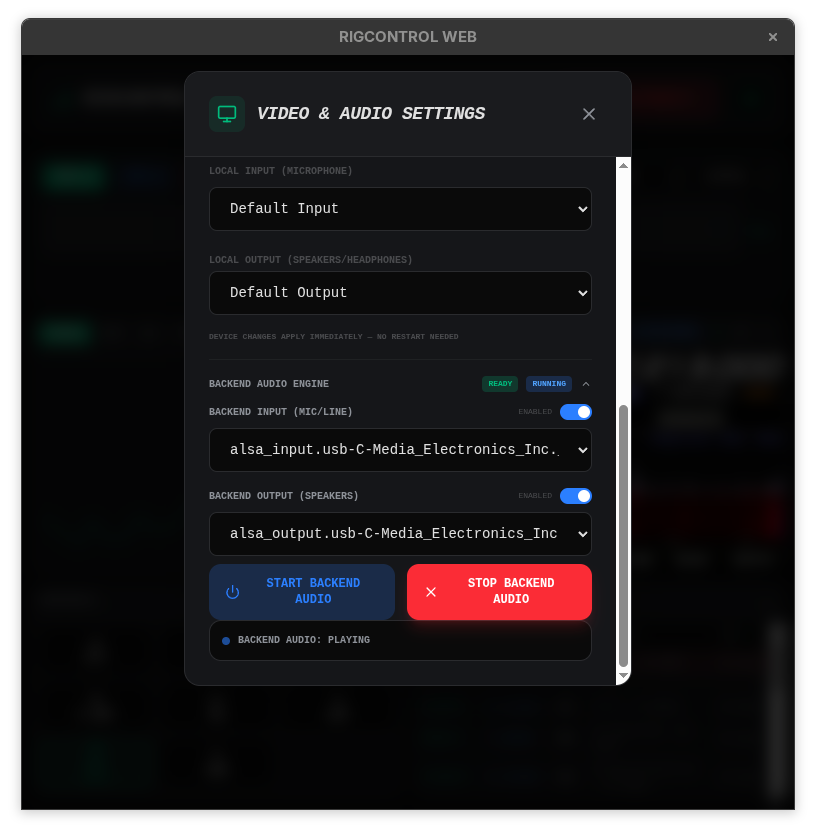
- Open Audio Settings (gear icon in the Audio Feed panel header).
- Under Local Client Audio (Your System), select your microphone from the Local Input (Microphone) dropdown and your speakers or headphones from the Local Output (Speakers/Headphones) dropdown.
- Use the Local Speaker Volume slider (directly below the Local Output dropdown) to set the playback volume for received audio.
- These settings are saved in your browser and apply only to your device — a different device connecting to the same server will have its own local audio settings.
Browser permission: The first time you use audio, your browser will ask for permission to access your microphone. You must allow this for transmit audio to work. If your microphone devices show without names (just "Input 1", etc.), click Request Permission next to the dropdown to prompt the browser permission dialog.
Device changes apply immediately — you do not need to stop and restart audio when switching local devices or adjusting the speaker volume.
Under Local Client Audio, the Audio Enhancements (AGC / Noise Suppression / Echo Cancellation) toggle controls whether your browser applies voice-oriented processing — automatic gain control, noise suppression, and echo cancellation — to your microphone before it's sent to the radio. It is on by default, which is usually what you want for SSB voice contacts.
Turn it off if you're sending audio that isn't speech and don't want it processed — for example, an external CW sidetone or a tone source fed into your mic input — since this DSP is tuned for voice and can distort or suppress non-voice audio. The app already forces this off automatically for the duration of a WSJTX/Digital Mode Bridge session (see WSJTX Integration), since AGC/noise suppression/echo cancellation would otherwise mangle FT8/PSK/other digital-mode tones — but you can still flip it manually during that session if needed.
Windows note: turning enhancements on tags the browser's audio session as "communications," which can trigger Windows' Sound Settings → Communications ducking of other apps' or tabs' audio while you're transmitting. This is expected Windows behavior, not a bug.
The backend audio settings are configured once on the server (the shack computer). They do not need to be changed when connecting from a different device.
- Open Audio Settings (gear icon in the Audio Feed panel header).
- Scroll down to the Backend Audio Engine section. It shows a READY or FAILED status badge indicating whether the audio hardware initialized correctly.
Linux: device list empty or status shows FAILED? On most Linux distributions, access to sound devices (
/dev/snd/*) is restricted to users in theaudiogroup. If the Backend Audio Engine shows FAILED, or the Backend Input/Output dropdowns are empty, add your user to that group:sudo usermod -aG audio $USERLog out and back in (or reboot) for the new group membership to take effect, then reopen Audio Settings.
- Select the audio device connected to your radio under Backend Input (Mic/Line) (receive audio from the radio). Use the toggle switch next to the label to enable or disable this direction.
- Select the audio device connected to your radio under Backend Output (Speakers) (transmit audio to the radio). Use its toggle switch to enable or disable it.
- Click Start Backend Audio to start the audio engine. The status will change to RUNNING.
- Click Stop Backend Audio to stop it.
Choosing the right device on Windows: The device list shows the host API (DirectSound, WASAPI) alongside the device name. MME and WDM-KS entries are hidden — MME's latency is too high and WDM-KS offers no benefit here. For most radios, DirectSound works reliably. If using WASAPI, the device must be configured to 48 kHz in Windows Sound settings — an incompatible WASAPI device will be shown as disabled in the list.
Enabling/Disabling directions: You can run inbound-only (receive audio only) or outbound-only (transmit audio only) if your setup requires it. Use the Enabled toggles next to each device selector.
If your radio supports remote power on/off, powering it off can make its USB Audio interface disappear from the operating system entirely — not just go silent — if the audio interface shares the same USB device as the radio's CAT/serial control (this is the case on radios like the Yaesu FT-710). RigControl Web watches for the backend audio device to come back and automatically restarts the backend audio engine a couple of seconds after the radio reports it has powered back on.
On Linux systems running PipeWire, this reappearance is not always clean:
- The instant the radio's USB Audio device disappears, PipeWire re-targets its default ALSA/PulseAudio sink and source to whatever device is next available.
- When the radio's USB Audio device comes back online after power-on, PipeWire does not automatically switch its default back to it — the default stays pointed at whatever it fell back to.
- If your Backend Input/Backend Output selection in RigControl Web resolves through that system "default" device rather than a device pinned to the radio's specific hardware, backend audio into and out of RigControl Web will remain broken after every power cycle until the default is reassigned back to the radio.
The steps below are written against the Yaesu FT-710, the radio this was developed and validated against — including a full power-off/power-on cycle of the real radio while RigControl Web was running. The technique itself is generic and not FT-710-specific: it applies to any radio, or any USB audio device, where you want Backend Input/Output to survive PipeWire's default-device drift after a reconnect, and/or where the device needs a specific sample rate it doesn't otherwise negotiate correctly on its own. Substitute your own device's vendor/product ID, node names, and required sample rate throughout.
Instead of relying on PipeWire's dynamic "default" sink/source — which can silently drift to the wrong device after any USB reconnect — pin RigControl Web's Backend Input/Output directly to the radio's specific PipeWire node by name. This bypasses default-device selection entirely, so it is unaffected by whatever PipeWire currently considers "default."
1. Identify the device
With the radio connected and powered on:
wpctl statusFind your radio's audio interface under Audio → Devices. Note that many radios present themselves as a generic-sounding device rather than under the radio's brand name — the FT-710, for example, shows up as a plain "USB Audio Device" backed by a C-Media USB audio codec chip. Note its device ID, then look up its vendor/product ID and its sink/source node names:
wpctl inspect <device-id> | grep -E "vendor.id|product.id"
wpctl inspect <sink-id> | grep node.name
wpctl inspect <source-id> | grep node.name
2. Pin the sample rate, if your device needs one
Skip this step if your device already negotiates a correct, stable rate on its own. Some radios' USB audio interfaces have a real hardware/firmware limitation that only manifests at their advertised default rate. The FT-710 is one example: it advertises 48 kHz support in its USB descriptors, but has a clocking bug that causes the device to drop in and out of the OS roughly once a second when actually driven at 48 kHz — 44.1 kHz is stable.
If your device needs a specific rate, the permanent global clock-rate override below is the one that actually matters — testing confirmed it is sufficient on its own (20+ seconds of stable operation, correct rate negotiated directly on the hardware node, and a working audio link), with no per-device rule present at all. A per-device rate pin alone, with no global override in place, is not sufficient — tested separately, it produced the FT-710's known once-a-second dropout.
-
Permanent global clock-rate override (required). Add
~/.config/pipewire/pipewire.conf.d/44100-rate.conf:context.properties = { default.clock.rate = 44100 }A temporary, session-only equivalent exists (
pw-metadata -n settings 0 clock.force-rate 44100), but it does not survive a WirePlumber/PipeWire restart or a reboot — it is only useful for a quick test. Use the permanent config file above so the fix actually persists; this was confirmed the hard way during testing, when a WirePlumber restart silently dropped a rate that had only been set via the temporary command, and the FT-710 promptly started dropping out again.Exact paths can vary by distribution — consult your distro's PipeWire/WirePlumber documentation if these drop-in locations don't apply to your setup.
-
Per-device rate pin (optional). The global override above changes the rate for your entire PipeWire graph, which is fine for a dedicated shack computer but may be unwelcome if the same machine is also used for other audio at a different rate. If you'd rather scope the rate change to just the radio's device, add a WirePlumber rule matched by vendor/product ID, e.g.
~/.config/wireplumber/wireplumber.conf.d/51-fixed-rate.conf:monitor.alsa.rules = [ { matches = [ { device.vendor.id = "0x0d8c", device.product.id = "0x0013" } ] actions = { update-props = { audio.rate = 44100 } } } ](substitute your own device's vendor/product ID —
0x0d8c/0x0013above is the FT-710's C-Media codec). This was tested alongside the global override above and made no observable difference to stability — the global override alone already fully resolves the dropout. It's included here only as a documented option for isolating the rate change if you need to, not because it's required.
3. Pin RigControl Web's Backend Input/Output to the exact node
Create (or add to) ~/.config/alsa/asoundrc. Verify this is the path your system's ALSA config actually loads — check the @hooks section of /usr/share/alsa/alsa.conf; some systems load ~/.config/alsa/asound.conf or plain ~/.asoundrc instead.
pcm.ft710_out {
    type pipewire
    playback_node "alsa_output.usb-C-Media_Electronics_Inc._USB_Audio_Device-00.analog-stereo"
    hint {
        show on
        description "FT-710 (pinned, 44.1k)"
    }
}
ctl.ft710_out { type pipewire }

pcm.ft710_in {
    type pipewire
    capture_node "alsa_input.usb-C-Media_Electronics_Inc._USB_Audio_Device-00.mono-fallback"
    hint {
        show on
        description "FT-710 (pinned, 44.1k)"
    }
}
ctl.ft710_in { type pipewire }
Use the exact node.name values from Step 1's wpctl inspect output for your own device — the strings above are the FT-710's and will not match a different radio or a different machine. playback_node/capture_node bind this PCM directly to that one hardware node, bypassing PipeWire's "default" indirection entirely regardless of what PipeWire currently considers default. The hint block gives the device a friendly label in RigControl Web's device dropdown; name the pcm/ctl blocks and the description after your own device if it isn't an FT-710.
4. Reload and verify
systemctl --user restart wireplumber pipewire pipewire-pulse
aplay -L | grep -A1 ft710
arecord -L | grep -A1 ft710
Both should list your new pinned device with the friendly description from the hint block.
5. Select the pinned device in RigControl Web
Open Audio Settings and select your new pinned device (e.g. FT-710 (pinned, 44.1k)) for both Backend Input and Backend Output. RigControl Web resolves the saved Backend Input/Output selection by device name, not by its numeric position in the device list, so this selection stays correct even if the set of available audio devices changes later — custom PipeWire PCMs like these are not guaranteed a stable numeric position between restarts.
This setup was validated end-to-end against a real FT-710, including an actual radio power-off/power-on cycle: the radio's USB audio interface disappeared and reappeared, and backend audio recovered automatically with no manual PipeWire reassignment required.
If you would rather not edit config files, you can rely on PipeWire's default device instead, at the cost of the reconnection caveat described at the top of this section.
- If your device needs a specific sample rate, force PipeWire's global clock rate — for a one-off test,
pw-metadata -n settings 0 clock.force-rate 44100(session-only; does not survive a restart); for anything durable, use the permanent config file from Step 2 above. - In Audio Settings, select the device labeled
pipewire [ALSA, 44.1k](or whatever rate is shown) for both Backend Input and Backend Output — RigControl Web's device list shows the sample rate PipeWire reports at enumeration time in brackets after the host API name. - After every radio power cycle, check
wpctl status(or a graphical mixer such aspavucontrolorqpwgraph) to confirm PipeWire's default sink/source is still pointed at the radio, and reassign it manually if it fell back to another device.
Once the backend audio engine is running, the Join Audio button appears in the Audio Feed panel header on the main screen.
- Join Audio — Connects your browser session to the running audio stream. You will hear received audio through your local output device, and your local microphone will be available for transmitting. You must join audio before the mute buttons or PTT audio will work.
If the backend audio engine is not started yet, you will not see the Join Audio button. Start the backend audio engine first (in Audio Settings), then join from the main screen.
Once you have joined audio, two mute buttons appear in the Audio Feed panel header:
- Inbound mute (headphone icon) — Mutes received audio so you do not hear it through your local speakers. The radio continues receiving; you just will not hear it.
- Outbound mute (microphone icon) — Mutes your microphone so your voice is not sent to the radio even if you key PTT.
The Local Speaker Volume slider is found in Audio Settings under the Local Output (Speakers/Headphones) dropdown.
- 0% — silence (equivalent to mute, but continuous rather than a toggle)
- 100% — unity gain: audio plays at your system volume level with no modification
- 101–200% — amplification beyond system volume; useful when your OS volume is already at maximum and the received audio is still too quiet
The slider adjusts volume in real time with no need to stop or restart audio. Your setting is saved in the browser and restored automatically on your next visit.
Multiple people can connect to the same RigControl Web server at the same time, and all of them can hear received audio simultaneously. However, only one client at a time can transmit. If another client's microphone is active, a warning will appear in the audio settings. Unmuting your own microphone (or pressing PTT) will transfer the transmit session to you.
The Video Feed panel displays a live stream of your radio's front panel. A common setup is to connect your radio's DVI or HDMI output to a USB HDMI capture card plugged into your shack computer. The panel shows the stream when active and a "Stopped" placeholder when it is not.
The gear icon in the Video Feed panel header opens Video Settings.
Click the gear icon in the Video Feed panel header to open Video Settings.
Video lets you see your radio's front panel display on screen, which is especially useful when operating remotely.
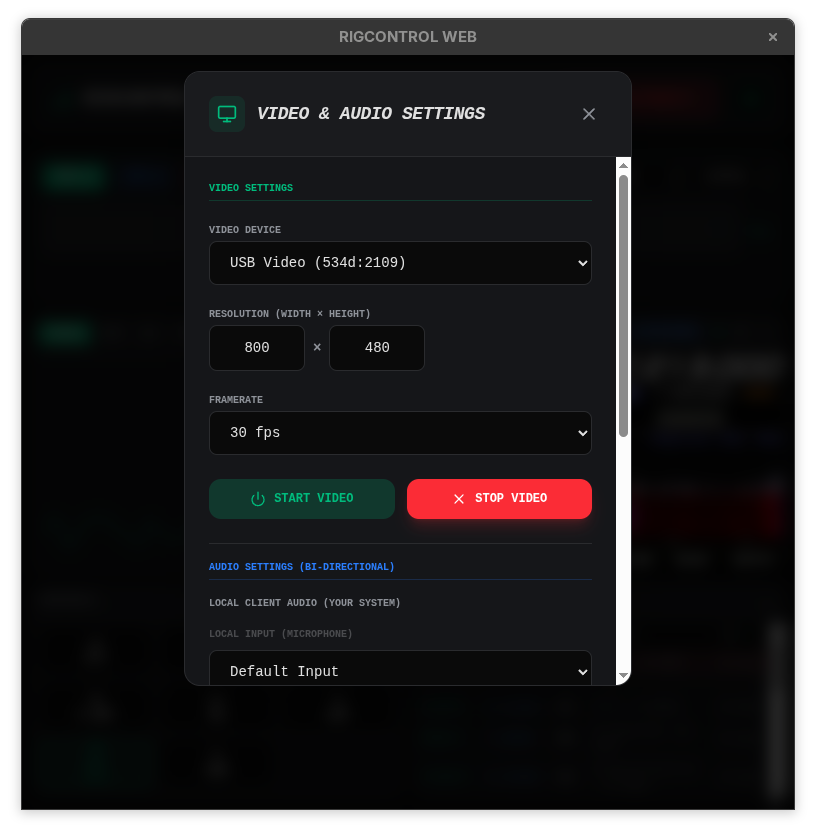
- Open Video Settings (gear icon in the Video Feed panel header).
- Under Video Device, select your capture device from the dropdown. If you do not see your device, make sure it is connected and recognized by your operating system.
Linux: device not listed? On most Linux distributions, access to
/dev/video*devices is restricted to users in thevideogroup. If your capture card does not appear in the Video Device dropdown, add your user to that group:sudo usermod -aG video $USERLog out and back in (or reboot) for the new group membership to take effect, then reopen Video Settings.
- Set the Resolution — width × height in pixels. Match this to what your capture card supports, or start with
640 × 480and adjust if needed. - Choose a Framerate. Lower framerates (5–10 fps) use less bandwidth and are fine for watching a radio display. Higher framerates (24–30 fps) look smoother but use more resources.
- Click Start Video. The feed will appear in the Video Feed panel on the main screen.
- Click Stop Video to stop the feed.
The video feed is served from the server computer. Any client connected to RigControl Web will see the same video stream.