Setting Up rigctld
Before RigControl Web can talk to your radio, it needs a program called rigctld running in the background. Think of rigctld as a translator — it speaks your radio's language over the USB or serial cable, and lets RigControl Web (and any other Hamlib-compatible logging software) talk to it over a simple network connection on your computer.
This page walks you through configuring and starting rigctld from inside the app.
Click the gear icon (⚙) in the top-right corner of the app to open General Settings. The settings panel has two tabs: RIGCTLD and CW. Make sure you are on the RIGCTLD tab.
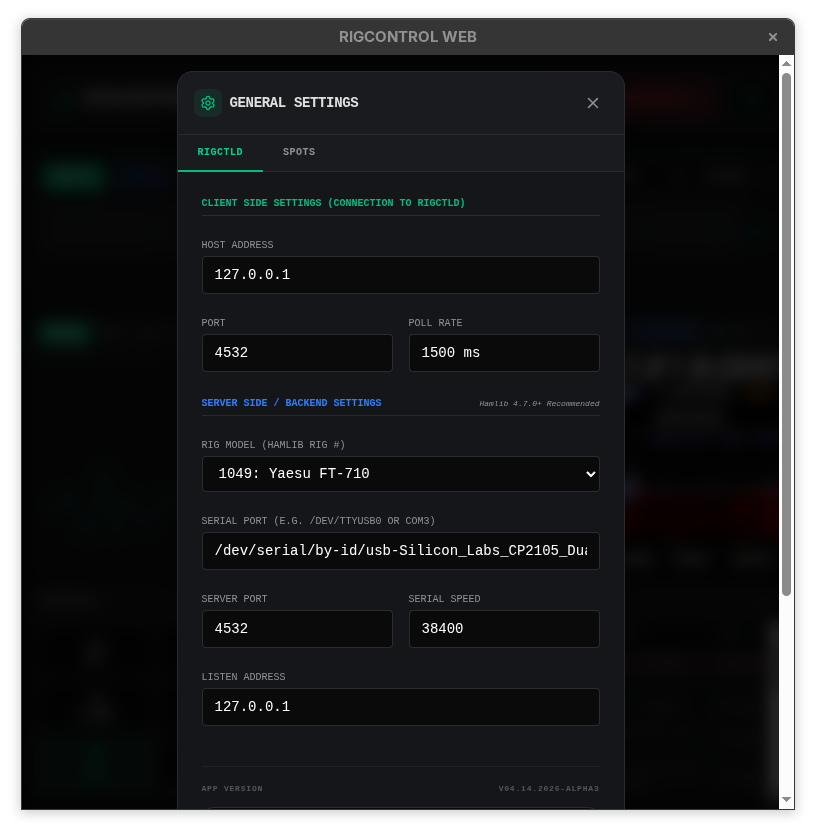
The RIGCTLD tab is divided into two sections with different background colors:
-
Client Side Settings (green heading) — These control how the app connects to
rigctld. In almost all cases you can leave these at their defaults. -
Server Side / Backend Settings (blue heading) — These control how
rigctldconnects to your radio. You will need to fill these in for your specific radio and computer.
These settings tell the app where to find the running rigctld process.
| Field | What it does | Default |
|---|---|---|
| Host Address | The address where rigctld is running. Use 127.0.0.1 if it's on the same computer as the app. |
127.0.0.1 |
| Port | The network port rigctld listens on. |
4532 |
| Poll Rate | How often the app asks the radio for its current frequency, mode, and meter readings. Lower values feel more responsive but put more load on the radio's serial connection. 1000–1500 ms is a good starting point for most radios. | 1500 ms |
Note for advanced users: If you are running
rigctldon a separate computer (for example, a headless server in your shack), enter that computer's IP address in the Host Address field here.
These settings are passed directly to rigctld when the app starts it. You must configure these correctly for your radio.
| Field | What it does | Example |
|---|---|---|
| Rig Model | Your radio's Hamlib model number. Use the dropdown to search by manufacturer and model name. | 1049: Yaesu FT-710 |
| Serial Port | The serial or USB port your radio's CAT cable is connected to. Click the field to see serial devices detected on the machine running RigControl Web, or type a path manually. On Linux this looks like /dev/ttyUSB0 or /dev/serial/by-id/.... On Windows it looks like COM3. |
/dev/ttyUSB0 |
| Server Port | The port rigctld will listen on. Should match the Port in Client Side Settings above. |
4532 |
| Serial Speed | The baud rate (communication speed) for your radio's CAT connection. Check your radio's manual for the correct value. Common values are 9600, 19200, and 38400. |
38400 |
| Listen Address | The network address rigctld will accept connections from. Leave this at 127.0.0.1 for local use only. To accept connections from other computers on your network, change this to 0.0.0.0. |
127.0.0.1 |
Serial Port is an autocomplete field, not a strict dropdown. Clicking it queries the RigControl Web server (not your browser) for currently-attached serial devices and lists them as suggestions — on Linux it prefers the stable
/dev/serial/by-id/...name over/dev/ttyUSB0, since the latter can shift if you have other USB devices connected. You can still type any path by hand; this matters if you're running the browser on a different computer than the server (see Headless Deployment) or if your device isn't detected for some reason.
Linux: permission denied / error opening port? Serial devices (
/dev/ttyUSB*,/dev/ttyACM*) are owned by thedialoutgroup on most distributions. Ifrigctldfails to open the port, add your user to that group:sudo usermod -aG dialout $USERLog out and back in (or reboot) for the new group membership to take effect. This same permission is also required for the CW keyer's DTR/RTS line if you use it.
Can't find your port in the list, or want to double-check on Windows? Open Device Manager and look under "Ports (COM & LPT)" with your radio connected.
Once your settings are filled in, scroll down to the bottom of the RIGCTLD tab. You will see a status bar with Test, Start, and Stop buttons.
-
Test — Checks whether
rigctldcan be found on your system and verifies your settings without actually starting it. Run this first if you are unsure. A "Test Passed" message means everything looks good. -
Start — Starts
rigctldwith your settings. The status indicator will turn green and show RUNNING when it is up. -
Stop — Stops the running
rigctldprocess.
Auto-start: RigControl Web remembers whether
rigctldwas running when you last closed the app. If it was running, it will start it automatically next time you launch. If you stopped it before closing, it will not auto-start.
Below the Start/Stop controls is a Process Logs panel. This shows the last 100 lines of output from rigctld. If something is not working — for example, the app cannot connect to your radio — this is the first place to look. Common messages you might see:
-
rigctld: rig opened successfully— Everything is working. -
error opening port— The Serial Port field is wrong, or the radio is not plugged in. -
bind: Address already in use— Something else (another copy ofrigctld, a logging program) is already using port 4532. See the section below.
If rigctld is already running on your computer from another program (WSJT-X, for example), the Start button will show an error and the status will display ALREADY RUNNING. You have two options:
- Stop the other program and then click Start.
- Click Kill and Restart — this forcibly stops any existing
rigctldprocess and starts a fresh one with your current settings. Use this with caution if other programs are actively usingrigctld.
Because rigctld exposes a standard network interface, you can configure any Hamlib-compatible logging or digital mode program to connect to it alongside RigControl Web. In programs like WSJT-X, FLDigi, VarAC, or JS8Call, choose Hamlib NET rigctl as the rig type and set the network address to 127.0.0.1:4532. All programs will share the same radio connection without needing separate serial port splitters.
RigControl Web can display a live panadapter and waterfall from your radio in the Spectrum Scope panel. Two independent source modes are supported — select the one that matches your radio.
Add the Spectrum Scope panel to your layout via Add Panel, then click its gear icon to open the Spectrum Scope settings modal, where you choose the source and enable the scope.
These Icom radios can stream live spectrum data over their CI-V bus while rigctld is connected. RigControl Web receives the data via Hamlib's UDP multicast stream.
- Serial speed set to 115200 baud. The IC-7300 and similar radios only stream spectrum data at this baud rate.
- CI-V Transceive OFF in the radio's CI-V menu. The app uses polling; transceive mode sends unsolicited data that can interfere.
- CI-V USB Echo ON in the radio's CI-V menu. This allows Hamlib to verify CI-V commands are received by the radio.
See the Hamlib UDP Spectrum Scope Setup page for complete radio menu settings and step-by-step instructions.
In brief: in the Spectrum Scope settings modal, set Source to Hamlib UDP, then enable the scope. Click Stop and Start (or Kill and Restart) in the RIGCTLD settings to restart rigctld with multicast enabled.
If the spectrum scope toggle is enabled but your
rigctldbinary does not support multicast,rigctldwill exit immediately with an error. RigControl Web detects this and automatically disables the toggle so rig control resumes on the next start. Check the Process Logs panel for the error message.
The default multicast address (224.0.0.1) and port (4531) match Hamlib's defaults and work for single-machine setups. Advanced users running rigctld on a separate machine from the app can change these to route spectrum data across a network.
The Yaesu FT-710's single USB cable exposes three devices to your computer: the CP2105 CAT serial port, USB audio, and a dedicated FTDI FT4222H chip that streams the live waterfall. This path does not use Hamlib and works independently of rigctld.
FT-710 only. The FTDX101MP, FTDX101D, and FTDX10 are marketed as SCU-LAN10 compatible but route their spectrum data through the physical SCU-LAN10 Ethernet accessory using Yaesu's proprietary protocol. They do not expose an FT4222H USB device to the host PC and are not supported by this feature.
-
libft4222from FTDI must be installed on your computer. See the FT-710 Spectrum Scope Setup page for full platform-specific setup instructions (Linux, macOS, Windows). - The spectrum output must be enabled in the radio's menu: OPERATION SETTING → GENERAL → SCU-LAN10: ON. (This enables the FT-710's built-in FT4222H chip over USB — no physical SCU-LAN10 device is needed.)
In the Spectrum Scope settings modal, set Source to FT-710 USB (FT4222) and enable the scope. The app spawns the ft4222-scope-reader helper binary, which connects to the FT4222H device and streams frame data. A status indicator in the panel shows whether the reader is running or has encountered an error.
The settings modal includes a span selector with 10 presets from 1 kHz to 1 MHz. Clicking a preset sends a CAT command directly to the radio via rigctld and saves the preference. A live readout next to the buttons shows the span currently being reported by the radio's frame data.