Simple Monitor
The Simple Monitor is a block that has many uses. The block can be used to view cameras, though they support apps which CCTVCraft will expand on with updates. See below for what apps are supported right now.
The monitor requires a keyboard to be added to the block. This will add mesh to the monitor, which looks like a keyboard. This will then allow players to turn on the monitor once it has been added.
To turn on the monitor, a keyboard must first be added to the monitor. Once added, right-clicking on the monitor will turn the monitor on. To turn the monitor off, it is possible to open the monitor UI and press the IO button on the task bar to turn off and close the monitor screen. It is also possible to press ESC while viewing the monitor screen to exit the monitor while leaving the monitor on.
Some apps require monitor and/or device permissions to use. One example is to add a camera; the camera must be owned by the same person, or the person must have permission to monitor the camera they are connecting to. Viewing a camera also requires permission for both the monitor and the camera. Permission can be for members or as owners and just requires the player to have access to the device.
There are a few apps and menus that make up the monitor. Main ones being Desktop, Drive and Camera apps. Many apps have an X button on the top right of the window, which can return the player to the desktop menu.
The desktop app allows you to select apps directly from the start-up screen without much hassle. It also has an IO button to turn off the monitor.
The drive app allows you to place a USB drive into the drive slot, which contains data. This data can then be used by another app, such as the Camera app, to use the data stored.
The Simple Monitor has support for 4 cameras. It is also possible to remotely turn on and off the cameras as well as see the camera's current status. There are also two actions for the camera app.
- To add a camera, the Camera USB must contain data about the camera.
- The camera on the USB must be in the same dimensions as the monitor.
- The Camera USB must be in the slot in the drive app.
- Enable the add camera mode using the + button, which will outline the button.
- Click the camera button A, B, C, or D to assign the camera to the slot.
- Select the remove camera mode using the - button, which will outline the button.
- Select the camera button A, B, C or D to remove the camera from the slot.
It is also possible to turn on a camera once the camera is added. By default, the camera will be turned off once added. Using the switches under the lights, it is possible to toggle the camera on and off remotely as long as the camera is not jammed.
To view an added camera, ensure that the add and remove modes are not outlined; if one is outlined, press the button to disable the mode. Once done, to view the camera, click the camera button you wish to view. If the camera is jammed or off, the player will view the monitor's location. When the camera is in the on state, it's possible to view the camera that you saved. To exit the camera view mode you can press Q by default when viewing a camera to return to the monitor and camera app screen.
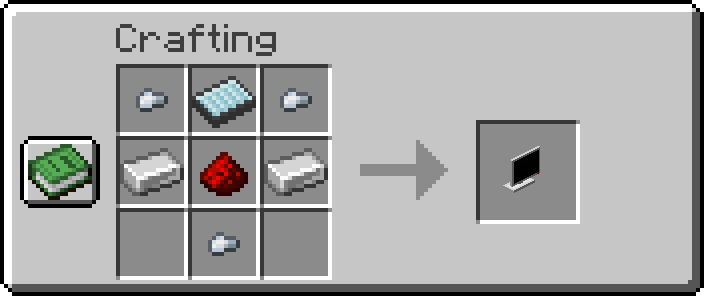
Simple Monitor:
-
x3Iron Nuggets -
x2Iron Ingot -
x1Redstone Dust -
x1Display
Full Breakdown:
-
x5Iron Nuggets -
x3Nether Quartz -
x2Glowstone Dust -
x2Redstone Dust -
x3Iron Ingot
| Item | Namespace | Tag |
|---|---|---|
| Nether Quartz | c | gems/quartz |
| Glowstone Dust | c | dusts/glowstone |
| Redstone Dust | c | dusts/redstone |
| Iron Ingot | c | ingots/iron |
| Iron Nugget | c | nuggets/iron |
Coming Soon |
|---|
| CCTVCraft 5.0.0 - Update Video - Part 1 |
-
5.0.0- Added Simple Monitor
- Simple Monitor has its UI.
- Simple Monitor has a Camera and a drive app.
- The Simple Monitor can be dyed.
- The Simple Monitor can be toggled on and off.
- The Simple Monitor requires a keyboard to be added.


