Repository navigation
#102_REST_API_in_dot_NET
Shane Vincent - 01/05/2019
Instructions on setting up a REST API for ASP.NET projects
- How to accept GET, POST, PUT, DELETE REST calls
- What to return
- What to return in case of error (Following on from Spike #100)
You must have the following installed in order to take advantage of the instructions in this Spike:
- Visual Studio 2017 v15.9 or later, with the ASP.NET and web development workload
- .NET Core SDK 2.2 or later
- Create a new ASP.NET Core Web Application template project. For this example, I will be naming this project testAPI.
- Select API as the template for the project.
A model is a set of classes that represent the data that the app manages.
- Create a new folder in the project called Models
- Inside this folder, create a new class for your model. For this example, I will create a class called testModel
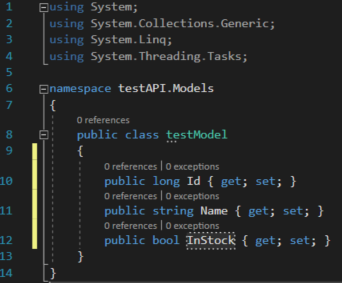
- Inside the main block of that class, create the structure for the data that you wish to manage. For this example, this structure will have an ID field (long), a Name field (string) and an inStock field (bool). See the example below:
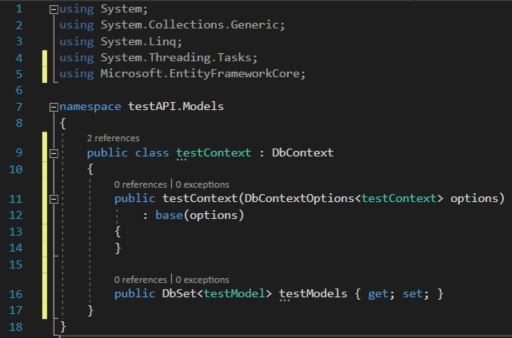
The database context is the main class that coordinates Entity Framework functionality for a data model.
This class is derived from the Microsoft.EntityFrameworkCore.DbContext class.
- Add a new class to the Models folder for the database context. For this example, I will name this class testContext.
- Add a library reference to the context class:
using Microsoft.EntityFrameworkCore; - Layout the class block like the following example:
public class testContext : DbContext
    {
        public testContext(DbContextOptions<testContext> options)
            : base(options)
        {
        }

        public DbSet<testModel> testModels { get; set; }
    }
In ASP.NET Core, services such as the DB context must be registered with the dependency injection container. The container provides the service to controllers. This next step will add the database context to the DI container and specify that the database context will use an in-memory database. Update Startup.cs with the following:
- Add the library reference
using Microsoft.EntityFrameworkCore; - Add the library reference `using (testAPI).Models;
- In the ConfigureServices(IServiceCollection services) method, update it to the following:
	services.AddDbContext<testContext>(opt =>
        opt.UseInMemoryDatabase("testList"));
	services.AddMvc().SetCompatibilityVersion(CompatibilityVersion.Version_2_2);
- Right click on the Controllers folder and add a New Item
- Click on the Web tab on the left and select to add an API Controller Class template. For this example, I will name this class testController.
- Replace the code in the Controller class with the following:
using Microsoft.AspNetCore.Mvc;
using Microsoft.EntityFrameworkCore;
using System.Collections.Generic;
using System.Linq;
using System.Threading.Tasks;
using TodoApi.Models;

namespace testAPI.Controllers
{
    [Route("api/[controller]")]
    [ApiController]
    public class testController : ControllerBase
    {
        private readonly testContext _context;

        public testController(testContext context)
        {
            _context = context;

            if (_context.testModels.Count() == 0)
            {
                // Create a new TodoItem if collection is empty,
                // which means you can't delete all TodoItems.
                _context.testModels.Add(new testModel { Name = "Item1" });
                _context.SaveChanges();
            }
        }
    }
}
To retrieve a testModel item from this API, consider how you want the data to be obtained.
- Would you like to see all items?
- Would you like to obtain a specific item by ID number?
If you wish to use any of the code below, it must be copied inside the Controller class. As a note, this will route the GET API to localhost:/api/test, as it uses the Controller's class name without the Controller suffix. This is also case-sensitive.
The code below will allow you to use a GET call to see all items by just using GET to api/test.
// 	GET: api/test
	[HttpGet]
	public async Task<ActionResult<IEnumerable<testModel>>> GetTestModels()
	{
		return await _context.testModels.ToListAsync();
	}
To test the above, build and run the app. It will automatically open a browser. Change the URL to this:
https://localhost:<your port number here>/api/test
You should see the following response:
[{"id":1,"name":"Item1","inStock":false}]
The code below will allow you to use a GET call to get a specific item by passing in an ID number to api/test/<ID number>.
	// GET: api/test/5
	[HttpGet("{id}")]
	public async Task<ActionResult<testModel>> GetTestModel(long id)
	{
		var testModel = await _context.testModels.FindAsync(id);

		if (testModel == null)
		{
			return NotFound();
		}

		return testModel;
	}
To test the above, build and run the app. It will automatically open a browser. Change the URL to this:
https://localhost:<your port number here>/api/test/1
You should see the following response:
{"id":1,"name":"Item1","inStock":false}
If not item matches the requested value, it will return a 404 error:
{"type":"https://tools.ietf.org/html/rfc7231#section-6.5.4","title":"Not Found","status":404,"traceId":"80000026-0000-ff00-b63f-84710c7967bb"}
Add the following code to the Controller class:
// POST: api/test
[HttpPost]
public async Task<ActionResult<testModel>> PostTestModel(testModel model)
{
    _context.testModels.Add(model);
    await _context.SaveChangesAsync();

    return CreatedAtAction(nameof(GetTestModel), new { id = model.Id }, model);
}
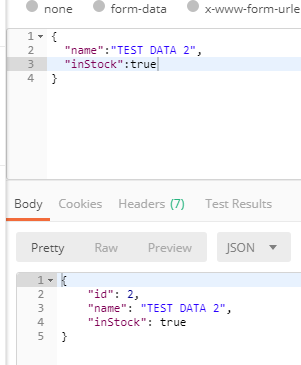
When wanting to POST data, you must send JSON data that is the same structure as the testModel (minus the ID). See the image below for an example of test sent data and the response to that:
In the image below, the JSON at the top is what was sent with the GET request, and the JSON at the bottom is was was received back after a success.
The code below will allow you to remove a specific piece of data by passing in an ID like so:
https://localhost:<your port number here>/api/test/<enter ID of data to remove>
Add the following code to the Controller class:
// DELETE: api/test/5
[HttpDelete("{id}")]
public async Task<IActionResult> DeleteTestItem(long id)
{
    var testItem = await _context.TestModels.FindAsync(id);

    if (testItem == null)
    {
        return NotFound();
    }

    _context.TestModels.Remove(testItem);
    await _context.SaveChangesAsync();

    return NoContent();
}
The above method allows for a variable to be passed-in for the ID of the item that you wish to delete. The response from this method will be 204 (No Content)
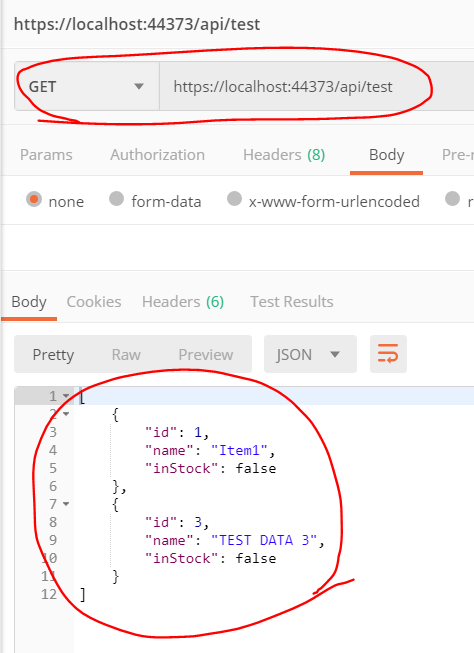
The image below shows the outcome after successfully sending a DELETE call to the API, using 2 as the called value.
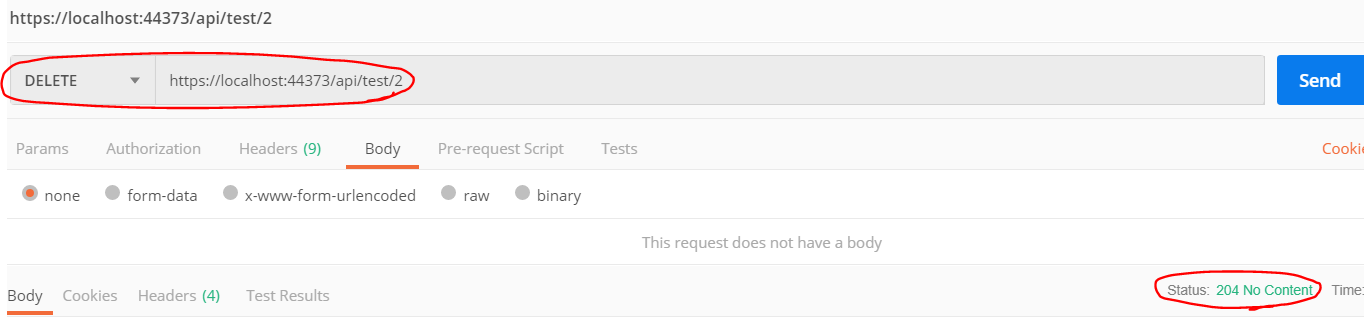
The image below shows that, of the 3 items being stored in the API, the one with ID #2 has been removed.