Repository navigation
Paperless ngx
Warracker can store and manage documents directly in Paperless-ngx, instead of (or alongside) local file storage. Invoices, manuals, product photos, and claim documents can all live in Paperless-ngx and stay linked to the right warranty.
- What it does
- Setup
- Attaching Paperless documents to a warranty
- The Paperless document browser
- Claim documents in Paperless-ngx
- Access rules
- Upload a document to Paperless-ngx from Warracker and link it to a warranty, manual, photo, or claim.
- Search your Paperless-ngx library from Warracker and link existing documents to a warranty.
- Documents uploaded through Warracker are titled after the
warranty's product name, for example
<Product> - Invoice,<Product> - Manual, or<Product> - Claim document— so they are easy to find later in Paperless-ngx itself.
Example: a claim's Documents section showing local files and one document linked from Paperless-ngx:


In Settings → Admin Settings → Paperless-ngx Integration (admins only):
- Enable Paperless-ngx Integration — turns the feature on.
- Paperless-ngx URL — your Paperless-ngx instance address.
- API Token — generate it in Paperless-ngx under Settings → API Tokens, and paste it here.
- View Documents in Warracker — on: Paperless documents open inside Warracker; off: they open in the Paperless-ngx UI.
- Verify with Connection Testing: Test Connection (reachability + credentials), Debug Config (what Warracker thinks is configured), and Test Upload (push a test document through). All three are admin-only.
Once enabled, non-admin users automatically see the browse and link sections in the add/edit forms — the enabled flag is exposed to signed-in users through a dedicated status endpoint, so no admin action is needed per user.

In the add/edit form's Documents tab, the Invoice and Manual sections gain a storage choice when the integration is enabled:
- Store Locally — the classic upload, kept on Warracker's disk.
-
Store in Paperless-ngx — uploads the file to Paperless-ngx
(titled
<Product> - Invoice/<Product> - Manual) and links it.
Either way, Browse Paperless-ngx Documents lets you link a document that already exists in Paperless-ngx instead of uploading.

Clicking Browse Paperless-ngx Documents opens the browser:
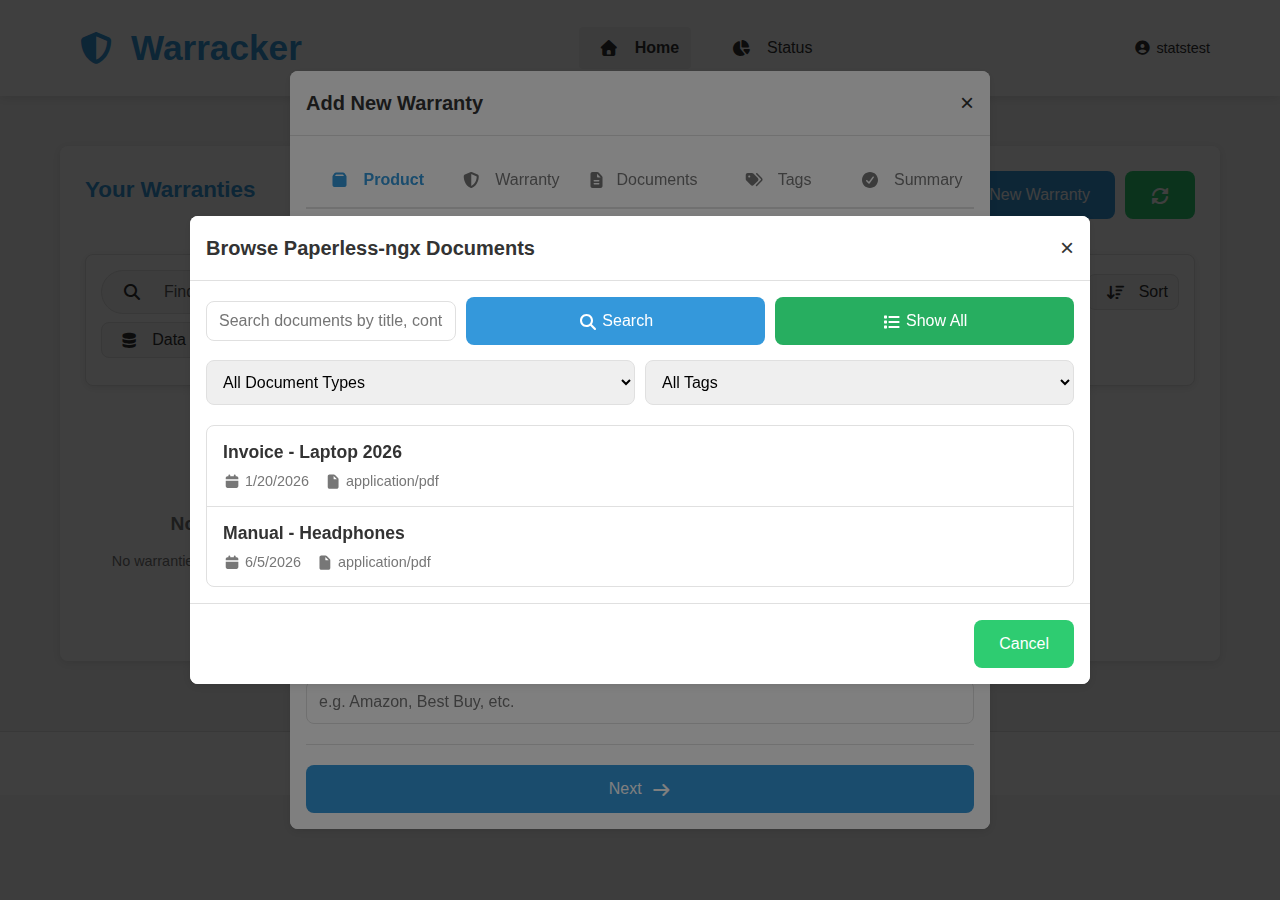
- Search documents by title, content, or tags + Search — full-text search across your Paperless-ngx library.
- Show All — lists everything (within your access scope, below).
- All Document Types — filter to PDF Documents, Images, or Archives.
- All Tags — filter by Paperless-ngx tag.
- Previous / Next — pages through results.
- Select a document, then Select Document to link it to the warranty. The linked document's name appears in the form, with a × to clear the selection.

Claim documents work the same way: in a claim's Documents section,
the Upload file dropdown offers uploading to Paperless-ngx when
the integration is on, and the document is titled
<Product> - Claim document.

- Paperless documents are tracked per user: search results are
scoped to documents you own or already reference, and linking a
document owned by someone else is rejected (a
403error). - The first user to link a document nobody owns or references yet becomes its owner in Warracker.
- Admins are unscoped — they see the whole Paperless-ngx library.
- Claim documents and "other" documents are owner/admin-only, even when the global warranty view is enabled — global view never exposes another user's claim files.
- The Paperless debug endpoints are admin-only.
One honest limitation: a Paperless-ngx document that was never uploaded or linked through Warracker can be claimed by the first Warracker user who links it. Fully closing that gap needs per-user Paperless-ngx tokens, which is a planned feature, not yet built.