Repository navigation
User Guide
- Header and navigation
- Accounts and roles
- Adding a warranty
- Editing a warranty
- Warranty cards — what you see, and what each button does
- Searching, filtering, and sorting
- Organizing
- Claims
- Status dashboard
- CSV import and export
- Languages

Every page shares the same header:
- Warracker logo (left) — the app home.
- Home (house icon) — your warranty list.
- Status (chart icon) — the status dashboard (see below).
- User menu (top right, your username) — opens Settings (your preferences, notifications, and, for admins, the admin sections), About (version and project info), and Logout.
- Mobile menu (hamburger icon, small screens) — the same navigation in a slide-out panel.
When you are signed out, the header instead shows Login and Register buttons.

- The first account created in the system automatically becomes the owner and an admin. The owner has ultimate control (including transferring ownership, see Settings).
- Admins manage other users, assign roles, and configure the site (global view, OIDC, Paperless-ngx, site-wide Apprise).
- Regular users manage only their own warranties, unless the admin enables the global view — then they can also see other users' warranties (read-only for warranties they don't own). Claim documents and "other" documents stay owner/admin-only even in global view.

Click Add New Warranty (blue button, top right of the list). The form walks through five tabs — click a tab directly, or use Previous / Next to step through. The × closes without saving.

- Product Name (required) — the product, e.g. "Bosch Dishwasher".
- Product URL (optional) — a link to the product page.
- Serial Numbers — one or more; Add another serial number adds another field. Serials are searchable.
- Model Number (optional) — e.g. "SM-G991U1".
- Vendor (optional) — where you bought it, e.g. "Amazon". Vendors appear in the Filter dropdown and on the card.
- Purchase Date (required) — the date you bought the product.
- Lifetime Warranty (checkbox) — tick this for a warranty that never expires; the duration fields disappear.
-
Warranty Entry Method — two ways to define the end date:
- Warranty Duration — enter Years, Months, and/or Days; the expiration date is calculated from the purchase date.
- Exact Expiration Date — pick the expiration date directly from the calendar.
- Warranty Type (optional) — Standard, Extended, Manufacturer, Third Party, Store, Premium, Limited, Full, Parts Only, Labor Only, International, Accidental Damage, or Other (Custom), which reveals a text field for your own type name.
- Currency — the currency for this warranty's price. It defaults to your currency setting; a warranty priced in a different currency is excluded from the Total Value card on the status dashboard.
- Purchase Price (optional) — feeds the Total Value statistic.
- Notes (optional) — free text; notes are searchable.
- Product Photo (optional) — PNG, JPG, or WebP. The photo becomes the card thumbnail; clicking it opens the full-size image.
- Invoice — three ways to attach it: Choose File (upload a PDF or image, stored locally), Store in Paperless-ngx (when the integration is enabled — pick the storage radio, then Browse Paperless-ngx Documents to link an existing document), or Or Link to Invoice URL (paste an external link).
- Product Manual (optional) — same three options as the invoice.
- Files (ZIP/RAR, Optional) — an archive of extra files, uploaded or linked by URL. These are "other" documents: owner/admin-only even in global view.
- Search or add new tag — type to filter existing tags, or type a new name to create one on the spot. Click a tag to attach it; attached tags show above the field.
- Manage Tags — opens the tag manager (see Organizing below).
Reviews everything before you commit: Product Information, Warranty Details, Documents, and Tags. Click Add Warranty to save. The new card appears in your list immediately.
Watch the whole flow:

Click the pencil (Edit) icon on a card. The edit form has the same five tabs as the add form, pre-filled, plus per-document Delete Photo / Delete Invoice / Delete Manual / Delete Files buttons in the Documents tab. Click Save Changes to apply, or Cancel to discard.


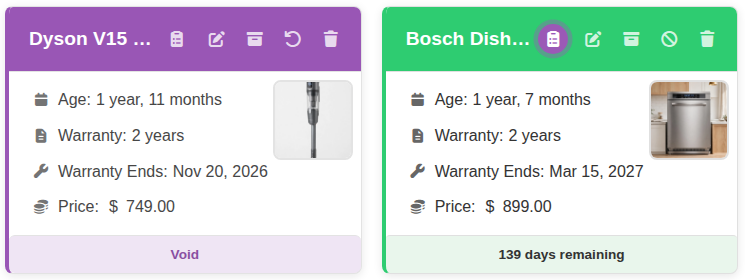
Each card shows: the product name, Age (time since purchase), Warranty (duration), Warranty Ends (expiration date), Price, Vendor, and a bottom bar with either days remaining or the status. Clicking the photo thumbnail opens the full-size image.
Status colors (highest precedence first: Archived, then Void, then the date-based status):
-
 Active — green header, days remaining shown.
-
 Expiring Soon — orange header, inside your "Expiring Soon
Days" window (default 30 days, set in Settings).
-
 Expired — red header. A warranty that expires today still
counts as active, not expired, everywhere (list, dashboard,
notifications).
-
 Void — purple header and a Void bar; the warranty stays
in the list but is excluded from totals, counts, the timeline, and
expiry notifications.
-
 Archived — kept for reference, excluded from the active
views; find archived items with the Archived filter.
The icons in the card header, left to right (in the Archived filter view, Archive becomes Unarchive):
| Icon | Button | What it does |
|---|---|---|
 |
Claims | Opens the warranty's claims (see Claims below). |
 |
Edit | Opens the edit form. |
 |
Archive | Asks for confirmation, then archives the warranty. Archived items are not deleted; use the Archived filter to find them again. |
 |
Unarchive (archived view) | In the Archived filter view, the archive button becomes Unarchive, restoring the warranty to the main list. |
 |
Void / Unvoid | Marks the warranty void (or restores a voided one). Voiding never changes the expiration date. |
 |
Delete | Asks for confirmation ("Are you sure? This action cannot be undone") and permanently deletes the warranty and its documents. |

Above the list, left to right:
-
Search box — filters as you type (with a × Clear search button once text is entered). It matches product name, model, vendor, notes, tags, and serial numbers.
-
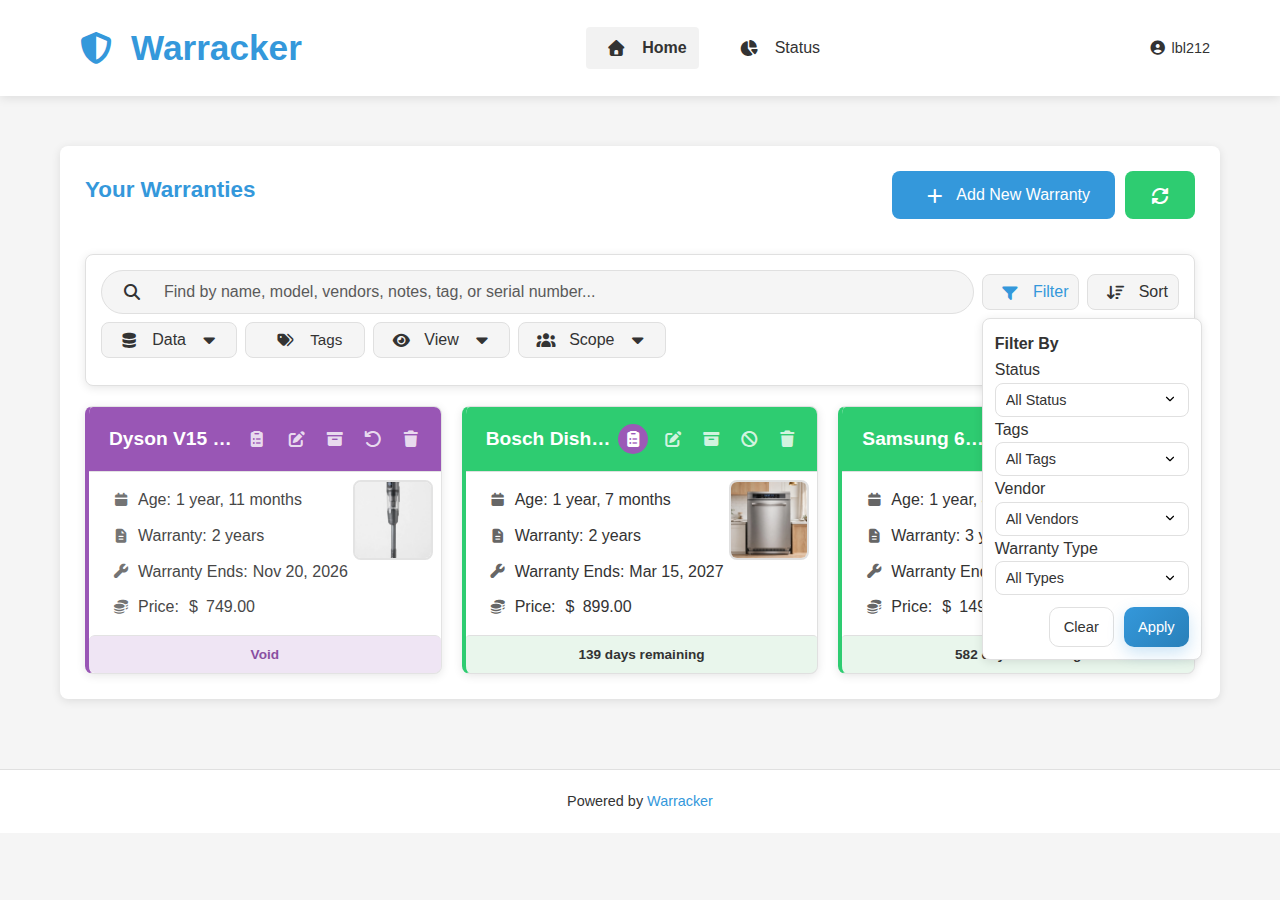
Filter (funnel icon) — opens a popover with four dropdowns: Status (All Status, Active, Expiring Soon, Expired, Void, Archived), Tag, Vendor, and Warranty Type. Click Apply to filter, Clear to reset. A dot on the Filter button shows when a filter is active.
-
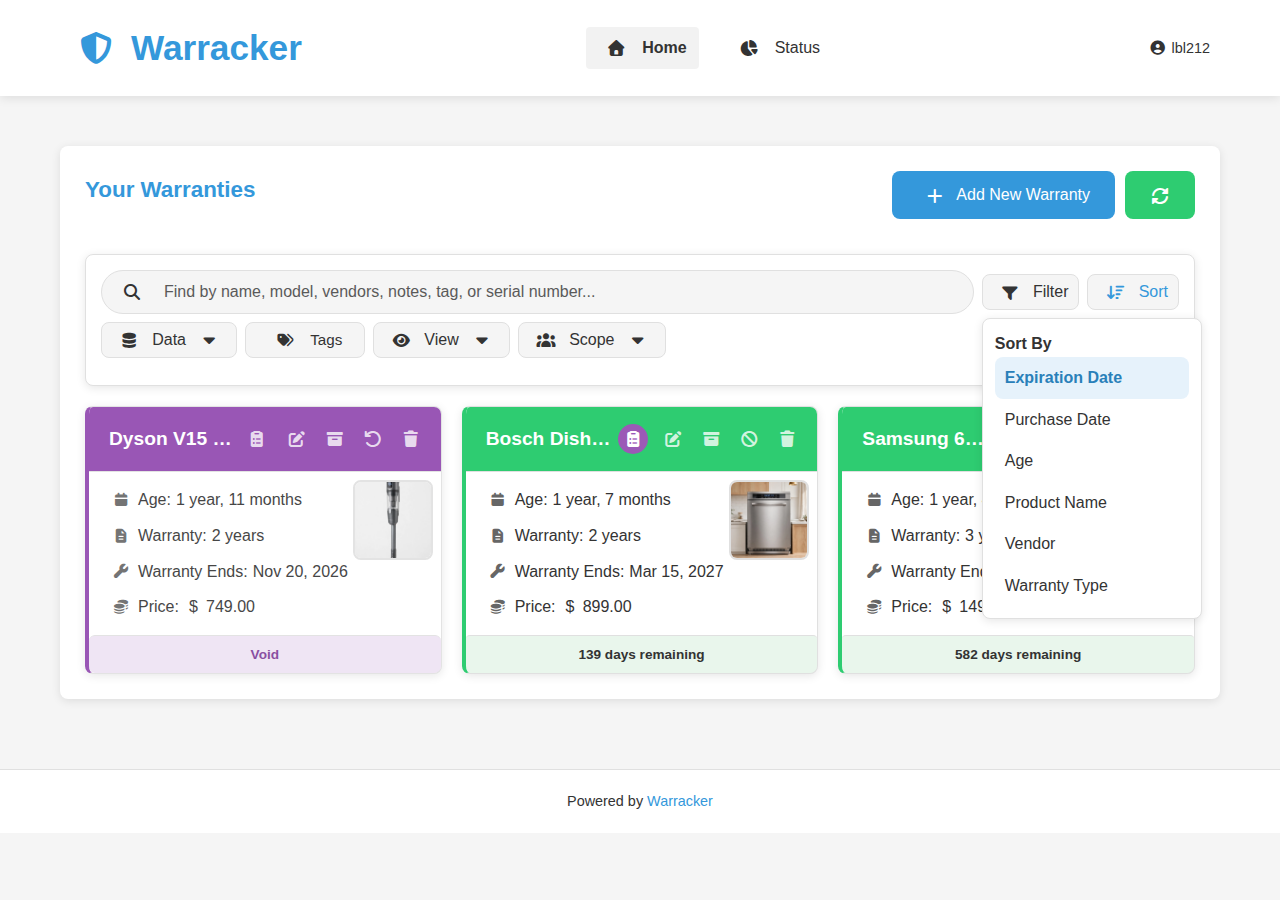
Sort (sort icon) — orders the list by Expiration Date (default), Purchase Date, Age, Product Name, Vendor, or Warranty Type.
-
Refresh (circular arrow, next to Add New Warranty) — reloads the list from the server.
-
Previous / Next — pages through the list when there are more warranties than fit on one page.
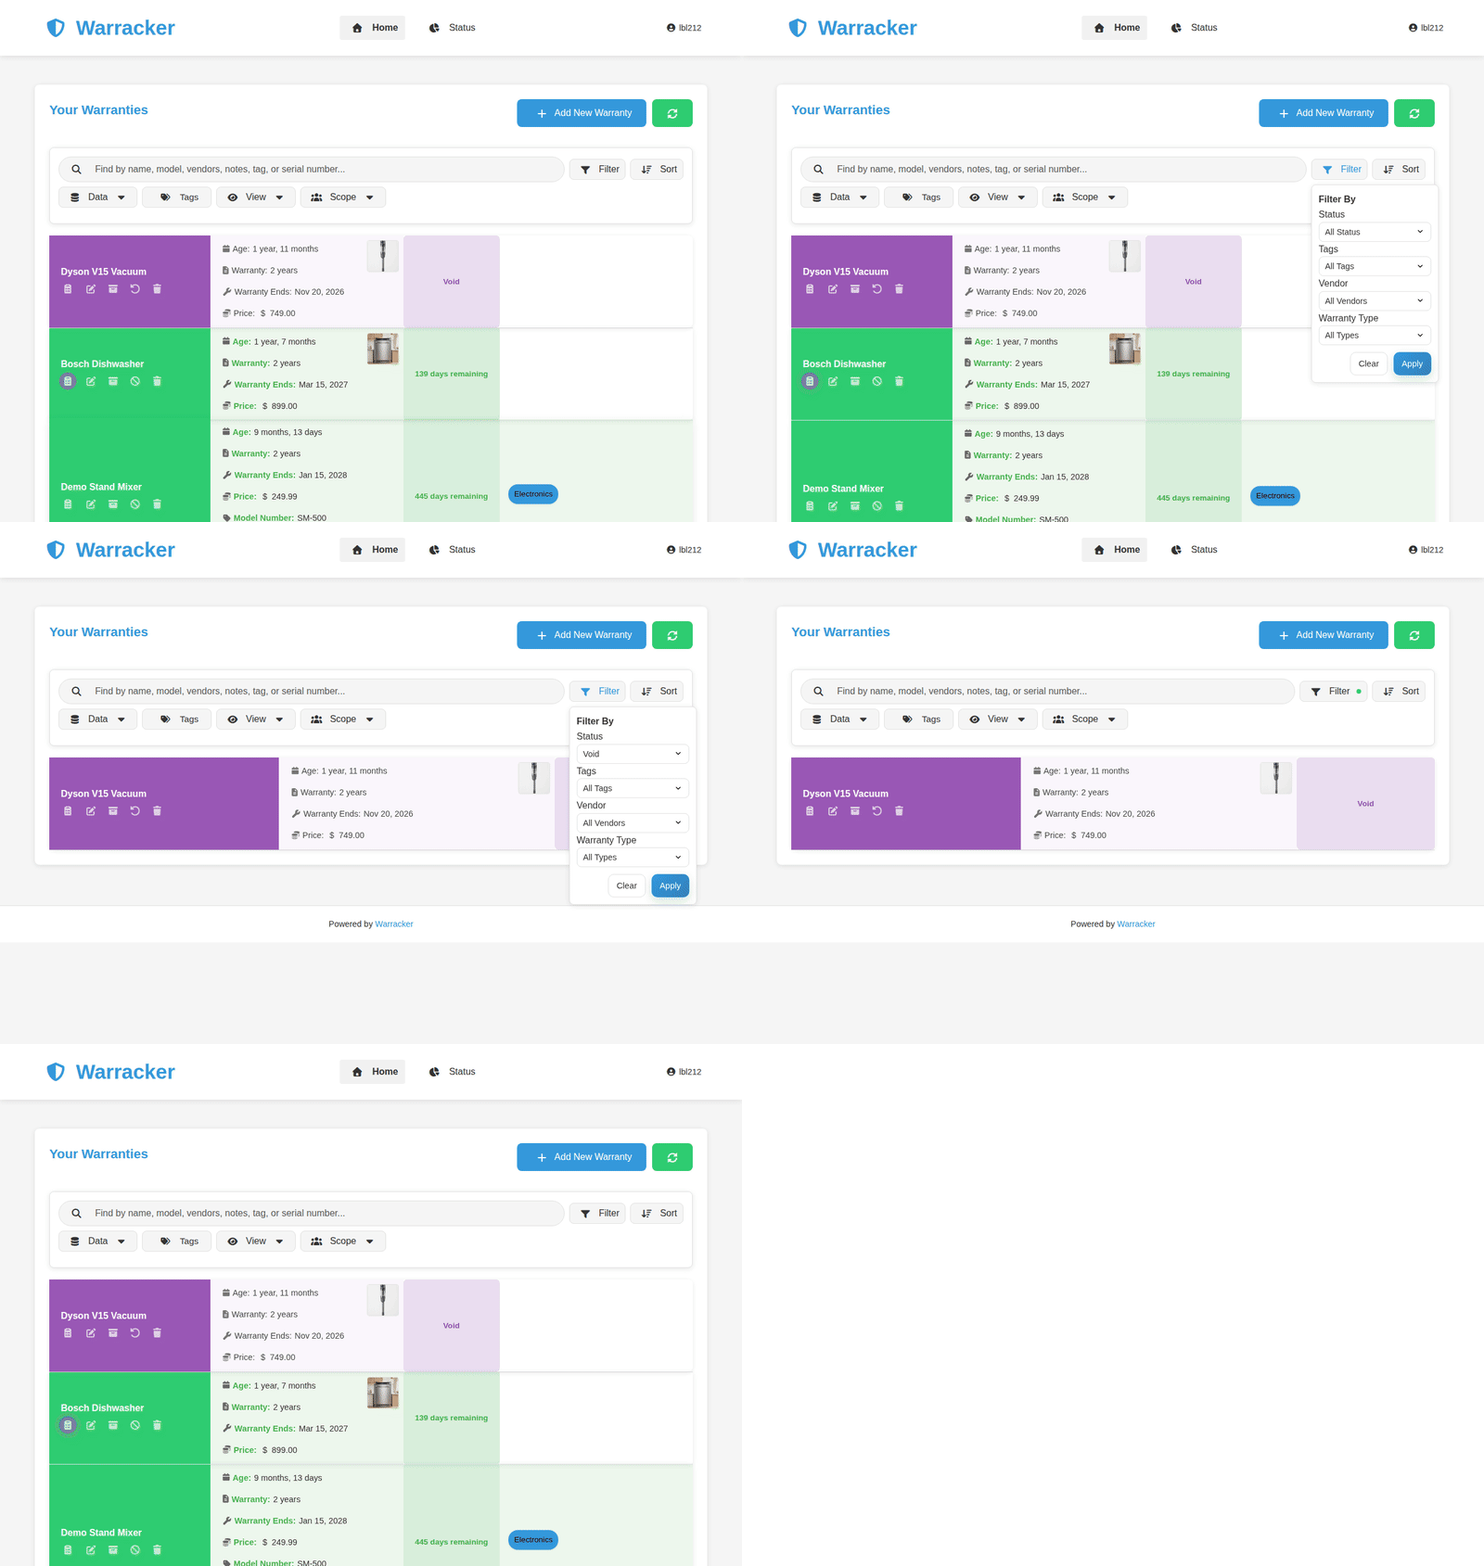
Watch filtering in action — here, narrowing the list to voided warranties only:

Click Tags in the toolbar to open the tag manager:
- New tag name + color picker + Add Tag — creates a tag. Tags have colors, so a card's tags are recognizable at a glance.
- Existing Tags — the tags already defined, with edit/delete options.
Tags are also managed from inside the add/edit forms (Manage Tags button on the Tags tab), and attached to a warranty from that same tab.

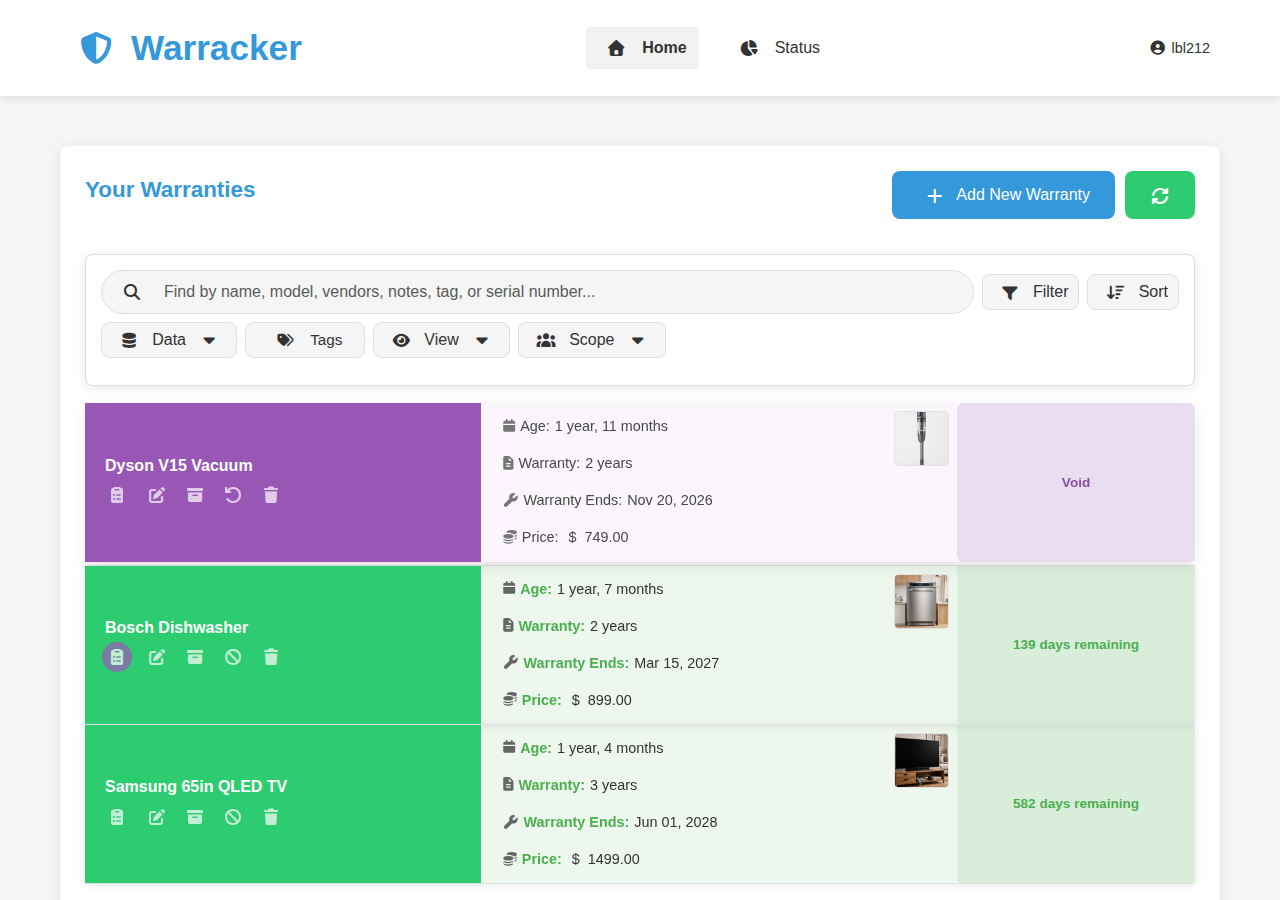
View (eye icon) switches how the list is rendered — your choice is remembered, and it is also the Default View setting in Settings:
- Grid — cards (default).
- List — compact rows.
- Table — columns for Product, Purchase Date, Expiration, Status, and Actions.
Scope (people icon) appears when the admin has enabled the global view. Personal shows only your warranties; Global shows every user's warranties. Other users' warranties are read-only for you, and their claim/"other" documents are never shown to you.
Archive from the card's box icon. Archiving is reversible in spirit — nothing is deleted — but there is no "unarchive" button: archived warranties live under the Archived filter, and you can edit or delete them from there.
Void from the card's circle icon when a warranty's conditions are broken before its expiration date — e.g. an unauthorized repair. The warranty keeps its expiration date, stays visible with a purple Void status, and drops out of every total, count, chart, and notification. Click the icon again (Unvoid) to restore it.
Example: a voided warranty (purple, Void) next to an active one:
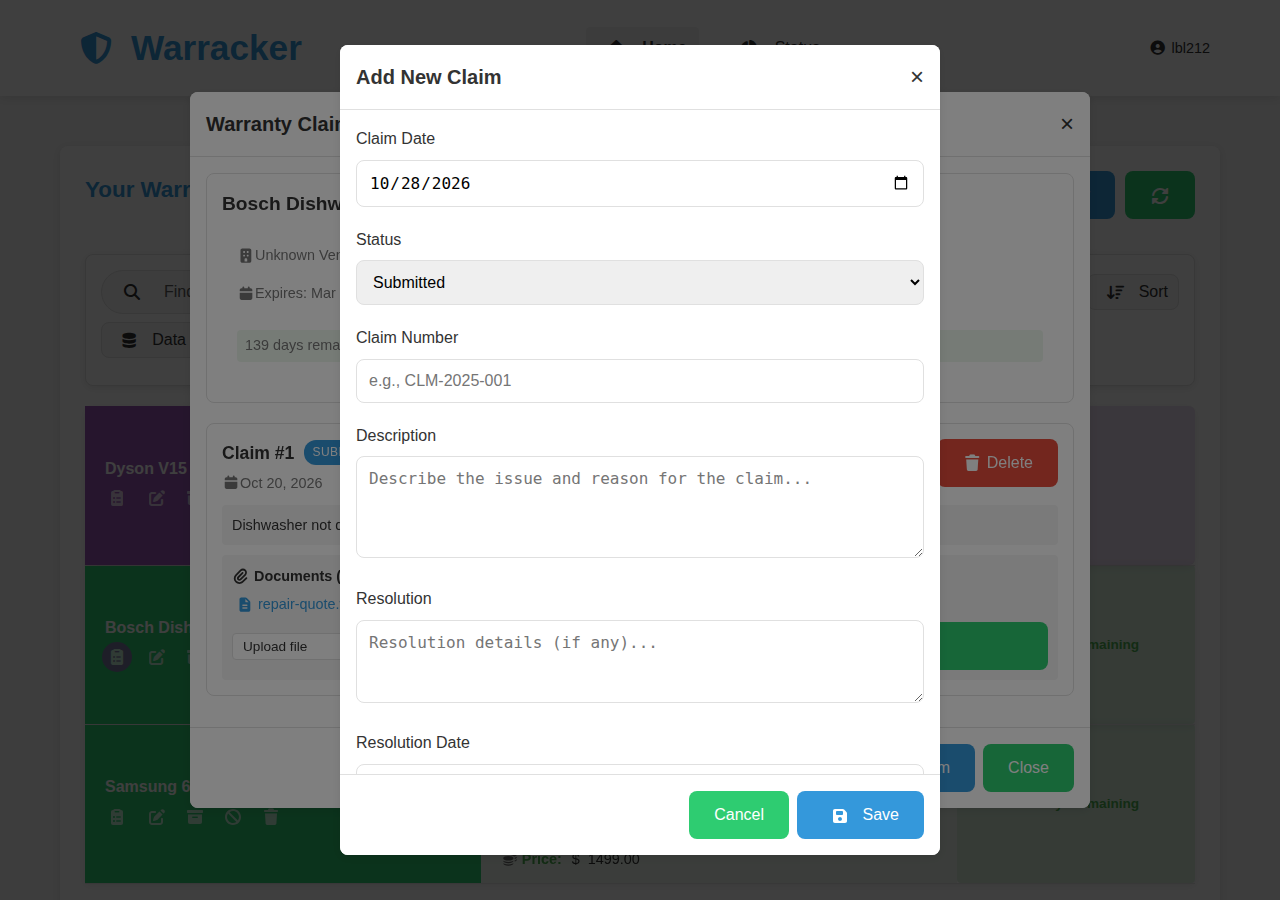
Click the document (Claims) icon on a card. The claims window shows the warranty (name, vendor, expiration, days remaining) and its claims, each with its status badge, dates, description, resolution, and documents.

Add New Claim (or Edit on an existing claim) opens the claim form:
- Claim Date (required) — when you filed the claim.
- Status — Submitted, In Progress, Approved, Denied, Resolved, or Cancelled.
- Claim Number (optional) — the reference your vendor gave you, e.g. "CLM-2025-001".
- Description — the issue and reason for the claim.
- Resolution — what the vendor did (fill in later as the claim progresses).
- Resolution Date — when it was resolved.
Save stores the claim; Cancel discards it. Delete on a claim removes it permanently.
Each claim has a Documents section:
- Upload file dropdown + Attach document button — attach a file directly to the claim. (When Paperless-ngx is enabled, the dropdown also offers uploading to Paperless-ngx.)
- × next to a document — removes that document from the claim.
- Documents linked from Paperless-ngx show a Paperless badge; like other claim documents, they are visible only to the warranty's owner and admins, even in global view.

Open it from the header's Status link. It shows:
-
Stat cards — Active, Expiring Soon, Expired, Total, Archived,
and Void counts, plus Total Value. Clicking the

- Warranty Distribution — donut chart of Active / Expiring Soon / Expired.
- Expiration Timeline — bar chart of expirations over time.
- Recently Expired or Expiring Soon — a table with its own search box, status filter, sortable columns (Product, Purchase Date, Expiration Date, Status), and Export button for a CSV of the filtered view.
- Personal / Global toggle (top right, when global view is enabled) and a Refresh button to reload the dashboard.


Data (database icon) in the toolbar has two options:
- Import — opens a file picker for a CSV file. The field reference is below.
- Export — downloads your warranties as a CSV file.
| Field Name | Format / Example | Required? | Notes |
|---|---|---|---|
| ProductName | Text | ✅ Yes | Provide the name of the product. |
| PurchaseDate | Date (YYYY-MM-DD, e.g., 2024-05-21) |
✅ Yes | Use ISO format only. |
| WarrantyDurationYears | Whole Number (0, 1, 5) |
✅ Yes, if IsLifetime is FALSE and Months/Days are 0/blank. At least one duration field (Years, Months, Days) must be non-zero if not lifetime. |
Represents the years part of the warranty. Can be combined with Months and Days. |
| WarrantyDurationMonths | Whole Number (0, 6, 18) |
✅ Yes, if IsLifetime is FALSE and Years/Days are 0/blank. At least one duration field (Years, Months, Days) must be non-zero if not lifetime. |
Represents the months part of the warranty. Can be combined with Years and Days. Max 11 if Years also provided. |
| WarrantyDurationDays | Whole Number (0, 15, 90) |
✅ Yes, if IsLifetime is FALSE and Years/Months are 0/blank. At least one duration field (Years, Months, Days) must be non-zero if not lifetime. |
Represents the days part of the warranty. Can be combined with Years and Months. Max 29/30 if Months also provided. |
| ExpirationDate | Date (YYYY-MM-DD, e.g., 2031-10-08) |
❌ No (Optional) | Use this if duration fields are 0 and IsLifetime is FALSE. |
| IsLifetime |
TRUE or FALSE (case-insensitive) |
❌ No (Optional) | If omitted, defaults to FALSE. If TRUE, duration fields are ignored. |
| PurchasePrice | Number (199.99, 50) |
❌ No (Optional) | Cannot be negative if provided. |
| SerialNumber | Text (SN123, SN123,SN456) |
❌ No (Optional) | For multiple values, separate with commas. Exports use JSON encoding when a value itself contains a comma; the importer accepts both formats. |
| ProductURL | Text (URL format) | ❌ No (Optional) | Full URL to product page (optional field). https://producturl.com |
| Vendor | Text | ❌ No (Optional) | Name of the vendor or seller where the product was purchased. |
| Tags | Text (tag1,tag2) |
❌ No (Optional) | Use comma-separated values for multiple tags. Exports use JSON encoding when a tag itself contains a comma; the importer accepts both formats. |
| Notes | Text | ❌ No (Optional) | Free-text notes stored with the warranty. Included in CSV exports, so re-importing an export restores them. |
| Currency | Currency code (USD, EUR, CAD) |
❌ No (Optional) | Must be a supported currency code; unknown codes fall back to your preferred currency. Included in CSV exports. |
| ModelNumber | Text | ❌ No (Optional) | Product model number. Included in CSV exports. |
| WarrantyType | Text | ❌ No (Optional) | Warranty type (e.g. manufacturer, extended). Included in CSV exports. |

The interface is available in 20 languages, switched from Settings → Preferences → Language. Warranty data itself (product names, notes) is never translated — only the interface text.
| Language | Code | Native Name | Notes |
|---|---|---|---|
 Arabic |
ar | العربية | RTL Support |
 Czech |
cs | Čeština | |
 German |
de | Deutsch | |
 English |
en | English | Default |
 Spanish |
es | Español | |
 Persian |
fa | فارسی | RTL Support |
 French |
fr | Français | |
 Hindi |
hi | हिन्दी | |
 Italian |
it | Italiano | |
 Japanese |
ja | 日本語 | |
 Korean |
ko | 한국어 | |
 Dutch |
nl | Nederlands | |
 Portuguese |
pt | Português | |
 Russian |
ru | Русский | |
 Ukrainian |
uk | Українська | |
 Chinese (Simplified) |
zh_CN | 简体中文 | |
 Chinese (Hong Kong) |
zh_HK | 繁體中文 (香港) | |
 Turkish |
tr | Türkçe | |
 Polish |
pl | Polski | |
 Hebrew |
he | עברית | RTL Support |
- Auto-Detection: Automatically detects browser language on first visit
- User Preference: Saves individual language choice to user profile
- Native Names: Dropdown displays language names in native scripts for clarity
- Instant Switching: Change languages in real-time without page reload