Getting Started
sudo apt install ./osprey_<version>_amd64.debThe installer handles everything automatically:
- Installs NATS (from distro repos or GitHub releases), PostgreSQL, and nginx as dependencies
- Creates the
ospreysystem user and database - Generates a random database password, JWT secret, and encryption key (stored in
/etc/osprey/osprey.env) - Creates a self-signed TLS certificate (valid for 10 years, stored in
/etc/osprey/certs/) - Runs all database migrations
- Enables the nginx site and removes the default site to avoid port conflicts
- Starts all five Osprey services via systemd (
osprey-engine,osprey-api,osprey-collector-manager,osprey-snmp-poller,osprey-bmp-server) underosprey.target
After installation you will see a summary:
Osprey installed successfully.
  Web UI:  https://localhost/
  Login:   admin / admin
  Config:  /etc/osprey/osprey.yaml
  Secrets: /etc/osprey/osprey.env
  Status:  systemctl status osprey.target
The Login: line is shown only on a first install, when the default admin / admin
credentials are still in effect. On upgrades — or any time the admin password has already
been changed — it instead reads use your existing admin credentials, so the summary never
advertises a password that no longer works.
Tip: The
.debpackage works on Debian 12 (Bookworm), Debian 13 (Trixie), and Ubuntu 24.04+.
Osprey runs in both privileged and unprivileged LXC containers.
Privileged LXC — no special configuration needed. Install the .deb package as on bare metal.
Unprivileged LXC — requires nesting for systemd. Add to /etc/pve/lxc/<CTID>.conf:
features: nesting=1
GRE collectors create tunnel interfaces via netlink and capture packets with raw sockets. On kernel 6.x, CAP_NET_ADMIN and CAP_NET_RAW within the container's user namespace are sufficient — both are kept by default in Proxmox unprivileged containers. If GRE tunnel creation fails with a permission error, AppArmor may be blocking netlink operations. Resolve by adding:
lxc.apparmor.profile: unconfined
SNMP-only deployments (no GRE tunnels) work in unprivileged containers without any extra configuration beyond nesting=1.
Open your browser to https://your-server/ (port 443). Accept the self-signed certificate warning. Log in with the default credentials:
| Field | Value |
|---|---|
| Username | admin |
| Password | admin |
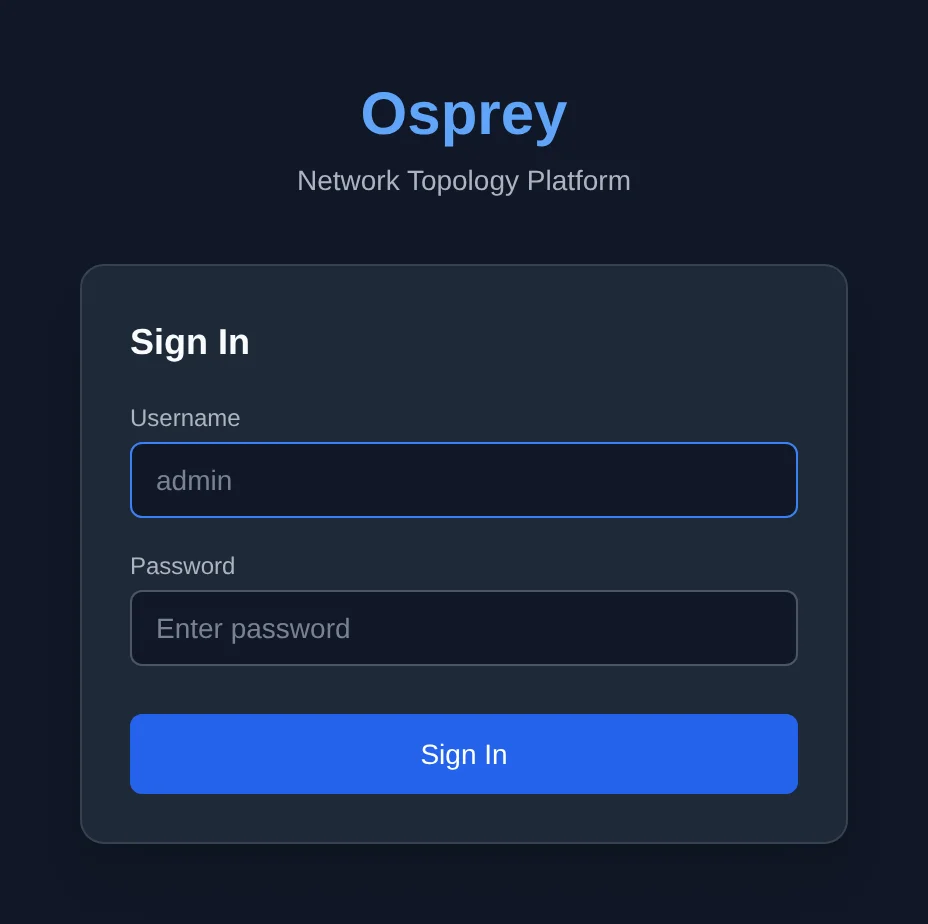
Important: On first login, a mandatory password change dialog appears -- you must change the default password before accessing any other feature. Enter the current password (
admin), then choose a new password that meets the security policy (minimum 8 characters, uppercase, number, and special character by default). After changing the password, you are logged in normally. A yellow warning banner also appears at the top of the screen whenever the defaultadminusername is in use, with a Change Password inline form. The banner can be dismissed for the current session but reappears on next login. You can also change passwords via Admin > Users & Security > Users.
Osprey's web UI adapts to phones and small tablets (screens narrower than 1024 px). The top menu collapses into a hamburger button, the hierarchy sidebar becomes a slide-in drawer (tap the dimmed area or press Escape to close it), and detail and report panels open as full-screen sheets -- minimize them to the bar at the bottom to switch between several. The topology canvas supports touch pan and pinch-zoom; tap a node or link to open its details, and long-press (or two-finger tap) for the context menu. Time Travel and Simulation work by touch too: their bottom bars stack into extra rows, with the time window behind a compact drop-up and a full-width slider you can scrub with a finger. Wide report tables scroll sideways. On desktop (1024 px and wider) the layout is unchanged. The SSH/Telnet terminal and administrative forms work on a phone but are best used on a larger screen.
Osprey organizes network data in a hierarchy:
Network → Autonomous System → Routing Domain → Protocol Instance → Area → Devices/Links
- Network: Top-level organizational boundary (e.g., "Production", "Lab").
- Autonomous System: BGP AS number (auto-created, hidden in the UI).
- Routing Domain: Global routing table, VRF, or L3VPN (a "default" domain is auto-created with each network).
-
Protocol Instance: A routing process. For OSPF:
router ospf 1(shown as "OSPF 1" or "OSPFv3 1 (v6)"). For IS-IS:router isis CORE(shown as "IS-IS CORE"). Supports OSPFv2, OSPFv3 (with IPv6 or IPv4 address family), IS-IS (ISO 10589), EIGRP, and BGP. -
Area: An OSPF area (e.g.,
0.0.0.0for the backbone) or an IS-IS level (Level 1 or Level 2).
In practice, the Autonomous System and default Routing Domain are created automatically when you add a network. The sidebar hides the AS level entirely, so the typical workflow is:
- Create a Network (e.g., "Production") -- this auto-creates a default AS (65000) and a default Routing Domain ("default", type global) behind the scenes.
- Add a Protocol Instance under the network (e.g., OSPF process 1 or IS-IS instance "CORE").
- Add an Area (OSPF area or IS-IS level) with a collector to start discovering topology (see Setting Up Topology Discovery).
The sidebar shows the result: a network, the protocol instances underneath it, and each instance's areas with a badge per discovery method.
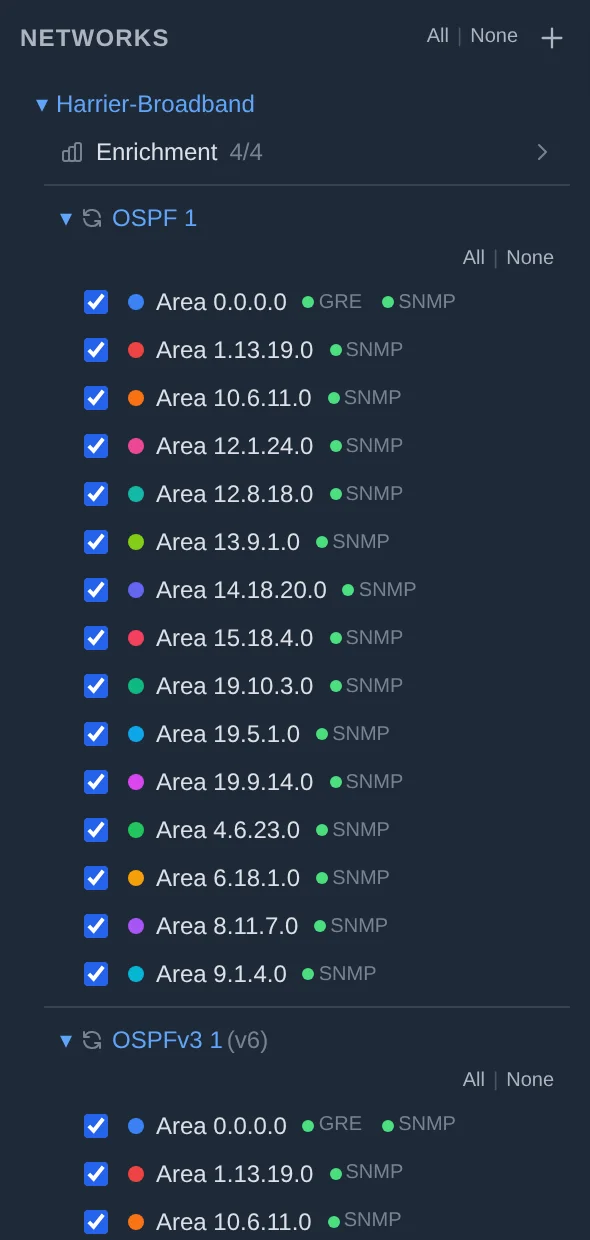
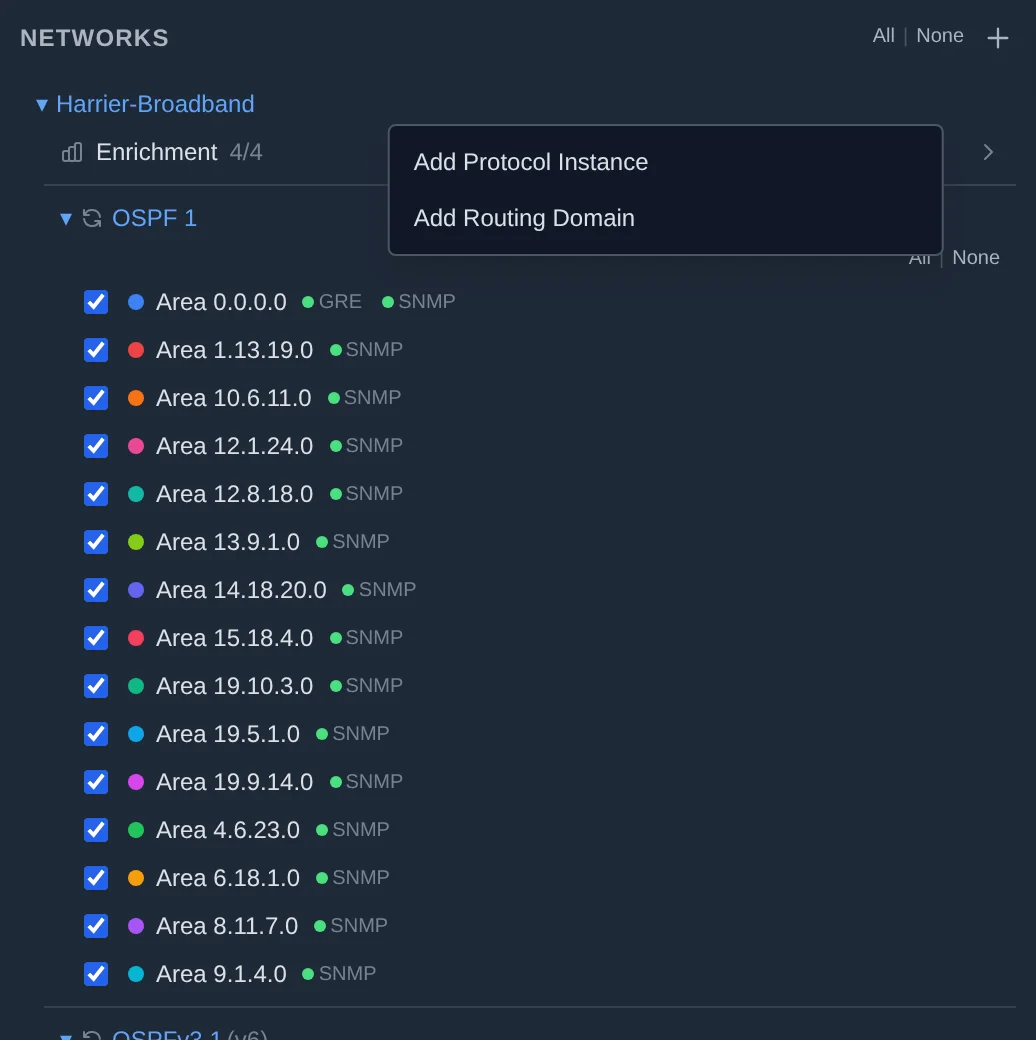
You only need to create additional Routing Domains manually if you have VRFs or L3VPNs. Use the + icon on a network and select "Add Routing Domain" for this.
Tip: Admin and engineer users see small action icons (add, edit, delete) when hovering over hierarchy items in the sidebar. Operator-role users can browse the hierarchy and view topology but cannot modify it.