900_100_Annotate_add ins
Previous Chapter Previous Page Table of content
By default, annotates are displayed next to the mouse cursor. With the annotate.js add-ins, it is possible to display the annotate at other places : in the middle, on top, at the bottom, on a specific place in the chart, etc... It is also possible to display annotates with special shapes (instead of the standard rectangle) : a bubble, a rectangle with an arrow, ...
If you want to use the annotate.js add-ins, you have to insert it AFTER the ChartNew.js module (annotate.js replaces some functions from ChartNew.js). The specification about where the annotates have to be displayed is done through new options that are only working when then annotate.js module is used - See chapter "Additional options for specifying the location of the annotates. If you want to use another shape for the annotate (something else than the normal rectangle), it is explained in the chapter "Shape of the annotate".
###annotatePaddingX/annotatePaddingY
Description : Through the options annotatePaddingX and annotatePaddingY, you can specify a offset value in pixels for the annotate. A positive value for annotatePaddingX will offset the annotate on the right. A positive value for annotatePaddingY will offset the annotate to the bottom. By default, if no annotate position options is specified, the annotate is displayed next to the mouse cursor. The offset between the mouse and the annotate is specified through the annotatePaddingX and annotatePaddingY wich have, by default, a non null value.
Chart Type : All charts
Values : any integer
Default value : 10
###annotatePaddingAngle/annotatePaddingRadius
Description : Through the options annotatePaddingAngle and annotatePaddingRadius, you can specify a offset value in degrees/pixels for the annotate. A positive value for annotatePaddingAngle will offset the annotate in dregrees (clockwise). A positive value for annotatePaddingRadius will offset the annotate to the external part of the chart. By default, if no annotate position options is specified, the annotate is displayed next to the mouse cursor.
Chart Type : Pie, Doughnut, PolarArea.
Values : any integer
Default value : 0
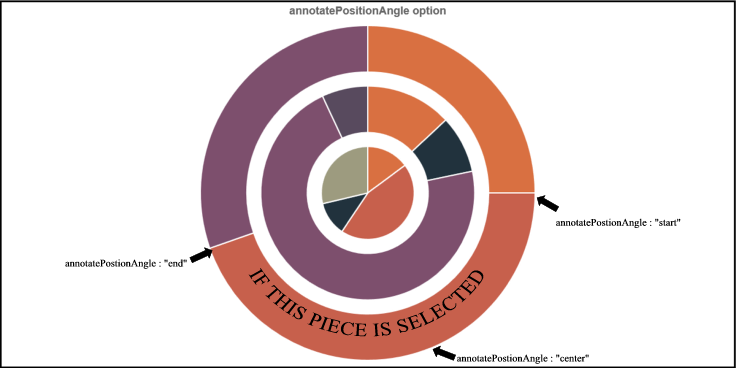
###annotatePositionAngle
Description : For all "circular" charts, you can specify at which angular position in the annotate has to be displayed. It can be displayed at the center of the angle ("center" or "middle"), at the start of the angle ("start"), at the end of the angle ("end") or at the mouse position ("atMousePosition").
Chart Type : Pie, Doughnut, PolarArea
Values : "center", "middle", "start", "end", "atMousePosition".
Default value : "atMousePosition"
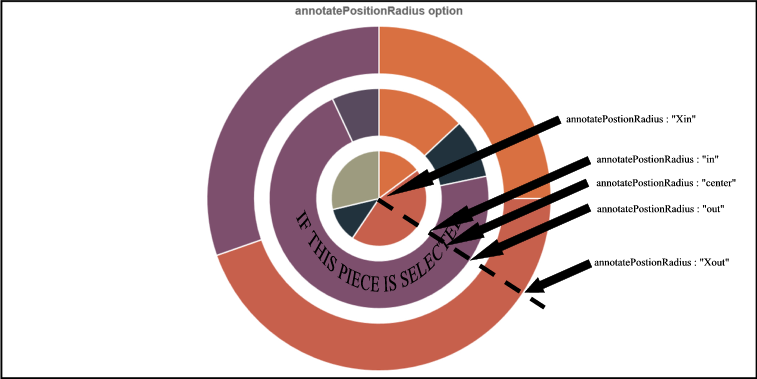
###annotatePositionRadius
Description : For all "circular" charts, you can specify at which radius position the annotate has to be displayed. It can be displayed at the center of the radius ("center" or "middle"), at the start of the radius ("in"), at the end of the radius ("out") or at the mouse position ("atMousePosition"). You can also set the annotate at the most external position from all pieces ("Xout"), at the most internal position ("Xin") at the center of the most internal and the most external position ("MXcenter" or "MXmiddle"). For group of data, you can set at the most internal position of the group ("Xin"), the most external position of the group ("Xout") or at the center of the group ("Lcenter" or "Lmiddle").
Chart Type : Pie, Doughnut, PolarArea, Radar
Values : "out", "Xout", "MXout", "in", "Xin", "MXin", "center", "middle", "Lcenter", "Lmiddle", "MXcenter"," MXmiddle", "atMousePosition"
Default value : "atMousePosition"
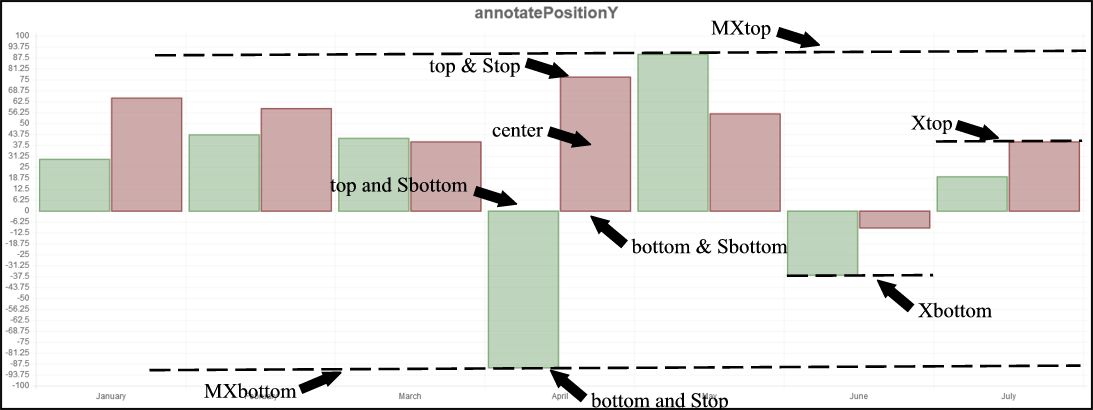
###annotatePositionY
Description : For all non "circular" charts, you can specify the position of the annotate on Y axis.
- It can be displayed at the center of the point/bar ("center" or "middle"), at the top of the point/bar ("top"), at the bottom of the point/bar ("bottom") or at the mouse position ("atMousePosition").
- you can set the annotate at a specific location on the Y axis by specifying a positive integer or a percentage of the chart (for instance "50%" will put the annotate at the middle of the Y axis, "0%" at the top and "100%" at the bottom).
For lines, Bar and StackedBar only:
- If you have negative and positive values on your Y axis, you can have that the annotate is displayed over the point/bar for positive values and under the point/Bar for negative values by specifying "Stop". Similary, "Sbottom" will put the annotate under the point/bar for positive values and over the point/var for negative values .
- You can also set the annotate at the maximum of all values ("MXtop") or at the minimum value ("MXbottom").
- For group of data, you can set the annotate at the maximum of the group ("Xtop") , the minimum ot the group ("Xbottom"). "SXbottom" and "SXtop" are also implemented.
- For lines chart, "LXtop" and "LXbottom" are available : annotate are displayed respectively at the maximum value (resp. minimum value) of the line.
For HorizontalBar only:
- You can also set the annotate at the center of all the bars of the group ("Xcenter" or "Xmiddle")
Chart Type : Line, Bar, StackedBar, HorizontalBar, HorizontalStackedBar
Values : "top", "Stop", "Xtop", "SXtop", "MXtop", "LXtop", "bottom", "Sbottom", "Xbottom", "SXbottom", "MXbottom", "Xbottom", "center", "middle", "Xcenter", "Xmiddle" or an integer or a string with an integer followed by "%".
Default value : "atMousePosition"
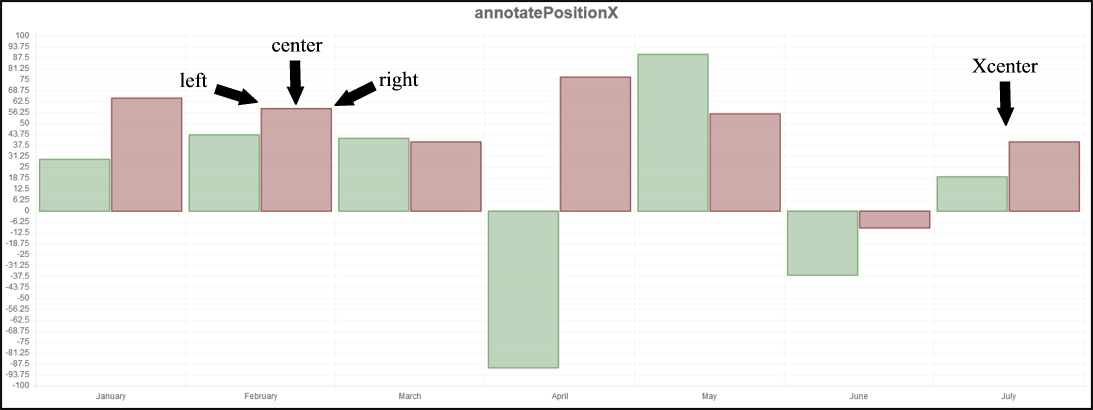
###annotatePositionX
Description : For all non "circular" charts, you can specify the position of the annotate on X axis.
- It can be displayed at the center of the point/bar ("center" or "middle"), at the right of the point/bar ("right"), at the left of the point/bar ("left") or at the mouse position ("atMousePosition").
- you can set the annotate at a specific location on the X axis by specifying a positive integer or a percentage of the chart (for instance "50%" will put the annotate at the middle of the X axis, "0%" at the left and "100%" at the right).
For HorizontalBar and HorizontalStackedBar only :
- if you have negative and positive values on your X axis, you can have that the annotate is displayed at the right of the bar for positive values and at the left of the Bar for negative values by specifying "Sright". Similary, "Sleft" will put the annotate at the left of the bar for positive values and at the right of the bar for negative values ("Sleft").
- You can also set the annotate at the maximum of all values ("MXright") or at the minimum value ("MXleft").
- For group of data, you can set the annotate at the maximum of the group ("Xright") , the minimum ot the group ("Xleft"). "SXright" and "SXleft" are also implemented.
For Bar only :
- You can set the annotate at the center of the group ("Xcenter" or "Xmiddle") .
Chart Type : Line, Bar, StackedBar, HorizontalBar, HorizontalStackedBar
Values : "right", "Sright", "Xright", "MXright", "SXright", "left", "Sleft", "Xleft", "MXleft", "SXleft", "center", " "middle", "Xcenter", "Xmiddle" or an integer or a string with an integer followed by "%".
Default value : "atMousePosition"
The shape of the annotate is not specified through an option : the shape of the annotate has to be the same for all charts in a page : if you have more than a chart in a page, you cannot specify that the shape for one chart is different to the shape of other charts in the page. The shape of the annotates is specified throught the global variable "annotate_shape".
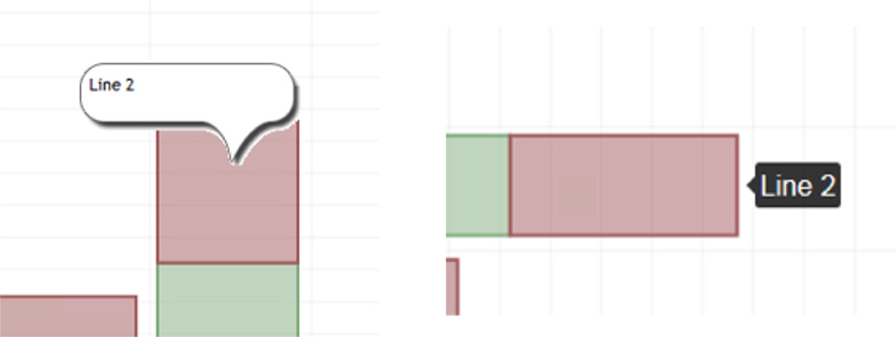
To set the shape of the annotate to a bubble, set the value of annotate_shape to 'bubble_tooltip'.
var annotate_shape='bubble_tooltip';
Bubble annotates are always displayed next to the mouse; You cannot place bubble annotates at other place through the options specified in previous chapter.
By default, the shape of the annotate is a simple rectangle. If you want, ChartNew.js can add an arrow in the direction of the piece that is associated to the annotate. In ordre to get this result, you have to set the variable annotate_shape to the value 'ARROW'.
var annotate_shape='ARROW';
The position of the arrow in the shape is computed by an algorithm and vary according the position of the annotate and the piece that is related to the annotate..
If you want, you can force the arrow to be always at the same place on the annotate. To do this specify the arrow position in the config option annotateClassName.
Allowed value for the annotateClassName option : "TopCenter", "TopRight", "RightTop", "RightCenter", "RightBottom", "BottomRight", "BottomCenter", "BottomLeft", "LeftBottom", "LeftCenter", "LeftTop" or "TopLeft" (options are listed according to the direction of a clock).
    var annotate_shape='ARROW';
    var options={ annotateClassName:"BottomCenter"; }