VS Code Setup Guide
Install the toolkit, arrange the editor, and make a small mod change that you can test. You need VS Code and the game you want to mod. You do not need Node.js or a terminal to use the extension.
Preview guide: These screenshots show the real Windows VS Code application running a local toolkit preview based on 0.5.0, captured on 24 September 2026. The red marks identify controls; the interface has not been redrawn. A separate development profile and a sample mod keep personal projects out of the pictures. Some features, including the mip-level dropdown, require a build with the latest preview changes. Check your installed version if a control is missing. This wiki is mainly AI-generated and has limited human review; please report errors.
This guide lives on GitHub. The extension still has its short built-in tutorial, but does not bundle this guide or add a separate setup-guide command.
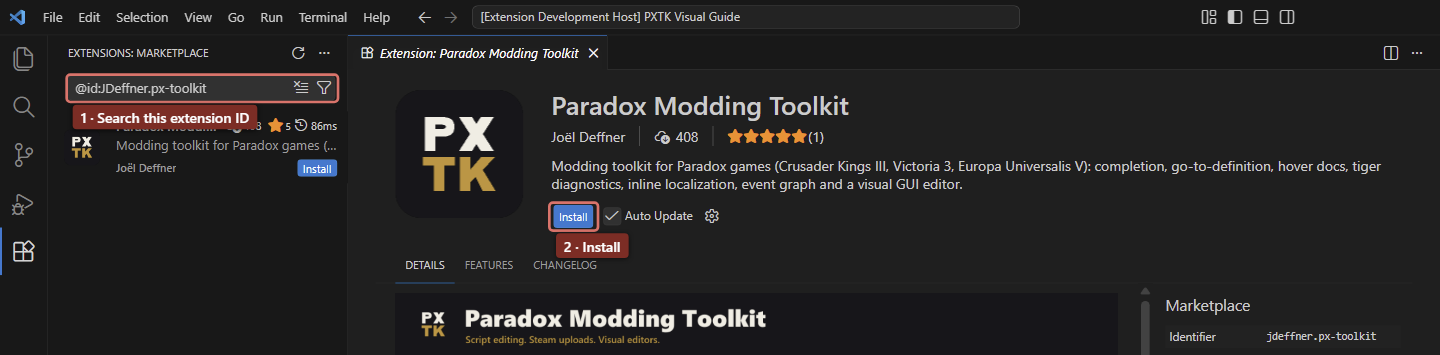
- Open Visual Studio Code and press Ctrl+Shift+X for Extensions.
- Search for
@id:JDeffner.px-toolkit(mark 1). Check that the result is Paradox Modding Toolkit. - Select Install (mark 2). Reload the window if VS Code asks.
- Press F1, type Paradox: Get Started with the Toolkit, and run it.
For a downloaded build, open the Extensions … menu and choose Install from VSIX…. See the release page for published builds. The older CK3 Modding Toolkit listing is separate; see Upgrading.
Check: the tutorial opens, and the PX icon is available in the Activity Bar.
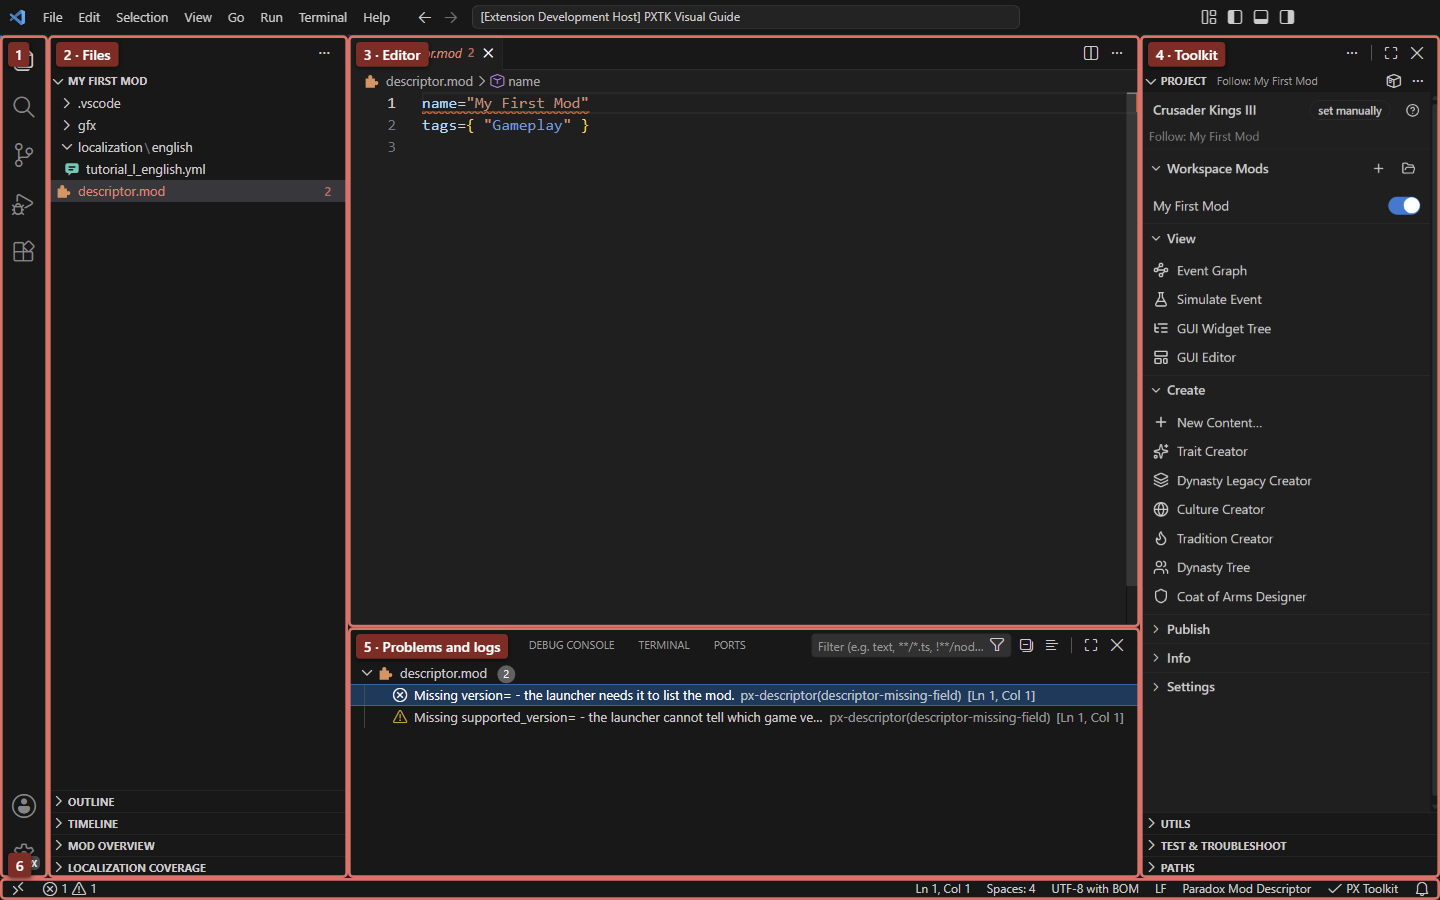
| Mark | Area | Use it for |
|---|---|---|
| 1 | Activity Bar | Switch between Explorer, Search, Source Control, Extensions and PX. |
| 2 | Primary Side Bar | Keep your file tree here. Open files from Explorer. |
| 3 | Editor area | Edit files and open previews. Tabs can be split into groups. |
| 4 | Secondary Side Bar | Keep Project and the other toolkit views beside your work. |
| 5 | Panel | Read Problems and Output. Select a problem to reach its file. |
| 6 | Status Bar | Check language mode, encoding and toolkit readiness. |
The screenshot deliberately uses an incomplete descriptor so that Problems has two findings to show. It is not a finished mod template. VS Code's interface reference explains the window areas.
Keep files on the left, your work in the center and tools on the right. You can change this arrangement at any time.
- Show View > Appearance > Secondary Side Bar.
- Select PX, then drag the Project view header into the right sidebar. Wait for the drop highlight before releasing.
- Move Utils, Test & Troubleshoot and Paths there too. Collapse views you are not using so Project has more space.
For the keyboard route, run View: Move View from F1, choose Project, then choose New Secondary Side Bar Entry. For later moves, choose the view you want to move and the new Project destination.
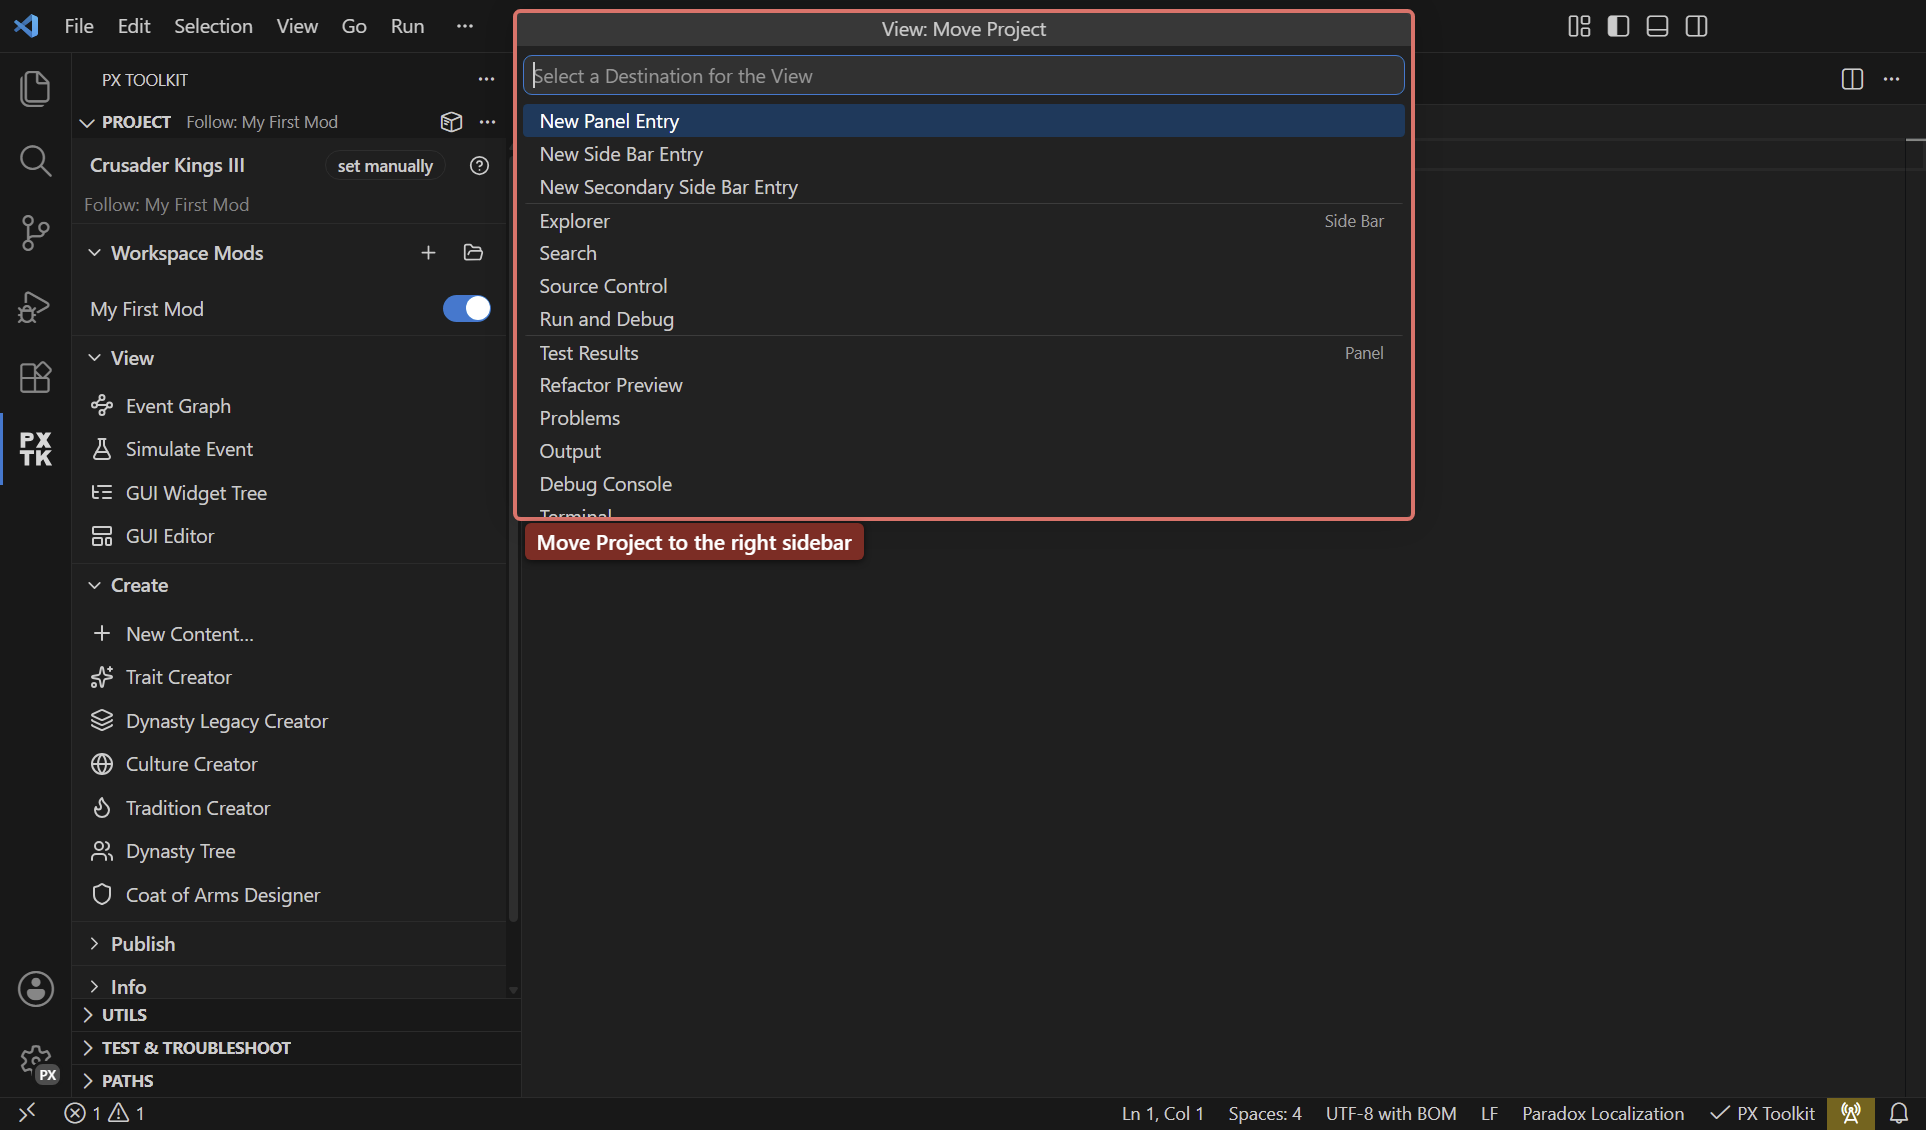
Only the outer view headers move independently. View, Create, Publish, Info and Settings are groups inside Project. Drag dividers to resize areas. View: Reset View Locations restores the default view placement. See VS Code's layout controls.
In Chat's … menu, turn off Show View by Default, then close or move that view. Keep the secondary sidebar visible for toolkit views. If you want to hide all built-in AI features, search Settings for chat.disableAIFeatures. This also disables Copilot features; it is not needed to use the toolkit. See the VS Code Chat FAQ.
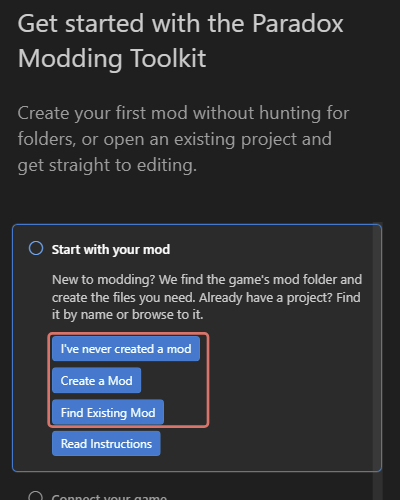
Open the tutorial with F1 > Paradox: Get Started with the Toolkit. The marked buttons offer two routes:
- New mod: choose I've never created a mod, select your game and enter a name. This route also turns on scope inlay hints. Create a Mod keeps your existing hint preference.
- Existing mod: choose Find Existing Mod, then search by name or browse to its folder. You can also open a mod with VS Code's File > Open Folder.
For a first project, keep Game mod folder (recommended). At the last step, choose Add to Current Workspace or Open in New Window. Creating a mod writes its files and launcher registration; it does not enable the mod in a launcher playset.

Check: Explorer contains your mod files, and Project shows the intended game and mod. If you cancel the final opening step, the created files remain. Use the completion notification or Find Existing Mod to open them. See Getting Started for project folders, launcher links and multi-mod workspaces.
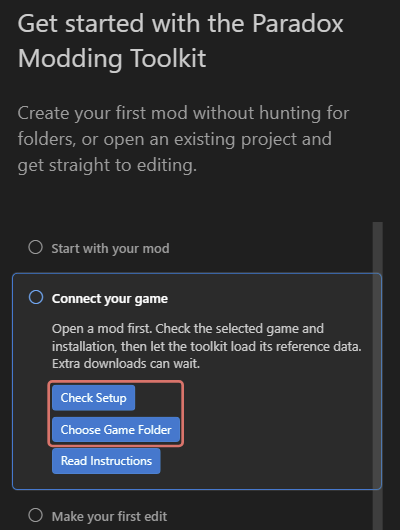
- Open Connect your game in the tutorial.
- Select Check Setup. The toolkit checks the game, mod and reference data.
- If automatic discovery misses the installation, select Choose Game Folder and choose its installation or game-data folder.
- Wait for indexing. Hover PX Toolkit in the Status Bar to see what loaded.
The mod folder is where you edit. The game installation supplies reference files. Keep changes in your mod. If Project shows the wrong game, correct Paradox: Game Id in workspace settings and run the check again. Use one game per workspace.
Missing generated dumps do not necessarily block a first edit: bundled reference data can provide a starting point. See Supported Games and Configuration for your game's paths and available data.
Use Project > Create > New Content… and choose a supported template. Give it a unique prefix when asked. The toolkit creates the relevant files and opens them.

Start with one change. Save with Ctrl+S. In a script, try Ctrl+Space for suggestions, hover a name for help and use F12 to follow a definition. Available templates depend on the selected game.
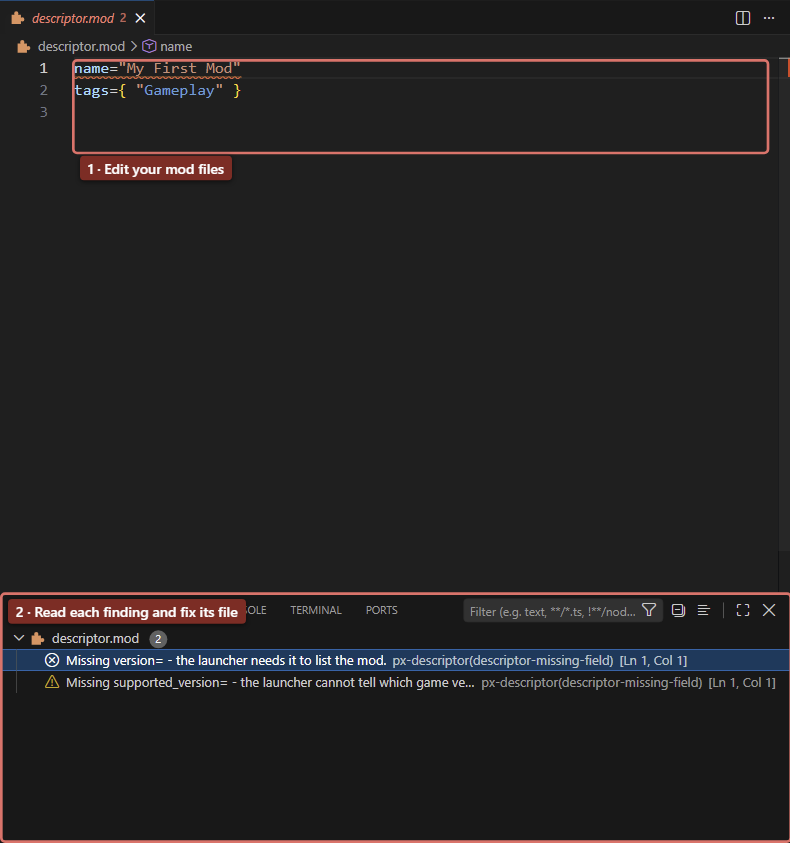
The picture shows an intentionally incomplete descriptor. 1 marks its source; 2 marks the findings that explain what is missing. Select a finding, correct that file, save, and check whether the finding clears. Editor Features covers completion, localization and navigation.
The Status Bar shows language and encoding. A Paradox script opened as Plain Text does not receive the normal script features. Use the toolkit's writers for new content so localization names, language headers and byte-order marks are correct.
Open a .dds file in the DDS viewer. In the preview build shown below, Mip level lists the stored images and their dimensions. Select a smaller level to inspect it; Save preview PNG exports the displayed level. A base-only texture has a disabled picker and a No smaller mipmaps message.
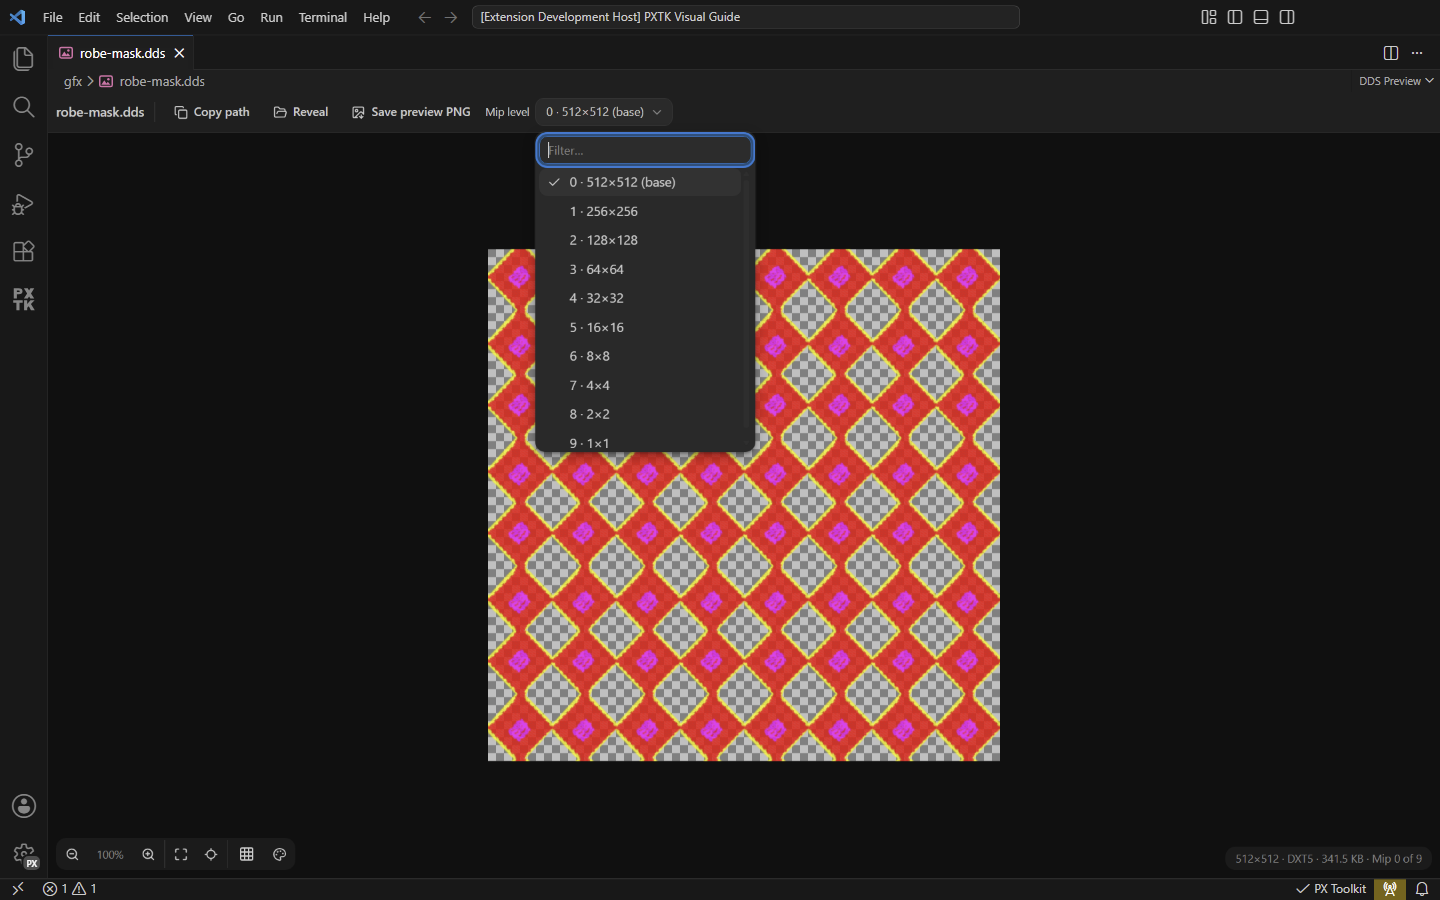
For a replacement texture, use Match a reference DDS during conversion when available. Match the base dimensions, compression and mip count of the relevant game texture. A successful preview alone does not prove that a texture array will accept it. The current converter also has a known filtering difference from some CK3 mask mipmaps: its RGB downsampling is not yet gamma-aware. See DDS and Images for formats and limitations.
Git records local versions of your files. Saving an editor tab does not create a Git commit. A commit does not upload your work.
Open Source Control with Ctrl+Shift+G. If your mod has no repository, choose Initialize Repository, or run Git: Initialize Repository from F1 and select the mod folder. Install Git if VS Code reports that it is missing.
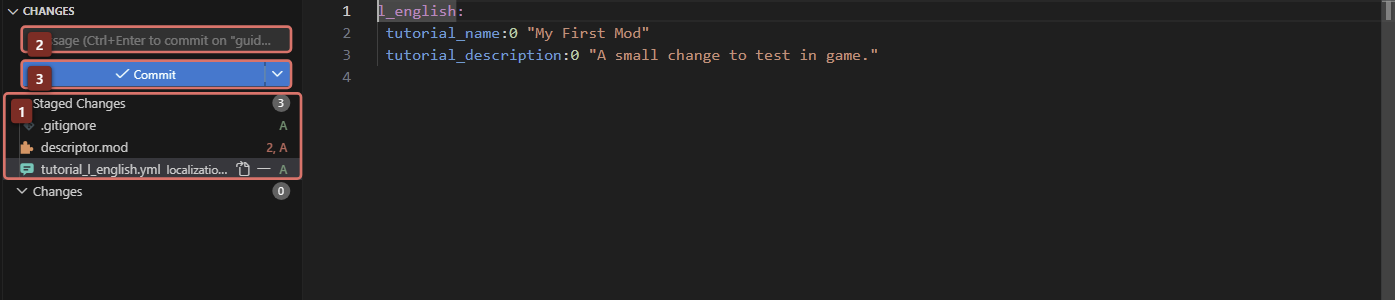
- Review changed files, then use + to stage the files you want in this checkpoint. They move into Staged Changes (1).
- Enter a short message in 2, such as
Add initial mod files. - Select Commit (3). The screenshot shows the stage before that action.
Make another checkpoint after a tested change. Keep unrelated files out of the commit. A remote backup is a separate, optional step; choose its privacy before publishing. See VS Code's source-control guide.
Open the tutorial's validator step if your game offers it. Download Validator installs the selected game's tool; Validate Mod runs it. Read the findings in Problems, fix them, save and rerun validation. CK3 and Victoria 3 have tiger integrations. Validation needs the game files and does not replace a game test.
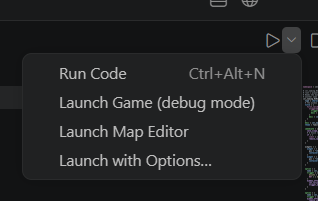
Enable your mod in the intended launcher playset. Save your files, launch the game, reproduce the changed behavior and inspect its error log. A clean editor preview is only one part of the check. Running the Game explains launch choices and log watching.
After a game patch, refresh the reference data too. The tutorial's Refresh reference data for your patch step gives the game-specific dump commands and Reload Game Data action. Check the Status Bar's data-source labels after reloading.
These are Windows defaults. F1 lets you find commands by name if your keymap differs.
| Action | Shortcut |
|---|---|
| Command Palette | F1 or Ctrl+Shift+P |
| Extensions | Ctrl+Shift+X |
| Source Control | Ctrl+Shift+G |
| Open a file by name | Ctrl+P |
| Save | Ctrl+S |
| Suggestions | Ctrl+Space |
| Go to Definition | F12 |
| Problems | Ctrl+Shift+M |
| Close a picker | Esc |
| Symptom | Check next |
|---|---|
| PX or a view is missing | Is the extension enabled in this VS Code profile? Try View: Open View or the toolkit's Get Started command. |
| Suggestions are absent | Check the file's language mode, selected game, indexing state and setup report. |
| Tools target another mod | Check Project's Follow/Pin state and the active file. |
| A preview control is missing | Compare your installed version with the preview build described here. |
| The game ignores a change | Check saved files, the actual mod path, playset, encoding and game log. |
| You need to report a bug | Include toolkit version, game patch, action, expected result and exact error. Remove private paths from shared logs. |
For the full feature map, continue with Feature Overview, Sidebar Views or Configuration.