Repository navigation
Getting Started
This page walks you through the first launch and the everyday tasks: placing overlays, configuring them and finding options. Make sure your game is set up first: see Game Setup.
On first launch, the setup wizard asks a few questions. Every choice can be changed later, and nothing is applied before Finish Setup: closing the wizard (Esc or the window close button, after a confirmation) keeps everything as it was. The steps are listed on the left: click one to go back to it, Enter goes to the next one.
-
Welcome:
EnglishorFrançais. The wizard switches language at once, the app once setup is finished. -
Game: the game to read telemetry from (
Le Mans UltimateorrFactor 2). A game running now is markedRunningand picked for you. -
Units:
Metric(km/h, °C, L, kPa, kg) orImperial(mph, °F, gal, psi, lb), saved in the preset. A preset with mixed units can keep them (Keep current units). Each unit can be changed later in the preset units. -
Appearance: the window theme (
Modern Dark,Modern Light,Legacy DarkorLegacy Light, each drawn in its colors), the overlay theme (the same four, with an overlay drawn in each),Colorblind safe colorsand the modern font (values in monospace JetBrains Mono, labels in Barlow; off: each overlay in its own font). A preview shows overlays in the chosen style. -
Overlays: create a new preset (the name is checked as you type) or pick an existing one, then check the overlays to show, each shown as a picture: Relative, Standings, Deltabest, Fuel, Virtual Energy, Pedal, Gear, Steering Wheel, Tyre Temperature, Brake Temperature, Flag, Session, Weather, Radar, Track Map and Trailing.
Recommendedchecks Relative, Deltabest, Fuel, Pedal, Gear and Flag. With an existing preset, the overlays it already shows are checked, and unchecking one turns it off; overlays not listed keep their state. -
Ready: every choice, with
Changeto go back to its step, and tips for the first drive.
Overlay pictures are drawn with the overlay settings on a simulated race (a GT3 mid race at Road Atlanta), so you see what each overlay shows before you drive.
The wizard is shown once. Open it again from Help > Setup Wizard.
The navigation bar on the left gives access to pages and tools:
| Entry | What it does |
|---|---|
Home |
Game and session state, overlay lock, last session, quick access, release notes |
Overlays |
Turn overlays on or off and configure them |
Stats |
Driver Stats |
Results |
Results of past sessions: classification, laps, sectors, incidents and penalties |
Broadcast |
Broadcast Director (Le Mans Ultimate) |
Telemetry |
Telemetry Viewer |
Race |
Race Calculator |
Preset |
Load, create and manage presets, see Presets and Settings |
The gear button under the bar opens Config: every global option of the app (also Ctrl+,), see Presets and Settings.
- Right-click the bar and choose
Customize Navigation Bar...to show, hide or reorder entries. TheModule(data modules used by overlays and tools),Hotkey(keyboard shortcuts),Tools(every tool and editor),SpectateandPacenotespages are not in the bar by default: add them back there, or open them from the command palette (Ctrl+K) or the Home page quick access. In 0.23.0 the bar of every user was set once to this default (Broadcastin place ofSpectate).Ctrl+1toCtrl+9open the first nine entries. - Tools, editors and settings open as pages inside the window.
Alt+Leftor the mouse back button goes back to the previous page. A page you leave closes by itself, unless it has unsaved changes. Navigation bar tools stay as you left them, and are reopened at the next start with the page shown last (Window>Reopen Pages at Startup). -
Ctrl+Kopens the command palette: type to find and run pages, overlays, modules, tools, presets and options. - A dot (
•) marks pages with unsaved changes.Ctrl+Ssaves the page shown. Invalid values are outlined in red with the reason while you type. - The menu bar has
Overlay,API,Config,Tools,WindowandHelpmenus. -
Window size: at first launch the window opens at a comfortable size, centered on the screen. Its size, position and maximized state are remembered (
Window>Remember SizeandRemember Position), saved a moment after each change so a crash keeps them too. Wide tools (race results, telemetry, layout editor...) grow the window while they are open, keeping it inside the screen, and give it back its size and place once closed: the grown size is never remembered. The window can never be made so small that pages overlap or get cut: the page area keeps a minimum size (about 650 × 445 pixels at 100% scale), larger while the telemetry viewer (its toolbar and three panels stay whole, in every language) or driver stats are shown. The navigation bar keeps its width, and its selected entry stays in view when the window is short. The window is also brought back on screen if it was left on a monitor that is no longer there.Window>Reset Window Size and Position(also in the command palette) puts it back to the default size, centered.
The app also has a tray icon. Click it to show the main window, right-click it for the overlay menu (Lock Overlay, Auto Hide, Reload, Quit...). With Window > Minimize to Tray, the window close button hides the app to the tray instead of quitting.
The Home page shows at a glance:
- the installed version, with a
Release Notesbutton (what's new in this version, readable offline) and the available update, if any; - the game state with the current session (track, session, position, lap), and a reminder of the game setup while the game is not running;
- a one-click
Lock Overlay/Unlock Overlaybutton; - the preset, overlays and modules in use, and the last session you drove;
-
Quick Access buttons (by default: Lap Telemetry Viewer, Race Calculator, Driver Stats Viewer, Layout Editor, Widget Performance, Results & Replays, the Overlays, Module, Preset, Spectate, Hotkey and Tools pages, Create Bug Report, Check for Updates). The Module, Hotkey and Tools pages, not in the navigation bar by default, are one click away there. Use
Customize...next toQuick Access, or right-click the buttons, to choose tools, pages and actions.
Overlays appear when your car is on track and hide when you are in menus or not driving (Auto Hide, on by default in the tray menu). Each overlay can also be limited to some sessions or to the pits: see Overlays.
While the overlay is unlocked you can move overlays with the mouse; once locked, they stay in place and clicks go through to the game. The lock state is kept between starts.
-
Unlock:
Unlock Overlayon the Home page, tray icon menu > uncheckLock Overlay, the command palette or theoverlay_lockhotkey. Overlays stay as they are: move the mouse over one to see its outline, name and corner handle. For the edit mode, right-click an overlay >Edit Mode: a toolbar shows up at the top of the game screen, and every overlay shows its outline and name, also the ones that draw nothing yet and the ones hidden byAuto Hideor their visibility context (so you can place them from the game menus too). To start the edit mode at each unlock, turn onenable_edit_mode_on_unlock(Config>Application>Overlay Editing). -
Drag an overlay to move it. It snaps to screen edges, screen center and the edges and centers of the other overlays; hold
Ctrlto move freely,Shiftto keep the move horizontal or vertical. Alignment guides and the position of the overlay show while dragging.Grid Movemoves overlays on a grid. -
Fine-tune with the keyboard: click an overlay to select it (solid outline), then arrow keys move it by one pixel (
Shift: 10 pixels, one grid step withGrid Move).Ctrl+Z/Ctrl+Yundo and redo,Deleteturns the overlay off,Escunselects it. - Resize an overlay with its corner handle: its size options (font size, bar size...) are scaled.
- Right-click an overlay for
Config,Center Horizontally,Center Vertically,Move to Screen(same place on another monitor),Visibility,Opacity,Undo,ReloadandDisable. -
Lock again when done:
Lock Overlayin the right-click menu, tray menu or Home page (Doneon the edit mode toolbar).
The toolbar has Snap (option enable_magnetic_snap), Grid and Guides toggles, Undo / Redo, Overlays (active overlays, uncheck one to turn it off, or open the Overlays page) and Done. Drag it by its grip. Its ✕ hides it and leaves the overlay unlocked; right-click an overlay > Edit Mode brings it back. Everything done while unlocked can be undone until the overlay is locked.
Without the edit mode (and for an overlay already unlocked when the app starts), the outline and corner handle only show under the mouse, so nothing stays on screen if you drive with the overlay unlocked.
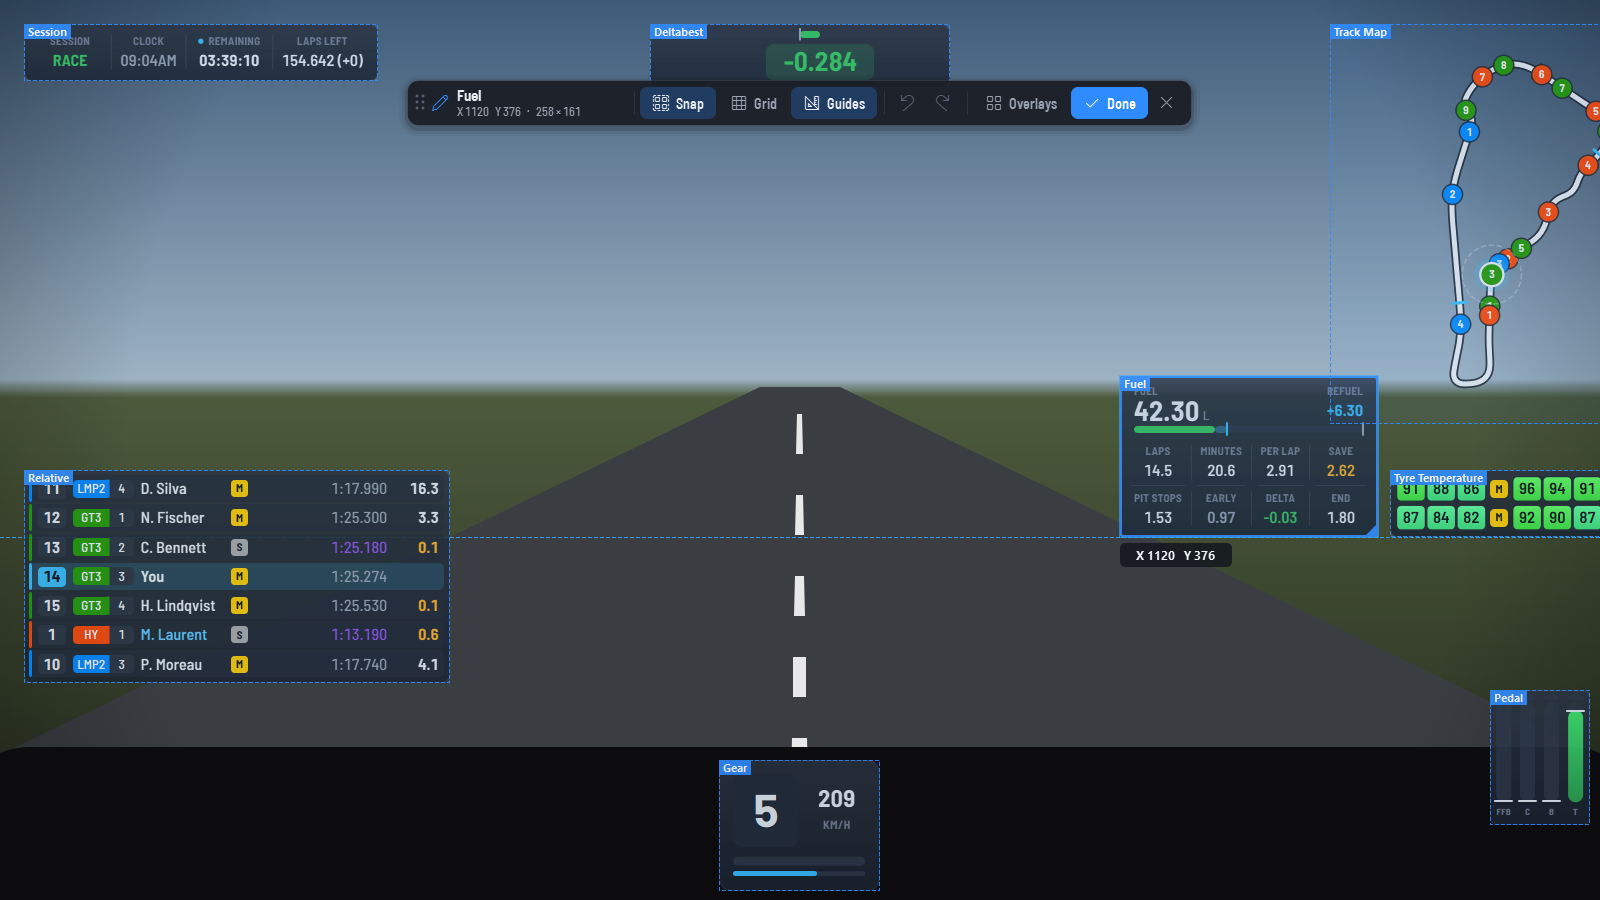
Positions are saved in the preset, and remembered per screen setup (screens plugged, resolution). To make every overlay bigger or smaller at once, set overlay_scale in Config > Overlay Style.
Tools > Layout Editor places overlays on a picture of the game instead of over the desktop:
-
Load Screenshot...uses a game screenshot as background,Capture Screengrabs the primary screen. - Drag the boxes: edges and centers snap to other overlays, screen edges and screen center (turn off with
Snap, or holdAlt). - Arrow keys move the selected overlay by 1 pixel (
Shift: 10 pixels). -
Applymoves the overlays and saves their positions,Resetreloads the current positions.
- Open the
Overlayspage. Each overlay is a card with a preview drawn with your settings, its category and its switch. The buttons at top right switch to a compact list (preview in a tooltip); the choice is kept (show_overlay_previewsinConfig>Application). - Turn an overlay on or off with its switch. Type part of a name in the search box (accents and case ignored, several words allowed), choose
All,ActiveorInactive, or click a category chip (the number of matching overlays is shown on each chip, click it again to show all). - Click a card (or the gear button shown on its preview) to open its options in the Overlay Options page. Right-click a card for its menu: options, enable or disable, show only its category.
- Change options, then
Apply(Ctrl+S): the preset is saved and the edited overlays restart. See The Overlay Options page.
At the bottom, Enable All and Disable All switch every overlay at once (with a confirmation). While a search or filter is active they become Enable Shown and Disable Shown and only switch the overlays shown. An overlay that is on but could not start shows an Error badge, with a notice at top to open the log. Every option is described in its tooltip and in the settings reference.
Keyboard: type anywhere on the page to search, / jumps to the search box, arrows move between overlays, Space switches the selected overlay, Enter opens its options, Esc clears the search.
One page holds the options of every overlay: the overlays on the left (by category, a filled dot when the overlay is on), the options of the selected one in the middle, and a live preview on the right (on wide windows) drawn with the values you have not applied yet. It also opens from a right-click on an overlay on screen, Find Option and the command palette (Ctrl+K).
-
Sections:
General,Position & Layout,Font, then one section per item the overlay shows (Speed, Time Gap, Fuel Level Bar...). The on/off switch of an item is in the title of its section; while it is off, its options are dimmed. Click a section title to fold it (Collapse All/Expand Allat top), itsResetbutton puts its options back to default.Display Orderis a list moved with the arrows. Relative, Standings and Rivals have aColumnslist instead: the columns from left to right, each one with its on/off switch, moved by drag or arrows, and their live preview shows a sample race. -
Only the options of the design in use are shown: switch
Enable Classic Layoutand the options of the classic layout show up at once. -
Search (
Ctrl+F): inThis overlayor inEvery overlay, for exampleopacityto set it for all overlays in one list.Changed onlylists the options changed from their default (in one overlay or in all of them); the overlay list shows how many options each overlay has changed. -
...button of an option:Reset to Default,Apply to All Overlays(the value goes to every overlay having this option: font, opacity, update interval, theme...),Copy Option Name. -
Changes stay pending until
Apply, for as many overlays as you like: the overlay list shows how many changes each one has,Undo/Redo(Ctrl+Z/Ctrl+Y) andDiscardare in the bar at the bottom. An invalid value is marked at once with the reason and blocksApply(click the message to show it).Applysaves the preset once and restarts only the overlays you changed. -
Dashboard HUD (formerly Black box): its own sections,
Advanced Options(simple mode shows the main items),Color Theme...(default or colorblind safe colors), display profile (options set by the profile say so; changing one switches toCustom) withSave as Profile...for your own profiles, and a click on a part of the picture shows its options.
Press Ctrl+F (Config > Find Option...) to search all options of all overlays, modules, the preset and the application, in English or in the current language (accents and case are ignored). Best matches come first, with the current value of each option; a dot marks options changed from their default.
- Click a result (or
Enter) to open it: theOverlay Optionspage or theConfigpage scrolled to the option, or a module page filtered on it. - On / off options have a switch in the list (or
Space): the change is saved and applied at once. - The chips (
Overlays,Modules,Preset,Application) narrow the results;Changed onlylists every option set apart from its default, even without search words. - Right-click a result:
Reset to Default,Copy Option Key(the name used in setting files and in the settings reference).
Config > Units sets units for distance, fuel, speed, temperature, pressures, power and weight. Overlays, tools and the web dashboard follow them.
Modules compute the data that overlays show: lap times and deltas, fuel and energy, positions of every car, tyre and brake wear, track map... The Module page (command palette Ctrl+K, or add it to the navigation bar) shows each module as a card:
- what it computes, its state (
Running,Disabled, orErrorwhen it could not start: see the log) and its update interval; - how many enabled overlays use its data (their names in the tooltip) and the modules using it. A module turned off that enabled overlays or modules need is flagged in orange, and
Enable Themat the top of the page turns those modules back on; - its switch and its
Configbutton (update intervals and options of the module). Right-click a card to reset its saved data: delta best (Delta), fuel and energy delta (Fuel), consumption history (Stint), sector best (Sectors), track map (Mapping).
Search, All / Active / Inactive and the keyboard work as on the Overlays page. Keep every module on unless you know an overlay does not need it.
A preset stores the layout and options of all overlays and modules. You can keep several (one per car class, one for VR...), load one with a double-click on the Preset page, and have one loaded automatically per class or track. See Presets and Settings.
The Hotkey page binds keys to commands: show, hide or lock the overlay, reload or switch presets, restart the API, spectate the next driver, cycle the delta best source, show the next Dashboard HUD incident, bring the main window in front of the game and focus it, even from the tray (show_main_window), drive the Broadcast Director (director_* commands), turn any overlay or module on or off, load a given preset, restart or quit the app.
- Click the
Disabledbutton to turn global hotkeys on (it then showsEnabled). - Click the key button of a command and press a key or key combination (
Clearremoves it,Clear Allremoves every binding). Preset commands also ask which preset to load.
Hotkeys do not block the key for other programs. Global hotkeys are not supported on Linux. The same commands can be run by other programs (Stream Deck, SimHub...): see Connections.
The Spectate page shows the data of another driver in your overlays (delta, fuel, timing, inputs...): in a replay, or while watching a session.
- Turn on the switch at top right (or click any driver: spectate mode turns on).
- Click a driver to follow it. The card on top shows the driver followed, with place, class, car and best lap; the arrows (
Alt+Left,Alt+Right) go to the previous or next driver by place,Stopfollows nobody. - Search by driver, car or class, keep one class with its chip, sort by position or name. Your own car is marked
You.
Drivers are read only while the page is shown. The spectate_mode, spectate_next_driver and spectate_previous_driver hotkeys do the same from the game. The page is no longer in the navigation bar by default (open it from the command palette or the Home page quick access). To cast a whole race with cameras and graphics, use the Broadcast Director (LMU).
- Overlays: designs, themes and the list of all overlays.
- Telemetry Viewer: analyze your laps.
- Race Calculator: plan fuel, energy and tyres.
- Troubleshooting if something does not show up.