Introduction to Unity Animators
Unity uses a state-machine allowing to combine different animation clips and blend trees with simple transitions. Using the animator and additional scripting, simple animation clips can be combined to simulate more complex behavior. For example, we can combine three individual clips waving to the front, left, and right in a blend tree and combine them, depending on the goal direction relative to the current forward-facing direction.
Although you can utilize MMUs to execute simple animation clips, using such standard tools as the Unity Animator Controllers are beneficial in multiple relations:
- it is computationally more efficient
- there is a higher-level of control for the mmu developer
- the combination of animation clips can be visually investigated
- a better MMU can be created, being able to simulate behavior with different goals and in different environments
The resulting MMU would be not only able to replay a single motion capture clip (e.g. wave to the front), but to simulate human behavior based on the environment and the goal (e.g. wave in the direction of any goal position).
Unity Animator Controllers are further described in the Unity Manual
As an example, we created a Waving MMU, which should wave in the direction of a goal in front of the character. For this purpose, three motion capture clips have been capture, post-processed and exported as FBX files. See From MoCap to MMU for more information. The example assets for the Unity Animator example can be downloaded as a Unitypackage.
In order to import an FBX to Unity, simply drag and drop it from the windows file explorer to the project tab or use the "Assets" - "Import a new Asset" dialogue from the Unity menu.
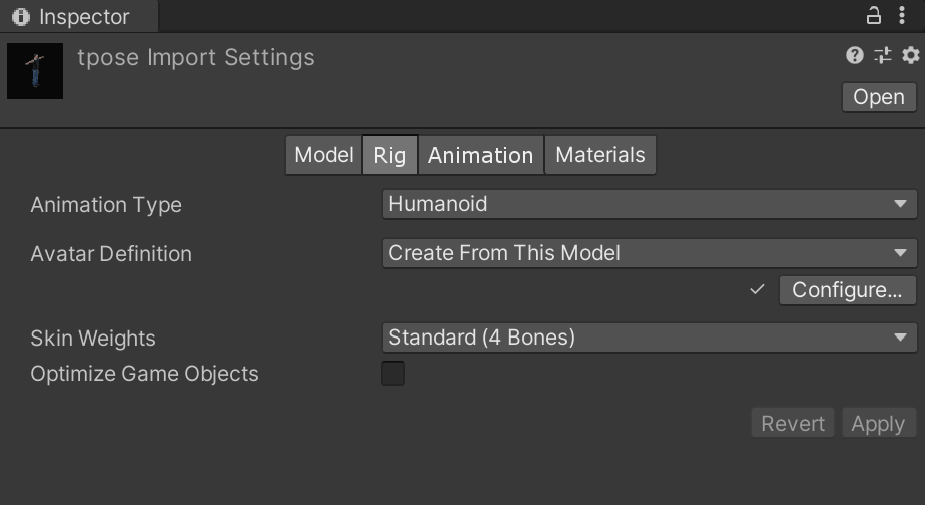
After importing, the FBX file will appear as an asset in your Unity project tab. In order for animations to work properly inside the Unity (Mechanim) animation system, please ensure that both, the asset containing the animation and, if used, the asset containing the avatar are set to the humanoid skeleton. For this, select the asset, and select "Humanoid" as the Animation Type. Afterwards, press "Apply".
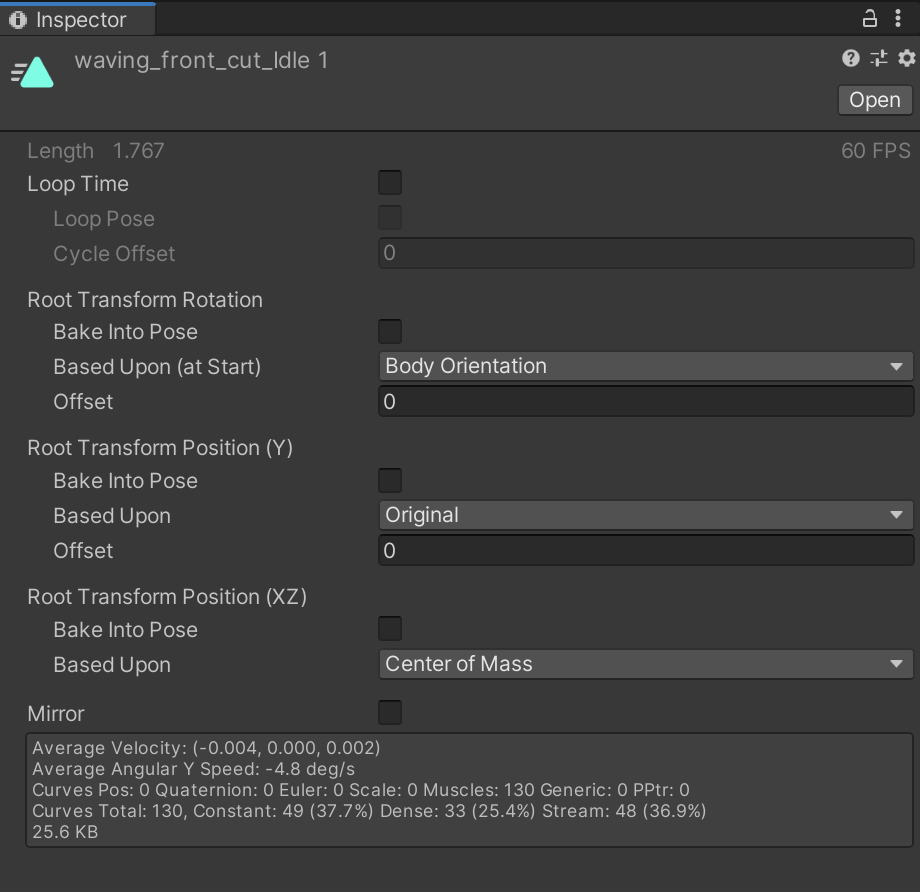
In some cases, e.g. when importing animations from Blender, a single FBX file can contain multiple animations. In order to be able to edit the animations, you can extract them from the asset by selecting an animation, and duplicating it by pressing + or selecting "Edit"-"Duplicate" from the menu. It will create a duplication of the animation outside of the asset, which is editable, can be renamed, cutted, or looped. For more information, please consider the Unity documentation on Animations.

Root motion will be usually transferred to the main transform of the avatar. If you want to keep the root movement in the animation, please select the "Bake into Pose" option from the inspector window with the animation details. For more information, please consider the Unity Documentation Inside the animation details, looping can be controlled as well.
As described above, the animation controller is a state-machine allowing to blend and combine different animation clips. In order to create a new animation controller select the "Assets" - "Create" - "Animation Controller" dialogue either from the Unity menu or by right-clicking into the project folder.
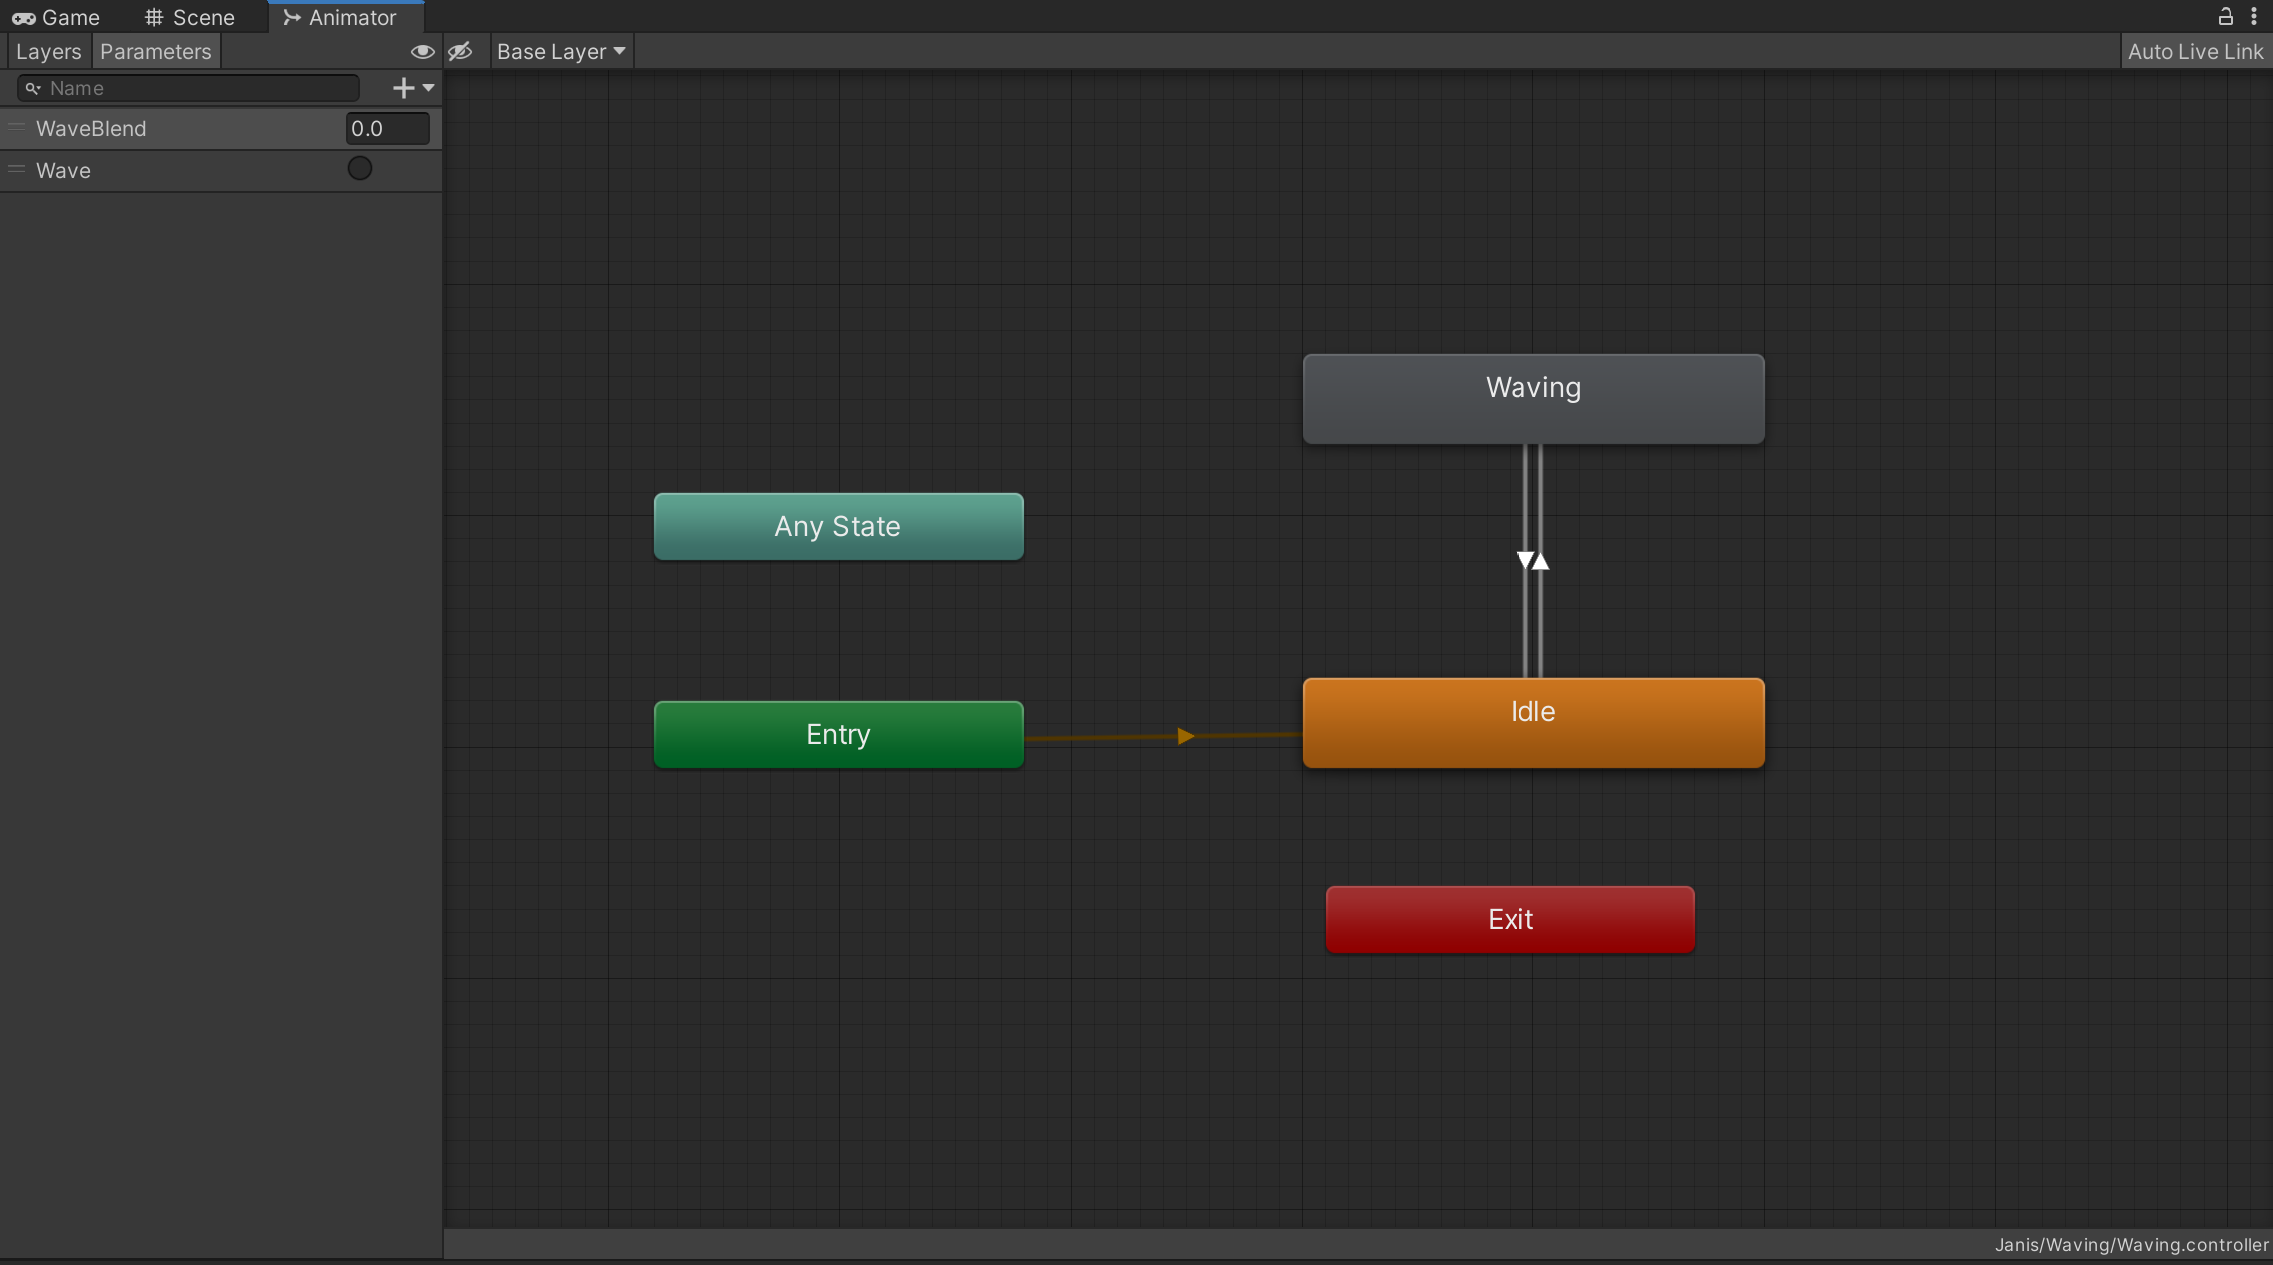
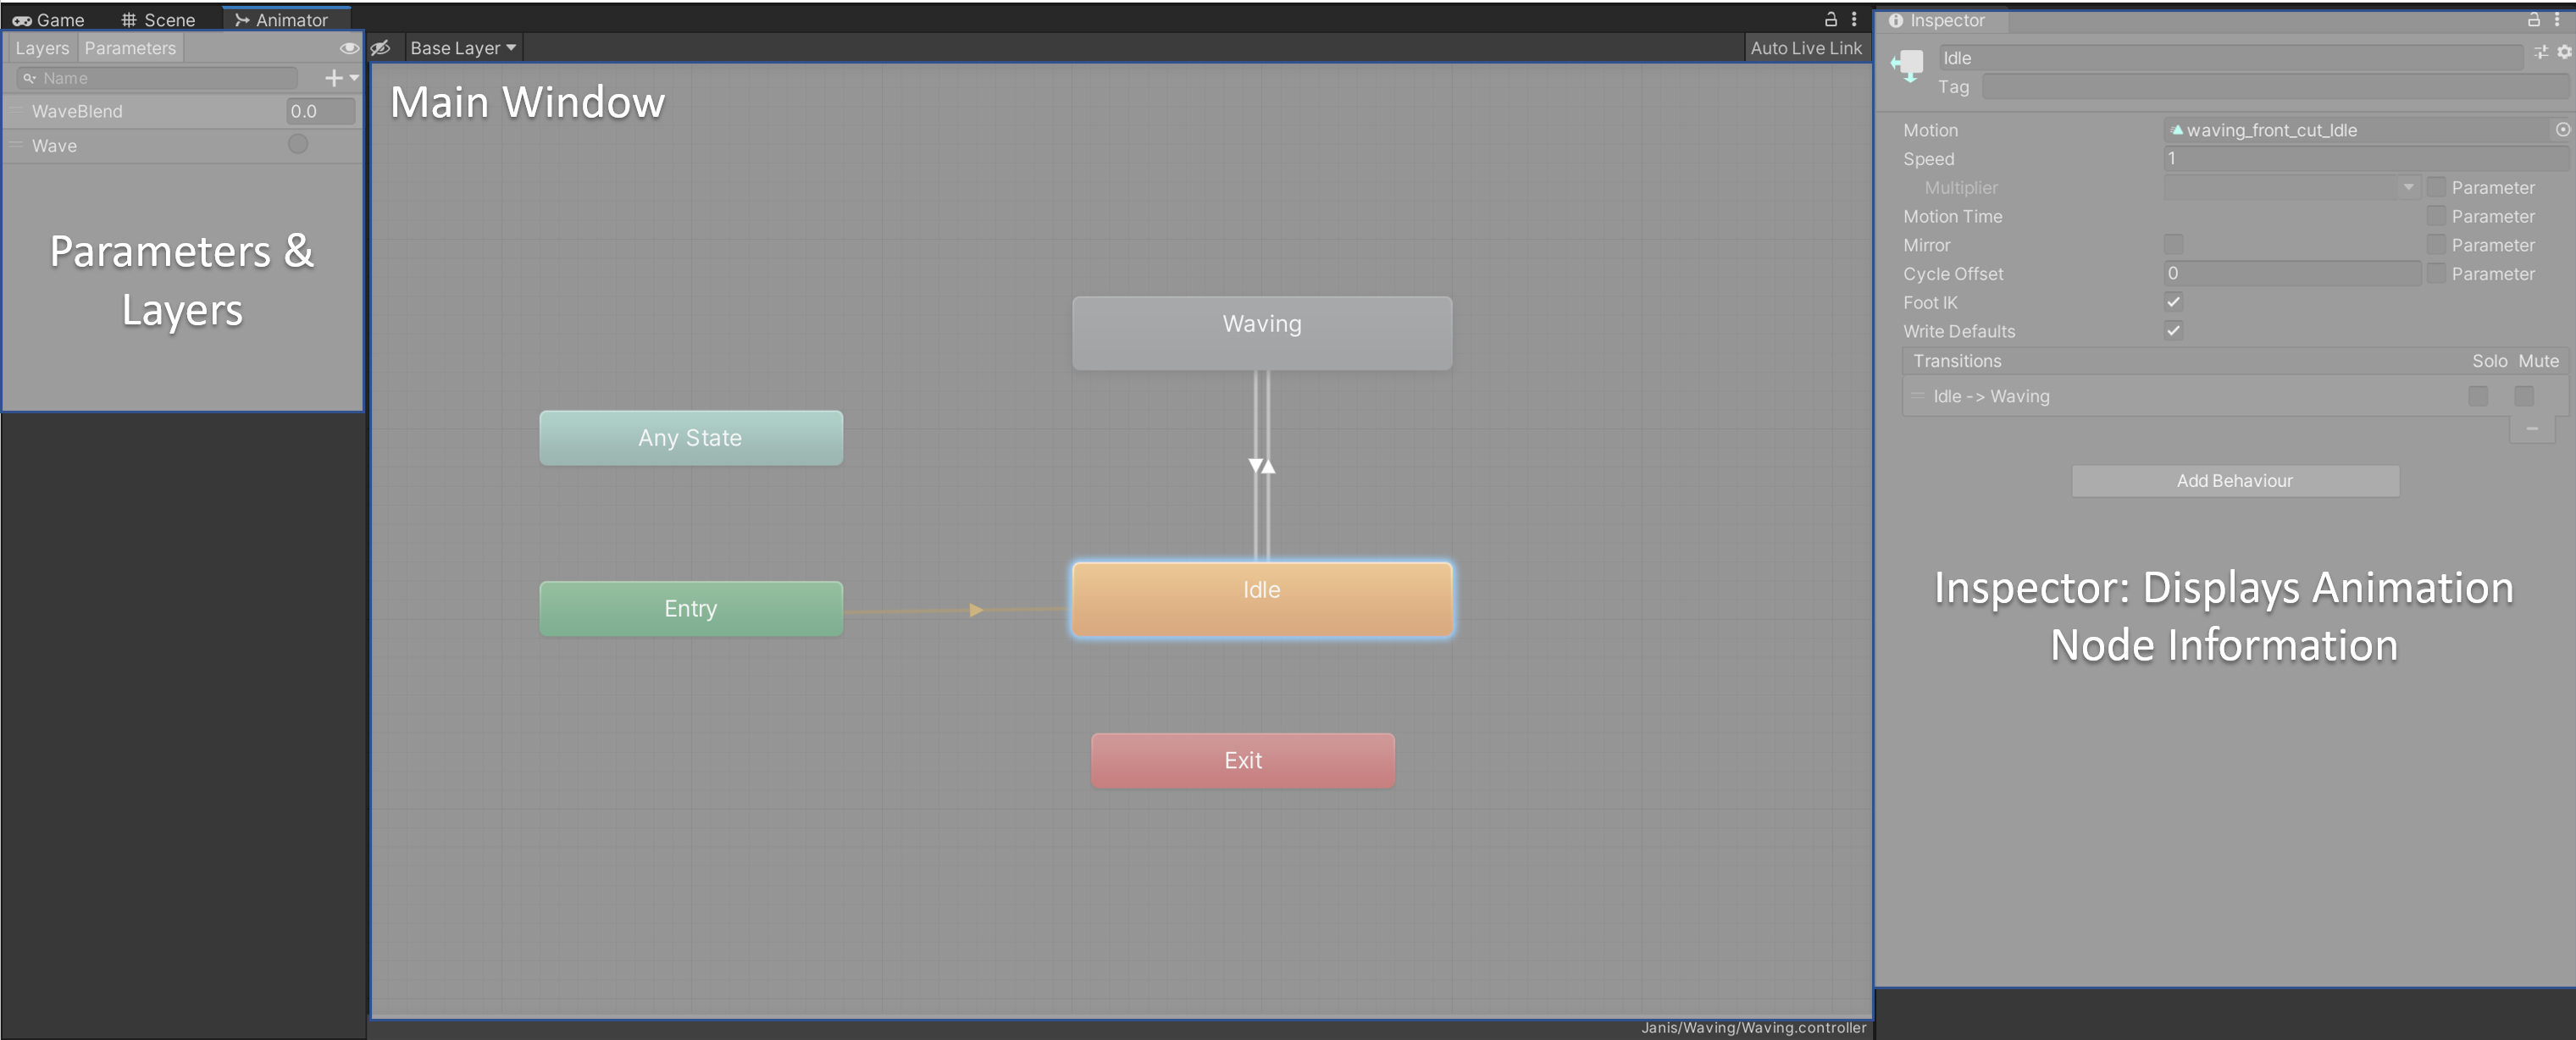
Inside the animation controller, states representing individual animation clips, blend trees, or sub-controllers can be created by right-clicking into the controller graph window. It is possible to add transitions between states by right-clicking on the state and selecting "Make Transition". The inspector displays information about animation states or transitions, depending on the selection in the main window.
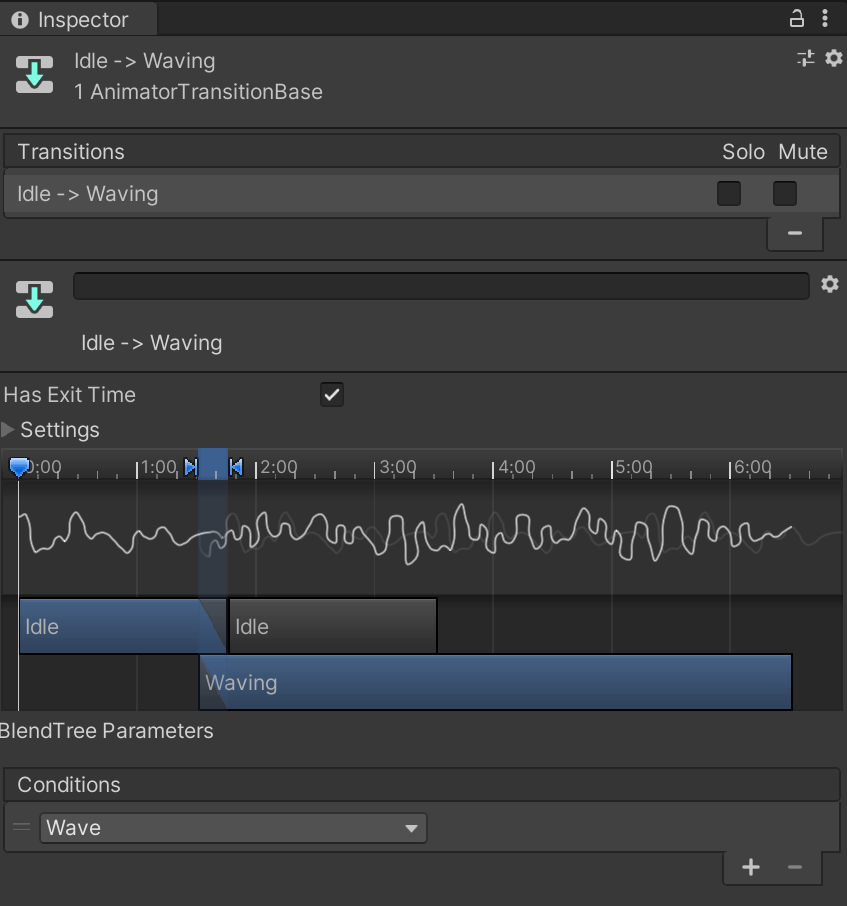
If an animation clip is configured to be looping, the animation state will be constantly active, until a transition condition is true. If the animations are not looping (e.g. in the examples blend-tree), there will be an outgoing transition as soon as the animation is finished. There always has to be a default state defined. This usually is something similar to "idle" animation. Blend trees can be default states as well. The default state is highlighted in orange. If a transition is set to "Has Exit Time", it will perform a linear blending over time to the next animation state. The blending window can be configured. If the flag is not set, there will be no blending and the new animation state will start to play at the next engine update. It is possible to tie transitions to conditions via parameters. It is possible to define float, int, bool and trigger parameters. Trigger parameters can be used to trigger the "start" of an animation type. For the other parameters, conditions can be defined with "greater", "less", "equal" and "nonequal" operations. Parameters can be created left to the main controller window.
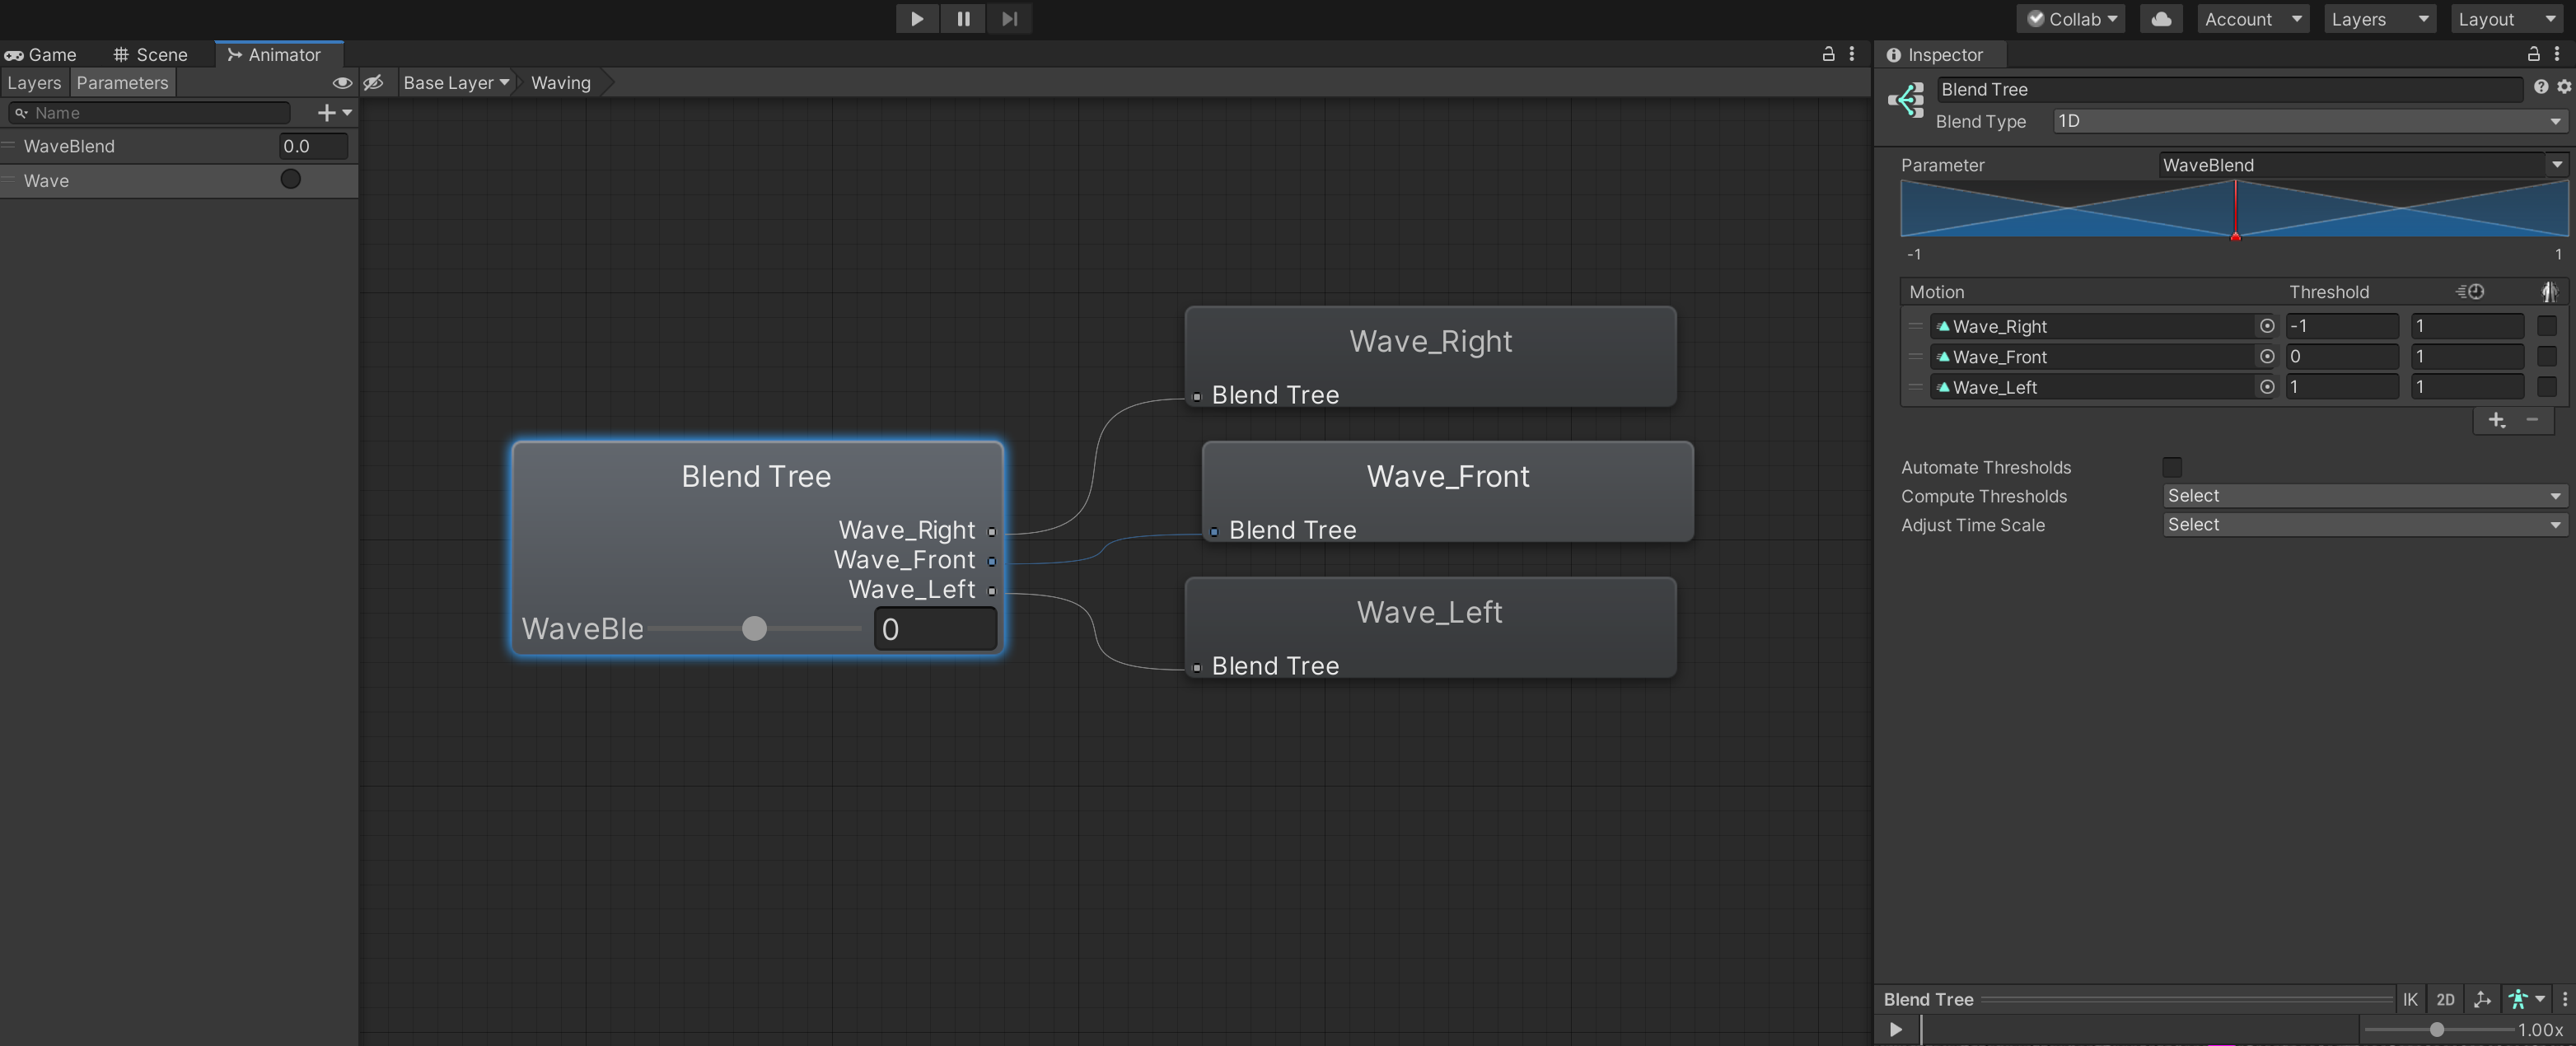
To enter a blend tree, double-click on the blend tree. To exit a blend tree, select the "Base Layer" on the top of the main animator window. There are multiple blending functions, which are described in the Unity documentation (https://docs.unity3d.com/Manual/class-BlendTree.html). Here, we will only discuss linear one-dimensional blending. The blend tree was set up to play the front-waving animation at a blending factor of 0, the right-waving at a blending factor of -1 and the left-waving at a blending factor of 1. The blending factor (blend wave) should not be set to values larger than 1 or smaller than -1. Values between 0 and 1 will result in a simple linear blending of the poses of the front-waving and left-waving animations for every frame. In order to set the blending thresholds to specific values, the "Automate thresholds" option must be disabled. Inside the blend tree, there are options to reverse and speed up the animation, as well as mirroring the animation from left-to-right and vice versa. The blending factor will not accommodate for time on its own. If the goal is to simulate acceleration (e.g. transitioning from walking to running), please ensure, that the blending factor is changed smoothly.
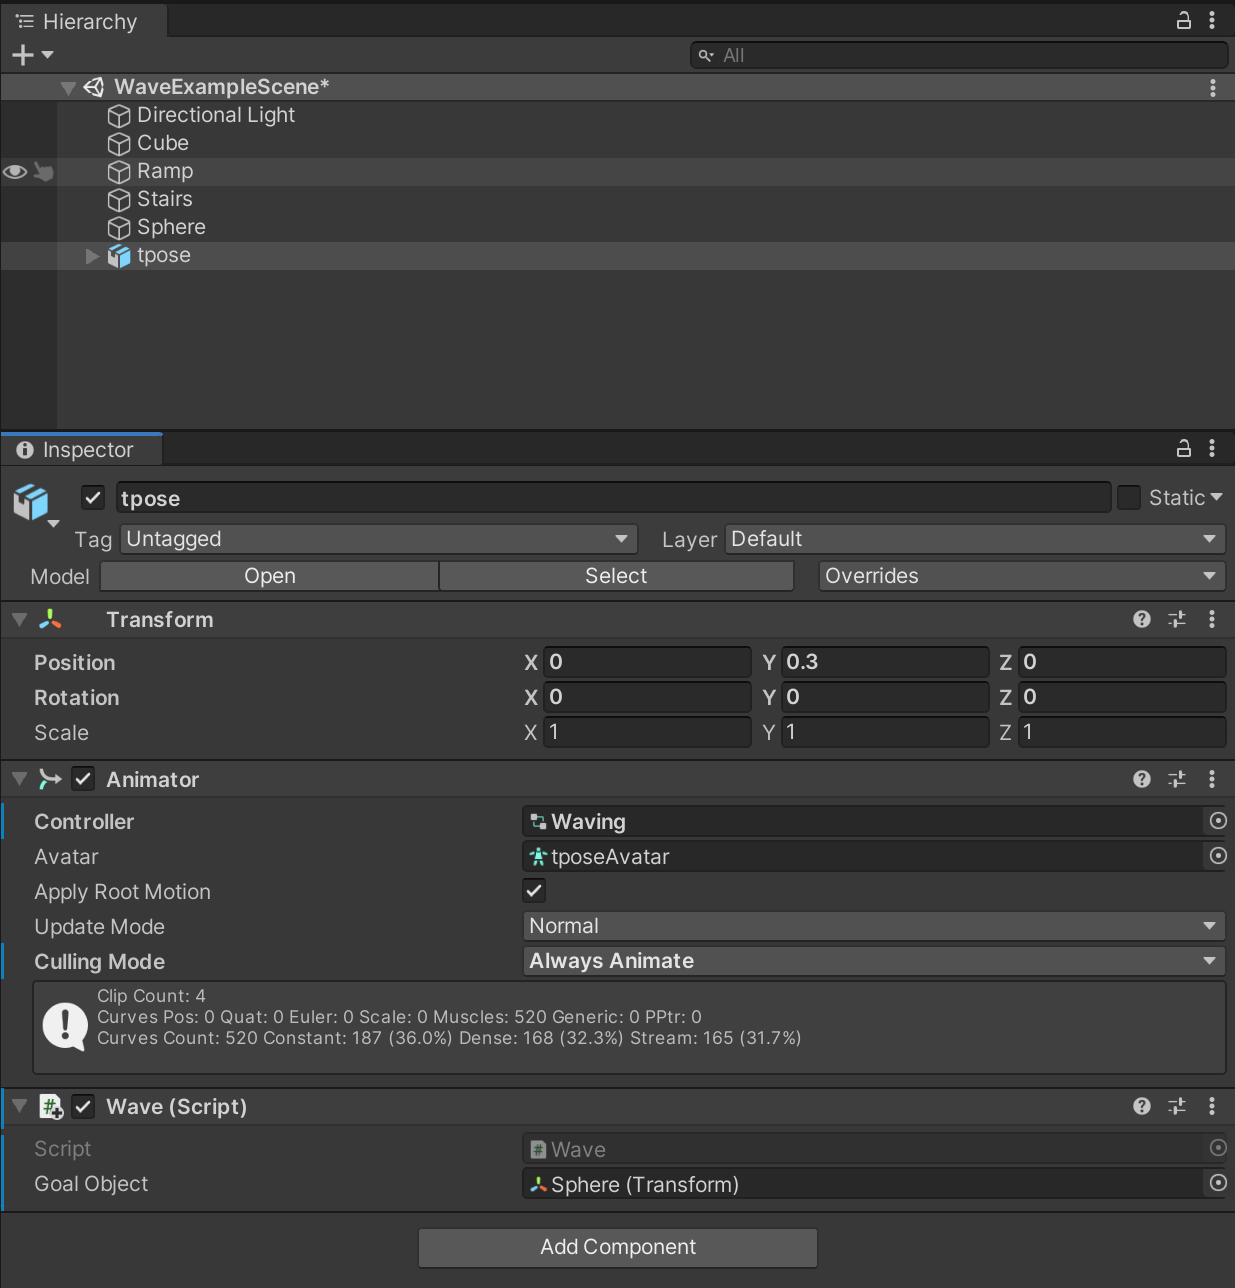
To be able to use the animation controller, please ensure that the avatar has an animator component and that the correct animation controller is assigned to the component. Ensure, that the animations are played by selecting "Always Animate" as the culling mode. If "Cull Completely" or "Cull Update Transforms" is selected, the animation might not play if the character is not within the view-frustrum of the game camera. After pressing play, the default animation (in this case "idle") should be displayed on the avatar. In order to transition to other states, a script is required.
It is recommended, to test animators and their functionality within a single unity instance, before attempting the first integration into the MOSIM Framework, if possible. For this purpose, we created a new MonoBehavior-Script ("Wave"). The Wave class requires two attributes, a reference to the animator component and a placeholder-transform to symbolize the wave-target. This dummy wave-target will be replaced in the final MMU by the target provided by the AssignInstruction method.
    private Animator anim;

    [SerializeField]
    private Transform goalObject;

    // Start is called before the first frame update
    void Start()
    {
        anim = this.GetComponent<Animator>();
    }
In the update method, we want to trigger the wave animation, whenever the user clicks the mouse button. In the final MMU, this code will be placed in the AssignInstruction method to start the animation. In this example, we assume that the MMU will be provided with a goal constraint to wave at. First, we compute the direction to the goal depending on our current transform orientation. After projecting the resulting vector on the ground, we can compute the signed angle relative to our forward-facing direction. By rescaling and clamping to the range of [1-,1], a suitable blending factor is created and assigned.
Parameters defined in the animation controller can be set of the animator instance with "SetFloat", "SetBool", "SetInt", and "SetTrigger. The parameter name is provided as a string. Additionally, the Set-functions provide overloads to dampen and smooth the transition over time, e.g. to enable smooth transitions in cases of acceleration (e.g. transitioning from walking to running).
    void Update()
    {
        if (Input.GetButtonDown("Fire1"))
        {
            var dir = this.transform.TransformDirection(goalObject.position - this.transform.position).normalized;

            dir = Vector3.ProjectOnPlane(dir, Vector3.up).normalized;
            float blendingFactor = Mathf.Clamp(Vector2.SignedAngle(new Vector2(0, 1), new Vector2(dir.x, dir.z)) / 90, -1, 1);

            anim.SetFloat("WaveBlend", blendingFactor);
            anim.SetTrigger("Wave");
        }
For the MMU, it will be important to know when the MMU is finished playing, to be able to determine the right moment to return an end-event. One example of detecting this moment is by querying the current animator state. In case, the "Has Exit Time" toggle was set, the animator state will only change, once the transition blending is completed.
        if (anim.GetCurrentAnimatorStateInfo(0).IsName("Idle"))
        {
            Debug.Log("Idle");
        }
        else if (anim.GetCurrentAnimatorStateInfo(0).IsName("Waving"))
        {
            Debug.Log("Waving");
        }
In order to run the script, add it as a component to the avatar. In addition, the script requires a dummy object. For this purpose, we create, scaled and positioned a sphere in the scene to function as a dummy target object. Once the game is started, the avatar should wave in the direction of the dummy goal when the left mouse button is pressed.
Animation layers can be utilized to blend different animations, e.g. for different body parts. In this case, this functionality is not utilized. For more information on the animation layers, please consider the Unity documentation on animation layers.
When used as a MMU, several options have to be considered. In some cases, it might make sense to combine multiple actions within a single animation controller and expose it to MOSIM framework as a complex MMU. For example, the individual waving animations could have been exposed to the MOSIM framework and a separate custom co-simulator could have combined the animations with linear blending. However, this would have not added any value, hence the animations have been combined within Unity to create a more useful MMU.
In other cases, more fine-grained MMUs to be re-used in different contexts and combined in the co-simulator is more useful. For example, instead of using a locomotion controller to get to the target, a constraint can be imposed to ensure, that the avatar is within a certain distance to the goal. Instead of simulating the arm movement to reach to an object, only the finger animation to grasp the object can be animated.
The "idle" or "default state" in particular can be used in a different way for MOSIM MMUs. In the example above, the Idle animation is redundant, as the MOSIM Idle would have been used to simulate idle behavior within the framework. Hence, the actual animation that is presented is irrelevant and for a MMU, there should be no linear transition between the idle and the waving state. However, the combination of Idle and Waving states allows for an easier control to start and end the animation, as well as the MMU.
Another specific case denotes partial simulation and blending to and from animations within the MOSIM framework. As the pose and underlying animation, the target avatar displays whenever the Wave-MMU is invoked is unknown during development time, it is not possible to use the Unity animation system to enable smooth transitions. At the moment, the co-simulation and transition model considers a hierarchical execution and blending scheme. Hence, the MMU should consider incoming poses and enable a smooth integration.
How to properly integrate the animation to the MOSIM framework, how to enable a smooth transition and how to send partial information, will be discussed in the documentation on MMUs in Unity
Unity animators are well documented. We do recommend the Unity documentation on animation. In addition, there are multiple youtube channels providing excellent tutorials and examples on animation, for example Brackeys and iHeartGameDev.