Task editor integration
Launcher provides optional connection point to task editor web service. Connection to task editor web service provides the following benefits:
- Bidirectional synchronization of MMU library
- MMU enabling/disabling and prioritization on task editor project basis
Configuration
Task editor connection details can be provided through Main menu -> Settings

First fill in the URL (1) to the task editor. Basic web address is sufficient, proper page name will be added automatically when you click the Test and save button (3). Token (2) is required to authenticate user to a specific project. After filling in URL (1) and Token (2) fields click the Test and save (4) button to apply your connection details. If the details are correct the configuration will be saved. In most cases it is sufficient to fill in only the URL and Token details, however if the connection fails, you have Internet connection, and web task editor service you want to connect to is on the Internet, you might need to configure proxy setting.
Configuration - proxy settings
To enable connection through proxy, check the Use proxy server (4) checkbox. This will enable Host (6) and Port (7) inputs, where you should specify IP address or domain name/host name of the proxy server you are using. Do not specify the protocol in the Host field. If you want to use SSL (HTTPS) connection check the Use HTTPS (5) checkbox. It is important to note that the Use HTTPS (5) connection checkbox enabled SSL connection between your computer and proxy server, and to use this feature your proxy server must support it. Once you fill int the details click Save (10) button. To test if the connection is working use Test and save (4) button above.
If proxy requires authentication you can enable the Use authentication checkbox (7) and fill in User name (8) and Password (9). These are user name and passwords required by the proxy server and not task editor web service.
Your proxy configuration is stored in system registry (for current user) and proxy user name and password are encrypted. This means that if you have several instances of Launcher on your machine all will use the same proxy settings so you need to specify them just once. Task editor setting on the other hand have to be supplied separately for every launcher installation. The proxy settings are common for the Launcher and Task Editor Script in the Unity. Changing proxy settings in Launcher automatically is reflected in Task Editor script on the next load of the model. Same applies in the opposite direction.
MMU library
Once Task editor connection is configured, the remote MMU library stored on the task editor web service can be used.
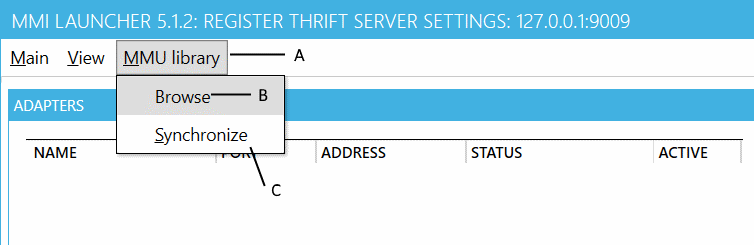
To see what MMUs are available on the server click MMU library (A) menu, and select Browse (B) menu item. Example output is shown below.

To upload locally available MMUs to the server and download additional MMUs from the server use MMU library (A) menu, and select Synchronize (C) menu item. If the libraries are identical then "MMU libraries are in sync" message will be shown, otherwise first summary of how many MMUs will be uploaded and how many MMUs will be downloaded will be shown. Then for every downloaded/uploaded MMU information dialog is shown indicating whether the sync was successful or not. Folder naming is handled automatically, so if new MMU has same folder name as the existing local MMU, a new folder will be created using MMU name and version and if required sequential number.