Getting Started
FermiViewer runs as a local web app: a small Python server serves the API and the single-page UI, which opens in your browser (or a native desktop window). Pick whichever install fits you.
Download FermiViewer_x64-setup.exe from the
latest release
and run it. It's fully self-contained (~47 MB) — no Python or Node
required. Launch FermiViewer from the Start menu; closing the window
shuts the server down.
The installer is currently unsigned, so Windows SmartScreen may warn on first run — choose More info → Run anyway.
Download fv-server-win64.zip from the same release, unzip, and run
fv-server\fv-server.exe. It starts the app at http://127.0.0.1:8000
and opens your browser; it exits when the last tab closes.
Requires uv (Python is fetched
automatically) and Node 20+. Get the code with git clone, or download
Source code (zip) from any
release
and extract it — no git needed:
git clone https://github.com/pquarterman17/fermiviewer
cd fermiviewer
cd frontend && npm ci && npm run build && cd ..   # build the web UI (once)
uv sync                                           # install backend deps
uv run fv              # → http://127.0.0.1:8000
That is the whole build — from then on, uv run fv is all you run.
Building from source needs internet (PyPI + npm); for a machine without
it, use the offline bundle below.
| Command | What it does |
|---|---|
uv run fv |
API + UI on :8000, opens the browser, exits when the last tab closes |
uv run fv --desktop |
Native window (pywebview), exits on close |
uv run fv --dev |
Vite hot-reload (:5173) + auto-reloading backend |
uv run fv --no-browser --no-auto-shutdown |
Plain server, stays up |
Each release also ships per-OS fv-offline-*.zip bundles for machines
with no internet access — or where IT policy rules out running downloaded
executables. A bundle contains the FermiViewer wheel with the web UI
already baked in, every dependency as a pre-built wheel, and a
standard-library-only installer. The only thing the target machine needs
is a 64-bit Python 3.10–3.14 (a per-user install from python.org
works offline and needs no admin rights).
- Download
fv-offline-win64.zip(or-macos-arm64/-linux-x64) from the latest release and carry it over (USB stick, file share, …). - Extract it anywhere you can write to — e.g.
C:\FermiViewer— and runpy install.py(macOS/Linux:python3 install.py). - Launch with the generated
FermiViewer.bat(Windows) or./fermiviewer(macOS/Linux).
Nothing is downloaded during install and no admin rights are needed.
Everything lives in that one folder; deleting the folder uninstalls it.
The bundle's own README-OFFLINE.md covers troubleshooting and how to
review the exact pinned dependency versions (requirements.txt ships in
the bundle for IT / security review).
Three ways to open data:
- File → Open… — the native file picker.
- Drag and drop — drop files anywhere on the window.
- File → Open by Path… — for large files already on the server's disk (skips the upload copy).
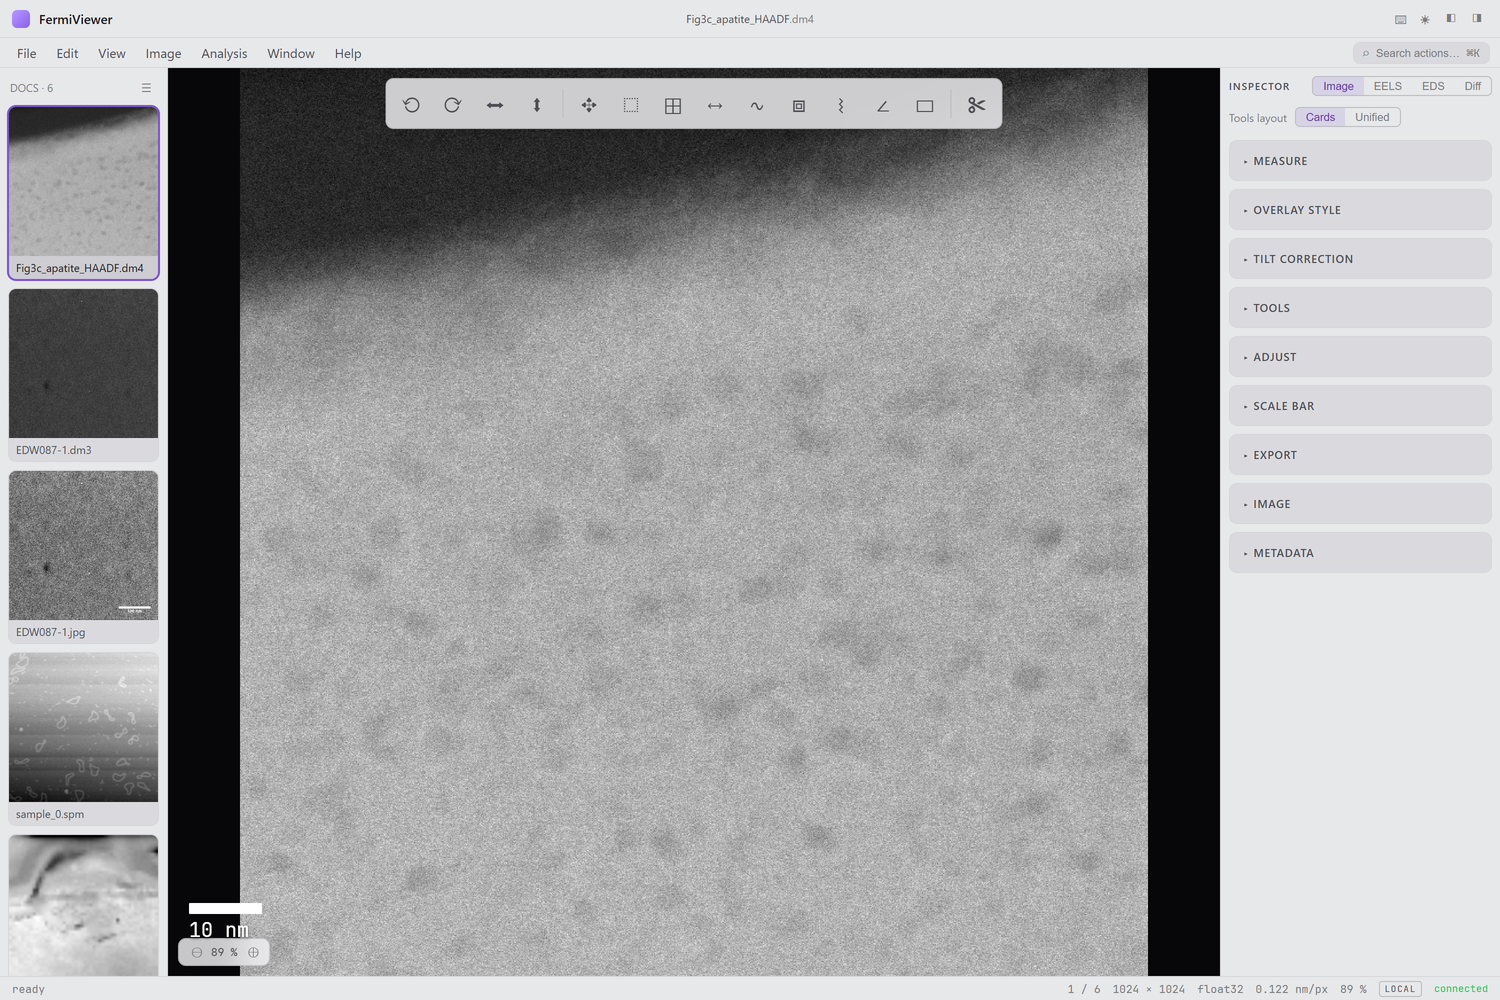
Opened images appear as thumbnails in the library (left). Click one to make it active; it renders on the central stage, with details and tools in the inspector (right).
- The stage shows the active image. Scroll to zoom, space-drag (or the hand tool) to pan, F to fit, 1 for actual size.
- The float toolbar at the top of the stage holds the measurement and zoom tools.
- The inspector tabs — Image · EELS · EDS · Diff — switch between image tools and the analysis workshops.
- Press ? for the full keyboard map and ⌘K / Ctrl-K for the command palette (search every action by name).
Next: Viewing & Display.