Repository navigation
Fresh install
From a blank micro-SD card to a ZenithBoard feeding the networks, showing the wall, and finished from the web console. Following this page alone, on a blank card, is one of the 1.0 proofs (the owner's criterion, 21 October 2026, see Roadmap): every step says what to do, what you should see, and what to do when you do not see it. Tick the checklist at the end as you go.
About 45 minutes, most of it waiting. Commands are typed on your computer's terminal, connected to the Pi by SSH
(Windows 10/11, macOS and Linux all have ssh).
- A Raspberry Pi 3B or newer, its official power supply, a micro-SD card of 16 GB or more (it will be erased).
- An RTL-SDR dongle and its 1090 MHz antenna; an Ethernet cable if you can (Wi-Fi works).
- Your antenna's position: latitude, longitude, altitude in metres. mapcoordinates.net gives all three for the spot you click (the ground's elevation: add the antenna's height above it); the installer points there too (0.54.18).
- A free ADSB Exchange feed is set up on the way; FlightAware, Flightradar24 and Plane Finder accounts only if you want those too.
Follow Moving to a new card instead: the same steps, with your backup made on the old card and put back by Start here, written for someone who has never done it (WinSCP to copy the file from Windows). Your stations, statistics, graphs and logs follow.
If the old card no longer starts, each identity can still be read from your accounts (the statistics and the graphs lived on the card only):
| What | Where to read it | Where it goes on the new card |
|---|---|---|
| ZenithBoard's settings | A settings file kept earlier (zenithboard settings export), if you have one |
Step 16 |
| ADSB Exchange feed UUID |
cat /usr/local/share/adsbexchange/adsbx-uuid (its installer's script) |
Before step 13: sudo mkdir -p /usr/local/share/adsbexchange && echo UUID | sudo tee /usr/local/share/adsbexchange/adsbx-uuid
|
| FlightAware feeder ID | Your FlightAware account, https://flightaware.com/adsb/stats/user/: the station's Unique Identifier (FlightAware's own guide) | After step 13: sudo piaware-config feeder-id THE-ID && sudo systemctl restart piaware
|
| Flightradar24 sharing key |
grep fr24key /etc/fr24feed.ini on the old card, or flightradar24.com → Account → My data sharing
|
Pasted when step 13 asks for it |
| Plane Finder share code | Its page on the old Pi, http://OLDPI:30053, or your planefinder.net account |
Entered on its page at step 13 |
| AirNav Radar sharing key (0.99.6) |
grep key= /etc/rbfeeder.ini or sudo rbfeeder --showkey --no-start on the old card |
A backup carries it. Without one: tick AirNav Radar at step 13, then write key=YOURKEY under [client] in /etc/rbfeeder.ini and sudo systemctl restart rbfeeder
|
| The Telegram bot (0.99.6) | Nothing to save: @BotFather gives the token again (/token) |
sudo zenithboard telegram setup |
| The Bluesky account | Nothing to save: an app password can be made again at bsky.app → Settings → Privacy and security → App passwords | Step 20 |
- Install Raspberry Pi Imager from https://www.raspberrypi.com/software/ and open it.
- Device: your board (Raspberry Pi 3, 4 or 5).
- Operating system: Raspberry Pi OS (other) → Raspberry Pi OS Lite (64-bit). No desktop: the Pi is reached by SSH and by the browser.
- Storage: the micro-SD card. Everything on it is erased: check it is the right one.
-
Customisation (Imager 2: the Configure your system step; older Imagers: Edit settings), as Raspberry Pi
describes it:
-
Hostname:
zenithboard(the Pi is thenzenithboard.localon your network). -
Localisation: your time zone (
Europe/Paris) and keyboard. The summaries post at the Pi's clock time. - User: a user name and a password of your own; keep them.
-
Wi-Fi: your network, its password and the country (
FR), unless you use a cable. - Remote access: enable SSH (with the password, or better with your public key). Raspberry Pi Connect is not needed.
-
Hostname:
- Write, wait for the check, eject the card.
- Card in, dongle with its antenna in a USB port, cable if you have one, then power. Wait 3 to 5 minutes: the first start enlarges the card's file system and restarts once.
-
Find it. On your computer:
ping zenithboard.local. No answer: your router's list of devices gives its address (192.168.1.x); use that address instead ofzenithboard.localfrom here on. -
Connect:
ssh YOUR_USER@zenithboard.local, answeryesto the fingerprint question the first time, then the password. You seeYOUR_USER@zenithboard:~ $. -
Bring the system up to date, then restart and connect again (step 9):
sudo apt update && sudo apt full-upgrade -y
sudo reboot
-
Download and run the installer:
sudo apt install -y git
git clone https://github.com/regis57/ZenithBoard.git
cd ZenithBoard
sudo ./install.sh
It installs
whiptailandcurlif they are missing; on a 1 GB board it says once what the board is good for. -
The first questions (once): the region (everywhere else, or the United States for 978 MHz), the units, the antenna's position (latitude, longitude, altitude in metres; a typo is asked again; the screen says where to find them: mapcoordinates.net), the wall's radius. Esc on any of them stops the installer with a line saying so: what you answered is kept and the questions come again at the next
sudo ./install.sh(0.54.5; it used to stop without a word). Then the main menu: choose Start here (every screen). It does steps 13 to 16 in this order (with Bluesky, optional, between 15 and 16), and skips what is done already. Do them in this order: the web console is a page of the wall, and the wall needs the decoder.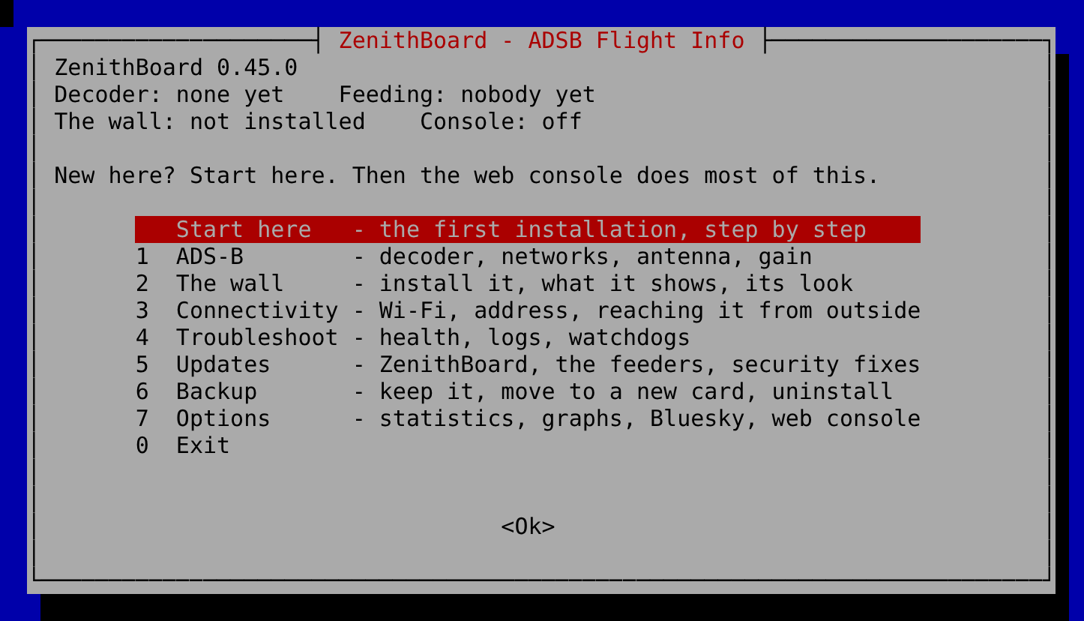
-
ADS-B — Moving from another card? answer No here, unless you follow Moving to a new card. Then the decoder and the networks: keep readsb, leave the dongle's serial number empty if you have one dongle, tick where to feed. ADSB Exchange is always on. Each network's own installer runs in turn and asks its own questions:
-
ADSB Exchange: a station name and your position; it prints a link to see your feed. Its boxes take no default, so ZenithBoard shows a screen first with the values to type (0.54.2): a short word for the name (not
0), the latitude and longitude already set on this Pi, and the altitude in whole metres with the unit glued on:180m, not180and not180 m(their box asks again, without a word, for anything else). - FlightAware: prints a claim link; open it on your computer, signed in to FlightAware, to attach the station to your account.
- Flightradar24: its sign-up asks for an e-mail, or your sharing key if you already feed; the screen says what to answer to the other questions and sets them right afterwards.
-
Plane Finder: finish on its page,
http://zenithboard.local:30053: a new share code, or your old one. -
AirNav Radar (0.99.6): nothing to answer; its MLAT is switched off for you (one network does MLAT, ADSB Exchange unless you choose another afterwards:
zenithboard mlat). It makes its sharing key and prints it. To link the station to your account: sign in to a free account on airnavradar.com, open https://www.airnavradar.com/raspberry-pi/claim, paste the key into the Sharing Key field and press Claim!. Lost the key?sudo rbfeeder --showkey --no-startshows it.
This is the step the console cannot do for you: see why.
-
ADSB Exchange: a station name and your position; it prints a link to see your feed. Its boxes take no default, so ZenithBoard shows a screen first with the values to type (0.54.2): a short word for the name (not
-
The wall — Yes. At the end it prints its address,
http://192.168.1.x:8080/. Open it on the tablet; aircraft appear within a minute of the first one in range. -
What is worth switching on — one list, everything ticked: statistics, graphs1090 (in ZenithBoard's look), logs kept after a restart, the hardware and network watchdogs, Debian's daily security fixes, the daily log clean-up, Wi-Fi hardening when on Wi-Fi. Untick what you do not want (Space), Enter. What each does: The menu.
Then, since 0.54.18, Bluesky (optional): Yes sets up the account now (its handle, then an app password made at bsky.app → Settings → Privacy and Security → App Passwords; step 20 says the rest); No goes on, and the console's first steps then show no summaries' switches until an account is there. Before 0.54.18 the account was only in step 20, and the first steps showed the summaries switched on for an account that did not exist (the owner's fresh card, 25 October 2026).
-
The web console — Yes, then its password (10 characters at least, asked twice). The last screen gives its address. Optional, in the terminal:
sudo zenithboard console phone-signin on(a computer signed in by your phone) andsudo apt install -y qrencode(QR codes drawn in the terminal). Leave the menu (0 Exit): the terminal is not needed any more, except for Bluesky (step 20).Only a settings file from an older card (
zenithboard settings export)? Put it back now:sudo zenithboard settings import ~/zenithboard-settings.env(the values from before are kept in a.bakfile).
-
Open
http://zenithboard.local:8080/consoleon your computer (or the addressconsole onprinted) and sign in with the console password. Its version is written at the bottom of the page, linked to its release notes. -
The first steps open by themselves the first time, nine short screens; nothing changes before the last one:
- Welcome: what this Pi is, its decoder, which networks it feeds. On a card where the console was just switched on, the page first waits (a few seconds) for the Pi's first reading, so these lines are true when they appear (0.54.2; before, they could say no decoder and nobody yet right after Start here).
- Where the antenna is: region, units, and the position, checked when you press Next (latitude −90 to 90, longitude −180 to 180, altitude in metres).
- The wall: its look, its colour, its radius.
- Feeding the networks: each one, running or not installed, with a link to its own page. Read only.
-
What to collect: statistics (for
/statsand the summaries), graphs1090, the receiver map's database. - What keeps it running: the hardware and network watchdogs, logs kept after a restart, Debian's daily security fixes, Wi-Fi hardening when on Wi-Fi.
- Sharing on Bluesky: the summaries of the day and of the week, once there is an account (without one, this step says how to set it up and shows no switch, 0.54.18).
- Your phone, and this computer: pair the phone now; computers signed in by the phone, or not.
- Ready: the changes, applied one after the other; each one's output is in Activity.
Skip leaves everything as it is. They come back at any time: System → First steps again, the Finish setting up card the overview shows while something is missing (no position, no decoder, statistics off, a watchdog off), or the address
…/console#first-steps. -
Your phone. On the computer: System → Signed in → Pair a phone. Scan the QR code with the phone's camera and open the link: the phone is signed in, and stays so as long as it opens the console once a month. From then on, with phone sign-in on, a computer's sign-in page shows a QR code: scan it with the phone, check the four digits match, say yes.
-
Bluesky, if you post and did not set it up in Start here (in the terminal, because it asks for an app password):
sudo zenithboard social setup, or menu 7 Options → 3 Bluesky → 2 The account. Then in the console, Sharing: switch posting on, try a post (Try a post posts nothing), set the summaries' times and posts. -
Check: the overview shows every service running and the setup card gone; Reliability → Health says Nothing to fix;
/statsfills at the next quarter hour; the networks' own pages show your station within the hour (ADSB Exchange's myip page, FlightAware's stats, Flightradar24's and Plane Finder's pages linked from the overview).
The console runs one command from a fixed list, checks its values, and closes its input: a command that would ask a question gets no answer. The networks' installers are written by FlightAware, Flightradar24, ADSB Exchange and Plane Finder, not by ZenithBoard, and they ask as they go: a station name, an e-mail, a sharing key, a claim to make in your account; some download and run their own scripts as root, for minutes. Carrying that through a web page would mean typing keys into it and letting it run other people's installers as root: two things the console is built not to do (Web console). Once installed, the networks are on the console's overview, running or not, with a link to each one's own page; their updates are in System → Update everything.
-
sshdoes not findzenithboard.local: use the address from your router (step 8). - The installer stops on a feeder: read its last lines, then run
sudo zenithboard menuagain; what was installed stays. Troubleshooting in the README. - The console: Break-glass, every case with its commands, and how to start the console again from zero.
- Start the whole card again: write it again from step 1. Nothing on your computer or your accounts is lost by it.
Tick each line on a blank card, following this page alone. A line that needed anything not written here is a fix to this page, then a new try.
| # | Step | What shows it worked | Done |
|---|---|---|---|
| 1–6 | The card written with SSH on | Imager says the card is written | |
| 7–10 | The Pi up, reached by SSH, up to date |
YOUR_USER@zenithboard:~ $ after the reboot |
|
| 11–12 | Installer and first questions | The main menu, Start here at the top | |
| 13 | Decoder and networks |
zenithboard status: decoder and feeders running, one MLAT client |
|
| 14 | The wall | Aircraft on the tablet | |
| 15 | The list applied | 4 Troubleshoot → 1 Health: watchdogs and kept logs on | |
| 16 | The console on | Its sign-in page, its version at the bottom | |
| 17–18 | The first steps applied | Every change ok in the review; the setup card gone | |
| 19 | The phone paired; a computer signed in by it | Both listed in System → Signed in | |
| 20 | Bluesky | Try a post draws the picture; the first crossing posted | |
| 21 | All checked | Health Nothing to fix; the networks show the station |