Repository navigation
Tutorial 3D Printed Bracket
In about 20 minutes you build a mounting plate with rounded corners and two screw holes, drive it from a note, correct it with the Red Pen, check it for printing and send it to your slicer. Along the way you meet the ideas that make MyCAD different.
Tip: every button mentioned here can also be found with Ctrl+K. Just type its name.
The built-in help has this tutorial too: ? → Getting Started → Tutorial: a bracket for 3D printing.
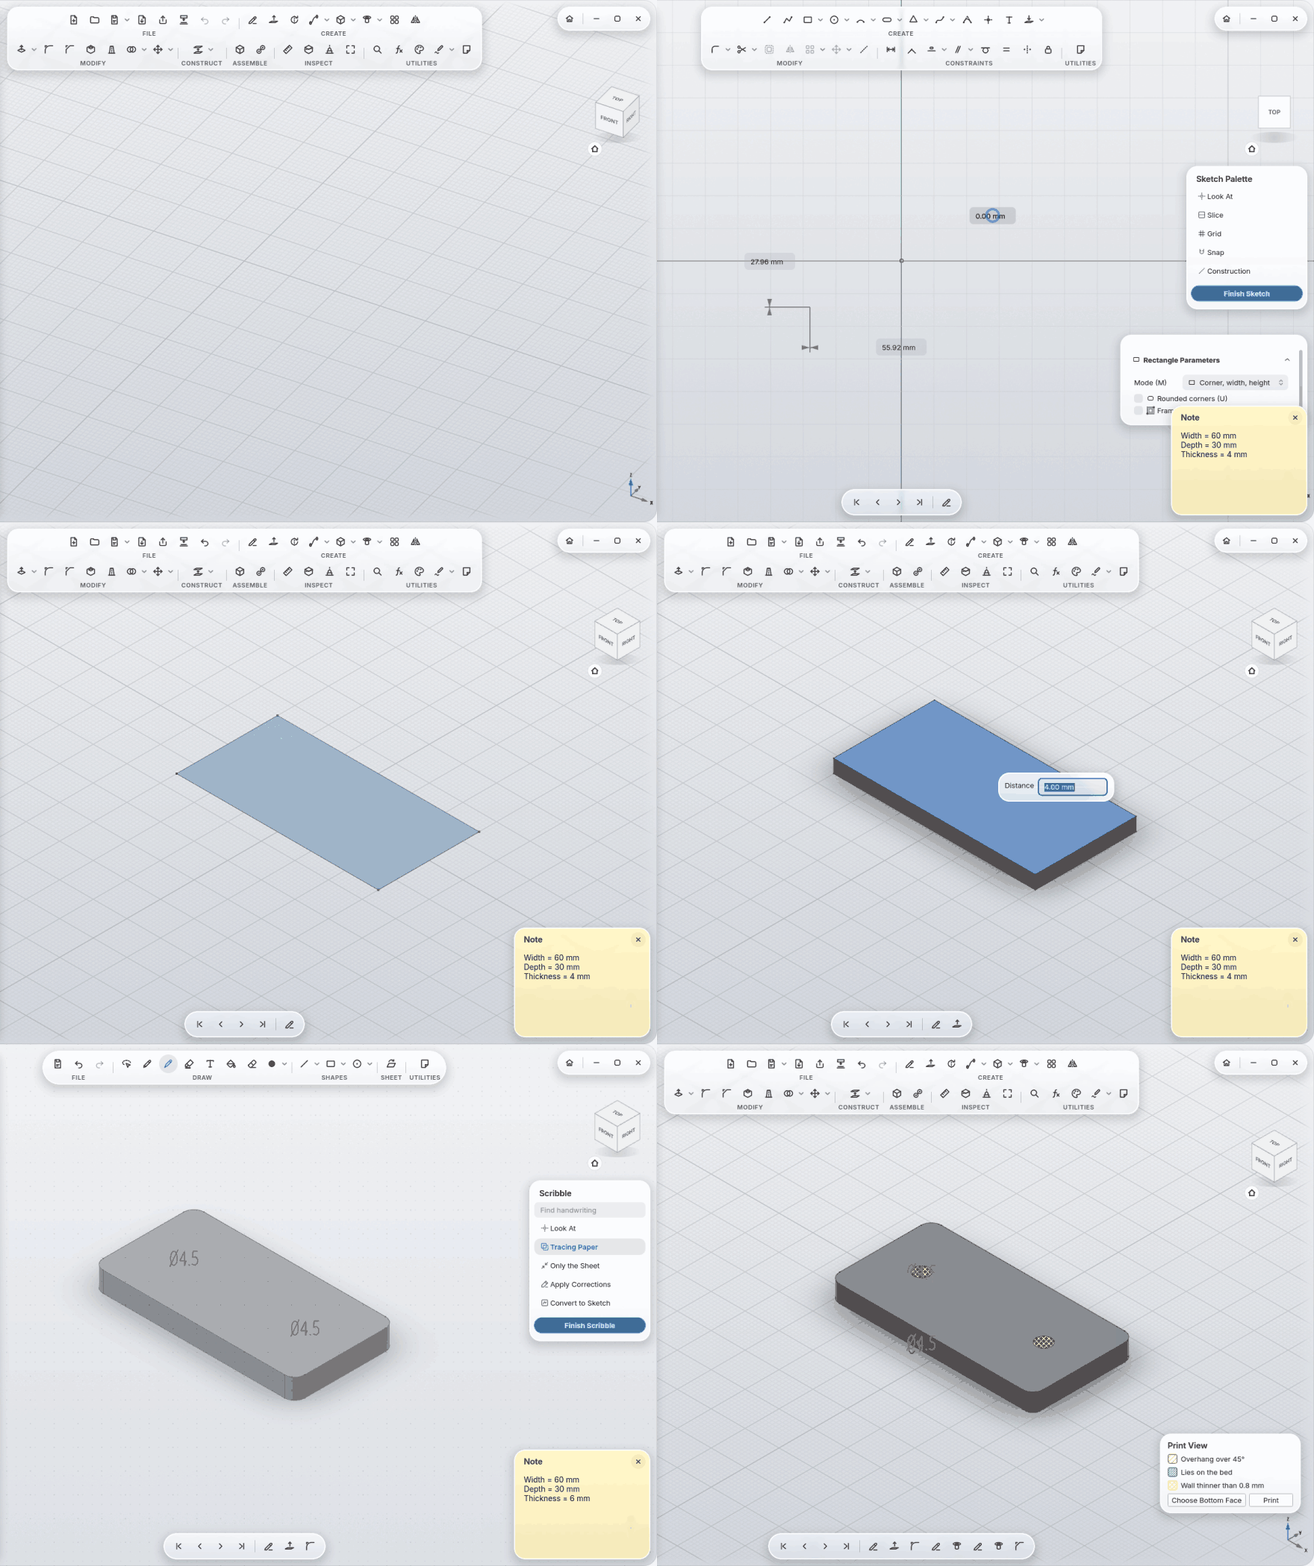
On the start page, click New Design. From now on MyCAD saves by itself, after every step as soon as you pause for a moment. The design gets its own folder in your projects folder (Settings → General → Projects folder). There's no save button to remember, and closing never asks.
In the toolbar, UTILITIES section, click Note. A yellow note appears. Type:
Width = 60 mm
Depth = 30 mm
Thickness = 4 mm
Slot = Width - 16 mm
After each Enter the lines become parameters. The formula shows its value right away:
Slot = Width - 16 mm → 44.00 mm. From now on you can type these names into any size field. Change Parameters
lists them too, marked "In note …".
Calculating works as well: a line ending in
=is worked out.Width / 2 =gives30.00 mm.
- Create Sketch (key S), then click the XY plane in the view.
- Draw a Rectangle, roughly, anywhere around the origin.
- With Dimension, click the width and type
Widthinstead of a number, andDepthfor the height. - Finish Sketch.
-
Extrude (key E), click the rectangle, type
Thicknessas the distance, click OK at the top of the panel.
You have a 60 × 30 × 4 mm plate.
With no tool active, double-click the top face of the plate. A small glass card appears next to it with the size that
makes this face: Distance = Thickness. Type 6 and press Enter. The plate gets thicker, and the note now says
Thickness = 6 mm. It works the other way round too: change the note to Width = 80 mm, click into the view, and the
plate gets wider. Ctrl+Z takes back any change.
Ctrl+click the four vertical edges, Fillet (key F), radius 3, OK.
Go ahead and try a radius that's too big, 20 for example: the step gets a red badge in the timeline, the panel says
what doesn't work and offers a radius that still fits. One click on the suggestion and you're good again.
Instead of hunting for tools, write what you want right on the model:
- In the UTILITIES section, click the small arrow ▾ next to Scribble and choose Red Pen. A see-through sheet lies in front of the model, and the pen is red.
- Write (with a pen tablet or the mouse)
Ø4.5twice on the top face, where the holes should go, andC1next to one of the long top edges. - In the palette, click Apply Corrections. Each correction becomes a card:
Ø4.5 → Hole Ø4.5 mm,C1 → Chamfer 1 mm on 1 edge. - Point at a card with the mouse to highlight its target. Show tries the result on the model, Apply keeps it, Apply All does them all.
The ink stays in the scribble "Corrections", so later you can still see what you changed and why.
The Red Pen also knows
R2(fillet),M5(tapped hole or thread),+5/−5(pull or push a face),H7or3×(pattern), a plain number (the face's size) andremoveor a line through a face (remove the face). See Red Pen and Scribble.
- In the INSPECT section, click Print View. Hatched red: overhangs that need supports. Dotted green: what lies on the bed. Cross-hatched yellow: walls thinner than 0.8 mm. The legend is at the bottom right.
- To print it on another side, click that face and Choose Bottom Face in the legend.
In MyCAD Ctrl+S means Save Version: give the state a name, such as "First print". Everything is saved anyway; the name just helps you find it again.
Click Print in the legend (or in the FILE section). MyCAD finds your slicer (OrcaSlicer, Bambu Studio, PrusaSlicer or Cura, Flatpak included) and opens the plate there as a 3MF, with the chosen face down. The first time, it asks which slicer you want if you have more than one.
Make the plate wider (Width = 100 mm in the note). Then, in the FILE section, click the arrow ▾ next to Save Version,
then Versions: pick "First print" and Compare. What was added since then lies over the model dotted green,
what was removed hatched red, and the panel lists the changed steps. Restore brings the old state back without
deleting the new one.