Repository navigation
Quick Start
From nothing to your own plan in about half an hour.
Using the Mac app? Its first launch creates the plan folder for you: skip to step 2, then use the menu-bar icon's Show Plan Folder to find the
datafolder. Otherwise, install first (Installation) and start at step 1.
- 1. Create a plan folder
- 2. Export your transactions
- 3. Open the app
- 4. Add your household
- 5. Connect your CSVs
- 6. Categorize
- 7. Explore
- What next
Keep it somewhere private, outside the financial_planner code folder:
cd financial_planner
pixi run financial_plan init ~/MyFinancialPlan
This creates config/ (starter settings with comments) and an empty data/ folder. See
Plan Folder.
From each bank and credit-card website, download about 12 months of transactions as CSV
and save the files in ~/MyFinancialPlan/data/. Any layout works; you'll describe it in step 5.
Tips:
- Export every account that pays for household spending (checking, each card).
- Re-export later and drop the new files in
data/. If a source's file pattern matches them (e.g.data/visa*.csv), they're picked up automatically.
pixi run financial_plan start ~/MyFinancialPlanYour browser opens at http://127.0.0.1:8765. With no data yet, a banner points you to Settings. Click the gear (Settings) at the top right.

Settings › Household
- Add partner for each adult: age, take-home pay per month, Social Security estimate at 67, any pensions and retirement accounts. Use generic names (Partner A).
- Add child for each child: age and 529 balance and monthly contribution.
Settings › Savings & income: monthly savings transfers, brokerage/stock accounts, other income.
Settings › Assumptions: the retirement age to start from, health insurance after retiring, the retirement tax rate. The defaults are fine to begin with.
Details: Settings Editor.
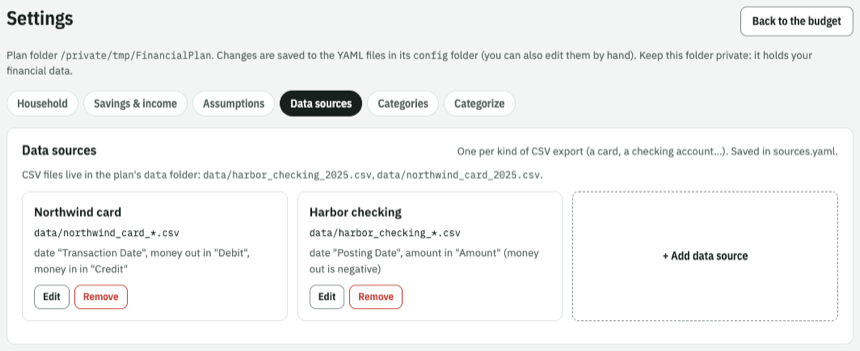
Settings › Data sources › + Add data source, once per kind of export:
- Name it (e.g. "Visa card").
- Pick the file (or upload it).
- Click Read columns from the file. The app guesses the date, description and amount columns.
- Check the guesses; pick whether amounts are in one signed column or separate money-out / money-in columns.
- Click Preview: purchases should say "money out", refunds and deposits "money in".
- Save.
Details: Data Sources.

Settings › Categorize lists every transaction and how it was categorized.
- Filter Matched by: No rule (default) to see what nothing caught.
- Click a transaction, pick a category, and choose how widely to apply it: just this one, every description containing some text, etc. The dialog shows how many transactions the rule matches.
- Mark transfers, card payments and paychecks as an ignore category so they don't count as spending.
Repeat until the uncategorized list is short. Details: Categorizing and Rules and Categories.
Click Back to the budget. Start with the strip at the top (income, spending, savings, taxes, left over), then try changing a number in the Monthly Planner. See Tour of the App.
- Save a few scenarios and compare them.
- Put a desktop shortcut on your computer.
- Read Privacy and Safety.