First capture
Connect the analyzer, pick it in the device list of the toolbar and press Connect. The list only offers boards that actually run the analyzer firmware, plus Network device… for a Pico W and Multiple devices… for a cascaded set.
Then Capture → New capture (F5) opens the capture dialog.
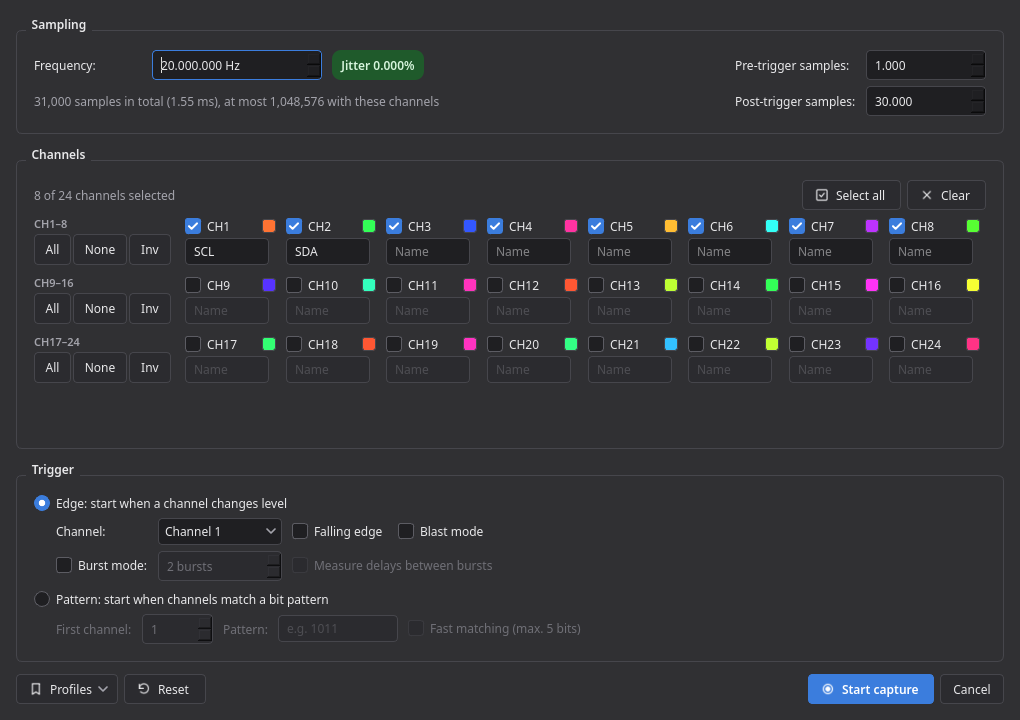
Tick the channels you want to record. Fewer channels mean more samples: the firmware packs the data into 8, 16 or 24 bit per sample, so a capture with 8 channels is four times as long as one with 24. The dialog shows the resulting maximum under the sample boxes.
Give the channels names right away (SCL, A0 (Y), …) — protocol decoders assign their inputs
automatically by name, and the names end up in the capture file.
- Sampling rate: pick at least four times the fastest signal you want to see. The Jitter chip warns when the rate cannot be derived exactly from the 100 MHz (or 200 MHz) base clock; 20 MHz, 25 MHz and 50 MHz are exact.
- Pre-trigger samples: what is kept before the trigger — the interesting part is usually just before the event.
- Post-trigger samples: what is recorded after it.
| Trigger | Use it for |
|---|---|
| Edge on a channel | A single line changes level: reset, chip select, an interrupt |
| Edge on the external trigger input | A signal wired to the trigger pin of the board |
| Pattern (up to 16 channels) | A bus value: an address, an opcode, a command byte |
| Fast pattern (up to 5 channels) | The same, at the full sampling rate, with less delay |
A pattern trigger compares levels, not edges: it fires as soon as the channels match. The channels of a pattern have to be consecutive trigger inputs — the dialog names the usable channels (on a Pico: 1–21 or 22–24) and refuses anything else.
Burst mode re-arms the trigger and records several bursts in a row, optionally measuring the delays between them. Blast mode captures at the maximum rate of the board without pre-trigger samples.
| Action | Input |
|---|---|
| Zoom | Mouse wheel (Shift: bigger steps), + / -, Ctrl 0 fits the whole capture |
| Scroll |
Ctrl + wheel, horizontal wheel, arrow keys, drag in the preview at the bottom |
| Channel height |
Alt + wheel, Ctrl Shift ↑ / ↓, or the Channel height slider |
| Jump to the trigger |
Ctrl T
|
| Set a marker | Click into the ruler |
| Select samples | Drag in the ruler (Shift + click extends) |
| Sample menu | Right-click in the ruler: copy, paste, delete, measure, create a region |
| Show/hide, pin, rename a channel | Dot, pin and name field left of the waveform |
Hovering a sample shows its time, the time from the trigger and the length of the current pulse with its frequency.