Espooler Support
Happy Hare can optionally drive a DC "espooler" for each gate. Typically this will be a DC20 (e.g. in the Box Turtle design). The primary value of this is to respool the filament when it unloads, however it can also be used to assist movement when loading or even relieve friction when printing.


 Hardware Config
If you need to control an espooler, you will need to ensure that mmu_hardware.cfg and mmu.cfg are setup correctly. On a fresh installation this should be added automatically but you can add manually if missing:
Add this section to your mmu_hardware.cfg file. The commented lines can be left commented and are there to remind you of some advanced configuration options. Note that the choice of pwm/digital motor control, hardware/software pwm, scaling, etc. are applied to all gates because the assumption is that configuration will be consistent. It is recommended that you leave the pin aliases and define the actual pins in the pins alias section in mmu.cfg
# ESPOOLER (OPTIONAL) -------------------------------------------------------------------------------------------------
# ███████╗███████╗██████╗  ██████╗  ██████╗ ██╗     ███████╗██████╗
# ██╔════╝██╔════╝██╔══██╗██╔═══██╗██╔═══██╗██║     ██╔════╝██╔══██╗
# █████╗  ███████╗██████╔╝██║   ██║██║   ██║██║     █████╗  ██████╔╝
# ██╔══╝  ╚════██║██╔═══╝ ██║   ██║██║   ██║██║     ██╔══╝  ██╔══██╗
# ███████╗███████║██║     ╚██████╔╝╚██████╔╝███████╗███████╗██║  ██║
# ╚══════╝╚══════╝╚═╝      ╚═════╝  ╚═════╝ ╚══════╝╚══════╝╚═╝  ╚═╝
#
# An espooler controls DC motors (typically N20) that are able to rewind a filament spool and optionally provide
# forward assist to overcome spooler rotation friction. This should define pins for each of the gates on your mmu
# starting with '_0'.
# An empty pin can be deleted, commented or simply left blank. If you mcu has a separate "enable" pin
#
[mmu_espooler mmu_espooler]
pwm: 1                                          # 1=PWM control (typical), 0=digital on/off control
#hardware_pwm: 0                                # See klipper doc
#cycle_time: 0.100                              # See klipper doc
scale: 1                                        # Scales the PWM output range
#value: 0                                       # See klipper doc
#shutdown_value: 0                              # See klipper doc

respool_motor_pin_0: mmu:MMU_ESPOOLER_RWD_0     # PWM (or digital) pin for rewind/respool movement
assist_motor_pin_0: mmu:MMU_ESPOOLER_FWD_0      # PWM (or digital) pin for forward motor movement
enable_motor_pin_0: mmu:MMU_ESPOOLER_EN_0       # Digital output for Afc mcu
assist_trigger_pin_0: mmu:MMU_ESPOOLER_TRIG_0   # Trigger pin for sensing need to assist during print

respool_motor_pin_1: mmu:MMU_ESPOOLER_RWD_1
assist_motor_pin_1: mmu:MMU_ESPOOLER_FWD_1
enable_motor_pin_1: mmu:MMU_ESPOOLER_EN_1
assist_trigger_pin_1: mmu:MMU_ESPOOLER_TRIG_1

respool_motor_pin_2: mmu:MMU_ESPOOLER_RWD_2
assist_motor_pin_2: mmu:MMU_ESPOOLER_FWD_2
enable_motor_pin_2: mmu:MMU_ESPOOLER_EN_2
assist_trigger_pin_2: mmu:MMU_ESPOOLER_TRIG_2

respool_motor_pin_3: mmu:MMU_ESPOOLER_RWD_3
assist_motor_pin_3: mmu:MMU_ESPOOLER_FWD_3
enable_motor_pin_3: mmu:MMU_ESPOOLER_EN_3
assist_trigger_pin_3: mmu:MMU_ESPOOLER_TRIG_3Define your pins here. Typically you will either be using just the _RWD pins to implement respooling or both _RWD and _FWD if you have the ability to drive in a forward (extrude) direction. Optionally some MCUs require the setup of an enable pin (e.g. Afc Lite board). The _TRIG pins are for an optional tension based feedback sensor See Sensor Trigger.
    MMU_ESPOOLER_RWD_0=,
    MMU_ESPOOLER_FWD_0=,
    MMU_ESPOOLER_EN_0=,
    MMU_ESPOOLER_TRIG_0=,

    MMU_ESPOOLER_RWD_1=,
    MMU_ESPOOLER_FWD_1=,
    MMU_ESPOOLER_EN_1=,
    MMU_ESPOOLER_TRIG_1=,

    MMU_ESPOOLER_RWD_2=,
    MMU_ESPOOLER_FWD_2=,
    MMU_ESPOOLER_EN_2=,
    MMU_ESPOOLER_TRIG_2=,

    MMU_ESPOOLER_RWD_3=,
    MMU_ESPOOLER_FWD_3=,
    MMU_ESPOOLER_EN_3=,
    MMU_ESPOOLER_TRIG_3=,
Note
- If you were using the previous macro based respooler then you might need to remove old pin aliases
The upgrade process should have added the following section to your mmu_parameters.cfg but if not, you can add by hand:
# ESpooler control -----------------------------------------------------------------------------------------------------
# ███████╗███████╗██████╗  ██████╗  ██████╗ ██╗     ███████╗██████╗
# ██╔════╝██╔════╝██╔══██╗██╔═══██╗██╔═══██╗██║     ██╔════╝██╔══██╗
# █████╗  ███████╗██████╔╝██║   ██║██║   ██║██║     █████╗  ██████╔╝
# ██╔══╝  ╚════██║██╔═══╝ ██║   ██║██║   ██║██║     ██╔══╝  ██╔══██╗
# ███████╗███████║██║     ╚██████╔╝╚██████╔╝███████╗███████╗██║  ██║
# ╚══════╝╚══════╝╚═╝      ╚═════╝  ╚═════╝ ╚══════╝╚══════╝╚═╝  ╚═╝
#
# If your MMU has a dc motor (often N20) controlled respooler/assist then how it operates can be controlled with these
# settings. Typically the espooler will be controlled with PWM signal. This will be at the maximum at speeds equal or
# above 'espooler.max_stepper_speed'. The PWM signal will scale downwards towards 0 for slower speeds. The falloff being
# controlled by the 'espooler_speed_exponent' setting according to this formula and allows for non-linear characteristics
# the DC motor (0.5 is a good starting value).
#
#     espooler_pwm = (stepper_speed / espooler_max_stepper_speed) ^ {espooler_speed_exponent}
#
# Regardless of h/w configuration you can enable/disable actions with the 'espooler_operations' list. E.g. remove 'play' to
# turn off operation while printing. Options are:
#
#    rewind - when filament is being unloaded under MMU control (aka respool)
#    assist - when filament is being loaded under MMU control (% of "rewind" speed but with minimum of "print" power)
#    print  - while printing. Generally set 'espooler_printing_power' to a low percentage just to allow motor to be turned
#             freely or set to 0 to enable/allow "burst" assist movements
#
# If using a digitally controlled espooler motor (not PWM) then you should turn off the "print" mode and set
# 'espooler_min_stepper_speed' to prevent "over movement"
#
espooler_min_distance: 30                       # Individual stepper movements less than this distance will not active espooler
espooler_max_stepper_speed: 300                 # Gear stepper speed at which espooler will be at maximum power
espooler_min_stepper_speed: 0                   # Gear stepper speed at which espooler will become inactive (useful for non PWM control)
espooler_speed_exponent: 0.5                    # Controls non-linear espooler power relative to stepper speed (see notes)
espooler_assist_reduced_speed: 50               # Control the % of the rewind speed that is applied to assisting load (want rewind to be faster)
espooler_printing_power: 0                      # If >0, fixes the % of PWM power while printing. 0=allows burst movement
espooler_operations: rewind, assist, print      # List of operational modes (allows disabling even if h/w is configured)
#
# The following burst configuration is used to control the small rotation in the ASSIST direction optionally used
# when in 'print' operation is enabled, 'espooler_printing_power: 0' and is triggered (tension switch or extruder movement).
# It can also be used to loosen filament with 'MMU_ESPOOLER COMMAND=assist BURST=1'
#
espooler_assist_extruder_move_length: 100       # Distance (mm) extruder needs to move between each assist burst
espooler_assist_burst_power: 100                # The % power of the burst move
espooler_assist_burst_duration: 0.4             # The duration of the burst move is seconds
espooler_assist_burst_trigger: 0                # If trigger assist switch is fitted 0=disable, 1=enable
espooler_assist_burst_trigger_max: 3            # If trigger assist switch is fitted this limits the max number of back-to-back advances
#
# The following burst configuration is used to control the small rotation in the REWIND direction optionally used
# when running running the filament drying cycle. The goal is to rotate the spool 60-90 degrees. It can also be
# used to tighten the filament with 'MMU_ESPOOLER COMMAND=rewind BURST=1'
#
espooler_rewind_burst_power: 100                # The % power of the rewind burst move
espooler_rewind_burst_duration: 0.4             # The duration of the rewind burst move is seconds
The supplied defaults are generally a good starting point. Note that unused options are ignored so it is advised to leave them in place (upgrade will likely reinstall them anyway). For example, if you don't have "assist" motors configured in the hardware, the espooler_operations "assist" and "print" will be ignored -- this option is most useful if you wanted to turn OFF the functionality even if the hardware is configured.
Most of the settings are self explanatory but a couple of worth further explanation:
This adjusts the speed conversion ratio meaning the profile of how the DC motor speed is adjusted over the speed range of the MMU gear (filament drive) stepper.
For the following examples, let's assume espooler_max_stepper_speed = 50
And remember actual eSpooler pwm speed values are between 0.0 (off) and 1.0 (full speed) inclusive
The formula looks like this:
(stepper_speed / espooler_max_stepper_speed) ^ espooler_speed_exponent So with 'stepper_speed_exponent' of 1 you would have a linear ratio:
With a stepper speed of 50mm/s, the eSpooler would run at full speed (1.0 PWM)
Calculated as (50/50)^1
With a stepper speed of 25mm/s, the eSpooler would run at half speed (0.5 PWM)
Calculated as (25/50)^1
But with 'stepper_speed_exponent' of 0.2 would have a non-linear ratio:
With stepper speed of 50mm/s, the eSpooler would still run at full speed (1.0 PWM)
Calculated as (50/50)^0.2
With a stepper speed of 25mm/s, the eSpooler would run at a greater than half speed (0.87 PWM)
Calculated as (25/50)^0.2
Note that the PWM signal range is scaled by the h/w configuration scale if set (see klipper doc).
This defines the stepper speed at which the espooler will start. It is generally most useful with digital controlled DC motors when you want to set a threshold below which the espooler doesn't run.
This is a percentage of the calculated "rewind" speed. While you want the espooler to over-rewind to keep the filament tight, you DON'T want it to over-unwind when loading. Thus a 50% setting will run the loading "assist" at 50% of the "rewind" speed. Note that this speed will never drop below the "in-print" power.
This is a % of the maximum power (max pwm signal) that is applied to the espooler motor while printing. This should not be large enough to spin the spool but rather acts as "releasing the braking effort" so there is less strain pulling from the spool while printing. It is recommended that you exclude "print" from espooler_operations initially until you determine that it is causing too much of a braking effect. You might also want to look at one of the intelligent "burst" modes.
These control the "Intelli-Assist" options for in-print operation discussed in detail later.
Tip
- As with most Happy Hare
mmu_parametersyou can change these settings at any time without re-starting klipper with theMMU_TEST_CONFIG var=valuecommand. Remember that parameters changed this way are only valid until the next restart.
 Rewind (Respool) Setup
- Ensure you have pins defined for
respool_motor_pin_*andenable_motor_pin_*if you mcu board requires it. - Ensure that these parameters are correctly defined and tuned:
espooler_min_distance:
espooler_max_stepper_speed:
espooler_min_stepper_speed:
espooler_speed_exponent:- Then make sure that
rewindappears in the list of operations:
espooler_operations: rewind- Test with:
MMU_ESPOOLER GATE=0 OPERATION=rewind
MMU_ESPOOLER GATE=0 OPERATION=off- Ensure you have pins defined for
assist_motor_pin_*andenable_motor_pin_*if you mcu board requires it. - Ensure that parameters specified for "respool" above are correctly defined and tuned (even if not using respool) then add the percentage of the defined rewind speed to use for forward motion:
espooler_assist_reduced_speed:- Then make sure that
assistappears in the list of operations:
espooler_operations: assist- Test with:
MMU_ESPOOLER GATE=0 OPERATION=assist
MMU_ESPOOLER GATE=0 OPERATION=off- Ensure you have pins defined for
assist_motor_pin_*andenable_motor_pin_*if you mcu board requires it. - Ensure that parameters specified for "respool" above are correctly defined and tuned (even if not using respool) then add the percentage of the defined rewind speed to use for in-print motion. This should typically be a very small amount so that it "lifts the brakes" off the DC motor but not enough to allow it to turn uncontrollably:
espooler_printing_power: 5- Then make sure that
printappears in the list of operations:
espooler_operations: print- Test with:
MMU_ESPOOLER GATE=0 OPERATION=print             # set to in-print assist mode
MMU_ESPOOLER GATE=0 OPERATION=offIf you set the espooler_printing_power: 0 then the burst-mode kicks into play. This waits for a trigger before advancing the espooler in a burst operation.
 Option 1: Extruder movement "burst" operation
This option setups up a watchdog on extruder movement so that every espooler_assist_extruder_move_length of extruder movement it will run the espooler at espooler_assist_burst_power % power for espooler_assist_burst_duration seconds.
- Ensure all the setup for basic in-print assist
- Set espooler_printing_power to 0 to enable burst mode:
espooler_printing_power: 0- Define the % of motor power (equates to PWM from 0 to 1) and duration in seconds for the motor burst. E.g:
espooler_assist_burst_power: 80
espooler_assist_burst_duration: 0.5- Test with:
MMU_ESPOOLER GATE=0 OPERATION=print POWER=0     # set to intelli-assist mode
MMU_ESPOOLER OPERATION=burst                    # trigger a burst
You should see the jump to burst operation and then falling back to 0% but in burst mode.
As a more reliable alternative to extruder movement triggering the espooler assist, Happy Hare can accept a sensor input. This is by far the best method and overcomes variability by introducing closed loop feedback: when the sensor detects tension on the filament it "bursts" the espooler into action thus relieving tension and providing intelligent assist. If the filament is not under tension the espooler will be inactive. This both prolongs the life of the espooler DC motor but also means that problematic unspooling is eliminated. Mods to popular MMU's/AFC's like Box Turtle are in the works...
- Ensure all the setup for basic in-print assist
- Ensure you have pins defined for
assist_trigger_pin_*. These would be standard input pins setup as you would for a microswitch sensor. - Set espooler_printing_power to 0 to enable burst mode:
espooler_printing_power: 0- Define the % of motor power (equates to a PWM from 0 to 1) and duration in seconds for the motor burst. E.g:
espooler_assist_burst_power: 80
espooler_assist_burst_duration: 0.5- Ensure that the burst trigger option is enabled and you set the maximum number of back-to-back bursts that are allowed (this is to prevent a stuck trigger sensor from ruining your print):
espooler_assist_burst_trigger: 1
espooler_assist_burst_trigger_max: 3 - Test with:
MMU_ESPOOLER GATE=0 OPERATION=print POWER=0     # set to intelli-assist mode
MMU_ESPOOLER OPERATION=burst                    # trigger a burst
MMU_ESPOOLER ALLOFF=1                           # reset intelli-assist mode
You should see the jump to burst operation and then falling back to 0% but in burst trigger mode.
The MMU_ESPOOLER command is ideal for testing but may have application elsewhere where you want direct control of the motors.
> MMU_ESPOOLER  HELP=1

MMU_ESPOOLER: Direct control of espooler or display of current status
└ ALLOFF    = [0|1] Quick way to turn all espoolers off
└ TRIGGER   = [0|1] Fire in-print trigger for testing
└ BURST     = [0|1] Jog in direction of OPERATION (assist|rewind) using configured burst duration and power
└ DURATION  = [0-10] Override duration of PWM signal (seconds) for burst operations
└ GATE      = g Specify gate to operate on (defaults to current gate)
└ LOOSEN    = [0|1] Quick way to loosen filament on spool
└ OPERATION = [assist|off|print|rewind] Set espooler operation mode
└ POWER     = [0-100] Override default % power to apply to espooler motor
└ QUIET     = [0|1] Used to suppress console/log output
└ RESET     = [0|1] Turn of in-print assist
└ TIGHTEN   = [0|1] Quick way to tighten filament on spool
└ (no parameters for status report)# This turns on the espooler in the rewind (retract) direction at 50% power/speed for gate 0.
MMU_ESPOOLER GATE=0 OPERATION="rewind" POWER=50
# This will turn off the epooler for gate 0
MMU_ESPOOLER GATE=0 OPERATION="off"
# This will energise the gate 2 espooler ready for printing at the default configured power level.. perhaps useful when purging out of print
MMU_ESPOOLER GATE=2 OPERATION="print"
# Without options this will give a status of all espooler motors
MMU_ESPOOLERTypically burst operation is automatic based on configuration but you can test/experiment directly with the MMU_ESPOOLER command. The gate, power and duration will default to the current gate, configured power and duration if not specified. Note that if the espooler for the given gate is not in a "print" mode, the burst request will be ignored. So to completely test standalone you will need to first put one of the espoolers into "in-print" mode, then the burst can be sent.
MMU_ESPOOLER GATE=0 OPERATION=print POWER=0
MMU_ESPOOLER OPERATION=burst                        # configured power/duration
MMU_ESPOOLER OPERATION=burst POWER=50 DURATION=0.8  # custom power/duration
Tip
-
MMU_ESPOOLER ALLOFF=1will quickly turn off ALL espoolers
The Mainsail and Fluidd support will render the operation of the espooler motor in their UIs with an arrow on the spool.
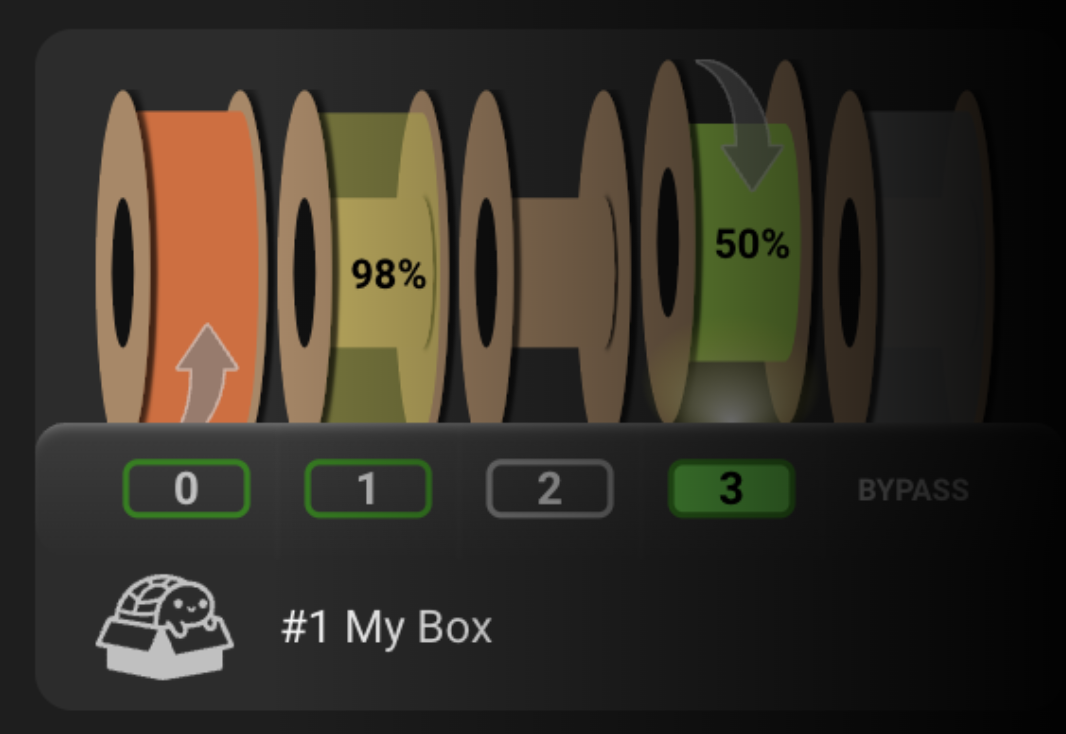 Assisting gate/lane 0 (load and in-print) |
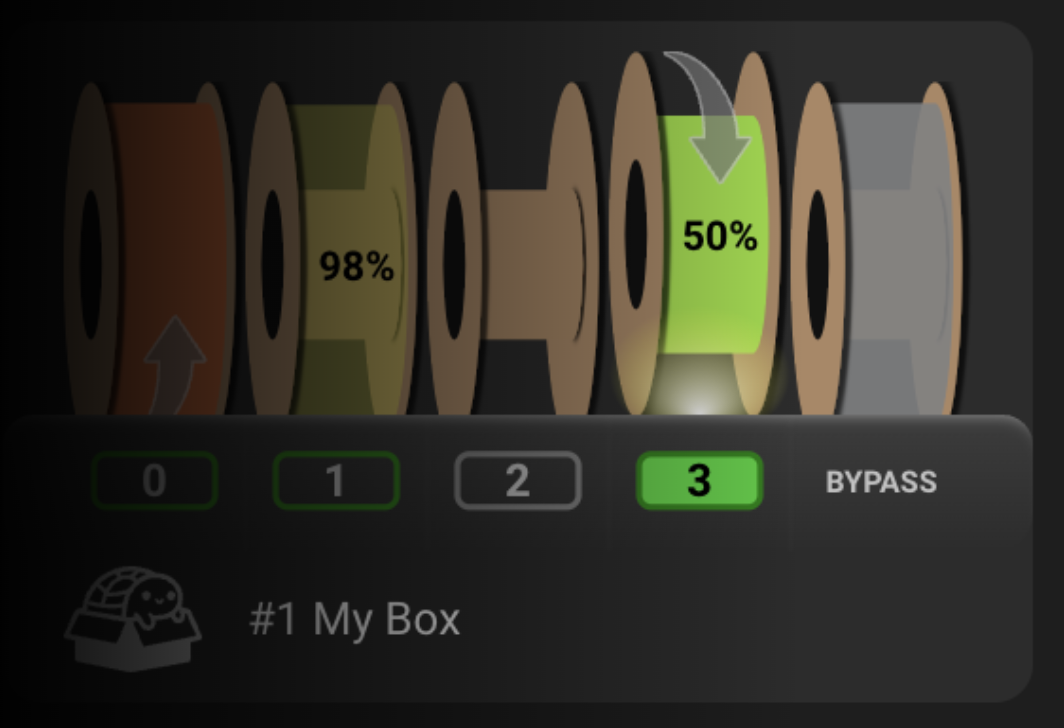 Rewinding gate/lane 4 (respooling) |
Don't forget you can get a quick summary with this command without options (remember that klipper can't run until the current command is complete):
MMU_ESPOOLER
0 : off     (0%)
1 : print   (0%) [assist for 0.8s at 80% power on trigger, max 3 bursts]
2 : off     (0%)
3 : off     (0%)