Tutorial
- Creating a scenario
- Running scenarios with the generic-scenario package
- Customising a model
- Using external input devices with Unity
There are 2 ways to screate a scenario: via the Web UI or manually via script. Both let you spawn vessels either with the waypoint follower (simple scripted movement) or with full dynamics via our physics server, xdyn.
There is also a LOTUSim scenarios repo available which enables creating scenario from a reusable config file. See Running scenarios with the generic-scenario package below.
1. Launch the Web UI
lotusim run
lotusim-ui
2. Open the scenario editor
In the Web UI, click the Scenarios tab at the top of the page, then the + button at the bottom right.
3. Create the scenario
Fill in the required fields in the popup, then click Create scenario.
4. Add a vessel
You'll land on a map centered at the latitude/longitude you entered. Right-click the map and select Add vessel.
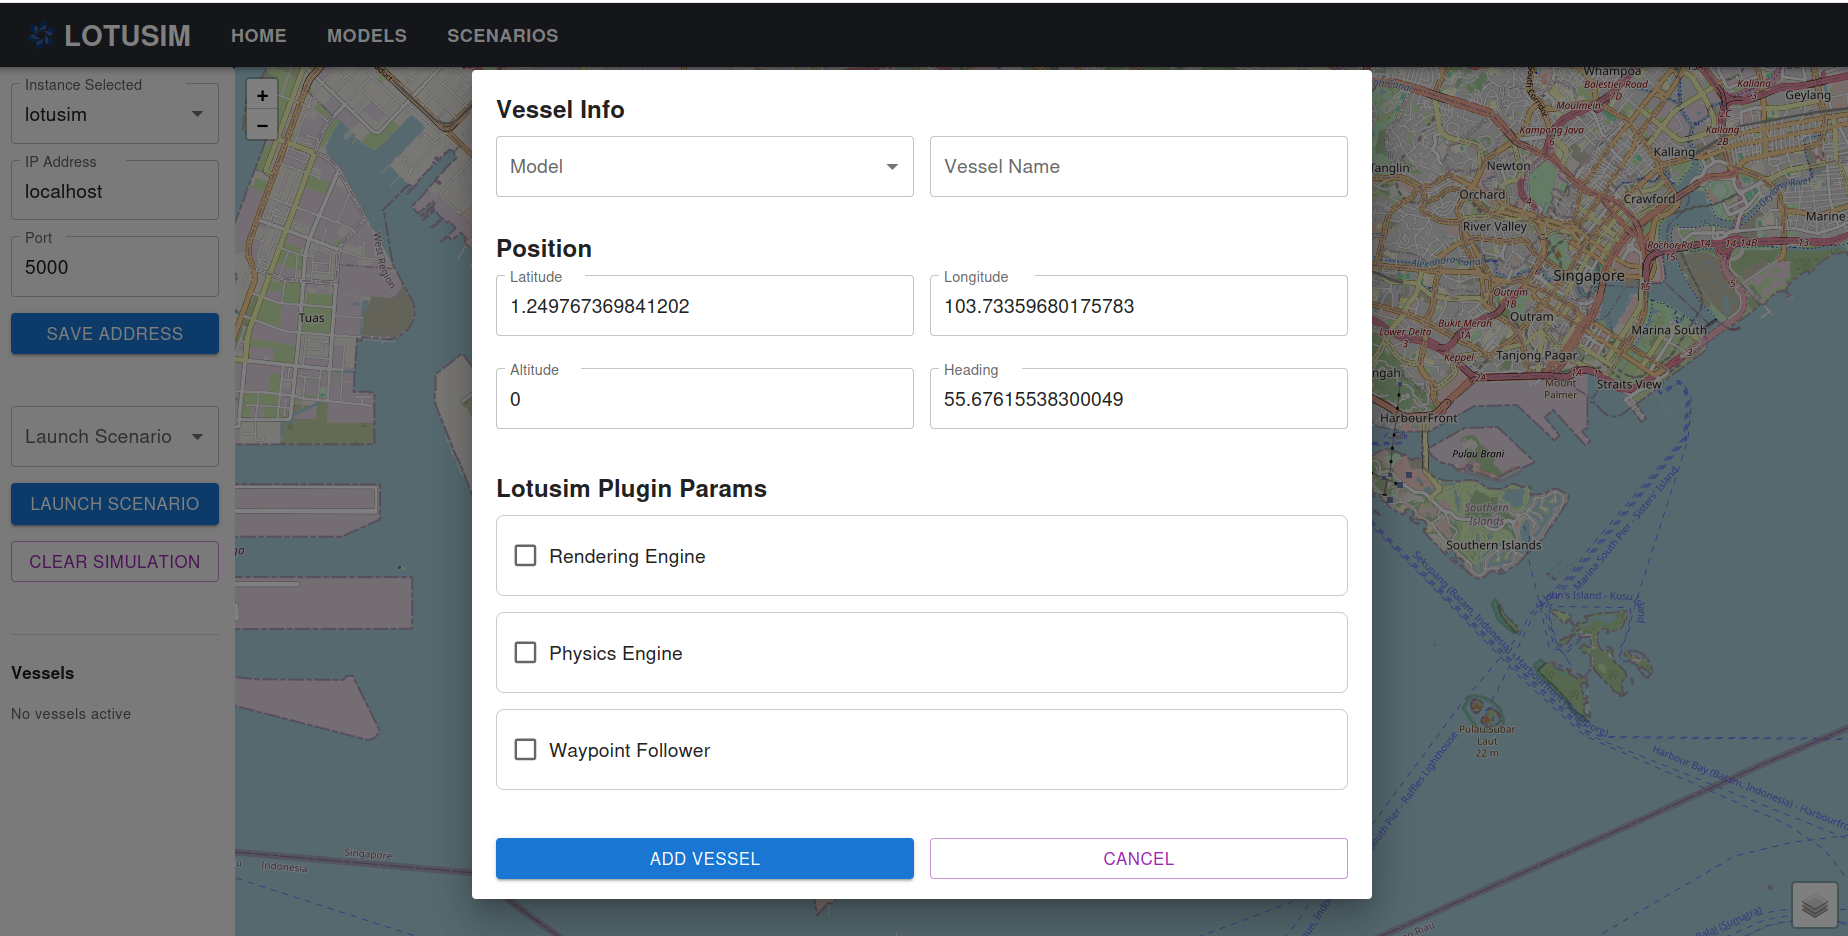
5. Configure the vessel
Fill in the Vessel info panel:
- Choose a model from the available list
- Enable the plugins you need for this vessel:
- Rendering Engine — visualises the scenario (Unity, by default)
- Physics Engine — simulates environment physics (default: xdyn)
- Waypoint Follower — controls vessel movement without full dynamics
Waypoint Follower modes:
| Mode | What to enter |
|---|---|
| Circle | Radius |
| Line | Length + direction angle |
| Waypoints | Edit points directly on the map |
Enable Loop on any mode to repeat the trajectory continuously.
Physics Engine setup:
- Select a mode: Aerial, Surface, or Underwater
- Select the XDyn interface
- Enter a URI, e.g.
127.0.0.1:12345(use a different port per vessel, e.g.12346,12347...) - Under Thrusters, type the thruster name (e.g.
propeller)
Click Add vessel once done. Repeat steps 4–5 for each additional vessel.
6. Save the scenario
Click Save at the top right. You can edit it later from the Scenarios tab.
7. Start the physics server (per vessel)
Before running the scenario, open a new terminal for each vessel that uses the Physics Engine plugin and run:
xdyn-for-cs $LOTUSIM_MODELS_PATH/models/[your-model-name]/[your-model-name].yml \
    --verbose --address 127.0.0.1 --dt 0.2 --port [port-number]
The --port must match the port you entered for that vessel in step 5. Example, for the LRAUV on port 12346:
xdyn-for-cs $LOTUSIM_MODELS_PATH/models/lrauv/lrauv.yml \
    --verbose --address 127.0.0.1 --dt 0.2 --port 12346
8. Run it
Go to the Web UI's Home page and select your scenario under Launch scenario.
We provide examples in C++, Python, and Jupyter-Python under the examples folder. Each has its own README with launch instructions. Use them as a reference for building your own scenario scripts.
What the script does:
- Subscribes to
/lotusim/posesto track spawned vessel positions - Publishes to
/lotusim/vessel_cmd_arrayto send propeller commands - Uses the
/lotusim/mas_cmdaction to spawn (and later delete) vessels via the Multi-Agent System - On spawn, sends an SDF snippet (
<lotus_param>) configuring the rendering and physics engine interfaces — this is the script-based equivalent of the Web UI's Vessel Info panel - On shutdown (Ctrl+C), cleans up by deleting all vessels it spawned
Below is a walkthrough of python-scripts/controlling_ships.py, which spawns a vessel with dynamics and drives it with a propeller command.
Key snippet for spawning a vessel with dynamics:
msg = MASCmdMsg()
msg.cmd_type = MASCmdMsg.CREATE_CMD
msg.model_name = "lrauv"
msg.vessel_name = vessel_name
msg.geo_point = geo  # latitude, longitude, altitude

msg.sdf_string = """
<lotus_param>
    <physics_engine_interface>
    <underwater>
        <interface_type>XDynWebSocket</interface_type>
        <uri>ws://127.0.0.1:12346</uri>
        <thrusters><thrusters1>propeller</thrusters1></thrusters>
    </underwater>
    <init_state>Underwater</init_state>
    </physics_engine_interface>
</lotus_param>
"""
Sending a propeller command once the vessel is spawned:
cmd = VesselCmd()
cmd.vessel_name = vessel_name
cmd.cmd_string = json.dumps({"propeller(rpm)": 200.0, "propeller(P/D)": 0.88})
cmd_array.cmds.append(cmd)
self.cmd_publisher.publish(cmd_array)
Full runnable version: python-scripts/controlling_ships.py in the examples folder.
The Web UI is best for quick, one-off scenarios with up to ~5 models, and the manual options with examples is also a good alternatives to launch many agents. We also have another option to spawn many agents at once from a reusable JSON config with generic-scenario package. It runs through its own standalone Unity executable rather than through lotusim ui / lotusim run.
This assumes you've already completed the Getting Started install and the 3D rendering setup, since this package builds on that workspace and uses Unity for rendering.
Clone the repository into $HOME/Documents/workspace/lotusim/:
cd
mkdir -p ~/Documents/workspace/lotusim
cd Documents/workspace/lotusim/
sudo apt update
sudo apt install -y jq
git clone --recurse-submodules https://github.com/naval-group/LOTUSim-generic-scenario
And after cloning:
cd LOTUSim-generic-scenario
git submodule update --remote --mergeThe architecture linking LOTUSim and Generic Scenario is defined in:
LOTUSim-generic-scenario/src/simulation_run/executable/scenario_launch.sh
# -------------------- Paths --------------------
PATH=$HOME/lotusim_ws/src/lotusim/physics:$HOME/lotusim_ws/src/LOTUSim/launch:$PATH
LOTUSIM_WS=$HOME/lotusim_ws
LOTUSIM_PATH=$LOTUSIM_WS/src/LOTUSim
LD_LIBRARY_PATH=$LOTUSIM_PATH/physics:$LD_LIBRARY_PATH
LOTUSIM_MODELS_PATH=$LOTUSIM_PATH/assets/models

# --- Updated paths for your scenario workspace ---
LOTUSIM_SCENARIO_WS=$HOME/Documents/workspace/lotusim/LOTUSim-generic-scenario
CONFIG_DIR="$LOTUSIM_SCENARIO_WS/src/simulation_run/config"
UNITY_EXE_PATH="$LOTUSIM_SCENARIO_WS/lotusim_unity_executables/lotusim_scenario_linux/lotusim_scenario.x86_64"
Open a terminal and run these commands to build and source both workspaces:
# Build and Source LOTUSim
source /opt/ros/humble/setup.bash
lotusim clean_build
source $HOME/lotusim_ws/install/setup.bash
# Build and Source the generic-scenario package
cd $HOME/Documents/workspace/lotusim/LOTUSim-generic-scenario/
colcon build
source install/setup.bash Your setup is now complete, you’re ready to start a simulation!
All configuration files live in: LOTUSim-generic-scenario/src/simulation_run/config/files.json
Spawning agents: supported initialisation formats
When spawning an agent, initialise its position in one of two ways, depending on the number of elements in the pose array:
-
Geographic position (GeoPoint) :
[lat, lon]or[lat, lon, alt]. The system automatically sends a GeoPoint message. -
Full pose (vessel_position) :
[x, y, z, roll, pitch, yaw](6 elements). The system sends a vessel_position message to place the agent at that Cartesian pose.
Example (2-element GeoPoint):
"Wamv": {
  "nb_agents": 1,
  "poses": [
    [-34.8852, 138.6217]
  ],
  "model": "model.sdf",
  "xdyn": true
}Note: set
"xdyn": trueto enable environment physics (waves and currents).
Below is a complete example config, defenseScenario.json:
{
  "world_file": "defenseScenario.world",

  "agents": {
    "Lrauv": {
      "nb_agents": 5,
      "poses": [
        [-2513.0, -2997.0, -100.0, 0.0, 0.0, 0.0],
        [-2515.0, -3000.0, -100.0, 0.0, 0.0, 0.0],
        [-2513.0, -3003.0, -100.0, 0.0, 0.0, 0.0],
        [-2518.0, -3003.0, -100.0, 0.0, 0.0, 0.0],
        [-2518.0, -2997.0, -100.0, 0.0, 0.0, 0.0]
      ],
      "model": "model.sdf",
      "xdyn": true
    },

    "Bluerov2_heavy": {
      "nb_agents": 1,
      "poses": [
        [-3000.0, -2500.0, -50.0, 0.0, 0.0, 0.0]
      ],
      "model": "model.sdf",
      "xdyn": true
    },

    "Mine": {
      "nb_agents": 1,
      "poses": [
        [0.0, 0.0, -100.0, 0.0, 0.0, 0.0]
      ],
      "model": "model.sdf",
      "xdyn": true
    },

    "Fremm": {
      "nb_agents": 1,
      "poses": [
        [-400.0, -4800.0, 0.0, 0.0, 0.0, 0.0]
      ],
      "model": "model.sdf",
      "xdyn": true
    },

    "Commando": {
      "nb_agents": 1,
      "poses": [
        [-2000.0, -2000.0, 0.0, 0.0, 0.0, 0.0]
      ],
      "model": "model.sdf",
      "xdyn": true
    },

    "Dtmb_hull": {
      "nb_agents": 1,
      "poses": [
        [-2000.0, -1500.0, 0.0, 0.0, 0.0, 0.0]
      ],
      "model": "model.sdf",
      "xdyn": true
    }
  },

  "aerial_domain": true,
  "renderer_unity": true
}
Note: the
Dtmb_hullagent has no corresponding 3D model in Unity, so it won't be rendered there.
-
Set your IP - update
ROS_IP(find your local IP withhostname -I) in
LOTUSim-generic-scenario/src/simulation_run/executable/scenario_launch.sh -
Launch the Unity executable, located at:
$HOME/Documents/workspace/lotusim/LOTUSim-generic-scenario/src/linux_executable/lotusim_scenario.x86_64
(make sure this matches the path defined inscenario_launch.sh) -
In the Unity window, enter:
- Your local IP address
-
ROS port:
10000 - Spectator Mode (free-fly camera), or leave it unchecked to follow entities (navigate with arrow keys)
- In a first terminal, run:
./src/simulation_run/executable/scenario_launch.sh --config $HOME/Documents/workspace/lotusim/LOTUSim-generic-scenario/src/simulation_run/config/defenseScenario.jsonFor debugging, append `--debug`:
./src/simulation_run/executable/scenario_launch.sh --config $HOME/Documents/workspace/lotusim/LOTUSim-generic-scenario/src/simulation_run/config/defenseScenario.json --debug- In a second terminal, source both workspaces and launch the ROS 2 ⟷ Gazebo bridge:
    source /opt/ros/humble/setup.bash
    source $HOME/lotusim_ws/install/setup.bash
    source $HOME/Documents/workspace/lotusim/LOTUSim-generic-scenario/install/setup.bash
This bridge carries simulation telemetry and environmental effects between Gazebo and ROS 2.
- **Simulation stats only** (sim time, Real-Time Factor):
ros2 run gz_ros2_bridge stats_gz_to_ros_bridge- **Wind only**:
ros2 run gz_ros2_bridge wind_ros_to_gz_bridge- **Both together**:
ros2 launch gz_ros2_bridge bridge_nodes.launch.py This launches `wind_ros_to_gz_bridge` (wind/environmental data) and `stats_gz_to_ros_bridge` (sim time, RTF) together.
- Terminals for the physics servers open automatically and the simulation starts.
When LOTUSim and Unity connect, the arrows in the top-left corner of the Unity window turn from red to blue.
-
Spectator Mode: move with
W,A,S,D,Q,Eand the mouse - or use Leap Motion hand tracking. - Target Follower Mode: the camera cycles through agents automatically. Use the arrow keys to switch between entities.
-
Change wind direction:
- X-axis:
1/2 - Y-axis:
4/5 - Z-axis:
7/8
- X-axis:
Propellers are currently only implemented on the LRAUV. To use one with active propellers, add it to your config file (e.g. defenseScenario.json):
"Lrauv_Propeller": {
  "nb_agents": 1,
  "poses": [
    [-2513.0, -2997.0, -100.0, 0.0, 0.0, 0.0]
  ],
  "model": "model.sdf",
  "xdyn": true
  }
Manual control via ROS topic
Launch the simulation as usual, then in a second (sourced) terminal, send:
ros2 topic pub /defenseScenario/lrauvpropeller0/control_lrauv std_msgs/msg/Bool "data: true"This sends the default high-rpm value set in lrauv_propeller.py. To stop:
ros2 topic pub /defenseScenario/lrauvpropeller0/control_lrauv std_msgs/msg/Bool "data: false"You can change the rpm value by editing this line in
LOTUSim-generic-scenario/src/external_packages/lrauv_propeller/lrauv_propeller/lrauv_propeller.py:
self.send_propeller_command(rpm=100.0, pd=0.88) # example propeller commandAuto-start cycle
To have the propeller automatically cycle between high and low values instead of waiting for a manual command, uncomment this line in lrauv_propeller.py:
# Automatically start the RPM sequence on initialization
# NOTE: Disabled auto-start for development - manual control via ROS topic
# self.start_sequence()
Remember to
colcon buildand re-source after any change tolrauv_propeller.py.
LOTUSim comes with a set of sensors and battery/power models you can add to any model by editing its .sdf file directly.
AIS:
<sensor name="ais_sensor" type="custom" gz:type="ais">
    <update_rate>1</update_rate>
    <noise_sigma>0.01</noise_sigma>
    <noise_amplitude>0.01</noise_amplitude>
</sensor>
IMU:
<sensor name="imu_sensor" type="custom" gz:type="imu">
    <update_rate>1</update_rate>
    <noise_sigma>0.01</noise_sigma>
    <noise_amplitude>0.01</noise_amplitude>
</sensor>
Radar:
The radar sensor needs a LiDAR sensor on the same link to provide its point cloud input. Minimal setup:
<link name="base_link">
<!-- 2D LiDAR — required input for the radar -->
<sensor name="lidar_sensor" type="gpu_lidar">
<pose>0 0 0.5 0 0 0</pose>
<always_on>true</always_on>
<update_rate>10.0</update_rate>
<ray>
<scan>
<horizontal>
<samples>360</samples>
<resolution>1</resolution>
<min_angle>-3.14159</min_angle>
<max_angle>3.14159</max_angle>
</horizontal>
</scan>
<range>
<min>1.0</min>
<max>100.0</max>
</range>
</ray>
</sensor>
<!-- Radar sensor — uses LiDAR point cloud -->
<sensor name="radar_sensor" type="custom" gz:type="radar">
<always_on>true</always_on>
<update_rate>1</update_rate>
<lidar_gz_topic>
world/lotusim/model/<vessel_name>/link/base_link/sensor/lidar_sensor/scan/points
</lidar_gz_topic>
<min_range>1.0</min_range>
<max_range>100.0</max_range>
</sensor>
</link>📖 For the full parameter list (PSF tuning, published topics, RViz2 visualisation, runtime activate/deactivate), see the Radar Sensor README.
Add a <lotusim_power> block to your model's SDF to give it a battery. Minimal example using the built-in simple_battery:
<lotusim_power>
    <name>main_battery</name>
    <type>simple_battery</type>
    <capacity_ah>100</capacity_ah>
    <initial_soc>1.0</initial_soc>
    <voltage_min>36.0</voltage_min>
    <voltage_nominal>48.0</voltage_nominal>
</lotusim_power>
To make a sensor draw power from that battery, add a <lotusim_power> block inside its <sensor> element:
<sensor name="ais" type="custom" gz:type="ais">
    <lotusim_power>
        <type>sensor</type>
        <nominal_w>5.0</nominal_w>
        <priority>3</priority>
    </lotusim_power>
    <update_rate>1</update_rate>
</sensor>
The priority field (1 = highest, 4 = lowest) controls load shedding -> if the battery runs low, priority 4 consumers are shed first, then priority 3, and so on. Priority 1 is never shed.
You can then visualise the power status of the vessel by launching this command in a new terminal after starting lotusim:
chmod +x power_monitor.py
python3 power_monitor.py
📖 For generators, fuel types, multi-battery switching, and writing a custom power manager, see the Power Subsystem README.
Forces and propulsion are configured in your model's .yml dynamics file, under external forces (passive forces like gravity or damping) and controlled forces (propulsion you command at runtime).
See Forces & Propulsion Types for the full list of what's available and what each one does.
Adding a force - e.g. quadratic damping, from BlueROV2.yml:
external forces:
  - model: gravity

  - model: quadratic damping
    damping matrix at the center of gravity projected in the body frame:
      row 1: [58.42, 0, 0, 0, 0, 0]
      row 2: [0, 55.137, 0, 0, 0, 0]
      row 3: [0, 0, 124.818, 0, 0, 0]
      row 4: [0, 0, 0, 4.0, 0, 0]
      row 5: [0, 0, 0, 0, 4.0, 0]
      row 6: [0, 0, 0, 0, 0, 4.0]
Each force is a list item under external forces, with model naming the force type. Some forces (like quadratic damping) need extra parameters such as a damping matrix, check the Xdyn Setup for what each one expects.
Adding a propeller - e.g. a standalone thruster using wageningen B-series, from BlueROV2.yml:
controlled forces:
  - name: thruster1
    model: wageningen B-series
    position of propeller frame:
      frame: BlueRov2
      x: {value: -0.14, unit: m}
      y: {value: 0., unit: m}
      z: {value: -0.092, unit: m}
      phi: {value: -1.57, unit: rad}
      theta: {value: 0., unit: rad}
      psi: {value: 2.355, unit: rad}
    wake coefficient w: 0.2
    relative rotative efficiency etaR: 0.8
    thrust deduction factor t: 0.2
    rotation: anti-clockwise
    number of blades: 3
    blade area ratio AE/A0: 0.3
    diameter: {value: 0.1, unit: m}
Give each propeller a unique name, this is how you'll address it when sending commands (see propeller commands and the controlling_ships.py example above). position of propeller frame sets where the thruster sits relative to your model's body frame, and the remaining fields describe the propeller's physical characteristics (wake coefficient, blade count, diameter, etc.).
If your vessel steers with a rudder instead of independent thrusters, use propeller+rudder instead - see Forces & Propulsion Types for an overview, or dtmb-xdyn.yml in the repo for a full working example.
After editing your .yml file, relaunch your scenario for the changes to take effect!
These are optional and require extra hardware. They assume you've already followed Set up the 3D rendering in Getting Started, since both devices interact with the Unity scene.
Requirements:
- An
Ultraleap Hand Tracking Camera- a Leap Motion Controller has been used for this project. Check your computer meets the Tracking Requirements. - The Ultraleap Hand Tracking Software (V5.2+) installed. Works on both Linux and Windows.
Setup:
- Make sure you have the requirements above installed for your specific device.
- Plug in your Leap Motion and confirm it's detected using the Ultraleap software.
- Place the Leap in front of the user, with the wire pointing left (it's set up for desktop mounting).
- In your Unity scene, check that the
LeapMouvementControllerGameObject is activated.Note: only the
defenseScenarioscene has been set up to work with the Leap Motion. - If you see red lights on the Leap's cameras, it's ready to use!
Requirements (Windows only):
- A
Tobii Eye Tracker 5device. - The
Tobii Experience App, installed from the Microsoft Store. - The Tobii Experience Driver v1.133.
- Tobii Ghost v1.14.1.
Setup:
- Plug the Eye Tracker, and make sure you have the requirements installed.
- Open the
Tobii Experience Appand callibrate your device by following the instructions. - Open the
Tobii Ghostapp and play with the settings to display the gaze trace and more... - You can start running your simulations and the Eye Tracker will track your gaze !