SFTP Customer Example
This guide shows you how to build a simple customer intake and SFTP processing system in xyOps. You will create a bucket that stores customer connection details, an event with a Magic Link intake form for adding customers, and a workflow that downloads a file from every customer SFTP server and passes it to a processing job.
The finished system has two parts:
- An Add New Customer event that reads the customer bucket, appends one customer, and stores the complete customer list back into the bucket.
- A Process Customer SFTP Files workflow that reads the same bucket, splits the customer list into individual jobs, downloads a file from each SFTP server, and passes each file to a secondary processing job.
This example stores SFTP passwords as plaintext in the bucket. For production hardening, consider encrypting them with a private key from a Secret Vault, and storing the encrypted payloads as Base-64 strings (for JSON compatibility).
Before you begin, make sure you have:
- Permission to create and edit Buckets, Events, and Workflows.
- At least one online xySat server that can reach the customer SFTP servers.
- xySat v1.0.34 or later, which includes the new @pixlcore/xyops-sdk package.
- One test SFTP account and a harmless example file, such as
example.csv.
Open the xyOps Marketplace, locate SFTP Transfer, and install the latest version. This Plugin supports password and private-key authentication, plus uploading, downloading, listing, and deleting files over SFTP.
Open the Buckets page and create a new bucket with the following suggested settings:
-
Title:
Customers -
Icon: Choose a cool icon like
rolodex. -
Notes:
Customer contact and SFTP connection details used by the customer file workflow.
In the bucket's Data editor, enter this initial JSON:
{
	"customers": []
}
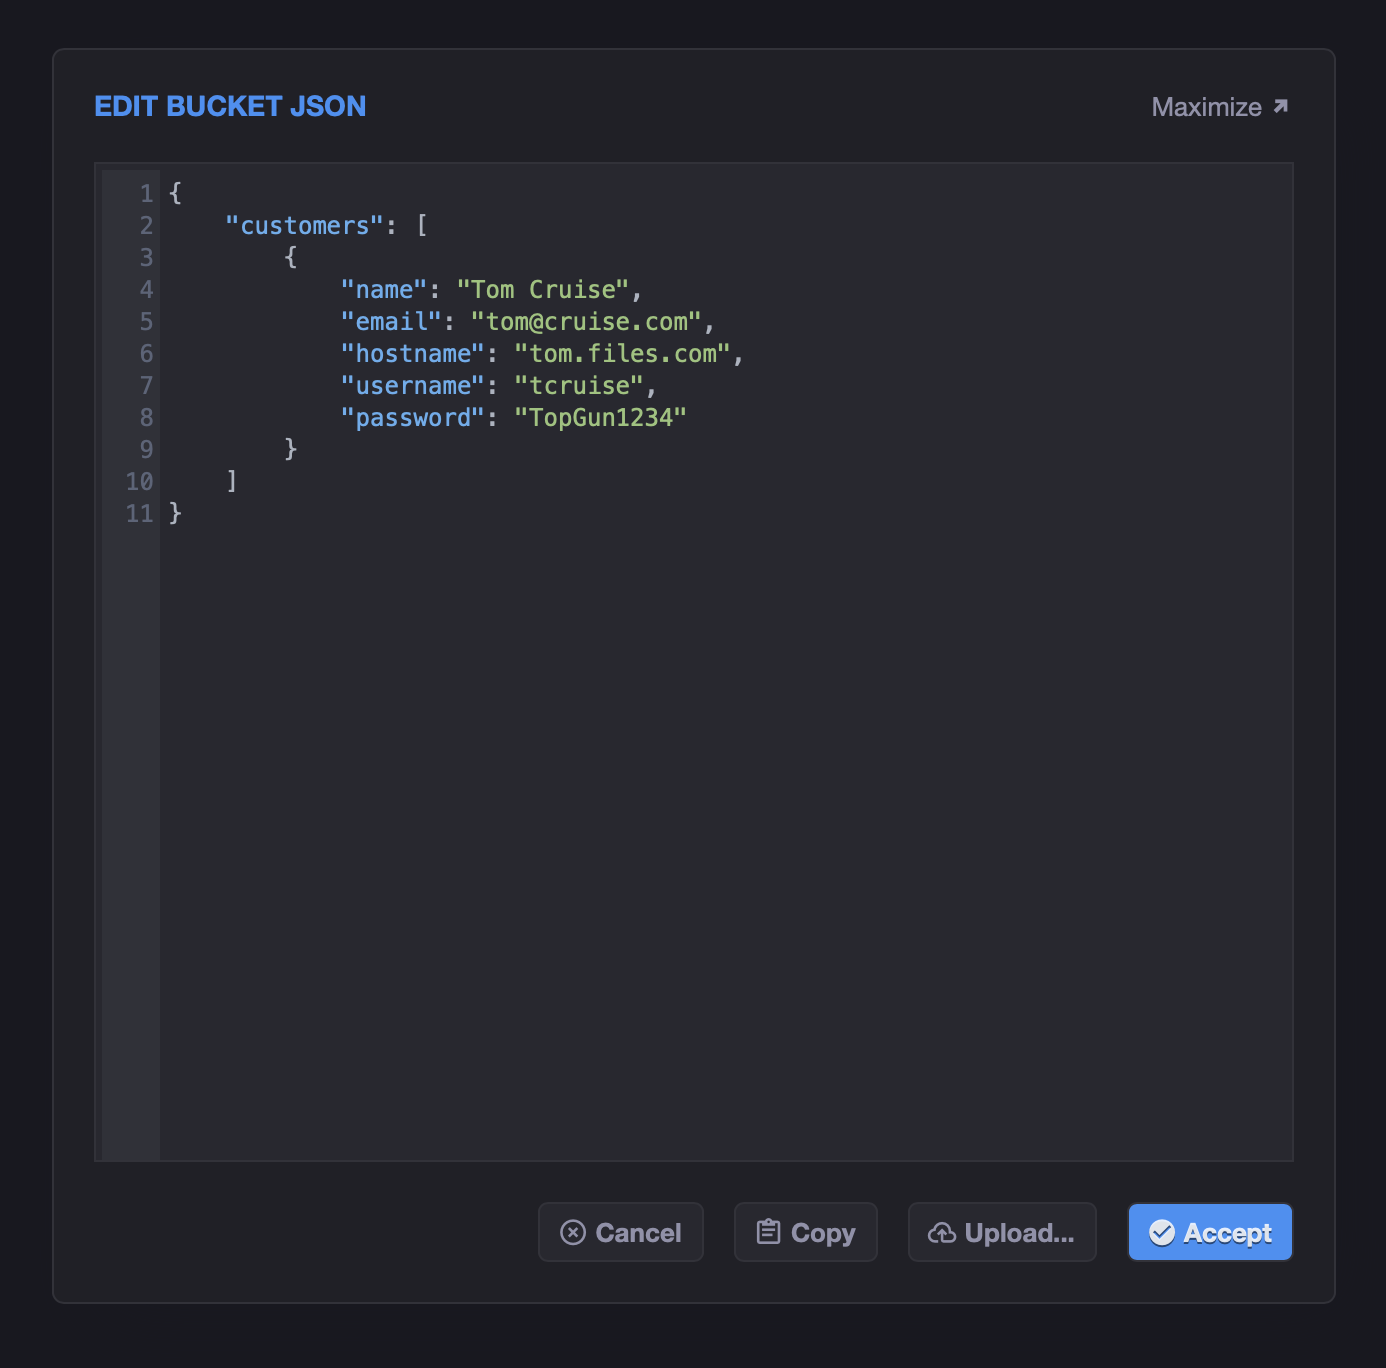
The bucket data uses an object with a customers property because bucket data is merged into input.data when fetched. The value of customers is the array that will hold the customer records.
Each customer will eventually have this shape:
{
	"name": "Example Customer",
	"email": "ops@example.com",
	"hostname": "sftp.example.com",
	"username": "example-user",
	"password": "example-password"
}
Save the bucket, then keep its title handy. You will select this bucket several times in later steps.
Open the Events page and create a normal event with these suggested settings:
-
Title:
Add New Customer -
Icon: Choose a fun icon like
account-plus. - Category: Choose a category.
-
Plugin:
Shell Script - Target: Select a server or group running xySat v1.0.34 or later.
-
Algorithm:
Random, unless your environment requires another selection method. -
Trigger: Add an enabled
Manual Runtrigger for initial testing.
The Shell Script Plugin lets us use a Node.js shebang while keeping the example code directly inside the event.
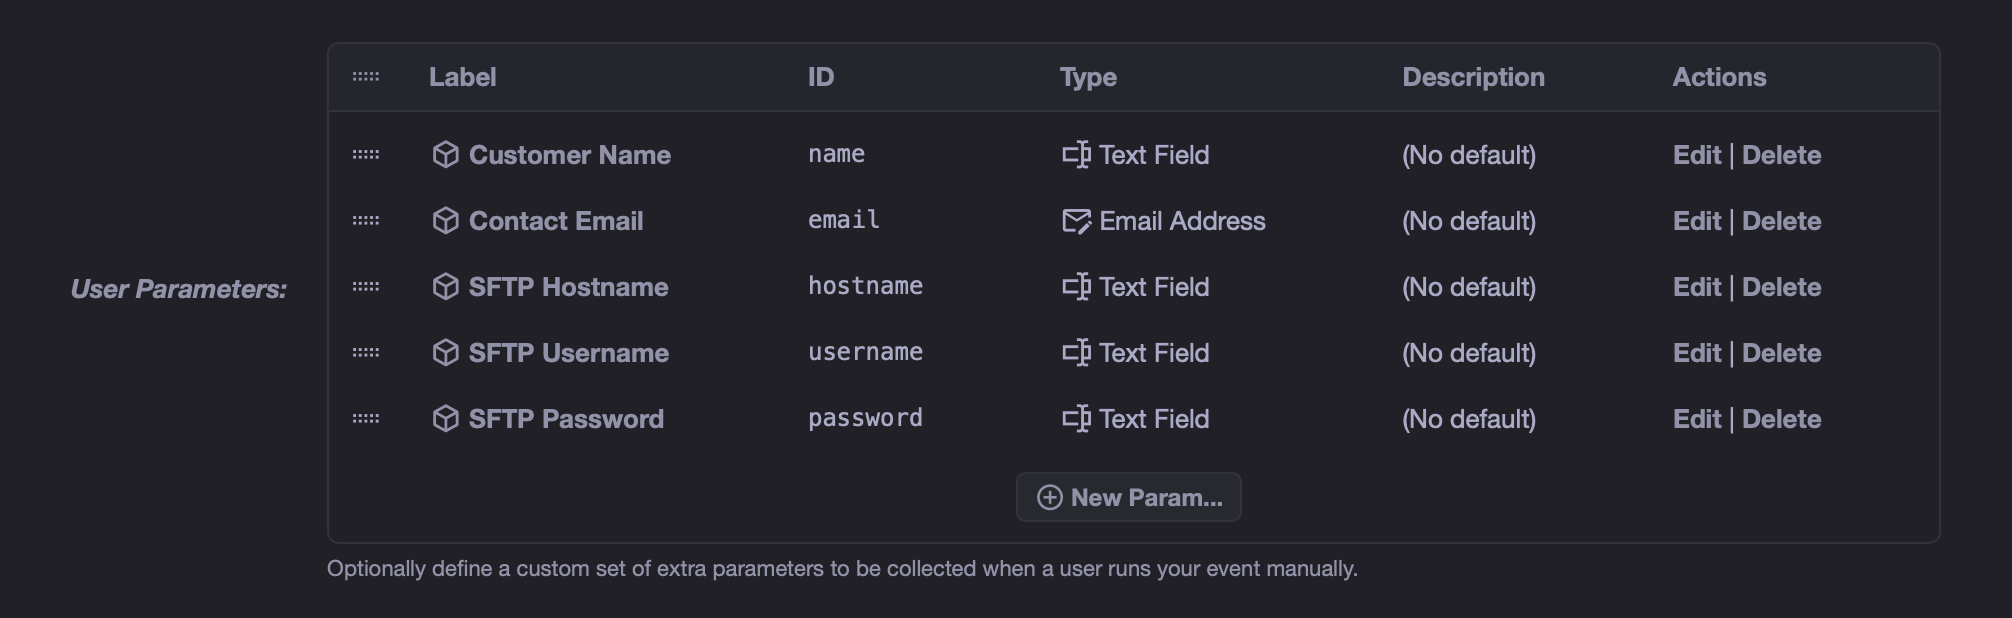
Add the following five user parameters to the event. Use the exact field IDs shown here because the Node.js job will read these names from job.params.
| Field ID | Title | Type | Required |
|---|---|---|---|
name |
Customer Name | Text | Yes |
email |
Contact Email | Text | Yes |
hostname |
SFTP Hostname | Text | Yes |
username |
SFTP Username | Text | Yes |
password |
SFTP Password | Text | Yes |
These fields are displayed whenever the event is launched manually or through its Magic Link landing page. xyOps merges the submitted values into the job parameters before the Plugin runs.
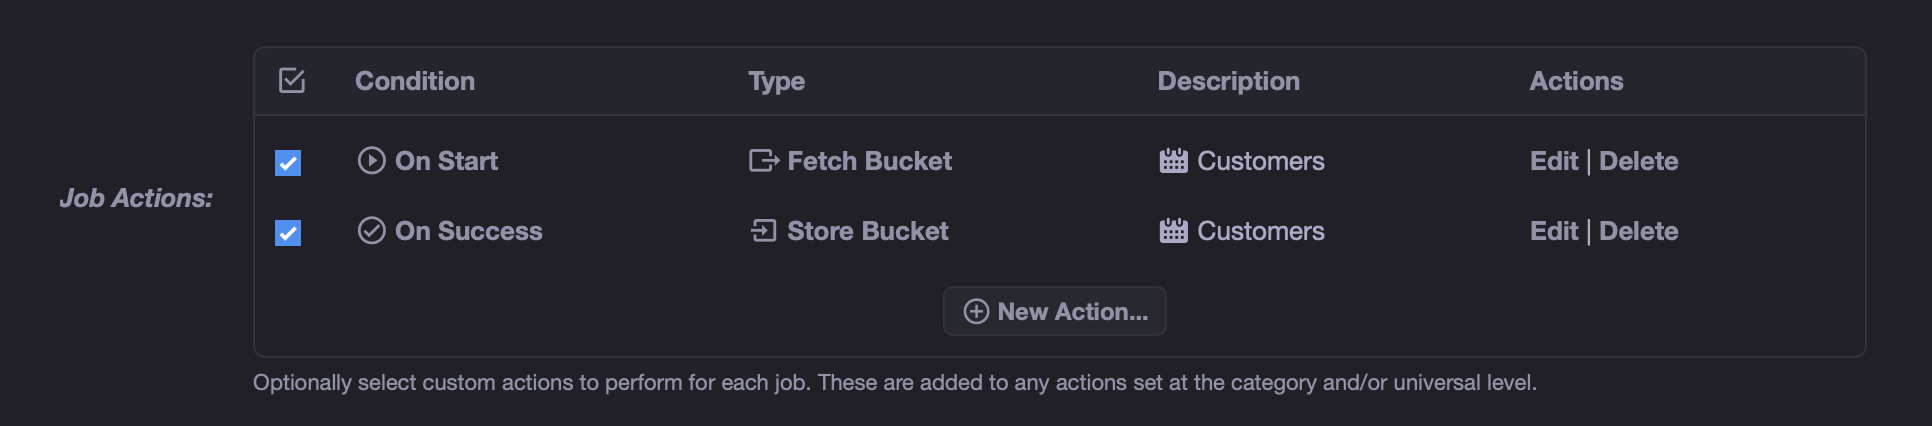
Add these two actions to the Add New Customer event:
-
Condition:
On Start -
Action:
Fetch Bucket -
Bucket:
Customers -
Sync:
Data Only
The starting action shallow-merges the bucket data into the new job's input.data. The Node.js code can then read the current array as job.getData('customers').
-
Condition:
On Complete -
Action:
Store Bucket -
Bucket:
Customers -
Sync:
Data Only
The completion action stores the job's output data back into the bucket. Our code will output the complete customers array, including the new entry.
Paste the following code into the Shell Script editor:
#!/usr/bin/env node

// The xyOps SDK is already included with modern xySat installations.
// No local npm install or package.json is required for this job.
const { job } = require('@pixlcore/xyops-sdk');

(async function() {
	try {
		// Read and parse the xyOps job document from STDIN before using the SDK.
		await job.read();

		// The event's five user fields are merged into the job parameters.
		let params = job.getParams();

		// The Fetch Bucket starting action places this array in input.data.
		let customers = job.getData('customers');
		if (!Array.isArray(customers)) {
			throw new Error('The bucket data must contain a customers array.');
		}

		// Build a clean customer record using the submitted field values.
		// Do not print this object because it contains the plaintext password.
		let customer = {
			name: String(params.name || '').trim(),
			email: String(params.email || '').trim(),
			hostname: String(params.hostname || '').trim(),
			username: String(params.username || '').trim(),
			password: String(params.password || '')
		};

		// Validate all fields again in case the event is launched through an API.
		let missing = Object.keys(customer).filter( function(key) {
			return !customer[key];
		} );
		if (missing.length) {
			throw new Error('Missing required field(s): ' + missing.join(', '));
		}

		// Append the customer and emit the complete array as job output data.
		// The Store Bucket completion action persists this object to the bucket.
		customers.push(customer);
		job.addData({ customers: customers });

		job.finalSuccess('Added customer: ' + customer.name);
	}
	catch (err) {
		job.finalError(1, err.message || String(err));
	}
})();
The SDK handles the xyOps JSON-over-STDIO protocol for us:
-
job.read()reads the incoming job document. -
job.getParams()returns the five submitted event fields. -
job.getData('customers')reads the array fetched from the bucket. -
job.addData()sends the complete updated array to the job output. -
job.finalSuccess()andjob.finalError()complete the job cleanly.
This event performs a read-modify-write operation. If two copies run at exactly the same time, they could both read the same old array and the last job to finish could overwrite the other job's new customer.
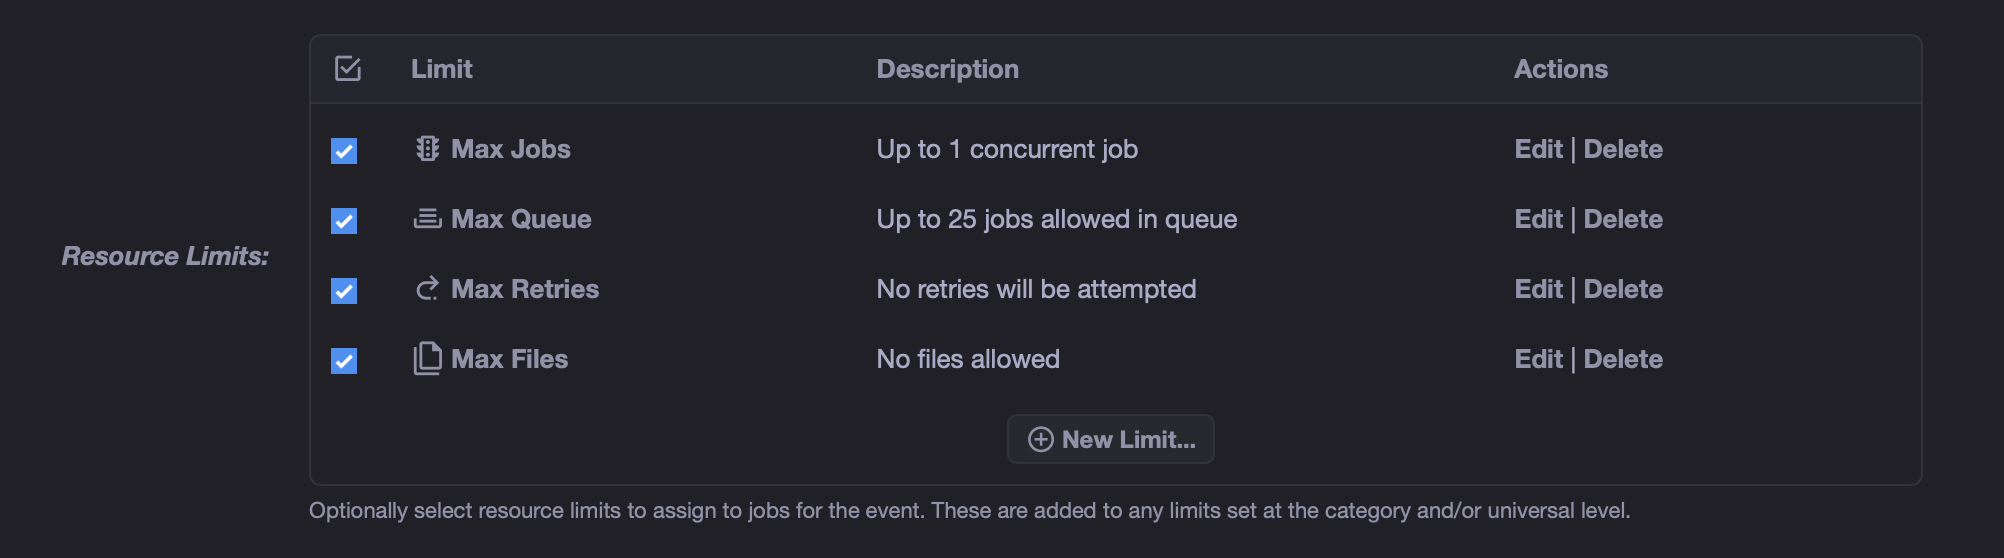
Add these event limits to serialize submissions:
-
Max Concurrent Jobs:
1 -
Max Queue Limit: Choose a reasonable number for your intake traffic, such as
25.
This allows only one Add New Customer job to update the bucket at a time while later submissions wait in the queue.
Also, add a Max File Limit set to 0, so no file upload selector is presented to the user on the magic link form.
When you're done, the event should have these 4 limits:
Save the event and run it manually with a test customer. Use an SFTP account that contains a harmless file matching the pattern you plan to download later.
After the job completes:
- Confirm that the job succeeded.
- Open the
Customersbucket. - Confirm that the
customersarray now contains the submitted record.
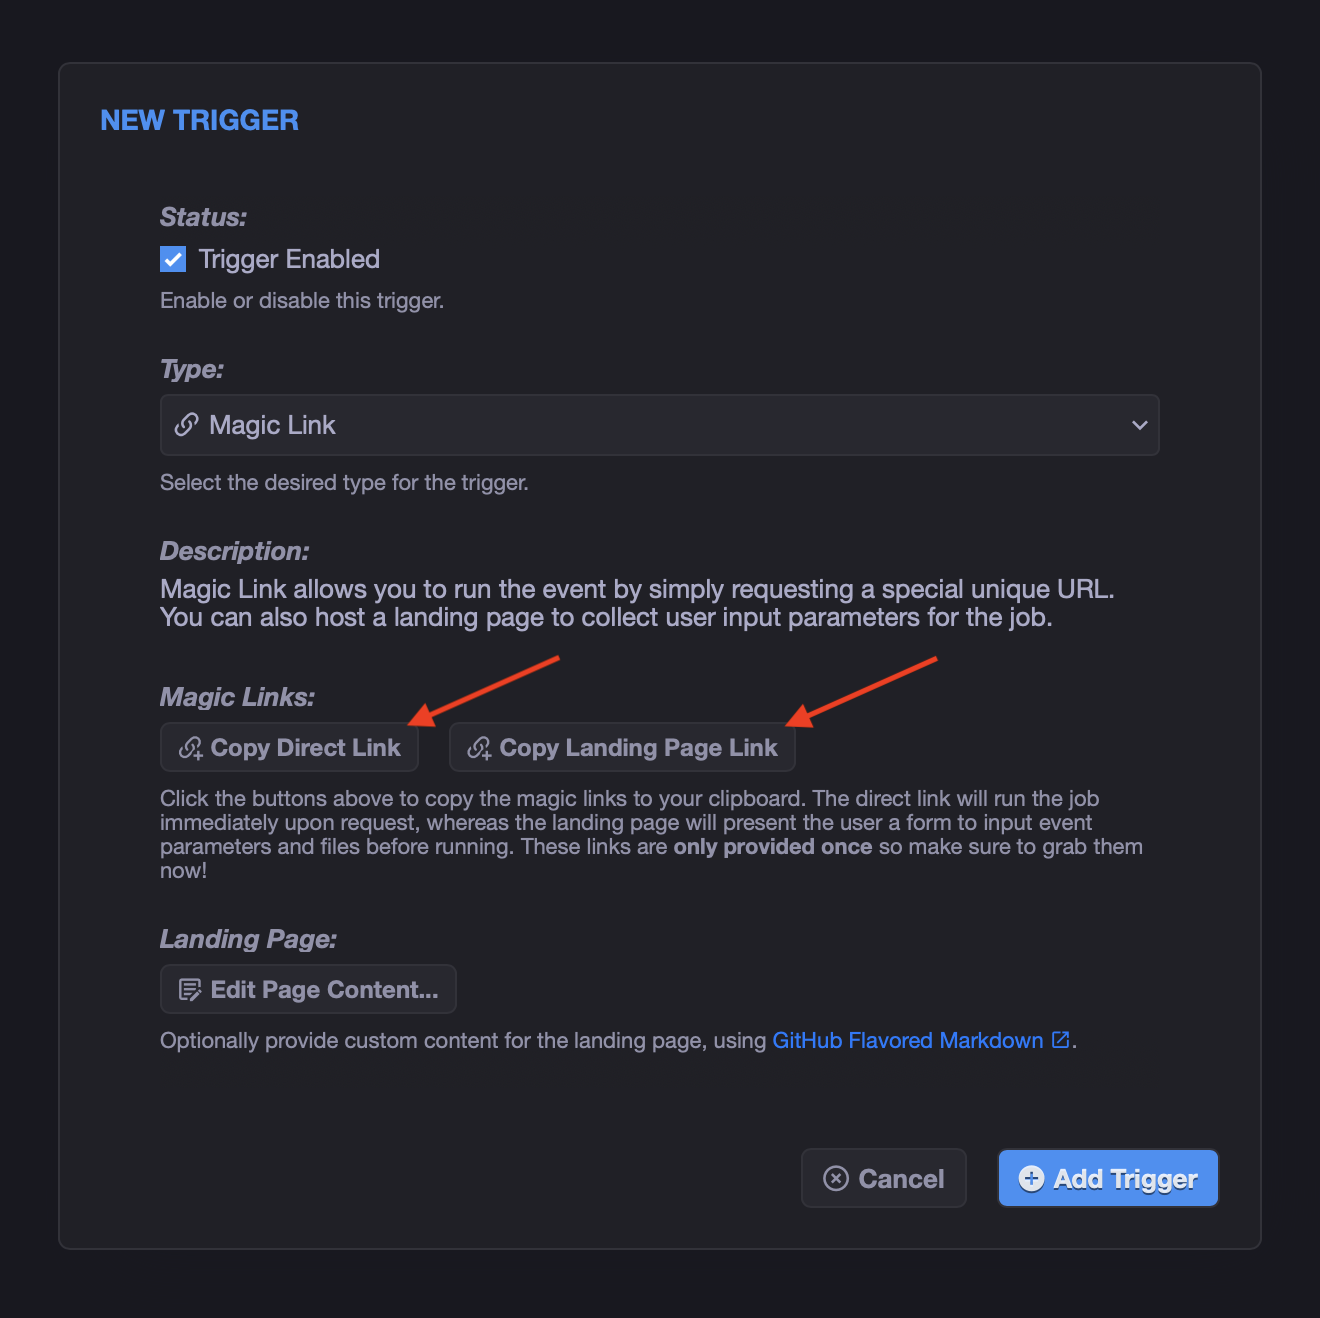
Edit the Add New Customer event and add a Magic Link trigger. xyOps will provide both a direct launch URL and a standalone landing-page URL. Copy both URLs and paste them somewhere safe, as xyOps only offers them to you once!
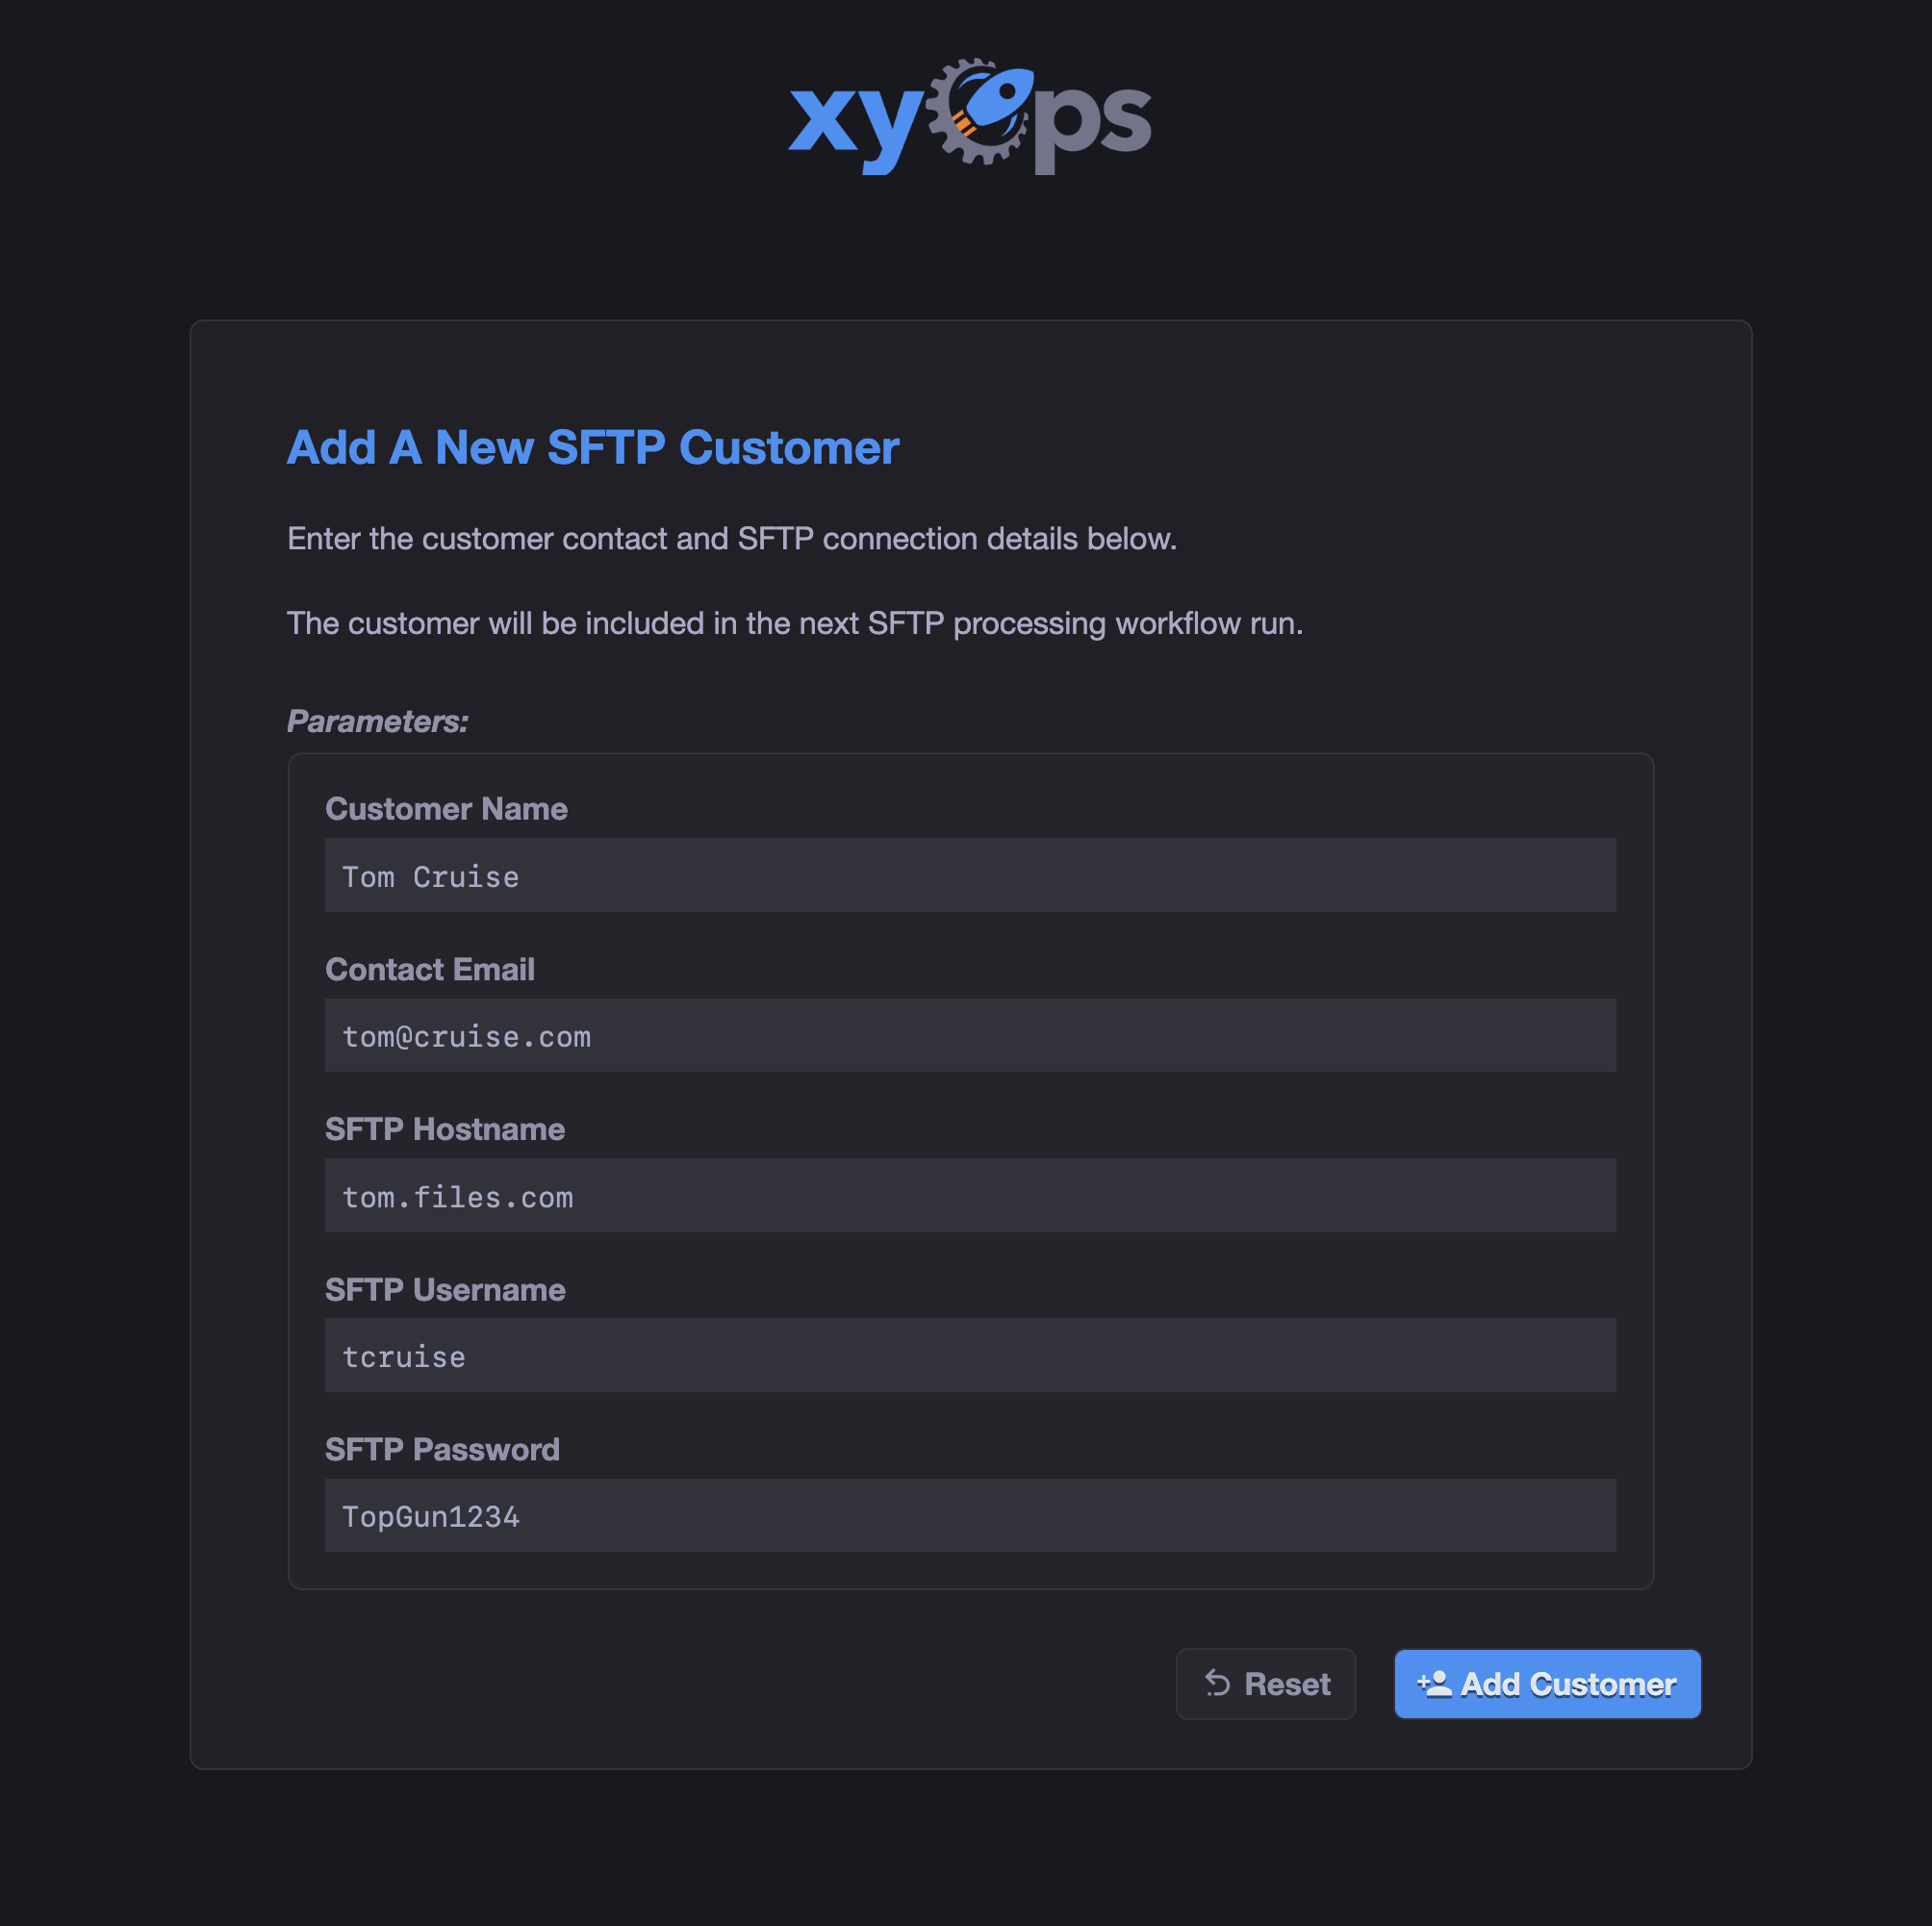
You can use this custom Markdown body for the landing page content:
## Add A New SFTP Customer

Enter the customer contact and SFTP connection details below.

The customer will be included in the next SFTP processing workflow run.

<!-- Button: Add Customer -->
<!-- Icon: account-plus -->
<!-- Response: The customer was submitted successfully. -->
The custom Response makes the form return immediately with a simple confirmation while the job runs in the background. Remove that line if you prefer to stream the live job progress and final result back to the page.
Treat the Magic Link URLs as credentials. Anyone with the URL can submit the form, and the password field is transmitted as a job parameter.
If you have your own customer intake process, and simply want to fire off the job directly, then use the magic "Direct Link" instead. This will initiate the job with a single request (i.e. via curl or similar tool). You can append the user parameters as query string arguments like this:
http://xyops.yourcompany.com/api/app/magic/v1/MAGIC_TOKEN_HERE?name=Tom%20Cruise&email=tom%40cruise.com&hostname=tom.files.com&username=tcruise&password=TopGun1234
Alternatively, you can send the request as a HTTP POST, and include the user parameters as POST parameters instead.
Create a new workflow with these suggested settings:
-
Title:
Process Customer Files - Category: Choose the appropriate workflow category.
Add a Manual Run trigger while building and testing the workflow. You can add a schedule later after the complete flow works.
At the top level of the workflow event (above the workflow editor), add this action:
-
Condition:
On Start -
Action:
Fetch Bucket -
Bucket:
Customers -
Sync:
Data
Because this is a top-level starting action, the customer bucket is fetched before the workflow graph starts. The Manual Run trigger and first controller receive the bucket content in the workflow's input.data.

Add a Split Controller as the first node after the Manual Run trigger and set its expression to:
input.data.customersKeep the batch size at 1. The Split Controller launches one downstream SFTP job for each customer. Each individual SFTP job receives its customer record here:
input.data.itemThis means the customer's hostname is available as input.data.item.hostname, the username as input.data.item.username, and so on.
Connect the nodes like this:
Manual Run -> Split Controller
Add a Job Node after the Split Controller and choose the Marketplace SFTP Transfer Plugin. Give the node a friendly title such as Download Customer File.
Configure the common SFTP fields with macros from the current split item:
| SFTP Field | Value |
|---|---|
| SFTP Hostname | {{ data.item.hostname }} |
| Username | {{ data.item.username }} |
| Password | {{ data.item.password }} |
| Port | 22 |
Those {{ double curly braces }} things are xyOps Expression Format (XYEXP), and will automatically populate the plugin parameters with input data from the job. In this casd, we're pulling in values that the split controller sent to our job's input.
Select the Download Files tool and use settings like these for the example:
| Download Field | Example Value |
|---|---|
| Remote Path | outgoing/ |
| Filename Pattern | *.csv |
| Local Path | Leave blank |
| Include Subfolders | No |
| Delete Files | No |
| Attach Files | Yes |
| Maximum Files | 1 |
| Sort Files | Oldest First |
Leaving Local Path blank downloads into the unique xyOps job directory. Enabling Attach Files is the important part because it adds the downloaded file to the SFTP job output, allowing xyOps to pass it to the next workflow node.
The example downloads the oldest matching CSV file from each customer without deleting anything. Adjust the path, pattern, maximum, and sort settings for your real SFTP layout.
Connect the Split Controller directly to this node:
Manual Run -> Split Controller -> Download Customer File
Make sure you add a Max Concurrent Jobs and a Max Queue Limit to this node, to control the parallelization and queuing.
Add a second Job Node using the built-in Shell Script Plugin and title it Process Customer File. Connect the SFTP job to it using the On Success condition.
Paste in this small Node.js example:
#!/usr/bin/env node

// Use only built-in Node.js modules plus the SDK bundled with xySat.
const fs = require('fs');
const { job } = require('@pixlcore/xyops-sdk');

(async function() {
	try {
		await job.read();

		// Files attached by the SFTP job are staged in this job's directory.
		let files = job.getFiles();
		if (!files.length) throw new Error('No SFTP file was received.');

		let results = [];
		for (let file of files) {
			// Replace this example inspection with your real processing logic.
			let stats = fs.statSync(file.filename);
			console.log('Processing file: ' + file.filename);
			results.push({
				filename: file.filename,
				size: stats.size
			});
		}

		job.addData({ processed_files: results });
		job.finalSuccess('Processed ' + results.length + ' customer file(s).');
	}
	catch (err) {
		job.finalError(1, err.message || String(err));
	}
})();
The SFTP Plugin attaches downloaded files to its job output. xyOps automatically stages those files in the next job's working directory and exposes their metadata through job.getFiles().
The sample only records each filename and size. Replace that block with your real parser, importer, validator, archive operation, or other processing logic.
Here's what the full workflow should look like:
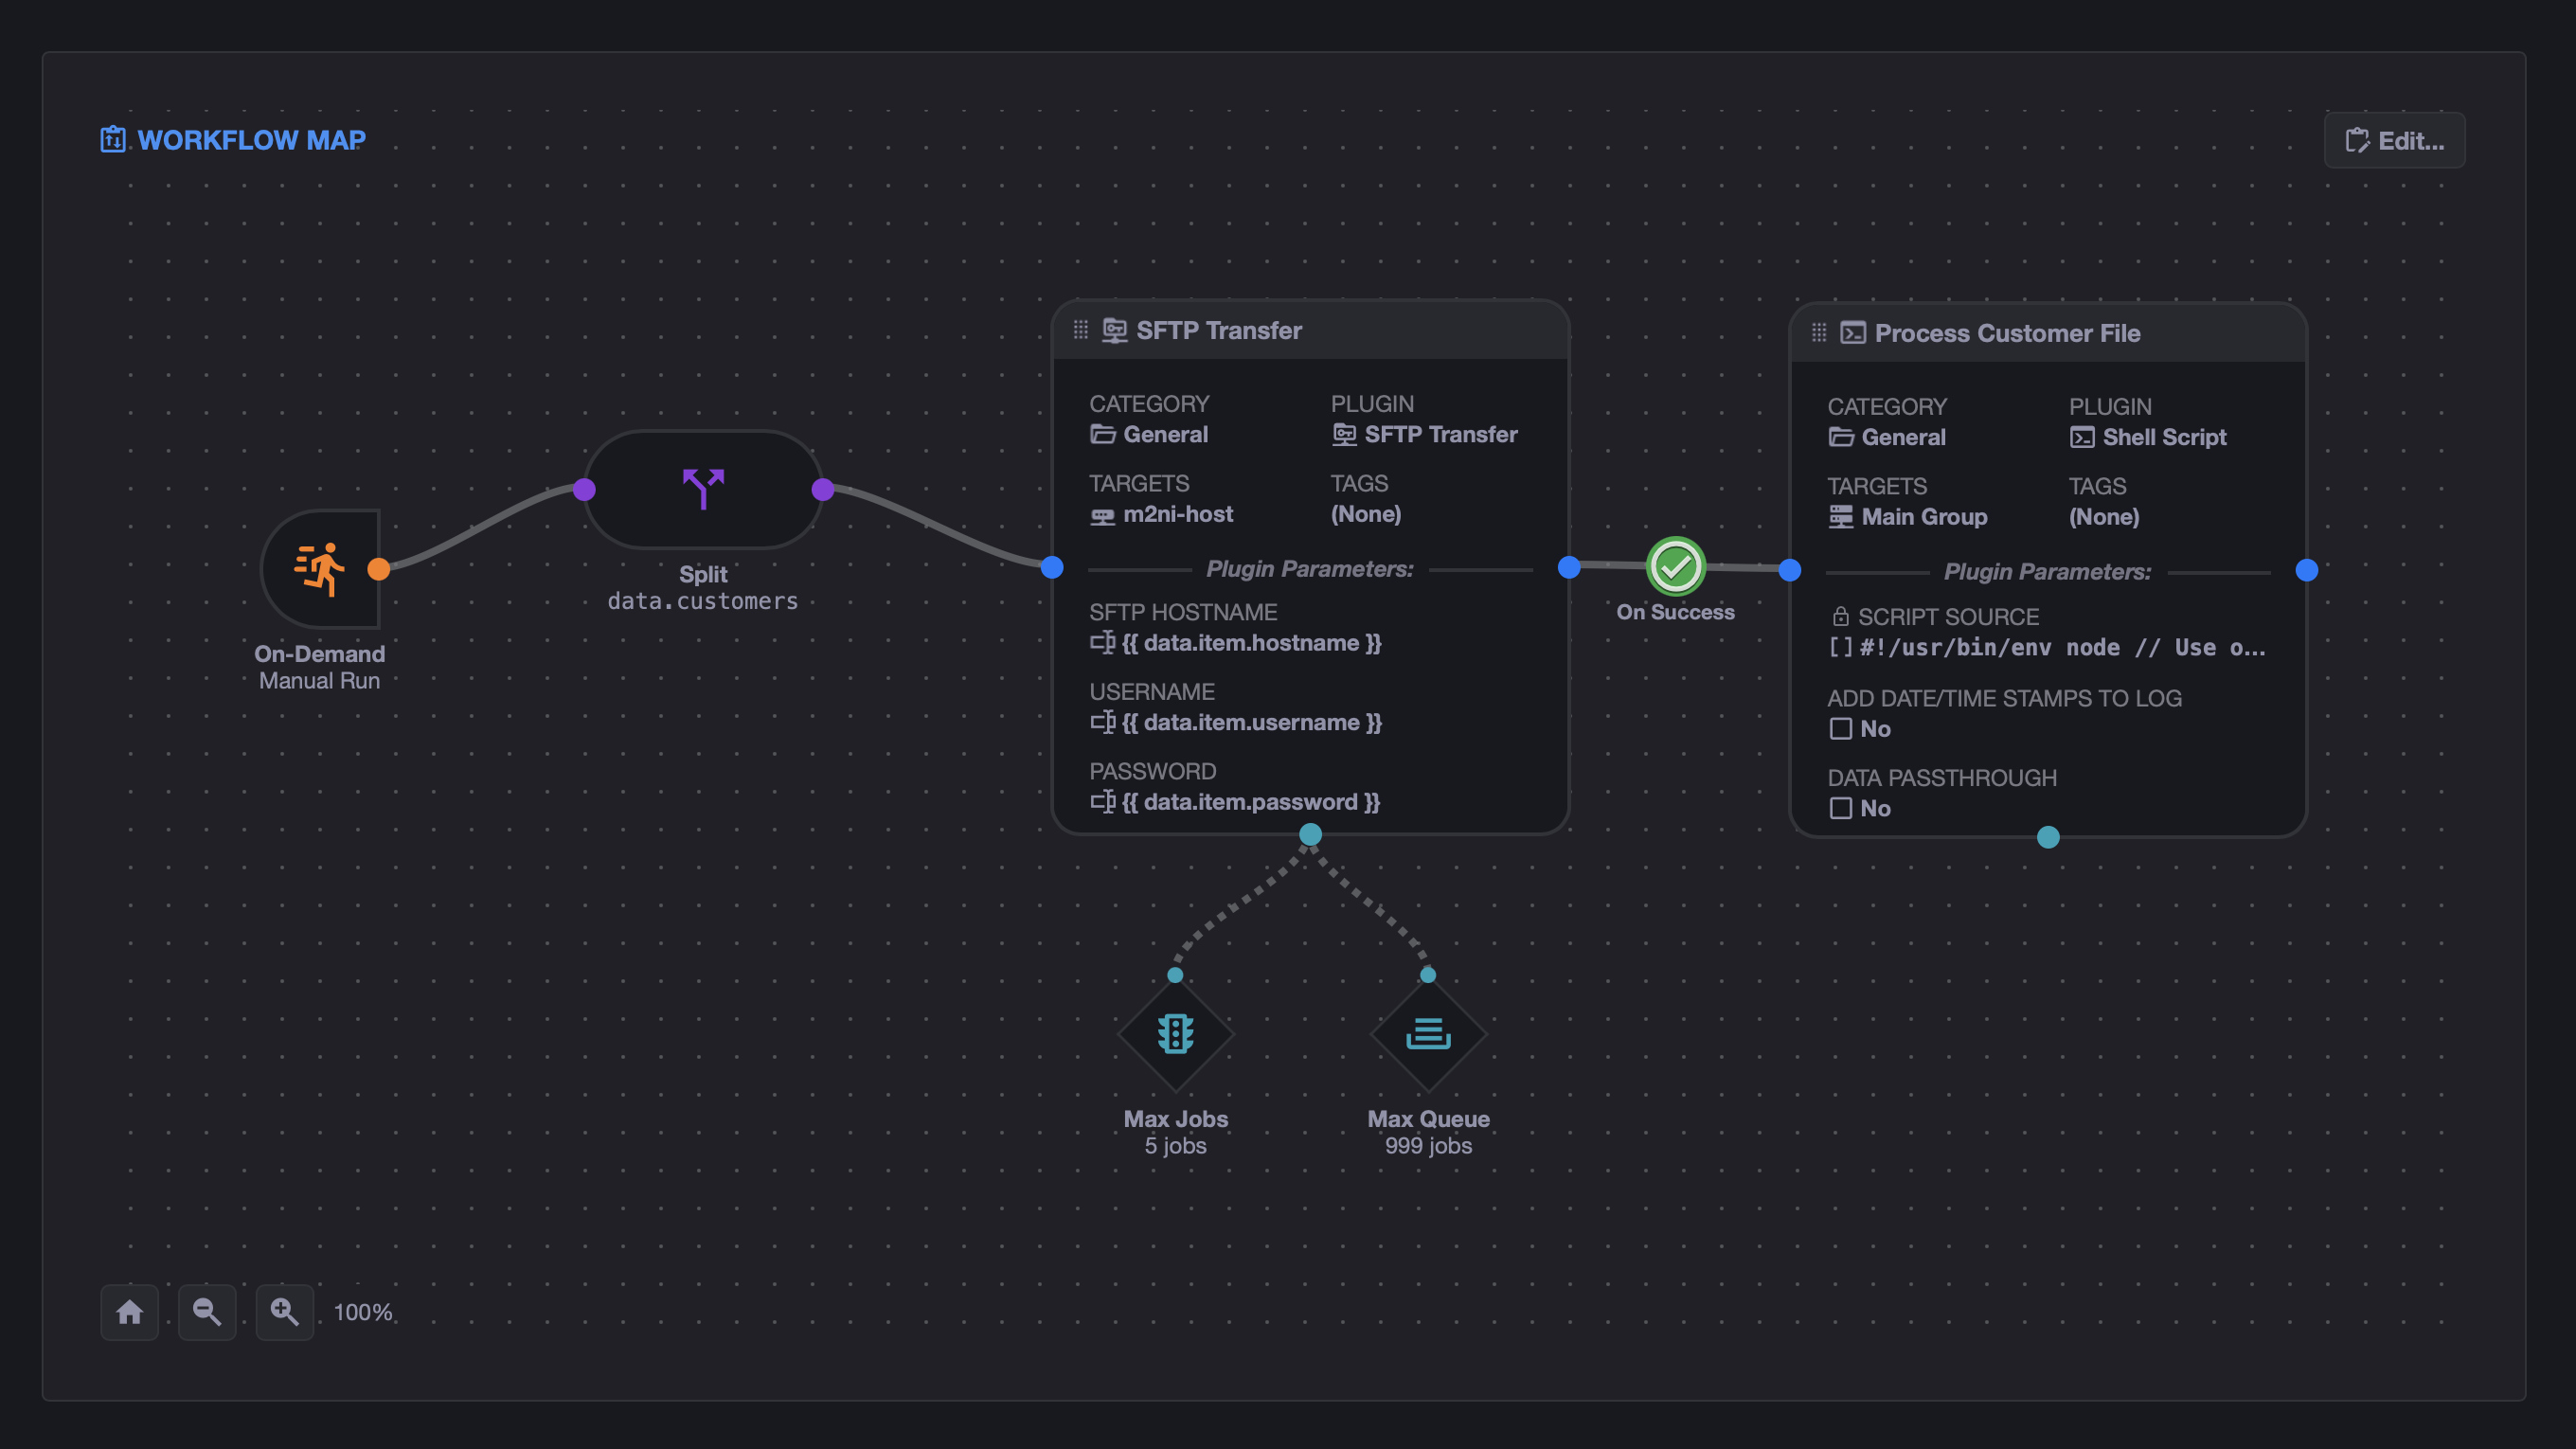
The behavior is:
- The workflow's starting action fetches
{ "customers": [...] }from the bucket. - The Split Controller evaluates
input.data.customers. - xyOps launches one Download Customer File job per customer.
- Each SFTP job connects with values from
data.itemand downloads one matching file. - The SFTP Plugin attaches the downloaded file to its job output.
- The On Success connection passes the file to Process Customer File.
- The processing job reads the attached file and performs your custom logic.
Save the workflow and run it manually. Verify that:
- One SFTP job launches for every customer in the bucket.
- Each job connects to the correct customer hostname.
- Each successful SFTP job shows an attached output file.
- One processing job launches after each successful download.
- Each processing job receives the correct file.
Once the manual test works, you can extend the system in several useful ways:
- Add a Schedule or Interval trigger to run the workflow automatically.
- Pin each customer's SSH host fingerprint in the customer data and map it into the SFTP Plugin.
- Add email, channel, ticket, or webhook actions for failures.
- Add customer-specific remote paths or filename patterns to each customer record.
- Add a Join Controller if you need one final summary after all customer jobs complete.