Writing Subutai Blueprints
Several application installation mechanisms exist for Subutai including Blueprints. Blueprints install, update, and keep applications operating optimally in P2P Environments.
Blueprints encapsulate users from the details of application installation and maintenance. Instead of wasting time and energy on figuring out how to install and maintain applications users focus on using them instead. Blueprint creators and maintainers engrain their knowledge of installing and maintaining applications into their blueprints.
For the benefit of blueprint authors and maintainers, Subutai provides workflows and tooling integrations to enable blueprint development using devops best practices and git for blueprint version control.
One click cloud application installation is critical. People from all walks of life should be able to launch an application in their own p2p cloud instantly. It should be as easy as installing an iPhone application from the Apple App Store. Bridging this gap between non-technical users and open source products is crucial for the success of open source in the cloud era. Subutai Blueprints make cloud applications easy to install and use for mass consumption.
While enabling users en masse, technically savvy, power users and blueprint maintainers are able to tap into the powerful features of the platform. These advanced features enable the construction of distributed, load balanced, and fault tolerant applications while using best practices to manage complexity.
Blueprints are generalized instructions on how to provision an application into a P2P cloud environment. They’re general in the sense they know nothing about the exact resources available to an environment and the network topology to make optimal choices. Blueprints just outline the steps needed to erect, update, or maintain an application when given infrastructure.
At application provisioning time, Subutai’s orchestration engine combines environment specific information with the blueprint’s general instructions to optimally allocate or purchase resources based on several factors called environment governance rules involving criteria such as:
- Resource Costs
- Performance Criteria
- Application Load Distribution
- Redundancy Requirements
- Security Requirements
- Peer and Operator Reputation
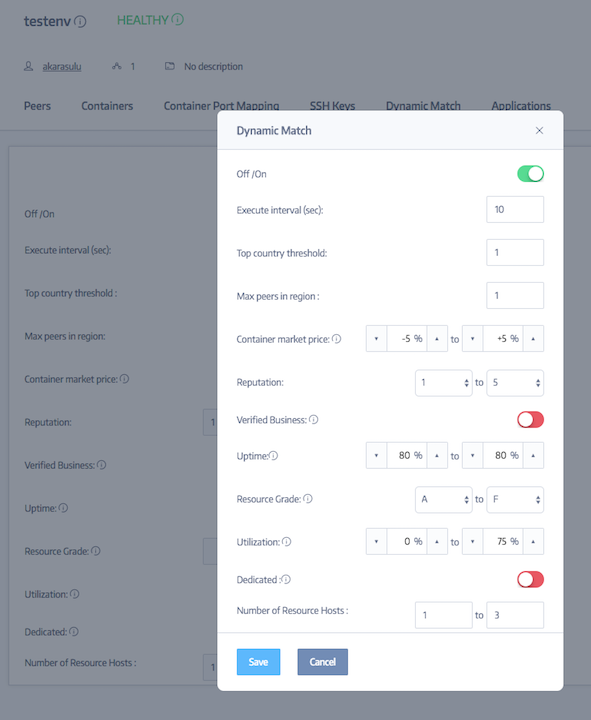
Provisioning occurs the first time an application is installed and subsequently to upgrade it, or to adjust resources and runtime parameters to changing conditions. The triggers to provision the application may be manual or automatic. Provisioning should be viewed as a perpetual process rather than a one time event. This is the only way to adapt to changing conditions to maintain a the "desired state". Automatic perpetual provisioning is enabled when an environment is flagged to use dynamic matching. The screenshot show’s the governance rules used to manage dynamic environment and application provisioning on the Subutai Hub.
These rules are used to match peers dynamically to the needs of the environment owner and to respond to changes over time. Some of these same parameters are also available to Blueprint authors. Blueprints use them to produce an initial set of peers an environment owner can choose from when creating a new environment using a blueprint. Later on the environment owner can use similar settings to enable dynamic peer matching for their environments.
Blueprints were designed to be version controlled from the start since they essentially represent Infrastructure as Code. So technically, a blueprint can have anything in it that you can put into a git repository.
All blueprints MUST have a specification file named "Subutai.json" in the root of the git repository. This file specifies various parameters that govern how the blueprint is used by the Subutai P2P Platform. The JSON file is pretty simple, take a look ...
Let's dive right in and take a look at a very simple blueprint to get a quick sense of what they look like. This minimal blueprint specifies the most simple application. It installs a web server for a static website with a single container. The blueprint can be used to create a new environment, or add the application (not much of one with its container) to an existing environment:
NOTE I will probable change this example to something more interesting and a bit more useful, maybe into a Wordpress application.
{
  "name": "My-Website",
  "description": "My static website",
  "version": "1.0.0",
  "ssh-key": "my-website",
  "author": "https://github.com/akarasulu",
  "containers": [ {
      "hostname": "www",
      "template": "apache",
      "peer-criteria": "HTTP-GROUP",
      "size": "SMALL",
      "port-mapping": [
        {
          "protocol": "http",
          "domain": "mywebsite.envs.subutai.cloud",
          "internal-port": "80",
          "external-port": "80"
        },
        {
          "protocol": "tcp",
          "domain": "mywebsite.envs.subutai.cloud",
          "internal-port": "22",
          "external-port": "4040"
        }
      ]
    }
  ],
  "peer-criteria": [
    {
      "name": "HTTP-GROUP",
      "max-price": "5",
      "avg-cpu-load": "50",
      "min-free-ram": "128",
      "min-free-disk-space": "10"
    }
  ]
}
The top level JSON object holds attributes for the name of the environment to be created, and a description of the new environment. Incidentally, these fields are ignored when adding the application to an existing environment.
The version and author attributes are pretty self explanatory.
In the Hub, users can associate public SSH keys with their accounts. The ssh-key attributes value is a reference to a user profile SSH key to use. This way, blueprints can reference a key, and the platform substitutes the user's profile key for it and injects it into the authorized_keys file of all the containers in the blueprint.
Things start to get interesting in the containers array of JSON objects. These are references to container templates to use to build container hosts within the P2P environment. The attributes are listed with a brief description in the table below:
| Attribute | Value Type | Description |
|---|---|---|
hostname |
String | the name of the container host in the environment |
template |
String | the template to use from the template repository |
peer-criteria |
String | reference to the peer selection criteria section |
size |
Enum | the container size: TINY, MEDIUM, SMALL, LARGE, HUGE |
The port-mapping attribute is a an array of port and DNS name mapping settings. Here we're mapping service ports to be exposed by the container: both HTTP and SSH are exposed to the outside world.
NOTE: all Subutai Containers templates are required to have at least SSH installed and available even if not exposed outside of a Subutai Environment.
Everything pretty much makes sense except perhaps this peer-criteria reference. It is a pointer into the next JSON object array of peer selection criteria. As mentioned earlier, these are similar to query parameters used to lookup peers satisfying some constraints. The criteria is used to offer the users of the blueprint an initial list of peers to select from which satisfy the blueprint author's suggested environmental conditions:
| Attribute | Value Type | Description |
|---|---|---|
| name | String | the name of the peer-criteria to reference it |
| max-price | Integer | the maximum price to pay for a container in "GoodWill" per hour |
| avg-cpu-load | Integer | the maximum cpu load on the peer as a percentage |
| min-free-ram | Integer | the minimum RAM (in MB) that MUST be available on the peer |
| min-free-disk-space | Integer | the minimum free disk (in GB) that MUST be available on the peer |
Using these and other parameters blueprint authors specify some basic environmental recommendations for the application's infrastructure stack to operate properly. The container infrastructure is then installed on the peers selected by blueprint users.
Go ahead and fork this blueprint from example-website. Then log into your account on the Subutai Hub. We can launch the blueprint by adding the GitHub Repository you just forked to your account.
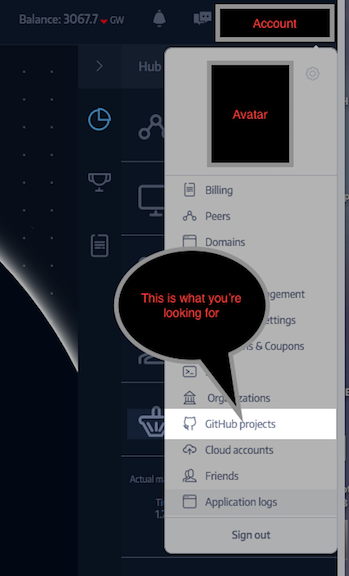
To add the repository, right click on your account with mini avatar in the upper right hand corner. You'll see a popup menu drop down to manage various settings. You'll see a 'GitHub Projects' menu item as seen on the image to the right. Select it to goto the GitHub area where you can authorize your GitHub account. In the upper left hand corner you'll see the following 'Authorize' button.

Press it to authorize you GitHub account. You should then see all with a Subutai.json file at the root will be loaded. Here's what my account looks like after loading the repository:

From here, an environment can be built with the blueprint or used to install it into an existing environment with the 'Build' button. The blueprint can be displayed using the 'View' button. If changes are made to the git repository the blueprint can be reloaded. When building a reload is automatically performed to make sure the freshest blueprint in the repository branch is used.
This is a boring and static blueprint without much flexibility. It is not very feasible is it?
- What if you want users to pick their own domains?
- What about setting the environment name?
- Can users pick their own ports to expose their application services?
These are all very valid questions and can be addressed through the use of variables. Blueprint authors can define variables to parameterize all aspects of the application. Variables are defined in the blueprint and used in place of fields in the JSON.
During application installation users of the blueprint are prompted to provide overrides for variable defaults. The choices users make while setting application values are automatically stored in the user's settings to be reused the next time the blueprint is used.
Here's what the blueprint above looks like after parameterizing some fields in JSON entities:
  "name": "${environmentName}",
  "description": "My static website",
  "containers": [ {
      "hostname": "${webContainerName}",
      "template": "apache",
      "peer-criteria": "HTTP-GROUP",
      "size": "${webContainerSize}",
      "port-mapping": [
        {
          "protocol": "http",
          "domain": "${domainName}",
          "internal-port": "80",
          "external-port": "80"
        },
        {
          "protocol": "tcp",
          "domain": "${domainName}",
          "internal-port": "22",
          "external-port": "4040"
        }
      ]
    }
  ],
  "peer-criteria": [
    {
      "name": "HTTP-GROUP",
      "max-price": "5",
      "avg-cpu-load": "50",
      "min-free-ram": "128",
      "min-free-disk-space": "10"
    }
  ],
  "user-variables":
  {
    "environmentName": {
      "description": "Enter the environment name",
      "type": "string",
      "default": "My-Website",
      "validation": "[a-zA-Z0-9]+"
    },
    "domainName": {
      "description": "Enter the application domain name",
      "type": "string",
      "default": "simpleblueprint-container",
      "validation": "[a-zA-Z0-9]+"
    },
    "webContainerName": {
      "description": "Enter the container's hostname",
      "type": "string",
      "default": "apache",
      "validation": "[a-zA-Z0-9]+"
    },
    "webContainerSize": {
      "description": "Set the container size to SMALL, MEDIUM, or LARGE",
      "type": "enum",
      "default": "SMALL",
      "validation": "SMALL,MEDIUM,LARGE"
    }
  }
}
The user-variables attribute is a map containing blueprint variables. The map key, the attribute, i.e. webContainerSize is the name of the variable. The blueprint author/maintainer can use these variable names in between ${}, i.e. ${webContainerSize}, to substitute values provided by users of the blueprint at installation time. Variable definitions have the following attributes:
| Attribute | Value Type | Description |
|---|---|---|
| description | String | a description to show the user at install time |
| type | Enum |
enum, int, double, domain string
|
| default | String | the default value |
| validation | String | regex for strings, comma separated enum list, numeric ranges for int and double |
The fields are self explanatory perhaps with the exception of the validation attribute. This field allows the blueprint installation wizard to validate values provided by users. For strings Java Regular Expressions validators are used to make sure strings conform to the patter. Enums just use a comma separated list of values, and users are offered these values in a drop down combobox so validation is not necessary since these are the only options presented.
AVAILABLE IN THE NEXT RELEASE For numbers (int and double types) a numeric range expression will be used for validation checks.
The domain variable type is very special. It will only accept domains by pulling them in from the Hub user's profile. Hub users can create sub domains under the base envs.subutai.cloud using the Hub.
[TODO screenshot showing domains area]
Right now custom user domains are not supported but on our short list. Later on with some breathing room, we will support using your own custom domains as well as registering new domains with the Hub.
You can change the original blueprint and press reload in the GitHub Projects view to see your changes. You used the GitHub Projects view above when you authorized your GitHub account. Try building the blueprint to see what happens now. You should see the blueprint wizard prompting for the following variables:
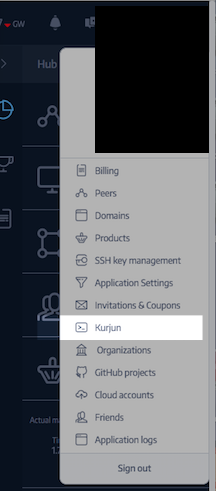
You'll notice we used an existing container template in the blueprint examples so far. Although discouraged, for blueprints, custom templates might be needed in some cases. Subutai allows users to modify existing templates and upload them to the template repository served over Subutai's CDN, called Kurjun. See how to get to the Hub's CDN interface to the right.
Kurjun a Mongol horseman's saddle bag to keep things like flints, small tools, and food.
Users can clone existing container templates, log in and change them. These live containers can then be promoted and exported to become templates. They can then be pushed to the repository to be shared with others or made accessible to only your environments. You can control the privacy level of the template. There are two ways in which you can do this: through the UI console of a peer, or on the command line inside the peer. These external guides document the steps needed:
Below is the Hub's Kurjun CDN interface where you can also upload your templates and manage them. Notice there are there areas one of which is the APT repository interface. You can upload software packages there to make them automatically available through apt-get.

We don't advise using custom templates when using blueprints. We touched upon this briefly above. This is a bad pattern. It restricts flexibility and extensibility. You really want to use base boxes and install your software instead. This allows the blueprint to be versioned and changed to deal with updates. Once you create a template and upload it that template is now locked into a specific version of the software. There are other disadvantages that go beyond the scope of this document but trust us when we say it's not the best approach.
So ok, don't use custom templates. Then how do I automate installation steps and other configuration changes involved with the installation on these containers? The answer is to use more sophisticated devops tools designed specifically for this purpose. Blueprints use Ansible playbooks to enable full application provisioning.
COMING IN FUTURE RELEASES: Presently only Ansible is supported, however we plan to provide additional provisioners in the future: namely all provisioners supported by Vagrant will be supported by Subutai Blueprints.
With Ansible and it's playbooks you can automatically provision and re-provision applications to achieve the Nirvana of continuous provisioning to always maintain an application's desired state. With one or more playbooks, shell scripts etc, you can do virtually anything you want to configure and build up the application. Here's how we can modify our blueprint and have it use a playbook inside the repository, which of course is all version controlled:
  "name": "${environmentName}",
  "description": "My static website",
  "containers": [ {
      "hostname": "${webContainerName}",
      "template": "apache",
      "peer-criteria": "HTTP-GROUP",
      "size": "${webContainerSize}",
      "port-mapping": [
        {
          "protocol": "http",
          "domain": "${domainName}",
          "internal-port": "80",
          "external-port": "80"
        },
        {
          "protocol": "tcp",
          "domain": "${domainName}",
          "internal-port": "22",
          "external-port": "4040"
        }
      ]
    }
  ],
  "peer-criteria": [
    {
      "name": "HTTP-GROUP",
      "max-price": "5",
      "avg-cpu-load": "50",
      "min-free-ram": "128",
      "min-free-disk-space": "10"
    }
  ],
  "user-variables":
  {
    "environmentName": {
      "description": "Enter the environment name",
      "type": "string",
      "default": "My-Website",
      "validation": "[a-zA-Z0-9]+"
    },
    "domainName": {
      "description": "Enter the application domain name",
      "type": "string",
      "default": "simpleblueprint-container",
      "validation": "[a-zA-Z0-9]+"
    },
    "webContainerName": {
      "description": "Enter the container's hostname",
      "type": "string",
      "default": "apache",
      "validation": "[a-zA-Z0-9]+"
    },
    "webContainerSize": {
      "description": "Set the container size to SMALL, MEDIUM, or LARGE",
      "type": "enum",
      "default": "SMALL",
      "validation": "SMALL,MEDIUM,LARGE"
    }
  },
  "ansible-configuration": {
    "source-url": "https://github.com/subutai-blueprints/example-website/archive/master.zip",
    "ansible-playbook": "setup-site.yml",
    "arguments": [
      {
        "key": "arg1",
        "value": "arg2"
      }
    ],
    "groups": [
      {
        "name": "web-servers",
        "hostnames": [
          "${webContainerName}"
        ]
      }
    ]
  }
}
Let's go over the objects and attributes in this ansible-configuration JSON object. The source-url points to where an archive of the entire repository can be downloaded. This is downloaded into a container in the environment with ansible installed on it. Once downloaded and extracted into the ansible container, the playbook file referenced by the ansible-playbook attribute is found and executed.
The ansible playbook is the entry point. Several other executables, programs, and scripts may be run to provision the application. These will be referenced by the playbook and ansible does the rest. Before running the playbook the platform populates the ansible inventory with groups. The default is all and every container in the blueprint is put into that super set. Blueprint authors can define other groups like in this example a group called web-servers was specified with the web container's hostname using a variable.
Key value pairs can be provided to ansible using the arguments attribute. When combined with user-variables this allows unlimited possibilities for blueprint authors.