pio 6 x howto
Bringing Up the Software for FujiNet on Version 6.x of PlatformIO
This document will take you thru the steps needed to build, modify and deploy the FujiNet project onto the ESP32 system that is the heart of the FujiNet Hardware Device.
The production version of the #FujiNet firmware is being written in Platform.IO. If you want to help work on it, you'll need to bring up this version of the code on your hardware.
You may need to install the USB to UART driver for your operating system available from Silicon Labs. If you have a custom FujiNet device, some esp32 developer boards may not use the Silicon Labs CP2102 USB UART chip which is on official FujiNet hardware. Check with the board manufacturer and install the appropriate USB UART driver for your devkit board.
If you haven't already done so. Please install git, which is required to check out the code from the source code repository.
apt-get install git-core
or
apt-get install build-essential
Which also adds a bunch of useful things.
NOTE: You need to add yourself to the dialout group and reboot
sudo adduser $USER dialout
sudo reboot
Under Windows, git can simply be installed from here: https://git-scm.com/download/win
Installing XCode from the App Store will give you 'git'. Install XCode via the command line with:
xcode-select --install
If you have brew installed you can install Visual Studio Code via brew:
brew install visual-studio-code
Brew also contains a better version of git for MacOS:
brew install git
So after a bunch of googling, and going down a number of rabbit holes, I found this super simple solution on the platformio community forum..

$ pwd
/Users/user/.platformio/penv/.espidf-5.0.0/lib/python3.9/site-packages
$ cp -r pip/_vendor/chardet .

I should add that when installing VSC I chose the Apple Silicon download
Microsoft Visual Studio Code is used as the IDE for Platform.IO. You can get a copy of it for Windows, Linux, or Mac.
-
For Apple Silicon choose Apple Silicon Version
-
Download a copy of Visual Studio Code for Windows, Mac, or Linux
As I was testing these instructions for Linux, I found that I had to install the following packages after installing Visual Studio Code, due to only a limited Python environment being installed by default under Ubuntu based Linux distributions:
apt-get install python3-venv
apt-get install python3-distutils
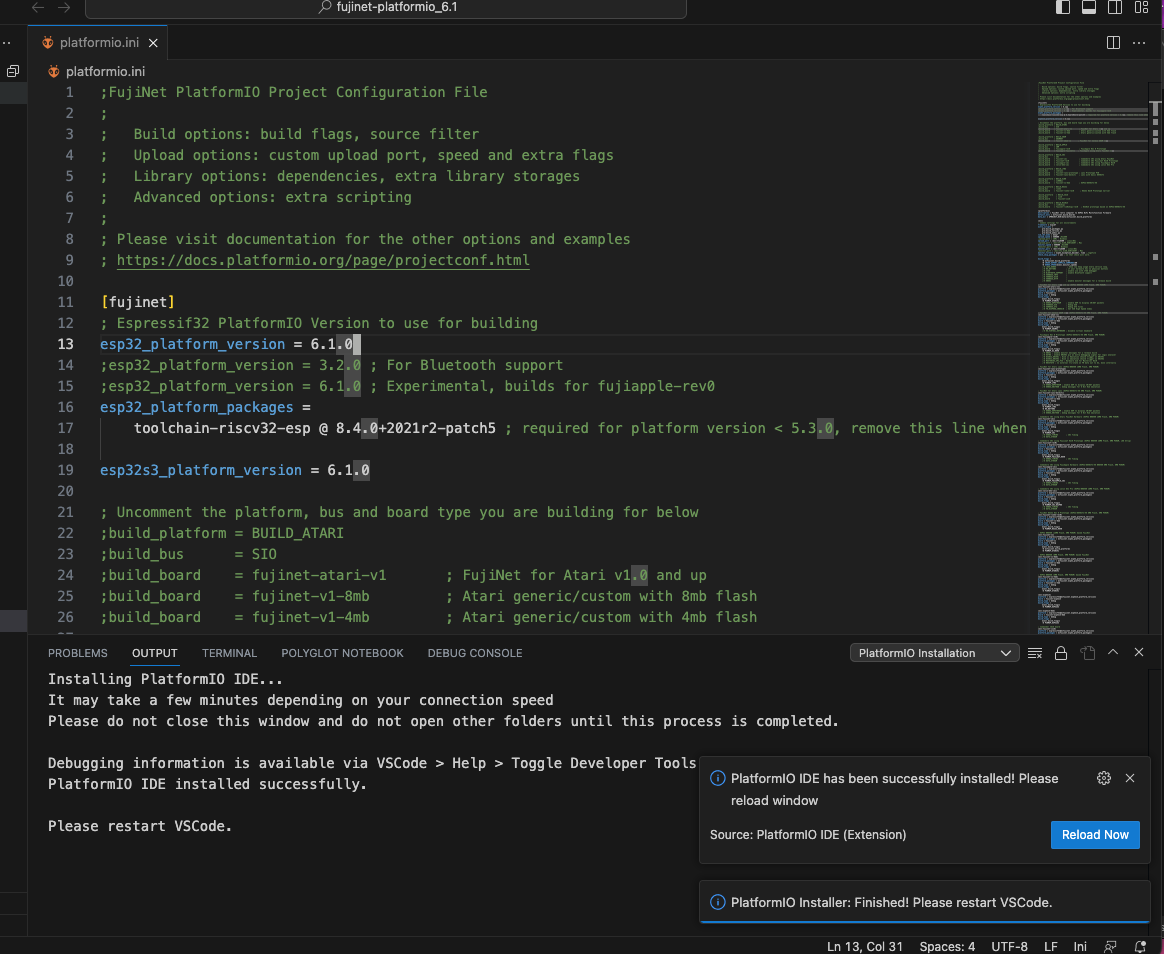
Once you've installed Visual Studio Code you will need to run Visual Studio Code and install the Platform.IO extension from the following Link:
Let the resulting terminal window finish installing Platform.IO
Once the Reload Now button appears, press it.
Once Platform.IO is installed, a new tab should appear with PIO Home, with icons down its left side. Select Platforms[1]. You should then select Embedded[2]. You should then select the Espressif 32 ESP32 platform for #FujiNet.
On the pull-down ensure you choose version 6.3.2
Then click the install button[4].
- Espressif 32 - for ESP32 based boards

You may need to quit and restart for the platforms to be loaded in the left-hand pane (Linux seems require a restart).
You should then press CTRL-` (the backtick), to open a terminal and move to where you want your repository to be. If you haven't created a space for projects, you should make one. e.g.
mkdir Projects
cd Projects
If you are only planning to test, you should then clone the repository with the following git command:
git clone https://github.com/FujiNetWIFI/fujinet-firmware.git
This command will download the project to a folder named fujinet-firmware in the current directory.
If you intend to contribute to this code, you should have an account on github.com. It is easy enough to make one, and it's free.
You should then have an SSH public key associated with your account that matches the one used by Visual Studio Code. If there isn't one yet, you can run the following program to generate one:
ssh-keygen
And then view the contents of the file it generated:
cat ~/.ssh/id_rsa.pub
Copy the contents to the clipboard. Go to your account settings, select SSH Keys, and add the key you just copied into the clipboard there.
You can then check out the code with the following command:
git clone git@github.com:FujiNetWIFI/fujinet-firmware.git
This command will download the project to a folder named fujinet-firmware in the current directory.
If you are not comfortable using SSH keys you can also use Personal Access Tokens to checkout and push code using HTTPS (not ssh).
- Using Personal Access Tokens in GitHub Again, this is a requirement if you are adding and fixing code and making PR requests to help FujiNet. It is not required to simply pull the latest code, build it and flash your FujiNet.
Before opening the project, copy the file in the project folder you just cloned (fujinet-firmware) named platformio-sample.ini to platformio.ini. This file both tells the PlatformIO extension in Visual Studio Code that this is a PlatformIO project, and is the place you'll adjust settings for your particular hardware configuration (see below). For example:
cp platformio-sample.ini platformio.ini
Now open the project in Visual Studio Code by using the Open Folder option in the File menu and navigating to open the fujinet-firmware folder you cloned.
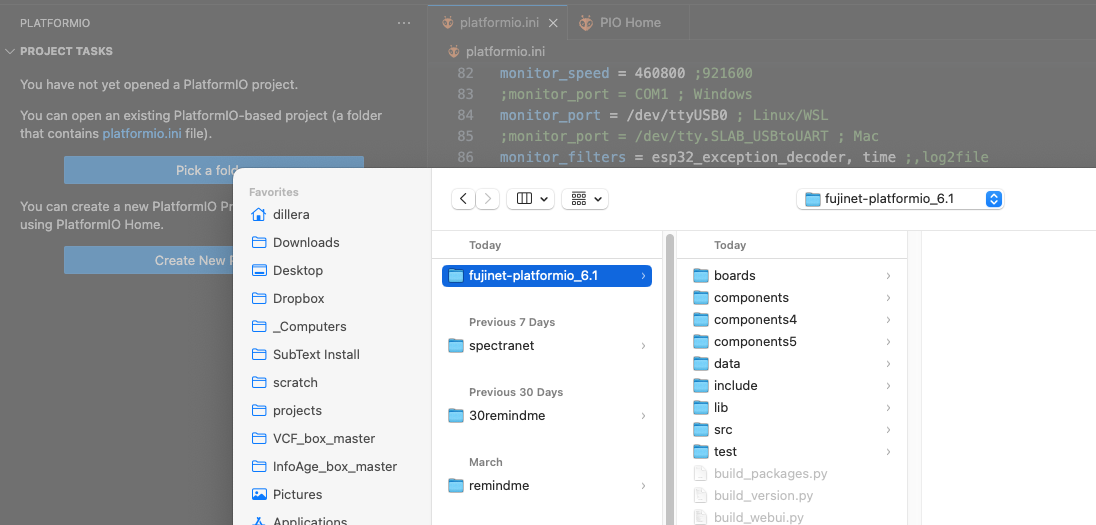
You should now see "FUJINET-FIRMWARE" in the Explorer menu bar (click on the top-left icon that looks like a couple of stacked pages) with various folders including data, lib, and src.
Select the Explorer tab (upper-left-most icon) and open the platformio.ini file.
In the top [fujinet] section, uncomment the build_platform and build_bus variable that targets the system you are building for. Also, uncomment the build_board variable that targets the physical hardware you are building for. Multiple build_board examples are provided in platformio-sample.ini but only one should be uncommented.
June 2023 - all devs should be using PIO version 6.3.2. At the bottom of the doc is guide to upgrade cleanly. There are three required entries: esp32_platform_version, esp32_platform_packages, esp32s3_platform_version. The correct values are below. You must have two keys (esp32_platform_packages should be empty) with the values set to 6.3.2 for proper build.
The ESP32's3' is a newer ESP SOC that is supported by FujiNet for certian boards (a2retronet).
- set the pio version
- set the specific board to build (Apple, Atari, etc...)
[fujinet]
; Espressif32 PlatformIO Version to use for building
esp32_platform_version = 6.3.2
esp32_platform_packages =
esp32s3_platform_version = 6.1.0
Ensure only one platform (ie. 6.3.2) is ever enabled at build time. Simply uncomment the platform, bus and board you want to build and ensure any others are commented out.
You must pick at least one platform to build. Uncomment the platform, bus and board, make sure only one platform is chosen per build!
In this example I've chosent to build for the Atari.
; Uncomment the platform, bus and board type you are building for below
build_platform = BUILD_ATARI
build_bus      = SIO
build_board    = fujinet-atari-v1       ; FujiNet for Atari v1.0 and up
;build_board    = fujinet-v1-8mb         ; Atari generic/custom with 8mb flash
;build_board    = fujinet-v1-4mb         ; Atari generic/custom with 4mb flash

;build_platform = BUILD_ADAM
;build_bus      = ADAMNET
;build_board    = fujinet-adam-v1       ; FujiNet for Coleco ADAM v1.0

;build_platform = BUILD_APPLE
;build_bus      = IWM
;build_board    = fujiapple-rev0         ; FujiApple Rev 0 Prototype
;build_board    = fujiapple-fujinetv1   ; FujiApple using Atari FujiNet v1.0
- Setup global attributes that apply to all builds
In the [env] section, you need to set the communications port your board is connected to. This port is used for both loading the FujiNet firmware on the board and viewing its debugging output. The speeds defined in the sample configuration file should work in most configurations, but you'll very likely need to change the port number. upload_port and monitor_port are usually set to the same value, and upload_speed and monitor_speed are usually set to the same value.
Note on USB Speeds: all speeds should be 460800 this is used for maximum compatibility.
Example:
[env]
upload_port = /dev/ttyUSB0
upload_speed = 460800
monitor_port = /dev/ttyUSB0
monitor_speed = 460800
You can see what your local USB device is named by clicking on the Devices tab, all connected USB serial devices should be listed. If not ensure your USB cable is plugged in and then click the Refresh button.

If you'd like to change build settings, you should change them in the [env:[BOARD] section. The main setting that is of interest here is the build_flags which makes certain changes when building the firmware code. Build flags of interest are:
Atari Example: Note that a semicolon before a value makes it disabled or use the default value.
- Every board env section must have a PINMAP set (uncommented). The PINMAPS define how the ESP32 pins are used on the various boards and it's possible to configure a certian physical board to use the PINs for different inputs and outputs.
; FujiNet for Atari v1.0 and up (ESP32 WROVER 16MB Flash, 8MB PSRAM)
[env:fujinet-atari-v1]
platform = espressif32@${fujinet.esp32_platform_version}
platform_packages = ${fujinet.esp32_platform_packages}
board = fujinet-v1
build_type = debug
build_flags =
    ${env.build_flags}
    -D PINMAP_ATARIV1
    ;-D DEBUG_UDPSTREAM     ; enable UDP to display IN/OUT packets
    ;-D VERBOSE_SIO         ; Debug SIO
    ;-D VERBOSE_ATX         ; Debug ATX files
    ;-D FN_HISPEED_INDEX=0  ; Set SIO High Speed Index
The build_board variable chosen above selects a more specific [env] targeting specific hardware. There are additional build_flags in these sections that relate specifically to the platform selected. You may (un)comment build_flags in this section as needed BUT do NOT uncomment the PINMAP_XXXX line as this is needed to define which pins are used by the ESP32 (these are defined in include/pinmap.h).
Apple Example:
; FujiApple Rev 0 Prototype (ESP32-DEVKITC-VE 8MB Flash, 8MB PSRAM)
[env:fujiapple-rev0]
platform = espressif32@${fujinet.esp32_platform_version}
platform_packages = ${fujinet.esp32_platform_packages}
board = fujinet-v1-8mb
build_type = debug
build_flags =
    ${env.build_flags}
    -D PINMAP_A2_REV0
    ;-D DBUG2 ; enable monitor messages for a release build
    ;-D EXTRA ; enable DRIVE2 pin as extra debugging signal for logic analyzer
    ;-D DISKII_DRIVE1 ; Disk ][ Emulation should trigger on DRIVE1
    ;-D DISKII_DRIVE2 ; Disk ][ emulation should trigger on DRIVE2
    ;-D MASTERIES_SPI_FIX ; Hardware mod for Masteries Rev0
    ;-D NO3STATE ; no external tri-state on FN data out to A2, done internally
Select the Platform.IO tab (it has an "alien head" icon).
Expand the project environment for the build_board you have chosen in platformio.ini. This will on-demand load required libraries/frameworks (this can take some time, the first time you do this).

Return to the Platform.IO tab, and choose Build.

The TERMINAL section of Visual Studio Code will show the progress of the build. You know it's done right when you get the output:
[... bunch of text ...]
Archiving .pio/build/fujinet-atari-v1/libfe1/libbus.a
Indexing .pio/build/fujinet-atari-v1/libfe1/libbus.a
Archiving .pio/build/fujinet-atari-v1/lib905/libFileSystem.a
Indexing .pio/build/fujinet-atari-v1/lib905/libFileSystem.a
Archiving .pio/build/fujinet-atari-v1/libbe1/libdevice.a
Indexing .pio/build/fujinet-atari-v1/libbe1/libdevice.a
Archiving .pio/build/fujinet-atari-v1/lib343/libhardware.a
Indexing .pio/build/fujinet-atari-v1/lib343/libhardware.a
Linking .pio/build/fujinet-atari-v1/firmware.elf
Retrieving maximum program size .pio/build/fujinet-atari-v1/firmware.elf
Checking size .pio/build/fujinet-atari-v1/firmware.elf
Advanced Memory Usage is available via "PlatformIO Home > Project Inspect"
RAM:   [          ]   1.8% (used 81864 bytes from 4521984 bytes)
Flash: [==        ]  22.7% (used 2138725 bytes from 9437184 bytes)
Building .pio/build/fujinet-atari-v1/firmware.bin
esptool.py v4.5
Creating esp32 image...
Merged 25 ELF sections
Successfully created esp32 image.
========================================================= [SUCCESS] Took 151.32 seconds =========================================================

Environment       Status    Duration
----------------  --------  ------------
fujinet-atari-v1  SUCCESS   00:02:31.319
========================================================== 1 succeeded in 00:02:31.319 ==========================================================
If you see output that indicates error conditions you won't have a firmware.bin file to upload. Make the corrections to ensure that the build completes and you have a firmware.bin create. This will be used in the next steps to flash the fujinet with the new functionality.
There are two blocks of data to upload to your board: the file system image and the firmware. The file system image consists of files that the firmware makes use of while operating (e.g. printer emulation fonts). These are stored in the project's data directory and don't change very often. The firmware is the actual code the board runs, and this changes with every new build.
Select the Upload File System Image task in the Platform.IO tab to upload the contents of the data directory.
Select the Upload task in the Platform.IO tab to upload the firmware to your board. This will also cause the firmware to be re-compiled if any changes have been made to any of the source code files.
If everything works, the FujiNet board should automatically reboot and start running the newly uploaded firmware image. You can use the Monitor option in the Platform.IO menu to view any debug logs the FujiNet generates as it operates.
After uploading the firmware, you may also need to Upload Filesystem Image. If your FujiNet has never had firmware installed or there are new changes to the CONFIG program and/or web interface, you must do this step. This will overwrite the SPIFFS filesystem data partition on the FujiNet which will wipe any settings (WiFi AP's, Host Slots, mounts, etc). A default set of Host Slots is installed. If you are using an SD card, the settings will be imported from it when the FujiNet boots after flashing.
Select the Platform.IO tab (it has an "alien head" icon).
Expand the project environment for the build_board you have chosen in platformio.ini. This will on-demand load required libraries/frameworks (this can take some time, the first time you do this).
Select Upload Filesystem Image and PlatformIO will build/install the image to FujiNet.
- Be in the correct git branch for the work you doing
- Update code as required, saving when necessary
-
Upload and Monitor- will compile, build and upload the Firmware, reset the ESP32 and show debug output of the system in the VSC terminal area -
Build- will just recompile what is necessary given the changed files -
Upload File System Image- use only if you have changed items in thedatadirectory - like web or a CONFIG app for the platform. It's not necessary to do this step if you have just made changed to the firmware code. -
Monitor- show debug output of the system in the VSC terminal area if you need to attach to a working FN
Example debug output:
- from May 2023
- with -D VERBOSE_TNFS -D VERBOSE_DISK enabled!
11:13:54.958 > --~--~--~--
11:13:54.958 > FujiNet v1.0 2023-05-07 08:00:00 Started @ 5
11:13:54.958 > Starting heap: 4334920
11:13:54.958 > [src/main.cpp:50] main_setup(): Heap: 189551
11:13:54.958 >
11:13:54.958 > Detected Hardware Version: 1.6.1 and up
11:13:54.958 > Safe Reset button ENABLED on GPIO 14
11:13:54.958 > SPIFFS mounted.
11:13:54.958 > SD mounted.
11:13:54.958 > fnConfig::load
11:13:54.958 > Load fnconfig.ini from SD
11:13:54.958 > fopen = /fnconfig.ini : ok
11:13:54.958 > fnConfig::load read 911 bytes from config file
11:13:54.958 > Reading wifi section
11:13:54.958 > SPIFFS Config Storage: Enabled
11:13:54.958 > fnConfig::load read 911 bytes from SPIFFS config file
11:13:54.958 > disk UNMOUNT
11:13:54.958 > disk MOUNT
11:13:54.958 > ATR MOUNT
11:13:54.958 > Percom Block Dump
11:13:54.958 > -----------------
11:13:54.958 > Num Tracks: 1
11:13:54.958 > Step Rate: 1
11:13:54.958 > Sectors per Track: 720
11:13:54.958 > Num Sides: 0
11:13:54.958 > Density: 0
11:13:54.958 > Sector Size: 128
11:13:54.958 > Drive Present: 255
11:13:54.958 > Reserved1: 0
11:13:54.958 > Reserved2: 0
11:13:54.958 > Reserved3: 0
11:13:54.958 > mounted ATR: paragraphs=5760, sect_size=128, sect_count=720, disk_size=0
11:13:54.958 > Creating a default printer using FS_SDFAT storage and type 1
11:13:54.958 > ModemSniffer::ModemSniffer(FS_SDFAT)
11:13:54.958 > SIO SETUP
11:13:54.958 > Set HSIO baud from 0 to 67431 (index 6), alt=68209
11:13:54.958 > Available heap: 4242396
11:13:54.958 > Setup complete @ 763 (758ms)
11:13:54.958 > [src/main.cpp:253] main_setup(): Low Heap: 169187
11:13:54.959 >
11:13:54.959 > WiFiManager::start() complete
11:13:54.959 > WiFiManager attempting to connect:
11:13:54.959 > ssid = [YOURSID]
11:13:54.959 > WiFi connect attempt to SSID "GIANT"
11:13:54.959 > WIFI_EVENT_STA_STARTesp_wifi_connect returned 0
11:13:54.959 >
11:13:54.959 > WIFI_EVENT_STA_CONNECTED
11:13:54.959 > IP_EVENT_STA_GOT_IP
11:13:54.959 > Obtained IP address: 192.168.251.248
11:13:54.959 > SNTP client start
11:13:54.959 > Starting web server on port 80
11:13:54.959 > SNTP time sync event: Wed May 31, 11:13:17 2023 -0400
Upgrading from 3.x to 6.1 the Easy Way
If you have been using 3.x and want to cleanly upgrade to 6.1 it's easy. Make sure you have no local work that isn't already pushed to some branch on the origin server as we are going to potentially delete some files.
I'm using OSX and so I'm doing some of the work in a terminal. It should be nearly the same for Linux, OSX and WSL on Windows. The concept of a home directory should be something you know - that is where platformIO keeps all its files (and we are going to clean them out).
Move the existing fujinet repo over to a new dir just in case we need it, then git clone a fresh copy into a dir called fujinet-firmware_6.1
cd ~/code
mv fujinet-fujinet-firmware fujinet-firmware_3x
git clone https://github.com/FujiNetWIFI/fujinet-firmware.git fujinet-firmware_6.1
cd fujinet-firmware_6.1
cp platformio-sample.ini platformio.ini
We are going to delete all the old platformIO files on your system. If you wish to keep them don't do this or rename the folder.
Lets git rid of all the old 3.x platformIO libraries by deleting them. Ensure that you specify the platformio dir only when you do this:
rm -rf ~/.platformio
-
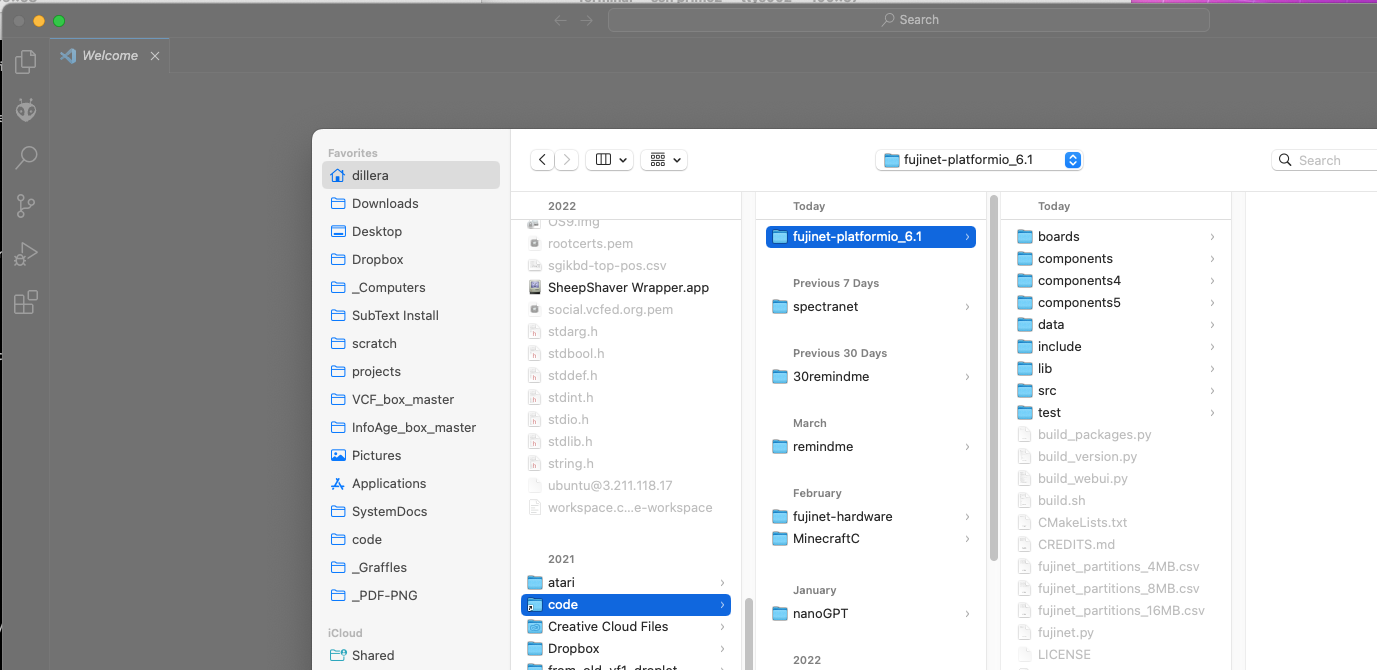
Now start up start up Visual Studio Code
-
Open the new folder you created from the git clone that has the platformio.ini file:
In the [fujinet] section (top) ensure that the line for the platform_version is 6.3.2. If it's still 3.4 change it to 6.3.2. Ensure that esp32s3_platform_version also has 6.3.2 as its value. esp32_platform_packages should be empty (but it's required).
[fujinet]
; Espressif32 PlatformIO Version to use for building
esp32_platform_version = 6.3.2
esp32_platform_packages =
esp32s3_platform_version = 6.1.0
-
ensure your USB device is set to the proper device in the [env] section
-
Pick a platform to build, like Atari; uncomment the platform, the bus the board.
-
Save the .ini
-
restart VSC:
- On restart let VSC load all the PIO goodies...

- If you see this when clicking on the Alien head you need to just re-start VSC again, or you have commented out the esp32s3 key in the [fujinet] section of the platformio.ini file:

That should be all. Build and upload your new firmware with the new 6.1 PIO libraries.
EOD