Repository navigation
Finding Your Meter
You need two things from the meter box: the transmitter ID and a photo of the dial. This page shows how to get both safely.
Tip
What you'll need
- Sturdy gloves (gardening or leather)
- A flat-blade screwdriver to lift the lid
- A torch, even in daytime
- Your phone camera
- Closed shoes
- Most Australian homes have a rectangular box set into the ground near the front boundary or footpath. Some have the meter above ground near the front tap.
- Don't stand on the lid. Some lids are fragile or sit loosely.
Look and photograph only. Wear gloves and lift the lid gently. If the box looks unsafe, leave it closed and ask your utility for help. Leave the meter, transmitter and cables in place, and replace the lid afterwards.
Meter boxes are dark, dry and sheltered. Australian wildlife loves them.
- Put gloves on before you touch the lid.
- Lift the lid slowly with the screwdriver at the lifting slot. Tilt it away from you so anything underneath moves away from your hands.
- Look before you reach. Shine the torch around the edges and under the lid.
- Watch for:
- Redback spiders. The Australian Museum says they build webs in dry, sheltered sites and that bites happen often, especially in summer.
- Snakes, especially in warm weather and rural areas.
- Ants, wasps and bees.
- If anything is living there, close the lid and leave it. Try another day, or ask your water utility for help.
Warning
If you're bitten, get help. Call triple zero (000) in an emergency. Healthdirect has first-aid guidance for spider bites and snake bites. You can also call healthdirect on 1800 022 222 for advice.
Caution
Leave the transmitter, meter and cables in place. They belong to your utility. Look and photograph only, then replace the box lid. The later water-use check means running a household tap, not tapping this equipment.
Compare meter types and pulse sizes to identify your register layout and expected litres per pulse before calibrating.
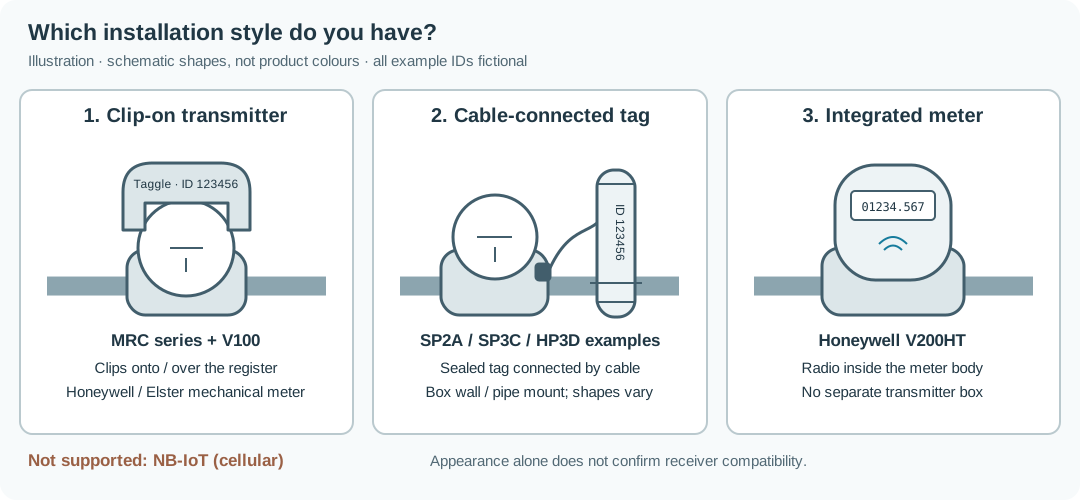
Illustration with simplified shapes. Appearance alone doesn't tell you the model or whether it will work.
| Style | What it looks like | Examples |
|---|---|---|
| Clip-on | A unit sitting on top of the meter's dial housing | Taggle's MRC devices fit Honeywell/Elster V100 mechanical meters, very common in Australian homes (Taggle telemetry devices, products) |
| Separate tag | A sealed battery tube or box in the meter box or on the pipe, with a thin cable to the meter | SP2A (A-cell), SP3C (C-cell), HP3D (D-cell); shapes vary (products). The SP3C datasheet shows a white tube about 21 cm long with a 40 cm cable. |
| Integrated | No separate tag. The radio is inside the meter body. | Honeywell V200HT (datasheet) |
The one confirmed working unit is a separate tag. It's a white cylindrical "baton" tube, hose-clamped to the supply pipe, with a thin cable to a pulse sensor on an Elster V100 meter. Its label shows only "taggle", a barcode and the ID, with no model number. It may belong to Taggle's pulse-transmitter family (for example SP-series / ADC-1), but that's unconfirmed.
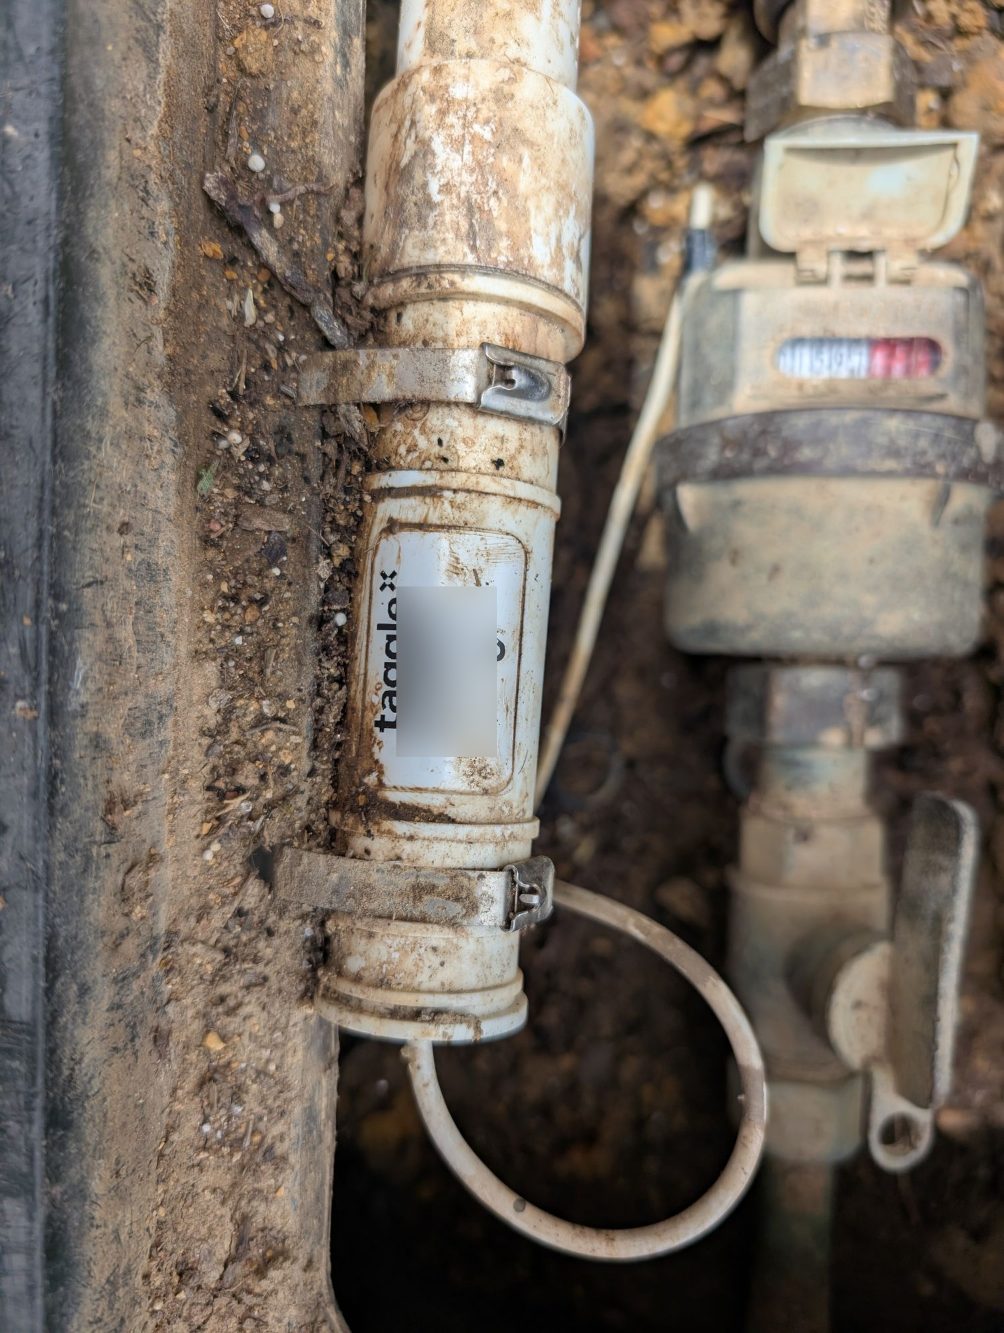
The one verified transmitter, in Gladstone, QLD. Its exact model is unknown; identifying details are covered. Similar-looking units may work differently.
- NB-IoT labels. These are mobile-network devices, like a phone. ha-taggle can't hear them, including the NB-IoT Q400, EDMI WP20 and NB3D variants in Taggle's product list.
- A plain meter with nothing attached. It's probably read by a person walking past.
- A data logger from another brand. That isn't a Taggle transmitter.
Note
Metal lid? Metal blocks radio. Some installs have a small external antenna on or through the lid. Taggle describes an antenna for metal-lid boxes. Leave it exactly where it is.
A wireless/antenna symbol alone is not proof of Taggle. The SP3C datasheet specifies encryption: these families are identification clues, not a list of working models. Some installations use RF-friendly plastic boxes instead of an external antenna.
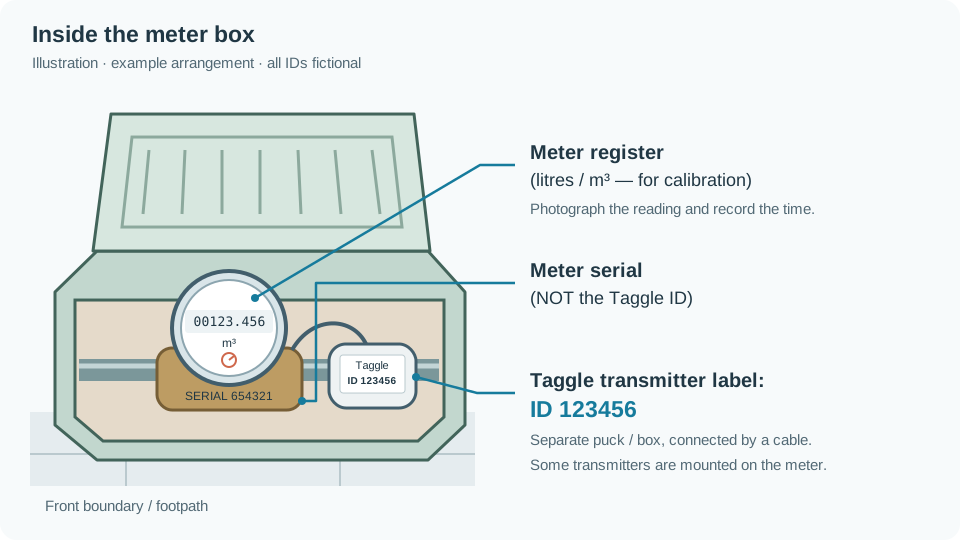
Illustration of a typical layout, not a photo.
There are usually several numbers in the box. You want the one on the transmitter label.
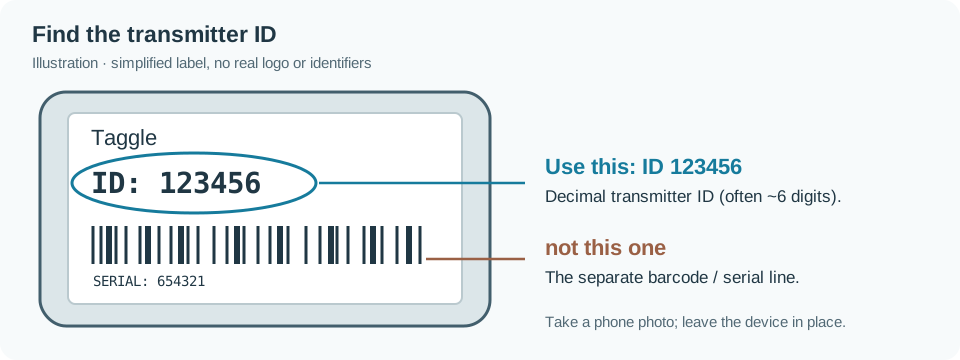
Simplified label with fictional numbers.
| Number | Where | Use it? |
|---|---|---|
| Transmitter ID | Transmitter label, often written ID:xxxxxx, about six digits (e.g. fictional 123456) |
Yes. This goes in meter_ids. |
| Meter serial number | Stamped on the meter body or dial face | No. It identifies the meter hardware. |
| Barcode serial | Under a barcode on the label | No, unless it matches the ID: number |
| Dial reading (register reading) | The rolling digits on the dial | No. But photograph it for calibration. |
Tip
Why the ID matters: every transmitter sends its ID in each radio message. ha-taggle uses it to pick out your meter from any others it hears. The ID is a whole number from 0 to 1,048,575 (it fits in 20 bits).
- Transmitter label, close up, sharp and readable.
- The whole dial face, including printed units (kL, m³ or L), multipliers and decimal digits. Keep the original photo and its time. A pre-installation photo without stored counter history cannot be aligned. Once reception works, take fresh readings just after transmissions; an older photo needs its original measurement time in the same reading command.
- Photos of the whole box layout, in case you need help.
Warning
Keep the photos private. Don't post your real ID online. If you share photos (for example in a compatibility report), blur the ID and any barcode first.
If the label is unreadable, continue installation with meter_ids: [] in add-on options or "meter_ids": [] in Docker JSON. Use the scan and water-use check to help identify your transmitter, or ask your utility. Configure only your own confirmed ID before normal use. Never leave fictional 123456 or an unconfirmed candidate configured.
With your config prepared, scan for 65 minutes to cover a typical hourly opportunity. Reception is not guaranteed. Stop any existing receiver process/service first. Docker commands run from the cloned ha-taggle directory:
# Starts rtl_sdr automatically:
taggle-rx --config config.json --scan 65

# Docker: stop normal reception before taking the USB receiver
docker compose stop taggle
docker compose run --rm taggle --config /config/options.json --scan 65
# After the scan ends, edit config.json to keep only your confirmed ID
docker compose up -d taggle
For Python, stop the foreground scan with Ctrl+C, then run taggle-rx --config config.json without --scan to return to normal reception. Add-on users set scan_minutes: 65, Save and Start/Restart, then return to 0, Save and Start/Restart after confirming their ID. Never put scan_minutes in standalone JSON.
An empty meter_ids list is allowed for scanning. Each valid frame prints one JSON object containing ID, SNR and signal level. Counts appear only for configured IDs with clear frames; missing counts in an unconfigured scan do not establish encryption. Scan makes no MQTT connection, writes no state or log files, and stops at the time limit. Verify your own label and use the tap test before keeping a candidate configured; hearing an ID does not establish ownership.