Repository navigation
Getting Started
Prefer a quick overview first? See ha-taggle.dancloud.au.
This page maps the setup for release 0.3.0. Allow time to install the receiver, wait up to an hour for a reading, then calibrate over normal water use. You may need extra time if Home Assistant or MQTT is new to you.
Important
The transmitter does not send the reading on your meter’s dial. It sends a pulse counter with an unknown starting offset and unknown litres per pulse. Guided calibration is available in 0.3.0: two dial readings separated by enough normal water use can establish both. Follow Calibration status if another reading is needed. Until calibrated, usage stays in pulses. Check the estimated reading against the physical dial; this is experimental, not billing-grade measurement.
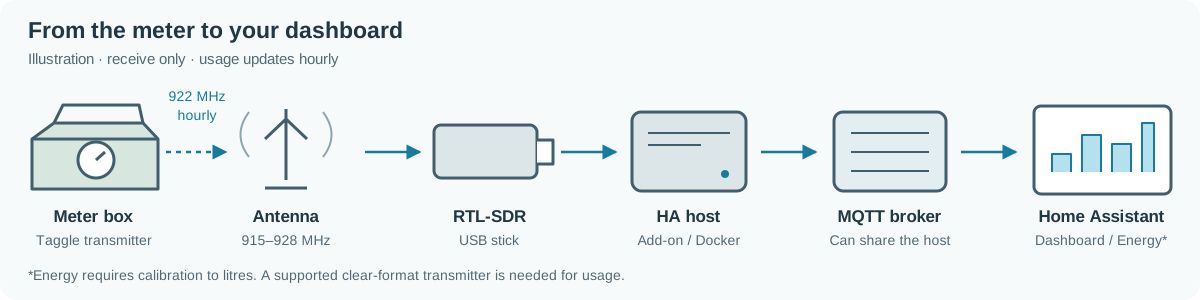
Illustration of the receive-only setup. The MQTT broker can run on the same computer as Home Assistant.
- Your water meter counts water with a dial.
- A Taggle transmitter in the meter box senses that dial movement as pulses. About once an hour, it broadcasts a short radio message with its ID and recent pulse counts.
- Your RTL-SDR (a USB radio) and an antenna pick up that message.
- ha-taggle decodes it, checks it for errors and works out how many pulses happened in each hour.
- It sends the numbers to an MQTT broker. Home Assistant reads them from there.
- The optional dashboard card shows them and guides dial entry. After you calibrate, usage becomes litres and Meter reading estimates your dial total.
Note
Why hourly? The transmitter only sends about once an hour, so readings arrive about once an hour. ha-taggle can't show live flow, and it isn't an instant leak alarm.
| Your starting point | Next step |
|---|---|
| Home Assistant is not installed yet | Finish the Home Assistant installation guide first. Home Assistant OS is the beginner route. |
| Home Assistant OS | Install the add-on. An add-on is a program managed by Home Assistant OS; newer menus call it an app. |
| Home Assistant runs in Docker, or the receiver will run on a separate Linux computer | Install with Docker. Docker runs the receiver in its own software container. Run its commands in a terminal on that computer. |
| Unsure | In Home Assistant, open Settings → System → Repairs → ⋮ → System information and check the installation type. |
Home Assistant's supported installation methods are OS and Container. Core and Supervised lost upstream support with release 2025.12. Existing Supervised users can use the add-on route; existing Core users can use Docker or the advanced Python CLI route. Only OS and Supervised have the Supervisor needed by add-ons.
Tip
What you'll need
- A running Home Assistant installation, with onboarding finished and an administrator account
- A water meter with a supported Taggle transmitter (check here)
- An RTL-SDR USB receiver (details)
- An antenna suitable near 922 MHz (a bare receiver may not include one; see the dipole kit instructions)
- A USB extension cable
- Gloves and a torch for the meter box
- A phone camera
- About 65 minutes of patience for the first scan
| Step | What you do | Page |
|---|---|---|
| 1 | Check your property has Taggle; council coverage alone is not enough | Check your meter |
| 2 | Photograph the transmitter label and dial safely | Finding your meter |
| 3 | Gather the USB receiver, antenna and cable | Hardware and antennas |
| 4 | Choose a route below and install the receiver | Add-on · Docker |
| 5 | Receive a reading, scan if needed, and check ownership using a household tap | First scan and water-use check |
| 6 | Optionally add the custom card; standard sensor cards also work | Dashboard card |
| 7 | Enter dial readings just after consecutive transmissions to calibrate litres and the starting offset | Guided calibration |
| 8 | Add the estimated Meter reading to Energy | Energy dashboard |
The possible-leak hint is enabled by default for your configured meters and works before litre calibration. It uses hourly totals, so it cannot provide an instant alarm.
Neighbourhood comparison is on by default. You can disable it before starting the receiver. It uses group statistics and assumed litres per pulse, so it is only a rough comparison.
- Check Is my area covered?. A Taggle meter doesn't guarantee this receiver will work.
- Look in your meter box (how). If the label says NB-IoT, it's a mobile-network device and ha-taggle can't receive it.