Polyline Rendering

The anti-aliased polyline rendering is based on expanding the stroke of the polyline, and making it slightly blurry by creating a fringe around the perimeter.
The fringe approximates box filtering of the line geometry. That is, you can get anti-aliased result by taking multiple samples (e.g. MSAA), analytically, or prefiltering the line and then taking just one sample. For more information, see "Prefiltered Antialiased Lines Using Half-Plane Distance Functions" https://bitsavers.trailing-edge.com/pdf/dec/tech_reports/WRL-98-2.pdf
Rest of the document focuses in how we can efficiently and robustly generate the outline and fringe geometry.

The stroke is expanded around the polyline along the normal of the lines. To create the continuous line, the corners are mitered or beveled depending how sharp the corner is.
The miter distance and direction can be calculated quite neatly from the normals of the neighboring segments. You can find detailed derivation here: https://www.angusj.com/clipper2/Docs/Trigonometry.htm
Miter join is the cheapest join, since it requires to only offset two points in opposite directions. The join can be used for most corners. With default miter limit of 4.0, miters will generally be used up to 150 degree corners.
Belvel join is a bit more complicated, and is used when the corners become very sharp. The sharper the turn, the more towards infinity the miter off set will shoot. Bevel is used to prevent the super spiky corners.

There are several ways to do create the bevel. The simplest way is to just offset the bevel corners along the normals, but that creates a corner that is very hard to anti-alias with the method that is explained later.
Instead, we are place the bevel points half stroke thickness away from the corner. It is a bit more expensive than the simple method, but allows us to control the texture coordinates used for texture based anti-aliasing. The bevel is essentially double miter, but we calculate it based on side offset which allows to easily reuse the distance on each side of the bevel.

The stroke tessellation is built so that the last 2 vertices (marked red, will be 0 and 1 in next corner), are always in the same order. This helps connecting the corners.
The middle vertex on beveled corners is needed to avoid texture strecthing (see Texture Coordinates section later).

When the corner is sharp, the inner corner will overshoot too. For outer corners we nearly handle that by beveling, but inner corners are trickier. One option for inner corners would be fold to create overlap, similar to the leftmost case in the Corner Types image above. We chose to no use that since it requires more triangles or creates a T-junction (which will cause flickring pixels).
Alternative solution is to just constrain the distance. Our solution is to allow the inner miter (on beveled joins) to only expand up to the maximun on the thickness, and adjacent edge lengths. The edge lengths guarantee that the miter position stays within the bounding box of the geometry, and thickness is there to ensure that small segments do not get over constrained.

To make the polyline rendering more useful for pixel perfect UI rendering, the renderer supports stroke position. Stroke position controls whether the stroke is rendered inside, center, or outside of the provided path. Inside is right along path direction.
The offset is simply implemented by biasing the extrusion of the stroke either left or right.
The fringes that describe the pre-filtered shape can be created any means necessary, as long as the pixels at the outer edge have transparency of 0, and the pixels close to the center have have the stroke color.
Since the fringe represents filtered results, the start of the fringe is placed from half filter width outside the stroke edge to half filter width inside. For this reason we never let the line width to be smaller than twice the filter width, and instead just adjust the opacity of the lines smaller than filter width. This is still an approximation (we're dealing with square filter after all), but works and is in the right spirit. We use filter width (which is the fringe width) of 1 pixel.
One option is to just add extra column of triangles each side of the line, and adjust the colors of the outer vertices. This would mean that in order to render a thick line, we would need 3 columns of triangles.
Instead we use textures to describe the fringe, which allows us to use just one column of triangles (2 triangles per segment).

The basic idea is that we create textures that describe the filtered result, and use the bilinear filtering to create the alpha across the line. This saves us rendering a lot of small triangles.
For line ends we use triangles and transparency, since wrapping around the texture would take more triangles.

Bevel joins are a bit tricky to texture, so that we keep the fringe width consistent. The general idea is to try to avoid texture stretching (even if we use 1D texture). It's a bit of balance between triangle count, vertex placement, and complexity of calculations.
It can help to think how the shape would unfold to reason if the texture would stretch. Many of the issues can be solved by placing a vertex at the middle of the corner. This is also why we chose the specific corner geometry. When we place the vertex at the corner, the distance to the bevel edge will be haf thickness, which makes it trivial to place the texture coordinate at the middle too.
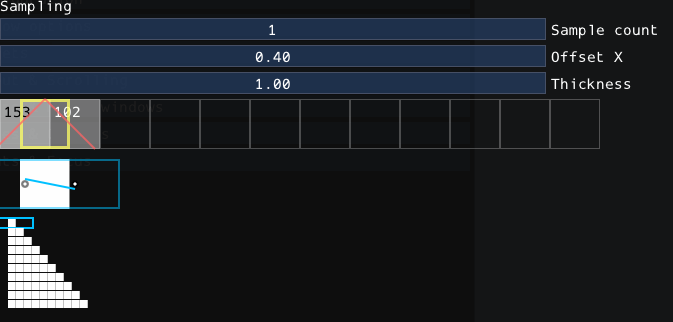
For integer thicknesses, we can create textures with transparent pixels at the edges, and opaque pixels in the middle. Note, that even if 1px line has 1 solid pixel, after biliear interpolation, it is interpreted as a tent!
For that reason, we should align the center of the texel to the fringe edge. The texel values are stored at texel centers.
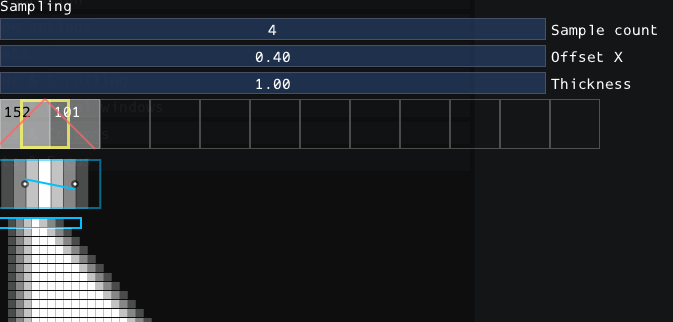
Fractional line thicknesses can be achieved by selecting the nearest texture and scaling the fringe so that half fringe (zero crossing) is at the line thickness.
The error is proportional to the requested size vs the size of the texture. The larger the thickness, the less error. For smaller sizes (< 4 px) where the texture transition can be very visible (especially on round, off grid, shapes), we can oversample the textures, and reduce the error.

Animation 1: How the 1 px prefiltered line gets sample to pixels. Note that even if the texture looks like 1 px wide, it is actually representing the result of box filter, which is tent shaped.

Animation 2: The prefiltered texture is selected based on the line thickness. For fractional thickness, the error is handled by scaling the fringe. Note how the fringe correction gets smaller the wider the texture is.
Animation 3: When the line position is slightly off pixel (e.g. at rounded corners), the texture size change can be very visible at the smaller values. This can be solved by super sampling the texture.
Animation 4: With 4x super sampling the transition on smaller sizes is much smoother. Note how the tent shape is more visible on the super sampled textures.