Repository navigation
Importing an Existing Library
You already have a few hundred films and a shelf of box sets on disk. This page gets them into Streamline without moving a single byte you don't want moved.
Import scans are admin-only and live under Imports in the sidebar.
The first choice you make is the one that matters. Everything else is detail.
"Files already inside your library — keep them where they are."
Streamline records the files at their current paths and starts tracking them. Nothing is moved, copied or renamed. Your existing folder structure survives exactly as it is.
Use this when your library is already organised the way you like it, and you want Streamline to manage it going forward rather than re-shape it. This is the right answer for most people migrating from Radarr/Sonarr, or from years of manual filing.
Files are hardlinked, copied or moved into
library.movie_path/library.series_pathand renamed to match your naming template.
Use this when files are sitting in a staging or downloads directory and you want them filed properly, or when you want to standardise a messy library onto one consistent scheme.
Each scan can override the global library.import_mode for that scan only:
| Mode | Effect |
|---|---|
| Hardlink | Same filesystem, instant, no extra disk |
| Copy | Leaves the original intact, uses double the disk |
| Move | Destructive, frees the source disk |
Caution
Move is destructive — it removes the original file from the source disk once the transfer succeeds. Use Hardlink or Copy unless you specifically want the source freed.
Chose in-place and later changed your mind? Adopted files can be renamed afterwards with the per-title Rename action. The two operations are deliberately separate.
Imports → New scan.
| Field | Notes |
|---|---|
| Path | An absolute path on the server, e.g. /srv/data/media/movies. In Docker this is the path inside the container, not on your host |
| Media type | Movies or Series — they're scanned differently, so you need one scan per type |
| Mode | Adopt in place, or Import & rename |
| Import mode | Only for rename mode; overrides the global setting for this scan |
The scan runs in the background through four visible phases — Scanning, Discovery, Parsing, Matching — and you can watch progress, or leave and come back.
The unit of work differs by media type, which trips people up:
- Movies: one entry per file. Each video file is parsed and matched against TMDB independently.
- Series: one entry per show folder. The folder name is parsed and matched against TVDB; episodes inside are then worked out from the filenames.
So for TV, point the scan at the directory containing your show folders — /media/series, not /media/series/The Wire.
Note
The scanner does not recurse infinitely. For films, keep your files at a sane depth under the scan root rather than buried many levels down.
Very small files are skipped as junk before anything is matched, along with anything whose name contains sample. The floor is 50 MB for a film and 5 MB for an episode — episodes get the lower one because short-form series are real (a three-minute episode is a few tens of MB, well under a film's floor). A show folder whose file count looks far too low in the review list is the symptom of files falling under it.
You can cancel a running scan at any time. It stops; nothing has been changed yet.
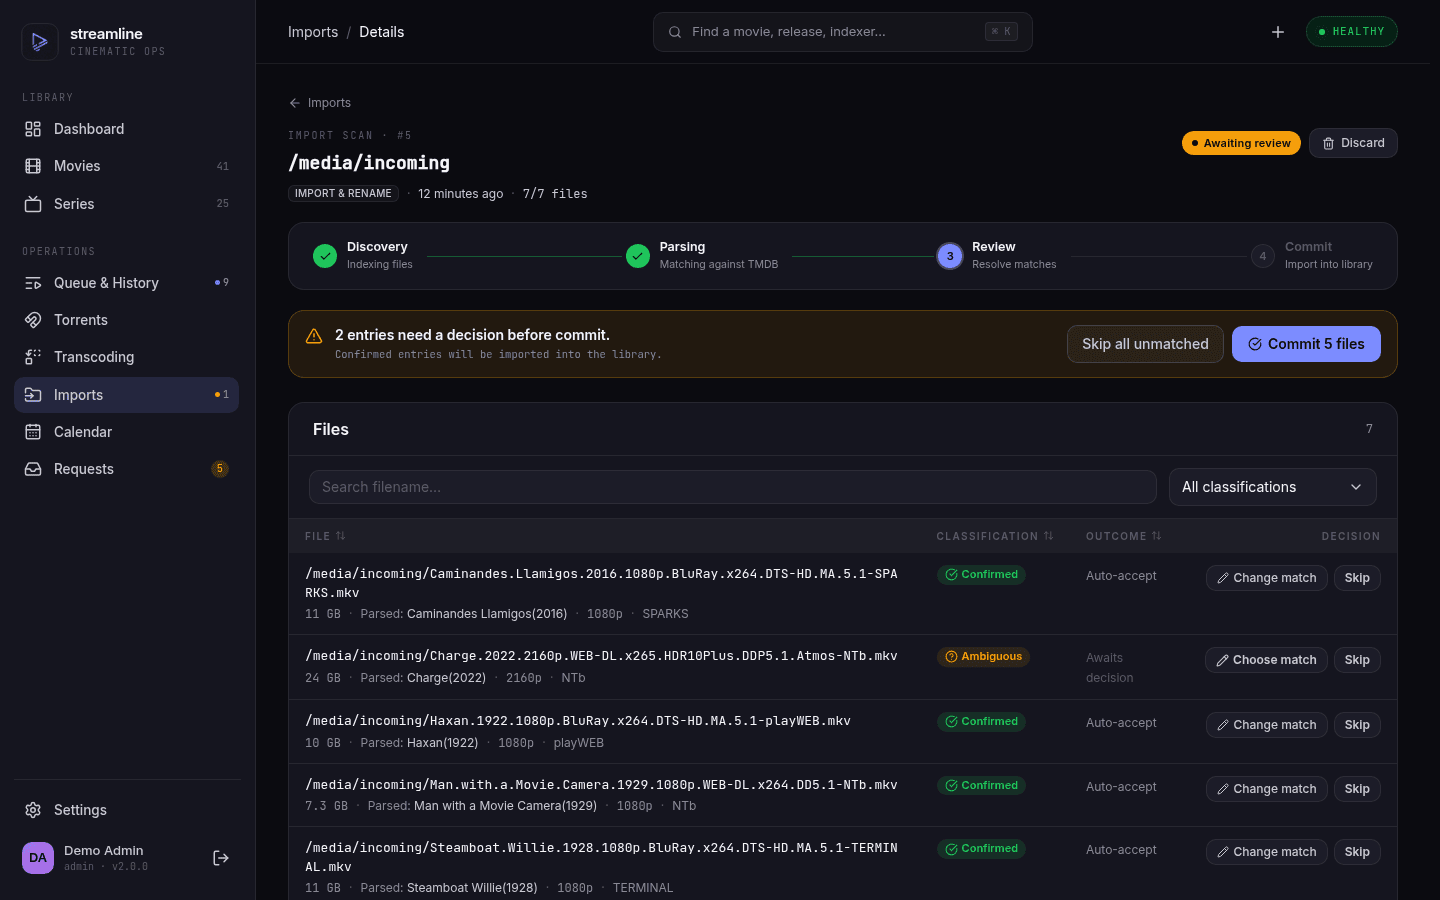
When the scan finishes it sits at awaiting review. Nothing has touched your disk. Every entry gets a classification:
| Classification | Meaning | What to do |
|---|---|---|
| Confirmed | Exactly one confident match | Nothing — these are ready |
| Ambiguous | Several plausible matches | Pick the right one |
| Unmatched | No match found | Search manually, or exclude it |
| Existing | Already tracked by Streamline | Committing attaches the file to the existing entry, relocating it if the scan is in Rename mode |
Filter by classification to work through them in batches. In practice a tidy library comes back nearly all Confirmed, and you spend your time on a handful of oddities — an ambiguous match or a file that failed verification look like this:
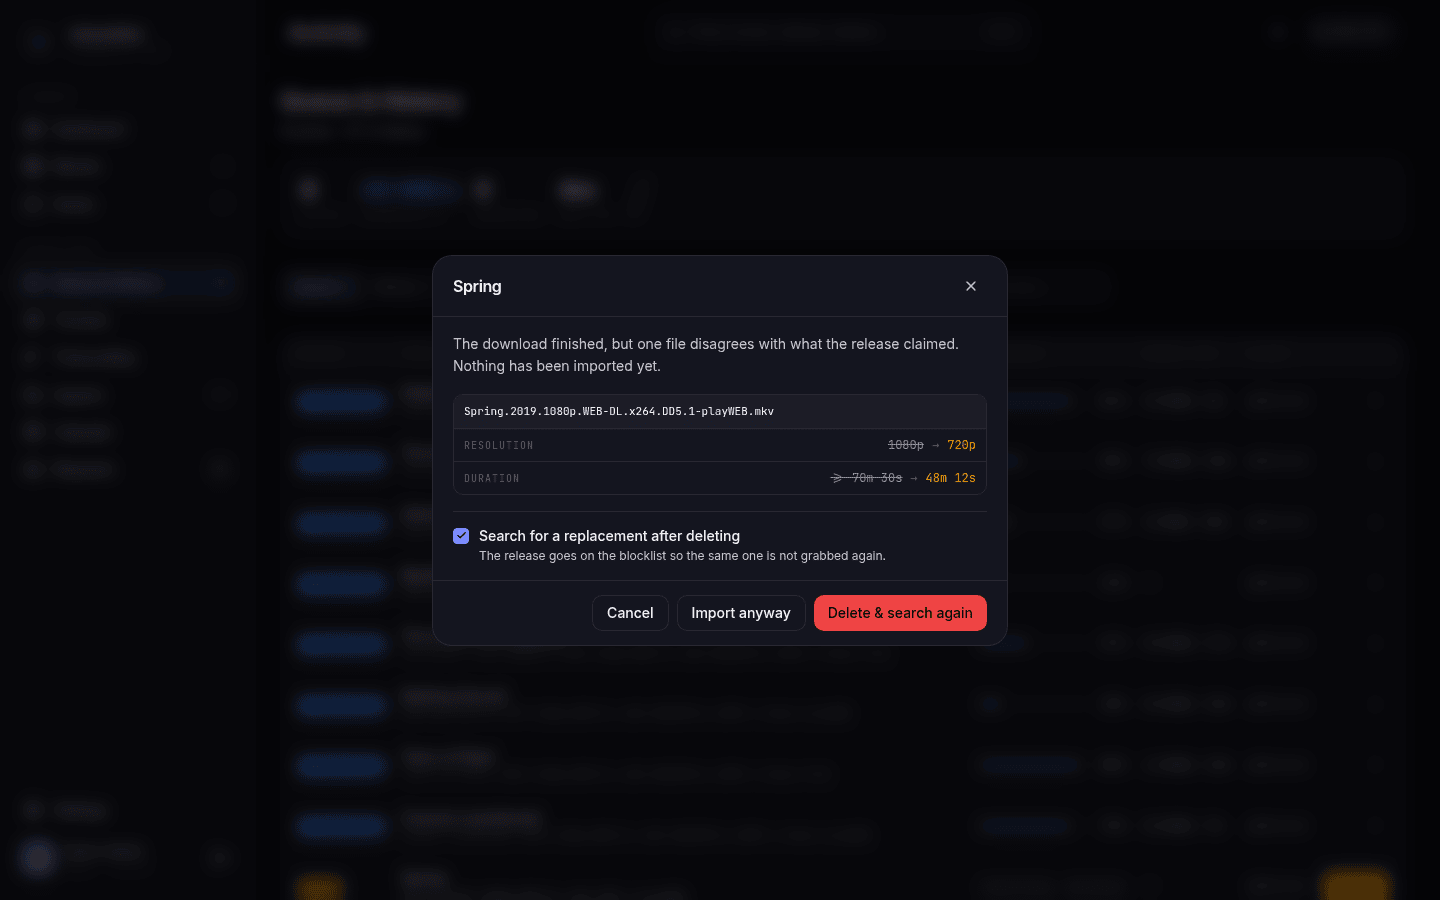
For each entry you can:
- Accept it as matched
- Change match — search TMDB/TVDB yourself and pick the correct title
- Exclude it from the import (trailers, samples, extras, that one file you don't want)
- Restore something you excluded
Two bulk actions save a lot of clicking: Auto-accept (or Auto-adopt in place mode) accepts everything Confirmed in one go, leaving only the entries that genuinely need you.
Entries showing "Nothing parsed from the filename" have names Streamline couldn't extract anything usable from. There are no candidates to offer — search manually or exclude.
Once nothing is left awaiting a decision, Commit. The banner tells you exactly what's about to happen — "Confirmed entries will be adopted in place", "…will be hard-linked into the library", and so on. Read it; it's the last checkpoint.
Commit runs in the background and reports {imported} imported, {failed} failed when done. Each entry ends up as:
| Outcome | Meaning |
|---|---|
| Created | A new library entry was made |
| Attached | The file was linked to an entry that already existed |
| Skipped | You excluded it |
| Failed | Something went wrong — permissions, missing file, cross-filesystem hardlink |
You can also Discard a scan under review, which throws away every decision you made without touching anything.
Warning
Committing an entry flagged "Movie already in the library" attaches the scanned file to that entry. If that entry already has a file on disk, the old one is deleted and replaced — usually what you want when re-importing a better copy, but it is a deletion, so check before committing a large batch. If it has no file (the common case for titles added by hand or through a request), nothing is deleted and the commit simply attaches.
In Rename mode these entries are relocated into your library root like every other accepted entry, using the scan's import mode. They are not left where they were found.
Import scans are the manual, deliberate route. Streamline also watches for files that appear in your library without going through it.
Two background jobs — movie-orphan-scan and tv-orphan-scan, every 6 hours by default — walk your library paths looking for untracked video files. Anything found is queued as a review item, so you get the same accept/match/exclude flow rather than a surprise import.
This is what catches files you dropped in by hand, or a title that arrived through some route Streamline didn't manage.
A third job, drift-check (every 15 minutes), does the reverse: it notices files Streamline thinks exist but which have vanished from disk. To survive a briefly-unavailable network mount, a file has to be missing for library.drift_grace_ticks consecutive checks (default 3, so 45 minutes) before its record is removed. If an NFS blip has ever wiped your library metadata in another tool, this is the setting that exists to prevent that.
All three are retimeable and pausable at Settings → Schedules.
Next: Activity and Calendar.