USARTComunicationWithCisecoXRFModule
This how to guide you in the setup of USART to Wireless modules that can be used to build a cheap wireless Souliss node. Use two nodes as starting point, a Gateway (Ethernet + USART) and a Peer (only USART).
The Gateway is a node with either an Ethernet and USART controller, the Ciseco XRF Radio is connected to the USART and the Souliss framework route automatically the traffic between the two communication interfaces. The Peer is a node use only the USART controller connected to a Ciseco radio and its data are bridged to the Ethernet via the Gateway one.
For each communication interface an address in the relevant address range shall be assigned, refer to the [supported network architectures](Supported Network Architecture), so the gateway node will have two address and the peer only one.
As example consider to define the following addresses
// Define the network configuration
#define eth_address     0x0011	// Ethernet Address for Gateway
#define usart_address   0xCE01	// USART Address for Gateway
#define remote_address  0xCE02	// USART Address for Peer
The address are in two different subnets the 0x00nn for Ethernet and 0xCEnn for USART. The address specified in the gateway will looks like:
SetAddress(eth_address, ..., ...);
SetAddress(usart_address, ..., ...);
The framework is programmed to use the USART as common interface between the two nodes. Using an USART to Wireless module (not only the Ciseco ones) nodes will go wirelessly without any additional action
As explained before the XRF radio send data from the USART into the air, all the addressing and collision avoidzance is handled by Souliss in background. The XRF radios runs in the 800-900 MHz band, that is more suitable for indoor use compared to 2.4 GHz.
A similar setup can be obtained with XBee radios.
Setup your boards as follows,
Gateway:
- Arduino Mega 2650
- Arduino Ethernet Shield W5100
- Ciseco XRF 2.0 Module
Peer:
- Arduino Uno Rev. 3
- Led
- 270 Ohm resistor
- Ciseco XRF 2.0 Module
You may need breadboards, some wires and USB cables. Be sure to use 3.3V power supply pin for the radio ((http://openmicros.org/index.php/articles/84-xrf-basics/212-using-xrf-15-with-5v-micros source)).
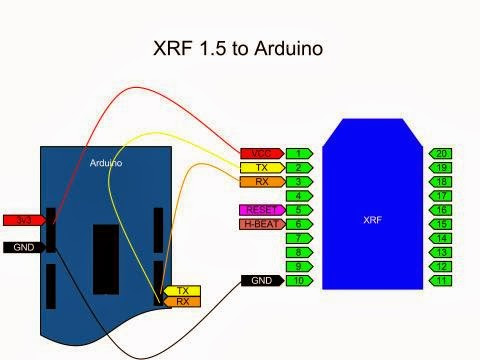
Connect in the same way both Arduino, and then connect the Led on Pin 10 on Peer (Arduino Uno) through the resistor. The pin header on XRF is similar the one on Xbee, so the pin have a distance of 2mm between them. Breadboard have a distance of 2,54mm between the pin, so you may need an adapter. You can use a Xbee adapter like this:
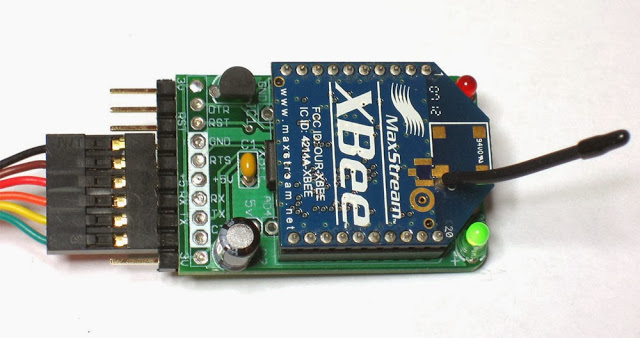
There are basically 2 version of this adapter, active and passive. Active usually have on board the 3,3 Volt Regulator and Level Shifter and some led di show activity, so you can power this with 5 Volt. Passive usually is a simple connection between RF Module and a Pin Header that fit on a breadboard, so you may need an external 3,3 volt adapter.
Ciseco XRF, came out of the box pre-configured at 9600 bps, with same PAN ID and without encryption. So the module permit to create a wireless serial cable between 2 Arduino, without any configuration. Using an dedicated software you may change the radio settings.
But from my test I found best USART Speed and Radio settings combination. Best USART speed I test is 57600 bps. The real Radio Speed in fullduplex of this module is 70000 bps, declared by CISECO, so the near USART speed is 57600. This permit to do not use any kink of buffer; data will be sent as soon XRF receive them. So with Ciseco XRF Software, set USART Speed at 57600 bbs. Now you have to set the radio side too in order to get better performance with souliss. Take a look over this screenshoot:
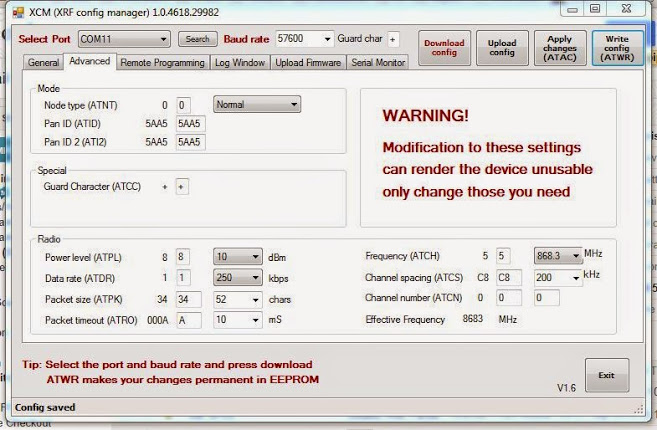
In the left side of Radio section there are values we nee to change.
Packet Size: is the data frame size that XRF send out in one shot. This mean that XRF start to transfert via Radio as soon as it receive 52 chars or bytes. This value is default set to 12, but Souliss set at maximum 52 bytes eact time, so to get better performance is very usefull to not fragment the packets, and send them out in one shot. You have to set value in HEX so set it to 34, and software will show you the value in DEC#52.
Packet timeout: this value is strictly related to USART Speed and Packet Size. This is the timeout that radio wait, in case the number of 52 byte was received buy USART. This timeout shoul be set in our case at 10ms. Each byte at 57600 will take 0,1726 ms to be received by XRF on his USART Interface. For 52 Byte, the timeout shoud be 52*0,1725#8,97ms. In additon there was one control byte added by XRF so timeout should be 9,1425 ms. Near highest value usable is 10ms, to be set in HEX#A.
RADIO SETTINGS MUST BE THE SAME ON ALL MODULES OF YOUR CISECO'S NETWORK
Let's take a look over the sketches.
On the Gateway you may upload something like this:
// Configure the framework
#include "bconf/StandardArduino.h"          // Use a standard Arduino
#include "conf/ethW5100.h"                  // Ethernet through Wiznet W5100
#include "conf/Gateway.h"                   // The main node is the Gateway, we have just one node
#include "conf/usart.h"                     // USART communication
......

#include "Souliss.h"
#include <SPI.h>

......

// Define the network configuration
uint8_t ip_address[4]  = {192, 168, 1, 77};
uint8_t subnet_mask[4] = {255, 255, 255, 0};
uint8_t ip_gateway[4]  = {192, 168, 1, 1};
#define Gateway_address 77
#define usart_address     0xCE01      // Local USART address
#define remote_address    0xCE02      // Remote USART address
#define myvNet_subnet     0xFF00
#define myvNet_supern     0x0000

......

void setup()
{
  // Setup the network configuration
  Souliss_SetIPAddress(ip_address, subnet_mask, ip_gateway);
  SetAsGateway(myvNet_address);                                   // Set this node as gateway for SoulissApp

  SetAsPeerNode(remote_address, 1);

......

}

void loop()
{

......

  FAST_GatewayComms();

......

}
On the Peer you may upload something like this:
// Configure the framework
#include "bconf/StandardArduino.h"          // Use a standard Arduino
#include "conf/usart.h"                  // Ethernet through Wiznet W5100
......

#include "Souliss.h"
#include <SPI.h>

......

// network addresses
#define myvNet_address		0xCE02   //USART vNet Address of the peer
#define myvNet_subnet		0xFF00
#define myvNet_supern		0x0000

......

void setup()
{

  SetAddress(myvNet_address, myvNet_subnet, myvNet_supern);

......

}

void loop()
{

......

  FAST_PeerComms();

......

}