Authentication EN
An access token is required to update stream info, receive EventSub notifications, and execute chat actions on Twitch.
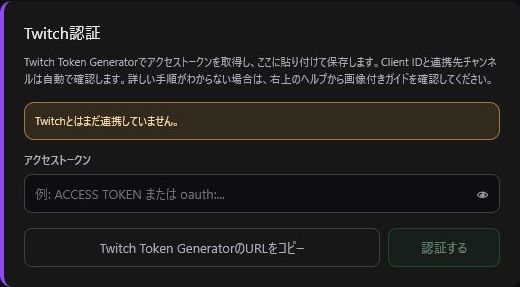
- Click the gear icon in the top-right corner to open Settings.
- Click "Copy Twitch Token Generator URL".
- Open the URL in your standard web browser and generate a Custom Scope Token.
- Paste the ACCESS TOKEN into TwitchManager and click Save.
- Verify that your linked Twitch account name is displayed.
| Feature | Scope |
|---|---|
| Title & Category | channel:manage:broadcast |
| Chat |
user:read:chat / user:write:chat
|
| Notifications |
bits:read / channel:read:subscriptions / channel:read:redemptions
|
| Predictions & Polls |
channel:manage:predictions / channel:manage:polls
|
| Raids & Shoutouts |
channel:manage:raids / moderator:manage:shoutouts
|
| Chat Management |
moderator:manage:announcements / moderator:manage:chat_settings
|
| Clips & VIPs |
clips:edit / channel:read:vips / channel:manage:vips
|
If scopes are missing, only the corresponding features will fail. For example, channel:read:redemptions is required for Channel Point reward history, and channel:manage:raids is required to perform /raid. When using new features or encountering authorization errors, regenerate a token with all required scopes selected.
- Never display or leak your access token on stream, in GitHub issues, or on social media.
- If you suspect a token leak, click "Disconnect Twitch Authentication" and generate a new token immediately.
- Local storage can differ between a standard browser and the OBS Browser Dock. Make sure to complete the token setup inside the OBS Browser Dock you use for streaming.