Repository navigation
Screen Display
Brightness, sleep, theme colour, the touch beep, the boot logo, the Nebula Camera settings, and turning the picture for a screen mounted upside down.
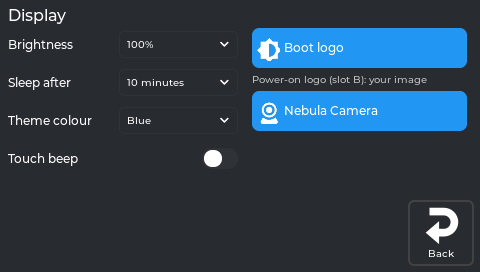
The real screen app, showing data from a printer running NebulaOS.
| Setting | What it does |
|---|---|
| Brightness | Backlight level. The levels come from NebulaOS. |
| Sleep after | Never / 30 seconds / 1 minute / 5 minutes / 10 minutes / 30 minutes / 1 hour. Touch to wake. |
| Theme colour | Blue, Red, Green, Purple, Pink, Yellow. Applies immediately. |
| Touch beep | A short click through the buzzer on every tap. A test beep plays when you turn it on. |
| Boot logo | Choose the boot screen and power-on logo of this boot slot: the NebulaOS logo, an image added from a USB stick or uploaded in Mainsail (PNG, BMP or JPEG, max 4 MB), or Restore Creality logo. |
| Camera | Creality Nebula Camera settings: night mode, anti-flicker, white balance, exposure, picture sliders, Defaults, Restart camera. See Camera. |
If your screen is mounted upside down, you can turn the picture 180°. There is no button for this yet; it is a line in the screen's settings file.
-
In Mainsail, open Machine and the file
nebulascreen/nebulascreen.json. -
Find the line
"display_rotate": 2,and change the2to0:"display_rotate": 0,
2is the normal KE mounting,0is turned 180°. Leave the comma at the end. -
Save & Close, then restart the printer.
-
Touch calibration belongs to one orientation. If taps land in the wrong place, run Settings → Reset → Reset touch calibration and tap the targets.
To go back, set it to 2 again. Do not use 1 or 3: those turn the picture 90°, and the screen
layout is not made for that.
Opens from Settings → Display → Boot logo. Sets the picture shown while the printer starts and the power-on logo, for the slot you are running.
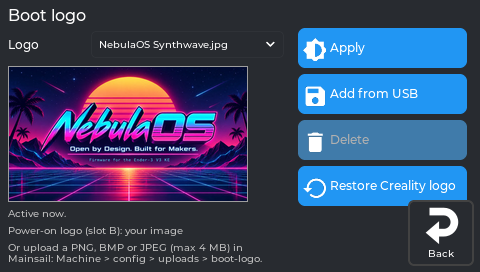
The real screen app, showing data from a printer running NebulaOS. The preview is worked out by NebulaOS's own boot-display code from the shipped logo.
| Control | What it does |
|---|---|
| The dropdown | NebulaOS, plus every image you have added. The one in use is pre-selected; picking one shows a preview. |
| Apply | Makes the selected image the boot screen and the power-on logo. |
| Add from USB | Copies an image from a plugged-in stick into the printer and selects it. |
| Delete | Removes an image you added. The NebulaOS logo cannot be deleted. |
| Restore Creality logo | Puts the original power-on logo back. |
The dropdown open, with every logo on that printer - the ones NebulaOS ships and the images uploaded to it:
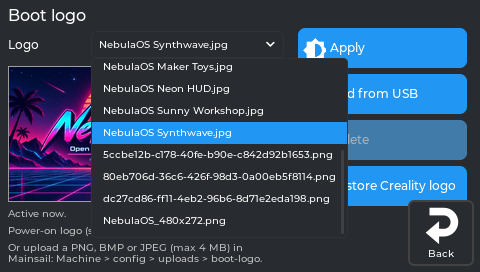
The real screen app, showing data from a printer running NebulaOS.
Picking another logo shows its preview and Not applied yet - tap Apply:

The real screen app, showing data from a printer running NebulaOS.
Apply asks first, for an image and for the NebulaOS logo; it shows from the next start:

The real screen app, showing data from a printer running NebulaOS.

The real screen app, showing data from a printer running NebulaOS.
Restore Creality logo and Delete ask too:

The real screen app, showing data from a printer running NebulaOS.

The real screen app; the picture is cut down to the question box.
Add from USB without a stick plugged in:

The real screen app, showing data from a printer running NebulaOS.
There is no picture yet of the list of images on a stick, or of the result after adding one - that needs a stick in the printer.
Images can also be uploaded in Mainsail - PNG, BMP or JPEG, up to 4 MB. See Resetting for the other things under Settings → Display.
Previous: Settings → Connections · Using NebulaScreen · Next: Settings → Printer