Repository navigation
Screen Tune
The fourth tab: live adjustments, the bed mesh, the drivers and the Calibration menu.
An 8-tile grid of icon buttons (4 columns × 2 rows). Tapping a button opens its sub-panel full-screen. Nothing is adjusted inline on this tab itself.

| Row | Col 1 | Col 2 | Col 3 | Col 4 |
|---|---|---|---|---|
| 1 | Fine Tune | Z Offset | Retraction | Limits |
| 2 | Bed Mesh | Power Settings | TMC Metrics | Calibration |

Not sliders — this panel is entirely + / − buttons, each with a matching Reset button, usable during a print or any time. There are two step-size selectors that control how much each button tap changes: one shared between Z-offset and Pressure Advance (0.01 / 0.05 / 0.10), and one for Speed and Flow together (the "Multiplier Step" — 1 / 5 / 10 / 25%).
| Control | Buttons | What it does |
|---|---|---|
| Speed | Speed+ / Speed− / Speed Reset | Global speed multiplier. 100% = follow slicer speeds exactly. |
| Flow | Flow+ / Flow− / Flow Reset | Extrusion multiplier. Under-extruding → raise. Over-extruding → lower. |
| Pressure Advance (PA) | PA+ / PA− / Reset PA | Compensates for nozzle pressure lag at speed. Fixes corner bulges and blobs. |
| Z-offset | Z+ / Z− / Reset Z | A third place to baby-step Z-offset, alongside the print-status readout and the separate Z Offset panel below — all three adjust the same underlying value. |
Firmware Retraction is not part of this panel — it's the separate Retraction tile on the Tune tab grid, described below.

First-layer baby-stepping. Same as tapping Z on the print-status screen, but also usable outside a print.
This is not the z_offset from printer.cfg. The number here is Klipper's live gcode
offset - the baby-stepping adjustment on top of the probe's calibrated offset. On a system
without NebulaOS's nebulaos_z_adjust (OpenKE, for instance) that live offset is forgotten at
every Klipper restart, which is why such a screen shows 0.000 mm after a reboot. NebulaOS
re-applies its saved adjustment at every Klipper start, so it keeps showing yours.
- Raise (farther from bed) / Lower (closer to bed) buttons, plus a Reset button that sets the offset to exactly 0.
- Step size buttons: 0.001 / 0.005 / 0.01 / 0.025 / 0.05 mm
- Current value shown at top
- There is no separate Save button — every tap (including Reset) applies the change at once and
NebulaOS saves it (
NEBULAOS_Z_ADJUST DELTA=…/RESET=1). The saved adjustment is applied again after every Klipper restart or reboot, and set back to 0 when the Z-offset calibration saves a new Z offset. The panel shows "Z offset adjustment: 0.050 mm, saved". - With older NebulaOS extensions (no
nebulaos_z_adjust), the panel sendsSET_GCODE_OFFSET Z_ADJUST=… MOVE=1instead: the change is kept only until Klipper restarts, and the panel does not say "saved". The Fine Tune panel's Z buttons work the same way. - The printer must be homed first. If it isn't, you'll get a homing prompt instead of the adjustment going through. An unhomed adjustment would change the live offset (so the on-screen number would move) but fail to move the toolhead, which would leave the displayed value out of sync with the nozzle. Homing first avoids that.

There are two separate requirements here, and both have to be true for this to actually do anything to your prints:
-
Your Klipper config needs a
[firmware_retraction]section. This is what decides whether this panel shows controls at all — if it's missing, the panel shows an empty state instead, and there's nothing to accidentally break. -
The gcode file you're printing needs to have been sliced with Firmware Retraction turned on (in
OrcaSlicer/PrusaSlicer etc., the retraction type setting —
G10/G11commands, not the slicer's default direct-E-axis retraction). This is a per-file slicer setting, completely separate from #1. Even with[firmware_retraction]configured and this panel showing live values, if the specific file you're printing wasn't sliced with Firmware Retraction selected, none of these values are used — the print just uses whatever retraction the slicer itself wrote into the gcode instead.
If both are true, you get 4 rows — Retract length (mm), Retract speed (mm/s), Unretract
extra (mm), Unretract speed (mm/s) — each with −/+ buttons, plus a Length step (mm) selector
(0.05/0.10/0.25) and a Speed step (mm/s) selector (1/5/10), and a single Reset all button.
Changes apply immediately (live, via SET_RETRACTION) and are runtime-only — like the Limits
panel, nothing here is saved to printer.cfg, so a Klipper restart reverts everything to your config
file's values.
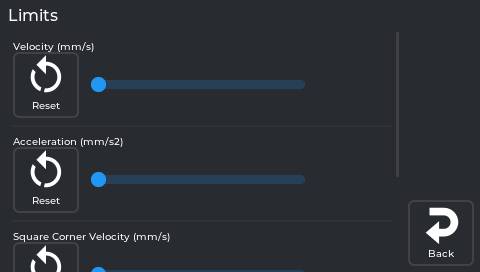
Hard caps on machine speed and acceleration, each shown as a slider with its own Reset button
(resets that one value back to what's set in printer.cfg, not a fixed factory number):
| Setting (exact on-screen label) | What it is |
|---|---|
| Velocity (mm/s) | Hard cap on axis speed |
| Acceleration (mm/s2) | Hard cap on acceleration |
| Acceleration to Deceleration (mm/s2) | A separate Klipper acceleration cap used specifically when the toolhead needs to slow down; distinct from the general Acceleration above |
| Square Corner Velocity (mm/s) | How fast the toolhead turns a sharp corner without fully decelerating |
Dragging any slider (or tapping its Reset) sends the change to Klipper immediately — there's no
separate "apply" step. These are runtime-only: nothing here is written to printer.cfg, so a
Klipper restart puts every value back to whatever printer.cfg says, undoing anything you changed here.
Raising these doesn't automatically make prints faster — the slicer's own speeds must also be raised. Going beyond what the machine can handle causes ringing artifacts.

Opens showing a table of raw Z values at each probe point by default (colour-shaded — blue is low, red is high) plus an info panel (Algorithm, Tension, and the X/Y probe range — min, max, count, points per segment). There's no on/off toggle for mesh compensation; see Clear Profile below for how that actually works.
- 3D View button — switches to a colour surface you can rotate/zoom instead of the table. Tap again to switch back.
-
Calibrate — runs
BED_MESH_CALIBRATE(auto-homing first if the printer isn't already homed), maps the whole bed fresh (~2–3 min). - Save Profile — saves the current mesh permanently under a name you choose, so you can switch between multiple saved meshes later.
-
Clear Profile — runs
BED_MESH_CLEAR, which turns mesh compensation off (this is the closest thing to an "off switch" — there's no separate toggle). Calibrating again, or loading a saved profile, turns it back on. - Saved profiles list — each saved profile is a row with its name; tap the row to load it as active, or tap the ✕ on that row to delete it permanently.
-
No active mesh — Klipper does not load a saved mesh after a restart, so after Auto Calibration
usually none is active. The page then shows the saved one (
defaultfirst) with Saved mesh 'default' - each print measures its own mesh at the start; it is not loaded. Without any saved mesh: No bed mesh yet - run Calibration > Auto Calibration.
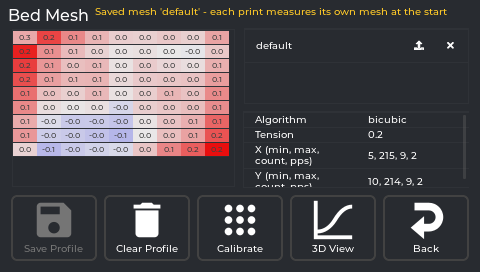
The real screen app, showing a saved mesh measured on a printer running NebulaOS 1.0.0.
Save Profile asks for a name. At 480x272 the keyboard covers the name field, so what you type is not visible while you type it:

The real screen app.
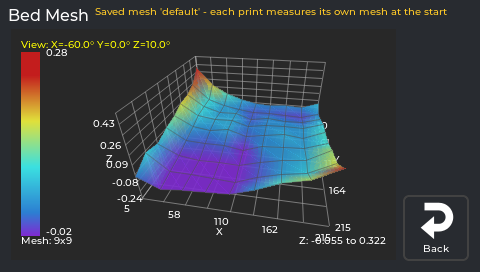
The real screen app, showing a mesh measured on a printer running NebulaOS 1.0.0. The "Z: ... to ..." label runs into the axis numbers at this size.
-
Drag anywhere on the mesh to rotate it — the angle readout in the top-left (
View: X=... Y=... Z=...) updates live as you drag. - The colour scale on the left maps colour to height (red = high, blue = low); the exact range and the mesh size (e.g. "Mesh: 5x5") are shown with it.
-
The +/− buttons on the right have two different jobs depending on how you press them — this is
the only place in the app where that's true:
- Short tap zooms the whole view in/out (like moving the camera closer/further).
- Press and hold instead exaggerates or flattens the height of the surface — makes bumps look taller (hold +) or flatter (hold −) — without changing how sensitive the colours are. It keeps changing for as long as you hold it.
- Back here returns you to the Table view, not out of Bed Mesh entirely — tap it again from the table to actually leave the panel.
| Section | What it does |
|---|---|
| Power devices | On/off buttons for smart plugs or relays configured in Moonraker's [power] section. NebulaOS ships none, so this section is normally not shown. |
| Power Loss Recovery | Shows the state of NebulaOS power-loss recovery (the Klipper object nebulaos_power_loss_recovery). After a power cut the screen asks by itself: "A print was interrupted by a power loss... Resume?" with Later and Resume (Mainsail shows the same question). Resume heats, homes X and Y, lifts, primes and continues; Later keeps the record for this screen. While a print runs it says the print is being recorded. After a power cut it shows the interrupted file and, when the printer allows a physical resume, a Resume Print button (asks to confirm); Discard drops the record. If the record cannot be resumed (file or printer configuration changed), it says why and offers only Discard. |

The real screen app. An example state: the power cut and its record were fed in for the picture. On the 480x272 screen the text runs on under the Later / Resume buttons.
Power devices: NebulaOS ships none, so there is no picture of that section.

Live TMC driver metrics, refreshed every second. The switch at the top starts and stops polling the
drivers (TMCSTATUS ENABLE=1 / ENABLE=0); it is off when the screen starts. NebulaOS always loads the
[tmcstatus] module, so no config edit or restart is needed.
sg_result, i_rms in mA, and two other computed values — the panel doesn't explain what these mean
beyond their names; the app's own advice is "refer to the TMC driver datasheet") plus four adjustable
values: toff (0–15), tbl (0–3), hstrt (0–7), hend (0–15) — these are raw TMC chopper-timing
register names. Tapping +/- on any of them sends the change to the driver immediately, live — it is
not a preview you confirm afterward. There's no indication these persist across a restart on their own.
These are low-level hardware timing values: don't adjust them unless you specifically know what you're doing (per the driver datasheet) — this isn't needed for normal printing or normal troubleshooting. If you suspect a driver issue, TMC Autotune (inside the Calibration hub below) is the supported way to tune your drivers.
One menu for every calibration routine, reached from the Calibration tile. It is a scrollable list: the numbered IN ORDER steps are the order a new printer needs them (just do 1, 2, 3, ...; every routine in detail: Calibration explained), then an OTHER section. Up / ✓ / Down on the right move through the list; Back is the tile in the bottom-right corner, like on every page.
| # | Row | Opens |
|---|---|---|
| 1 | Bed Tramming | Guided four-corner tramming (Bed tramming) |
| 2 | Heaters (PID) | PID tuning: Bed 65 C and Hotend 230 C, each saved with one Klipper restart (details) |
| 3 | Axis Twist | Axis Twist Compensation wizard; its Save also removes the saved bed mesh (details) |
| 4 | Auto Calibration | Load cell check, nozzle clean, Z offset, bed mesh - about 7 min, no tools needed (details) |
| 5 | Input Shaper | Guided resonance measurement (details) |
| 6 | E-Steps | Guided mark-extrude-measure calibration (details) |
| 7 | Skew Correction | Skew Correction (needs a printed test part) (details) |
| — | Load Cell Calibration (Other) | Automatic re-check or manual with a bottle (Load cell calibration) |
| — | TMC Autotune (Other, optional) | TMC Autotune - quieter motors (details) |
| — | Bed Mesh (Other) | The same Bed Mesh panel as the Tune-tab tile — view or measure (details) |
Under every row a status line: Done 24 Oct - (green) when it has run, a one-line description with the time it takes when not, or Redo: (orange, with a bar on the left) when something changed since - for example Redo: Axis Twist changed on Auto Calibration after Axis Twist was saved, or Redo: a shim was added at front left after tramming the load-cell corner. Older NebulaOS versions without a calibration history show the descriptions only.
Every row except Bed Mesh is locked while a print is running. Axis Twist and Skew Correction
show a message instead of opening when their Klipper section ([axis_twist_compensation],
[skew_correction]) is missing; NebulaOS ships both. TMC Autotune is greyed out when Klipper has
no motor_database.cfg.
Heaters (PID) asks before each run:

The real screen app.

The real screen app.
These run NebulaOS calibration workflows in Klipper (NEBULAOS_* macros). Each screen shows a short
description, a Start button (asks to confirm) and, while the workflow runs, its live state, the
buttons for the current step and Cancel. Auto Calibration, Input Shaper and E-Steps show every
step with check marks (Step 7 of 10, the current step in large type with its live detail:
temperatures, touch 2 of 3, point 41 of 81), a notice while Klipper restarts to save (the
screen reconnects by itself), and at the end either Done with the new values or
Failed: with why and what to do. What each one does:
- Bed Tramming — measures the four bed corners and tells you which one to correct, one at a time: a printed shim on rigid spacers, or a screw turn on rubber or spring mounts. The printer homes and probes; the bed must be empty.
- Auto Calibration (formerly Z-Offset & Bed Mesh) — load cell check, nozzle clean, Z offset and bed mesh, saved with one Klipper restart; resets the Z adjustment to 0. About 7 minutes; the bed must be empty. Step by step: First calibration.
- Input Shaper — measures resonances with the accelerometer, first mounted on the toolhead (X), then on the bed (Y), and saves the result with one Klipper restart.
- E-Steps — the hotend heats; you mark the filament at the extruder entry, the printer extrudes a fixed length, and you type in how far the mark moved. The corrected value is applied for you.
- Load Cell Calibration — Automatic (default: a sensor check, no bottle; after a pass Ready - Automatic needs no weight calibration; Auto Calibration uses it.) or Manual (a 1.5 L water bottle and a kitchen scale, about 2 minutes; nothing moves or heats).

A 5-point paper test across X (AXIS_TWIST_COMPENSATION_CALIBRATE SAMPLE_COUNT=5). Fixes first
layers that are uneven left to right despite re-meshing. Full guide:
Calibration explained → Axis Twist.

Corrects parts that come out as slight parallelograms instead of squares.
- Enter three caliper measurements from a printed test square: AC diagonal, BD diagonal, AD side. Tapping a field opens a number keypad.
- Tap Apply & Save — this sends the correction and runs
SAVE_CONFIG(Klipper restarts).
Full guide: Calibration explained → Skew Correction.

The real screen app.
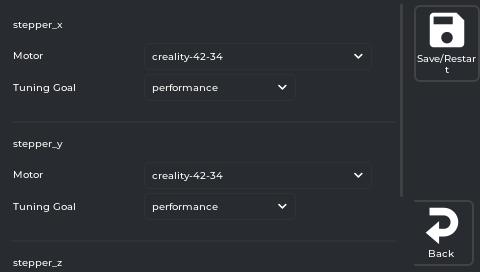
The real screen app, with NebulaOS's shipped configuration and motor list. A printer that has saved its own choices shows those instead.
Quieter, cooler steppers. For each stepper pick a Motor and a Tuning Goal (auto, silent,
performance, autoswitch), then tap Save/Restart. Steppers without a saved choice are
pre-selected with the KE's stock motors. Full guide: Calibration explained → TMC Autotune.
Previous: Macros and Console · Using NebulaScreen · Next: Settings → Connections