Repository navigation
Screen Updates
App updates through Moonraker, and system images (USB stick, upload, online). The task, step by step: Keeping NebulaOS updated.
Lists what Moonraker's update manager knows (Klipper, Moonraker, Mainsail, NebulaOS extensions, ...) with version and state. Check now refreshes the list, Update all installs every available update, and each row has its own Update button. Klipper stops while Klipper or the extensions update.
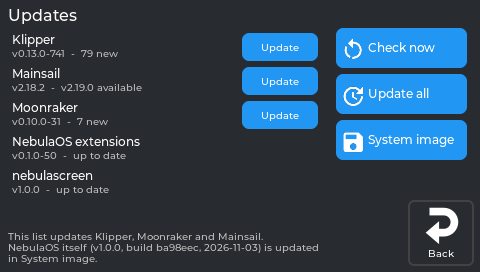
The printer's own display, running NebulaOS 1.0.0.
Each update asks first:

The real screen app, showing data from a printer running NebulaOS 1.0.0.

The real screen app, showing data from a printer running NebulaOS 1.0.0.
System image installs a NebulaOS (or Creality) .img from a USB stick or from
config/uploads/system-image into the boot slot that is not running, then restarts into it.
Online asks GitHub for a newer NebulaOS release and downloads it (checked against the
release); it then shows in the list as Downloaded and installs the same way. After a NebulaOS
image, the new slot gets a trial start: if Klipper and the screen do not come up, NebulaOS goes
back to the previous slot. See Updating NebulaOS.
Previous: Settings → System · Using NebulaScreen · Next: Settings → Reset