Repository navigation
Devices Advanced Virtual Device
An Advanced Virtual Device (AVD) is a configurable virtual Homey device. Use its fields to represent useful information or controls, then connect them to real devices with Flows. The AVD driver is the only device type currently listed for Device Capabilities.
- Create one
- Configure fields
- Names and capabilities
- Device class and energy
- Ordering and icons
- Tile status and controls
- Reflect values from other sources
- Connect the AVD to devices
- Flowcards
- Share and import
- Advanced HomeyScript API examples
- In Homey, choose Add device, select Device Capabilities, and select the Advanced Virtual Device.
- Choose Creating an empty AVD, Selecting from a Template, or Importing a TEF. An empty AVD is the best starting point when following the field guides below. For an imported template, review its dependencies and map any included Flows as explained in Templates and The Exchanger File.
- For an empty AVD, enter a name and choose a built-in icon or upload an SVG device icon. Finish pairing and assign the device to a zone.
- Open the device's Repair/Maintenance screen. This is the AVD's configuration screen; Homey's ordinary device settings are also used for options such as choosing a tile status indicator.
- Add one or two fields, name them, configure them, and save. Return to the device to check the result before adding the rest.
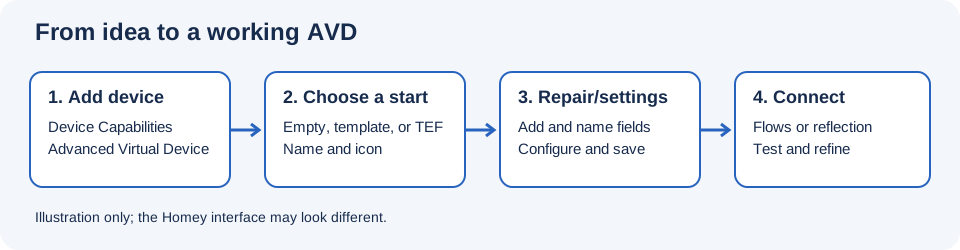
Illustration: the configuration workflow, not an actual Homey screenshot. The original Living Room tutorial shows the process in Homey; its older screenshots and status-field instructions may differ from the current interface.
The repair screen warns that enabling many fields at once may take time. Changes to a device class or field's representation can affect Homey capabilities and existing Flows. Review dependent Flows and tags before modifying an established AVD; export a template first if you need a reference copy.
The repair screen lets you name and configure fields, order them, and choose icons where supported. The current Homey listing describes these field types:
| Field | Typical use |
|---|---|
| Text | Labels, messages, track information, or tile text. |
| Number | Measurements, counters, percentages, and numeric controls. |
| Yes/No | Boolean state, such as open/closed or active/inactive. |
| Button | A control that a Flow can treat as a button press or persistent indicator. |
| List | A selectable value from a configured set of choices. |
| Camera | An image from a URL or an image token supplied by a Flow. |
The Homey listing describes fields as addable without a fixed count. The Homey client may display different field types in different places.
For settings shared by several field types, including Show as, Create Tag, Create Insights, Create Hidden Fields, Reflect, and React, see Field configuration and reflection. These options are conditional: the settings screen only shows options relevant to the selected field and representation.
The Show as reference lists the app's custom choices and compatible Homey capabilities by field type and minimum version.
For complete room-control, monitoring, and device-integration examples, see AVD Examples.
Give each field a clear name. The name is used to identify the field in the device UI and Flow-card selectors. Only configured fields are available to their corresponding field actions and triggers. If a Flow cannot find a field, check that it has been added and saved in the repair screen.
Choose a device class that matches how you intend to use the AVD. Changing the class can change Homey's standard behavior and cards associated with that class; the repair screen warns that existing Flows may be affected. Use the cumulative-energy option only when the represented energy value is cumulative rather than instantaneous.
Use the field-order controls to arrange fields after they have been saved. The app supports choosing app-provided and custom icons; custom icons can also be managed from App Settings. If you change an icon that is already in use and the change is not immediately visible, restart the Device Capabilities app and check again.
To show text on an AVD tile, configure a Text field and select it as the tile's status indicator in the Homey mobile device settings. Update it with the Set Text action.
An AVD button can also be used as a tile control. A Flow can set its light/dark state, so the button can act as a control while continuing to indicate the state of the system it represents. The app also allows the device-tile button to be hidden from the device itself when that is preferable.
Where the repair screen offers a Reflect source, you can configure a field to update from a selected device property or supported app source instead of writing a periodic polling Flow. Multiple device properties can be selected for supported fields. Available calculations depend on field type: numeric fields offer sum, mean, median, minimum, and maximum; Boolean fields offer any/all variants. BLL expressions require Better Logic Library.
Some writable reflected device properties can also be configured with React to send field changes back to those properties. This is an alternative to creating a command Flow, not a requirement. See Field configuration and reflection for setup, limitations, and loop prevention. Basic AVD operation does not require Better Logic Library or Chronograph.
Unless you explicitly configure a supported React connection, an AVD field does not automatically control another Homey device. Add Flows such as:
- AVD button changed → turn a real device on/off.
- AVD list changed → select a mode on a real device.
- Real device capability changed → set a matching AVD field.
- Several real-device values changed → update an AVD status or aggregate field.
For reliable state, reflect real-device changes back to the AVD. Be careful to avoid a loop where the reflected update triggers a second command.
The AVD Flowcards index links to the AVD's triggers, conditions, and actions. Each card has its own page with settings, outputs, behavior, and an example.
Use the AVD's repair screen to open Share Your Device and create a TEF. Depending on the export options, the file can include the AVD, icons, and associated Flows. A template can be selected while adding a device or imported through the app settings/repair workflows. Read Templates and The Exchanger File before importing.
These examples use the current homey-api syntax in a new HomeyScript. Install HomeyScript, create a script, and replace My AVD with the exact name or lowercase UUID of your AVD. Replace number1 with the ID of an existing Number field on that device. Use a unique device name, or a UUID if names are duplicated.
Set the Number field:
const dcApp = await Homey.apps.getApp({ id: 'nl.qluster-it.DeviceCapabilities' });

const result = await dcApp.post({
  path: '/setvalue',
  body: {
    device: 'My AVD',
    field: 'number1',
    value: 21,
  },
});

if (result !== true) throw new Error(`Setting the field failed: ${result}`);
In a separate script, change the field's displayed title:
const dcApp = await Homey.apps.getApp({ id: 'nl.qluster-it.DeviceCapabilities' });

const result = await dcApp.post({
  path: '/setfieldname',
  body: {
    device: 'My AVD',
    field: 'number1',
    name: 'New field title',
  },
});

if (result !== true) throw new Error(`Renaming the field failed: ${result}`);
The value must match the selected field's type. /setvalue updates the field and explicitly triggers its AVD-specific When card; it does not offer the Set field Flow action's Nothing else mode. /setfieldname changes the capability's displayed title, not the AVD's name; verify the result in the device UI even if the request returns true. A missing device can return Device not found. rather than throwing, so the examples check the response.
Older forum posts may use apiPost(path, body). The current app object uses post({ path, body }); older scripts can remain on the old API until migrated. See the HomeyScript migration guide and Homey Web API App reference. Test scripts on a non-critical AVD before using them in an automation.