UI harness
Source: src/components/harness/HarnessPanel.tsx (340 lines)
Reach: / → sidebar → Agent harness
States: 5 — loading, Workflow, Single agent, Backends, plus a result panel on any tab
A modal for driving the meta-harness CLI (wks harness) from the UI: pick a backend
slot, pick a workflow or agent, run it, read the result.
max-w-2xl, max-h-[90vh], three fixed regions — a header (title, description, tab
pills), a scrolling body, and no footer. z-[120], the highest surface in the app;
CommandPalette is z-[100], so the harness wins if both are somehow open.
Backend slot is above the tabs' content and shared by all of them. Its options are
prefixed ● (available) or ○ (not) — a text glyph, not an icon, so it survives an
accessibility snapshot as literal text.
Three rounded-full pills: Workflow, Single agent, Backends. Active is
bg-foreground text-background; inactive is bg-muted. They are plain buttons with no
role="tab", so target them by text.
| Tab | Body |
|---|---|
| Workflow | Workflow <select>, Feature Input, Run workflow, and a <pre> showing the exact CLI the run maps to |
| Single agent | Agent YAML <select>, Message Input, Run agent, plus its CLI <pre>
|
| Backends | A prose note about mock always working, then one card per backend: a status dot (emerald-500 when available, else muted), label, id · command, notes, and a check on the right |
The CLI <pre> blocks are live — they interpolate the current selections, so they
change as the form changes. That is the point: the panel teaches the command it is
running. Their text is an Acceptable Difference; their presence is not.
Renders under whichever tab is open once a run completes. data-testid="harness-result",
holding an ok / failed pill, a [data-volatile] line, an optional plan path, and a
max-h-48 scrolling summary <pre>.
{runId} · {backend} · {durationMs}ms is [data-volatile] — every value differs
per run, so .ui-freeze hides it with visibility: hidden. The line keeps its height:
the gap in a frozen capture is the hidden metadata, not a layout bug.
emerald appears here too (dot and check) and, like the sidebar's sync icon, is not a
theme token.
This modal is hand-rolled, not components/ui/dialog.tsx. It has role="dialog",
aria-modal, and aria-labelledby, so it is addressable — but it has no focus trap,
no Escape handler, and no focus restore. The scrim is a real <button> labelled
Dismiss (better than AppShell's aria-hidden scrim), and it refuses to close while
a run is in flight. The X is labelled Close and closes unconditionally, even
mid-run — the two dismissal paths disagree, deliberately or not, and that is current
behaviour.
Moving this onto the shared Radix wrapper is tracked separately; when it lands, this section and the rubric below both change.
Both runs call toast.success(...) on completion. .ui-freeze hides
[data-sonner-toaster] entirely, so a frozen capture never shows the success
toast — assert it through the DOM instead. The result panel is the screenshot-visible
evidence a run finished.
| What | Selector |
|---|---|
| Panel | role=dialog[name="Meta-harness · CLI agents"] |
| Scrim | role=button[name="Dismiss"] |
| Close | role=button[name="Close"] |
| Tabs | role=button[name="Workflow"|"Single agent"|"Backends"] |
| Backend slot |
role=combobox — the first select, label Backend slot (executor.harness)
|
| Workflow / Agent select | the second select on those tabs |
| Feature / Message |
role=textbox — the only one on its tab |
| Run | role=button[name="Run workflow"|"Run agent"] |
| CLI preview | the pre after the Run button |
| Result | [data-testid="harness-result"] |
| Status pill | text ok | failed inside the result |
| Volatile line | [data-volatile] |
| Backend card |
.rounded-lg.border rows on the Backends tab |
Selects use wrapping <label> with no htmlFor, so getByLabel is unreliable —
address them positionally within the panel. This is the repo's densest cluster of that
gap: three selects in one modal.
1. seed localStorage["forgenotes-ui-freeze"] = "1"
   (+ localStorage["workspace-v1"] = {"state":{"theme":"dark"},"version":0} for dark)
2. load /, viewport 1280x800
3. click sidebar "Agent harness"
4. wait for role=dialog[name="Meta-harness · CLI agents"]
5. wait for role=button[name="Run workflow"]   ← its absence IS the loading state
6. webview_screenshot
| State | Extra |
|---|---|
| Loading | transient — assert Loading harness… rather than screenshotting |
| Workflow | default tab |
| Single agent | click Single agent |
| Backends | click Backends |
| Result | select the mock backend and Run — mock always works, no CLI needed |
Use the mock backend for the result capture. A real CLI backend is slow,
nondeterministic, and may not be installed; mock always works in preview and produces
the same panel structure.
Freeze mode matters more here than anywhere else in the app: without it the capture carries a run id, a duration in milliseconds, a spinner, and a toast — four sources of noise in one screenshot.
| State | Wireframe |
|---|---|
| 1 · Workflow tab | 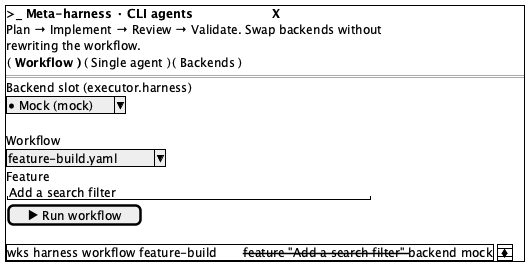 |
| 2 · Single agent tab | 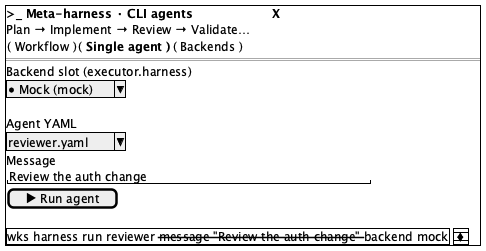 |
| 3 · Backends tab | 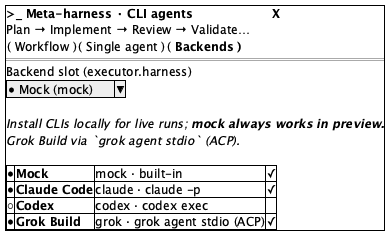 |
| 4 · Result panel | 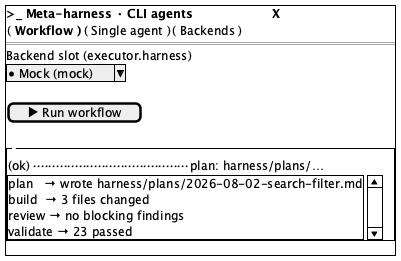 |
Tokens and always-acceptable items: tokens.md.
- Title "Meta-harness · CLI agents" with a terminal icon, description beneath
- Three pills in order: Workflow, Single agent, Backends — exactly one filled
- Backend slot select above the tab body, on every tab
- Backend options prefixed
●or○ - Workflow tab: Workflow select, Feature field, Run workflow, CLI
<pre>— in that order - Single agent tab: Agent YAML select, Message field, Run agent, CLI
<pre> - Backends tab: one bordered card per backend, status dot at the left
- CLI
<pre>is monospace on a muted fill and reflects current selections - Result: status pill first, then metadata, then a scrolling summary
- Only the body scrolls; header and pills stay put
- Which backends are available — depends on what is installed
- Workflow and agent lists, default feature/message text
- Exact CLI text in the
<pre>— it interpolates the form - Result summary text;
okvsfailed - Panel height (content-dependent, capped at 90vh)
- A visible run id or duration under
.ui-freeze—[data-volatile]must be hidden - A spinner in a frozen capture
- A success toast (hidden by
.ui-freeze) - A result panel before any run
- More than one filled pill
- Panel below the command palette — this is
z-[120]and must win - Body overflowing the 90vh cap instead of scrolling
- Summary
<pre>growing pastmax-h-48 - The volatile line collapsing the layout when hidden (it is
visibility, notdisplay) - Scrim dismissing the panel mid-run — it refuses while
running
The harness CLI itself (harness/README.md), workflow YAML semantics, backend
availability detection, and toast content. wks harness behaviour is a CLI concern,
not a screen.