Repository navigation
Building the flasher
The flasher is a Wemos D1 mini running atc1441's ZBS_Flasher, with a small power switch and seven wires to the label's test pads. This page takes you from a bare D1 mini to a flasher the Flash tag page can talk to. The jig is the case and pogo pins around it.
OpenESL does not ship ZBS_Flasher. You download it from its own repository and build it yourself; this page only says which settings and wiring work with OpenESL.
- A Wemos D1 mini (ESP8266) and a USB cable for it
- One 2N3904 (NPN) and one BC557B (PNP) transistor
- Resistors: 2 × 1 kΩ and 1 × 10 kΩ
- Pin headers for the D1 mini (2 × 8), a small piece of perfboard, and thin insulated wire
- Pogo pins, or the 3D-printed jig with pogo pins in it
- A soldering iron and a continuity tester (multimeter)
- A computer with VS Code and the PlatformIO extension, or the PlatformIO command line
The label's chip (ZBS243 / SEM9110) only enters its debug mode right after a clean power-on, and only leaves it when the power goes away. Two things follow:
- The label's VCC must come from a switch the flasher controls, not straight from the D1 mini's 3V3 pin and not from a GPIO pin. Here a GPIO (D2) drives an NPN transistor, which turns on a PNP transistor between 3V3 and the label.
-
Do not use D3 (GPIO0) or D8 (GPIO15). They are the ESP8266's boot pins. D3 also has a pull-up on the D1 mini that feeds the label through its RESET pad, so the label never gets fully switched off (you can measure 1.7 to 2.5 V on it), never gets a clean power-on, and every read returns
00. A label on 3V3 while the D1 mini boots can also stop the D1 mini from starting at all.
| D1 mini | GPIO | Signal | Label test pad |
|---|---|---|---|
| D7 | 13 | MOSI | 2 |
| D1 | 5 | SS | 3 |
| D5 | 14 | CLK | 5 |
| D6 | 12 | MISO | 6 |
| D0 | 16 | RESET | 8 |
| D2 | 4 | power switch (through R1) | – |
| switch output (PNP collector) | – | VCC | 1 |
| G | – | GND | 7 |
The power switch:
- D2 → R1 (1 kΩ) → base of the 2N3904. Its emitter goes to GND.
- Collector of the 2N3904 → R2 (1 kΩ) → base of the BC557B.
- R3 (10 kΩ) between the BC557B's base and its emitter. The emitter goes to 3V3.
- Collector of the BC557B → pad 1 (VCC).
D2 high switches the label on. R3 holds the PNP off while D2 is low.
The legs, seen from the flat side with the legs pointing down, left to right: 2N3904 is E B C, BC557B is C B E. The middle leg is always B.
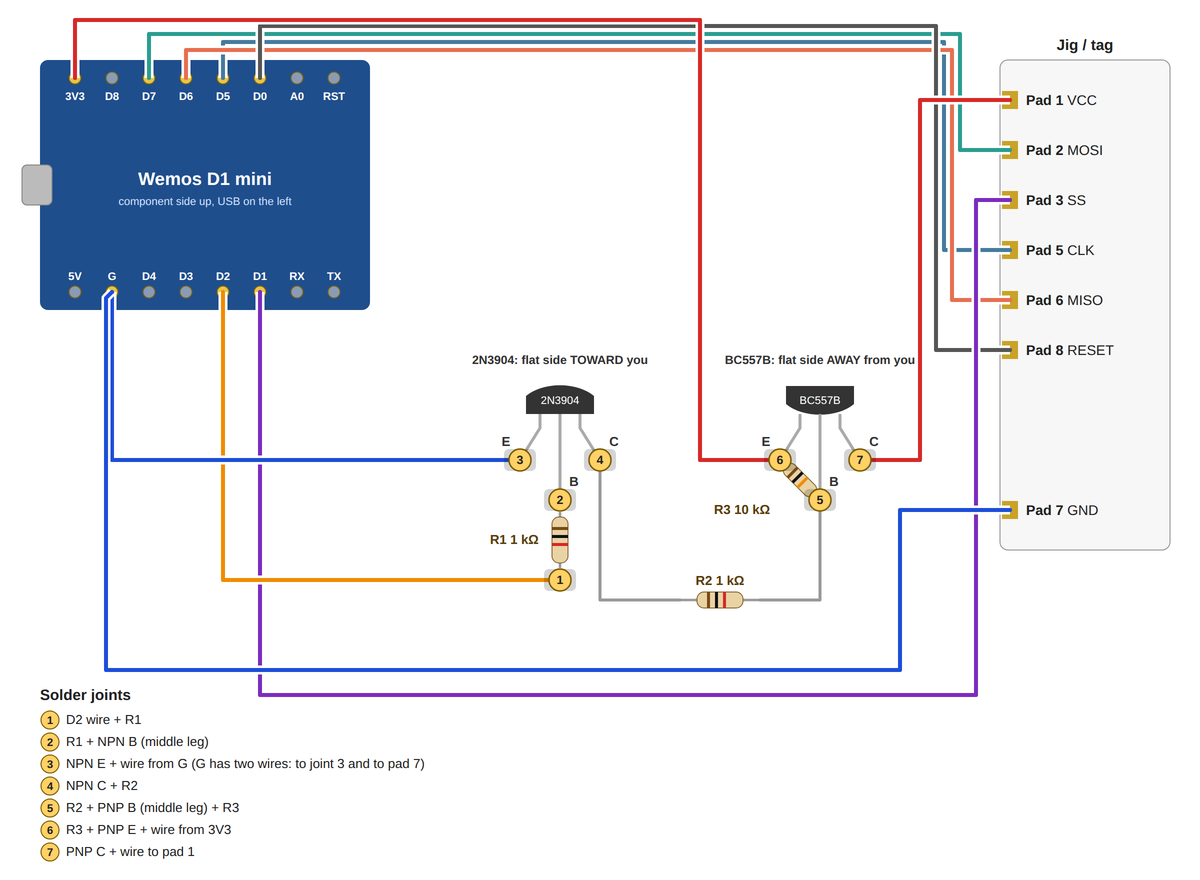
The same circuit laid out on a small perfboard:
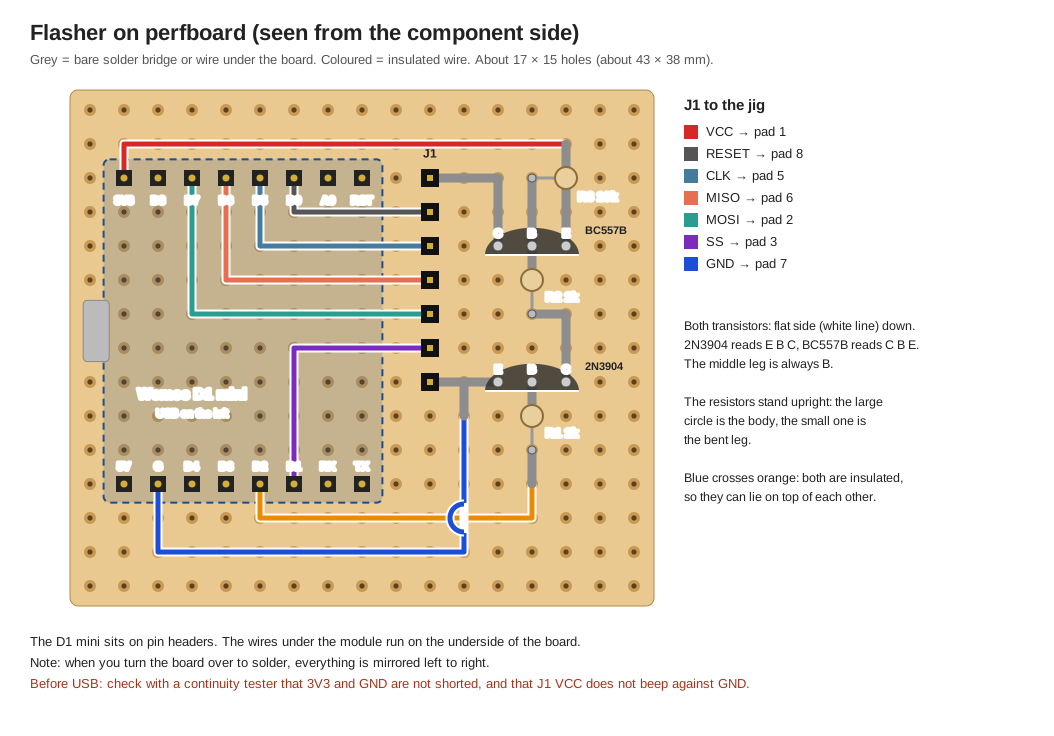
Keep the signal wires short, about 10 cm or less, and avoid loose breadboard jumpers: one bad contact on RESET is enough to make the label never answer. Before you plug in USB, check with the continuity tester that 3V3 and GND are not shorted and that pad 1 does not beep against GND.
Behind the batteries on the 2.9" label (ST-GM29XX2), seen with the label face down. From the right: the top row is pads 1, 2, 3 and 4, the middle row has four small round dots and then pads 5 and 6, the bottom row is pads 7, 8, 9 and 10. Pad 1 is the large pad above the dots, pad 7 the one below them. Pads 9 and 10 are not used. Pad 4 is only for debugging (the label's serial log) and is not needed for flashing.
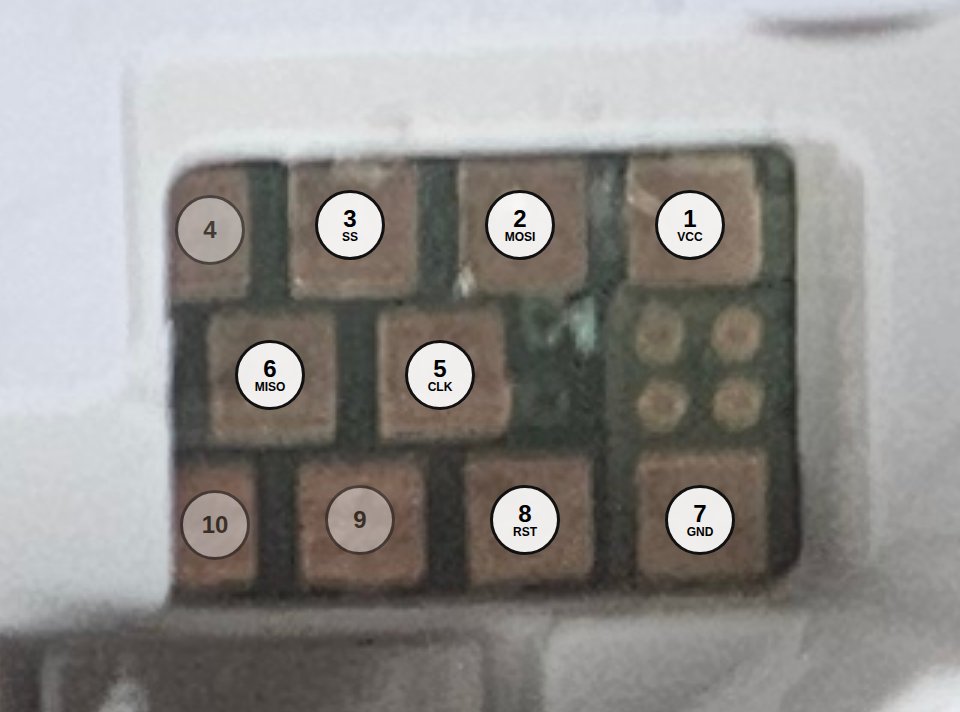
The 1.54" label (ST-GM16XX2) has its pads behind the coin cell and is flashed in the same jig. Its pads have the same numbers.
-
Download or clone ZBS_Flasher and open its folder in VS Code with PlatformIO.
-
The D1 mini uses the ESP8266 environment,
env:nodemcu. Its default pins do not match the wiring above. Openplatformio.iniand set the pin options in thebuild_flagsof[env:nodemcu]to:Option Value D1 mini pin LED-1none ZBS_SS5D1 ZBS_CLK14D5 ZBS_MoSi13D7 ZBS_MiSo12D6 ZBS_Reset16D0 ZBS_POWER4D2 ZBS_RXD,ZBS_TXD-1not used Each one is a
-D NAME=valueline. -
Edit the file itself and save it. Settings changed through the PlatformIO menus in VS Code may never reach
platformio.ini, and the build then keeps the default pins. Check withgrep -n ZBS_ platformio.inibefore you build. -
Plug in the D1 mini, build and upload the
nodemcuenvironment (pio run -e nodemcu -t upload, or the upload button for that environment).
If the computer shows no serial port for the D1 mini, install the driver for its USB chip: most D1 minis have a CH340 (driver for Windows and older macOS), some a CP210x. Linux has both built in; add yourself to the dialout group if the port is there but cannot be opened.
- Open Flash tag in Chrome or Edge, pick a model, go to Connect flasher and pick the D1 mini's port. The page should show ZBS_Flasher and a version number. This does not need a label.
- Put a label (battery out) in the jig and press Flash tag. Follow Flashing labels.
What the messages mean:
| Message | What to check |
|---|---|
| the port does not answer the ZBS_Flasher protocol | Wrong port (another D1 mini, for example the debug board), ZBS_Flasher not uploaded, or another program (such as tools/flash-tui or a serial monitor) has the port open. |
| no contact with the tag | The label does not answer. Check that it sits right on the pogo pins and that the battery is out. Then check the wiring and the pins in platformio.ini. Measure pad 1 to pad 7 with the label switched off: anything well above 0 V means a signal line is feeding the label, so it never gets a clean power-on. |
| two reads of the … differ: bad contact? | A pogo pin with poor contact. Reseat the label and try again. |
Reads that are all 00
|
The label is not in debug mode: usually back-powering (see above) or RESET on the wrong pin. |
Reads that are all FF
|
Often a half-powered label, not a real answer. |
ZBS_Flasher also runs on an ESP32 or an Arduino Nano. On an ESP32 the boot-pin problems above do not exist, but you still need a switched VCC. OpenESL is tested with the D1 mini wired as on this page. If you build something else, tell us.
Next: Flashing labels.