Board headless


The cheapest WinterDash — no screen, just a status light and the web page.
📖 On this page
👋 Given a ready-made device? You don't need this page → Reading your WinterDash.
| Screenless ESP32 | |
|---|---|
| Screen | — (web page is the display) |
| Navigate | the web page · a BOOT button for reset |
| Status light | one LED — a heartbeat / attention / SOS pattern |
| Auto-brightness | — (no screen) |
| Web + Home Assistant | ✅ |
| One-click OTA update | ✅ |
| Saved banners | 2 |
| Buy | from ≈ €5 (≈ €5–10) · "ESP32-WROOM-32 DevKitC" |

A plain ESP32-WROOM-32 — no screen, so the web page and a single status light do the work.
Comparing boards? The full side-by-side is on Boards.
There's no screen — you read the charger on the web page (and in Home Assistant). The one status light tells you at a glance that all is well, or that something wants a look:
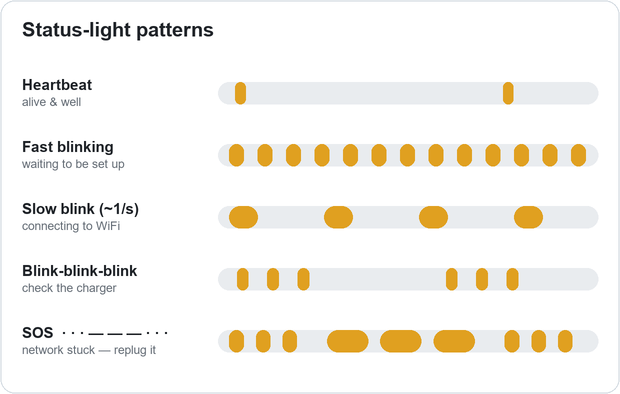
- A slow heartbeat (~every 6 s) = alive and well · blink-blink-blink = needs attention (usually the charger) · SOS = a network glitch, unplug and replug.
- Full pattern table (setup, connecting, reset) → Reading your WinterDash.
Every board behaves a little differently — here's how this one does. None of these stop it working.
🖥️ The web page is the only display
Why — there's no screen on the board, by design (that's what makes it the cheapest). What to do — open the web dashboard on your phone to see the charger; it's also where you set banners and everything else. Home Assistant works too.
🔘 Setup and reset use the BOOT button
Why — with no screen there's no on-device menu, so a physical button is the escape hatch. What to do — hold BOOT for about 5 seconds to bring back the WinterDashAP setup network (the light guides you). System actions are also on the web page.
Live issues for this board:

🛠️ A maker section — skip it if your device is already set up.
- Plug in over USB (most WROOM-32 boards use a CP2102 or CH340 chip → the matching driver).
- Open the flasher — Flash it (screenless pre-selected) — and follow the one-click steps.
- Pair your charger → Connecting your charger.
Updates: one-click over-the-air — the dashboard tells you when a new version is out, and you flash it from the same browser installer or the device's own update page. Reach the device at winterdash-a1b2c3.local (each unit names itself; read it off the Network card on the web page).
🔧 Specs & build (for makers)
| Spec | Screenless ESP32 |
|---|---|
| SoC / PSRAM | ESP32-D0WDQ6 (classic) / none |
| Flash · app · storage | 4 MB · 1.81 MB ×2 dual-OTA · 320 KB |
| Screen · input | — · BOOT button (GPIO0, hold-to-reset) |
| Status light | one mono LED (GPIO2, on/off patterns) |
Build: master esphome/esp32-wroom32.yaml · packages core + board_esp32_wroom32 + led_wroom32 + input_wroom32_boot + producers · partitions_esp32_wroom32.csv · → Build from source.
Charger: Victron Blue Smart IP65s 12/5, over a real charge cycle. Verified on hardware: boots from a real ESP32-D0WDQ6 4 MB dev board, Wi-Fi onboarding, the BOOT-hold reset (full destructive cycle), the status-light state machine, web + Home Assistant, and over-the-air updates. Maturity: Shipping — fully working, no screen.
Next: Flash one · or compare the boards.