Install and update
Get WinterDash onto a board and onto your WiFi — one USB cable, then your phone.


📖 On this page
This page covers getting WinterDash onto a board and connected to your WiFi.
-
Handed a device that's already flashed? (it shows a setup screen, or a
WinterDashAPWiFi network) → just do First-time setup right below. - Starting from a blank board? → flash it first (further down), then come back to First-time setup.
Ready-made builds live on the Releases page; the one-click browser installer is under Flash the board below.
Once WinterDash is on the board, it needs your WiFi. Everyone does this part — including if you were handed a device that's asking to be set up. (Starting from a blank board? Flash it first, then come back here.)
-
Power it up. It creates a temporary WiFi network called WinterDashAP (a board with a screen also shows a QR code you can scan).
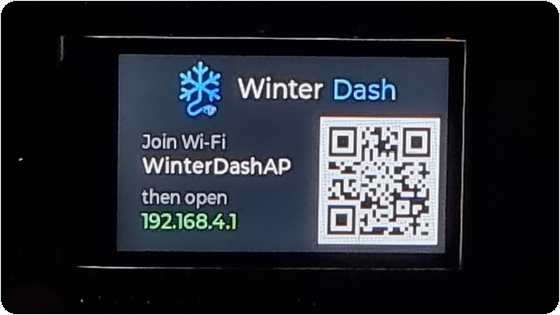
A board with a screen shows the WinterDashAP network and a QR code to scan.
-
Join that network from your phone, and tell it your home WiFi. (Your phone may warn that WinterDashAP has no internet or looks insecure — that's expected for a setup network; stay connected to it.)

Once you join WinterDashAP, this form opens on your phone (or scan the QR): pick your home WiFi and enter its password.
-
It reboots onto your WiFi. Open its web page at the address it shows — something like
http://winterdash-a1b2c3.local/. -
Pair it with your charger — see Connecting your charger.
🛠️ A maker section — flashing a fresh board. Handed a working device? You don't need this — First-time setup above is all you do.
The easy way is our one-click browser installer below. Prefer to do it yourself? A manual Espressif route is in the collapsible after it. Both run in Chrome or Edge (desktop only).
First, the USB driver (both methods need it). Plug the board in with a data cable (not charge-only). If no serial port shows up, install your board's driver, then replug: CP210x (Silicon Labs — most TTGO / CP2102 boards) or CH340 / CH341 (many generic ESP32 boards).
Our own installer picks the firmware and flashes it for you — nothing to install on your computer.


- Open the installer (button above) and choose your board.
- Click Connect and pick the board's port in the browser prompt.
- Click Install and keep the cable plugged in (about a minute).
- When it finishes, carry on with First-time setup above.

What it looks like when done — the installer tells you what's next (unplug & replug to power, then set up WiFi). The First-time setup steps above cover that part.
🧰 Prefer to flash it yourself? — the official Espressif flasher
Use Espressif's own web flasher with our firmware:
-
Download your board's firmware — grab the matching
….factory.binfrom the latest release. - Open Espressif's esptool-js flasher in Chrome or Edge.
- Click Connect and pick the board's port. Once it connects (it names the chip), the flash table appears: set
Flash Address to
0x0, click Add File and choose the.factory.binyou downloaded. (Optional: tick the Erase box first for a clean slate.) - Click Program and wait for it to finish. Then unplug/replug to power and carry on with First-time setup above.
New versions appear on the Releases page. Over-the-air
updates use the small ….ota.bin for your board — not the big .factory.bin (that one is only for a
fresh USB flash).
🔌 CYD: the CYD updates over USB only — use the first method below (re-flash with the browser installer). The two over-the-air methods don't apply to it. See Board-CYD.
There are three ways — pick by how much you want to keep. The simplest is the browser installer; the other two keep more of your setup (tap to open).
Re-flash with the browser installer. (Starts fresh — you'll redo WiFi and charger pairing; no file to download, nothing to type.) Open the installer, flash your board, then run through First-time setup again. Use this if you're not sure which to pick.
Keep your charger pairing — upload on the device's setup page
You re-enter your home WiFi, but the charger stays paired. No computer tools needed. Download your board's
….ota.bin from the release, then put the device into setup mode so WinterDashAP comes back:
- boards with a screen: System → Reset WiFi
- screenless boards: hold BOOT for about 5 seconds
Join WinterDashAP, open http://192.168.4.1, expand Advanced → "Update firmware from a .bin file",
pick the .ota.bin, and Update firmware — no password. Then re-enter your home WiFi.
Keep everything — push it from a terminal
No reset, the device stays on your WiFi — but you need a terminal. Upload the same ….ota.bin straight to the
running device (use its own name):
curl -F "file=@<board>.ota.bin" http://winterdash-xxxxxx.local/update
Built from source instead? esphome run … does the same over the network and asks for the OTA password
(winterdash-ota on official builds, or your secrets.yaml ota: password).
- Boards with a screen: use the on-screen System menu.
- Screenless boards: hold the BOOT button for about 5 seconds — the status light guides you.
Unplugging is always safe — it keeps your WiFi and settings.
Already run Home Assistant? Once WinterDash is on your WiFi it shows up there automatically — see Home Assistant for what it exposes. If you don't use Home Assistant, ignore this — nothing needs it.
Next: Connecting your charger — pair it · Reading your WinterDash — what the readings mean.