Release Testing Instructions WooCommerce 3.9
WooCommerce Product Blocks 2.5 is included in this release. WooCommerce Products Blocks is our eCommerce focused blocks for the Gutenberg editor that has been part of WordPress since 5.0.
The first Product Blocks were included in WooCommerce 3.6. With the inclusion of Product Blocks 2.5 in WooCommerce 3.9, new blocks were added:
- All Products Block
To give merchants the power to change what product data is shown via the All Products block, we’ve introduced a new UI within the block itself to customize content using:
- Inner Blocks
To help customers find products, we’ve introduced an initial batch of filtering blocks which work alongside the All Products Block specifically:
- Filter by Price
- Filter by Attribute
- Active Filters
In order to have access to the new Product Blocks, you will need to have WordPress 5.3+ installed.
To test, you’ll want to add a new page or post and add each of the new blocks to that page. Some areas to focus on:
- Blocks discoverability
- Add, edit, publish and delete block
- Block customization
To test the Inner Blocks:
- Add All Products Block
- Click on the pencil icon on the block to edit it
- Edit the blocks inside the preview
Putting all the block together and test:
- Add Columns Block
- Select the number of columns (for example, 2)
- You can now add different blocks to each column
- You can add All Products Block to the first column
- You can add filter blocks to the second column
If you need more details about recent WooCommerce Blocks changes, visit WC Blocks 2.5 Release Notes.
This release adds an a/b test to the setup wizard, which for 10% of users will allow opt-in to the new WooCommerce Admin onboarding experience. This allows us to test our changes, prior to launching for all new users next year.
Note that the new onboarding experience is available on sites running WordPress 5.3+.
For users in the test group, the WooCommerce Admin installation step is done before anything else, and the user is redirected to the new onboarding experience after install.
To test:
- Uninstall WooCommerce Admin plugin (if you have it installed);
- Go to
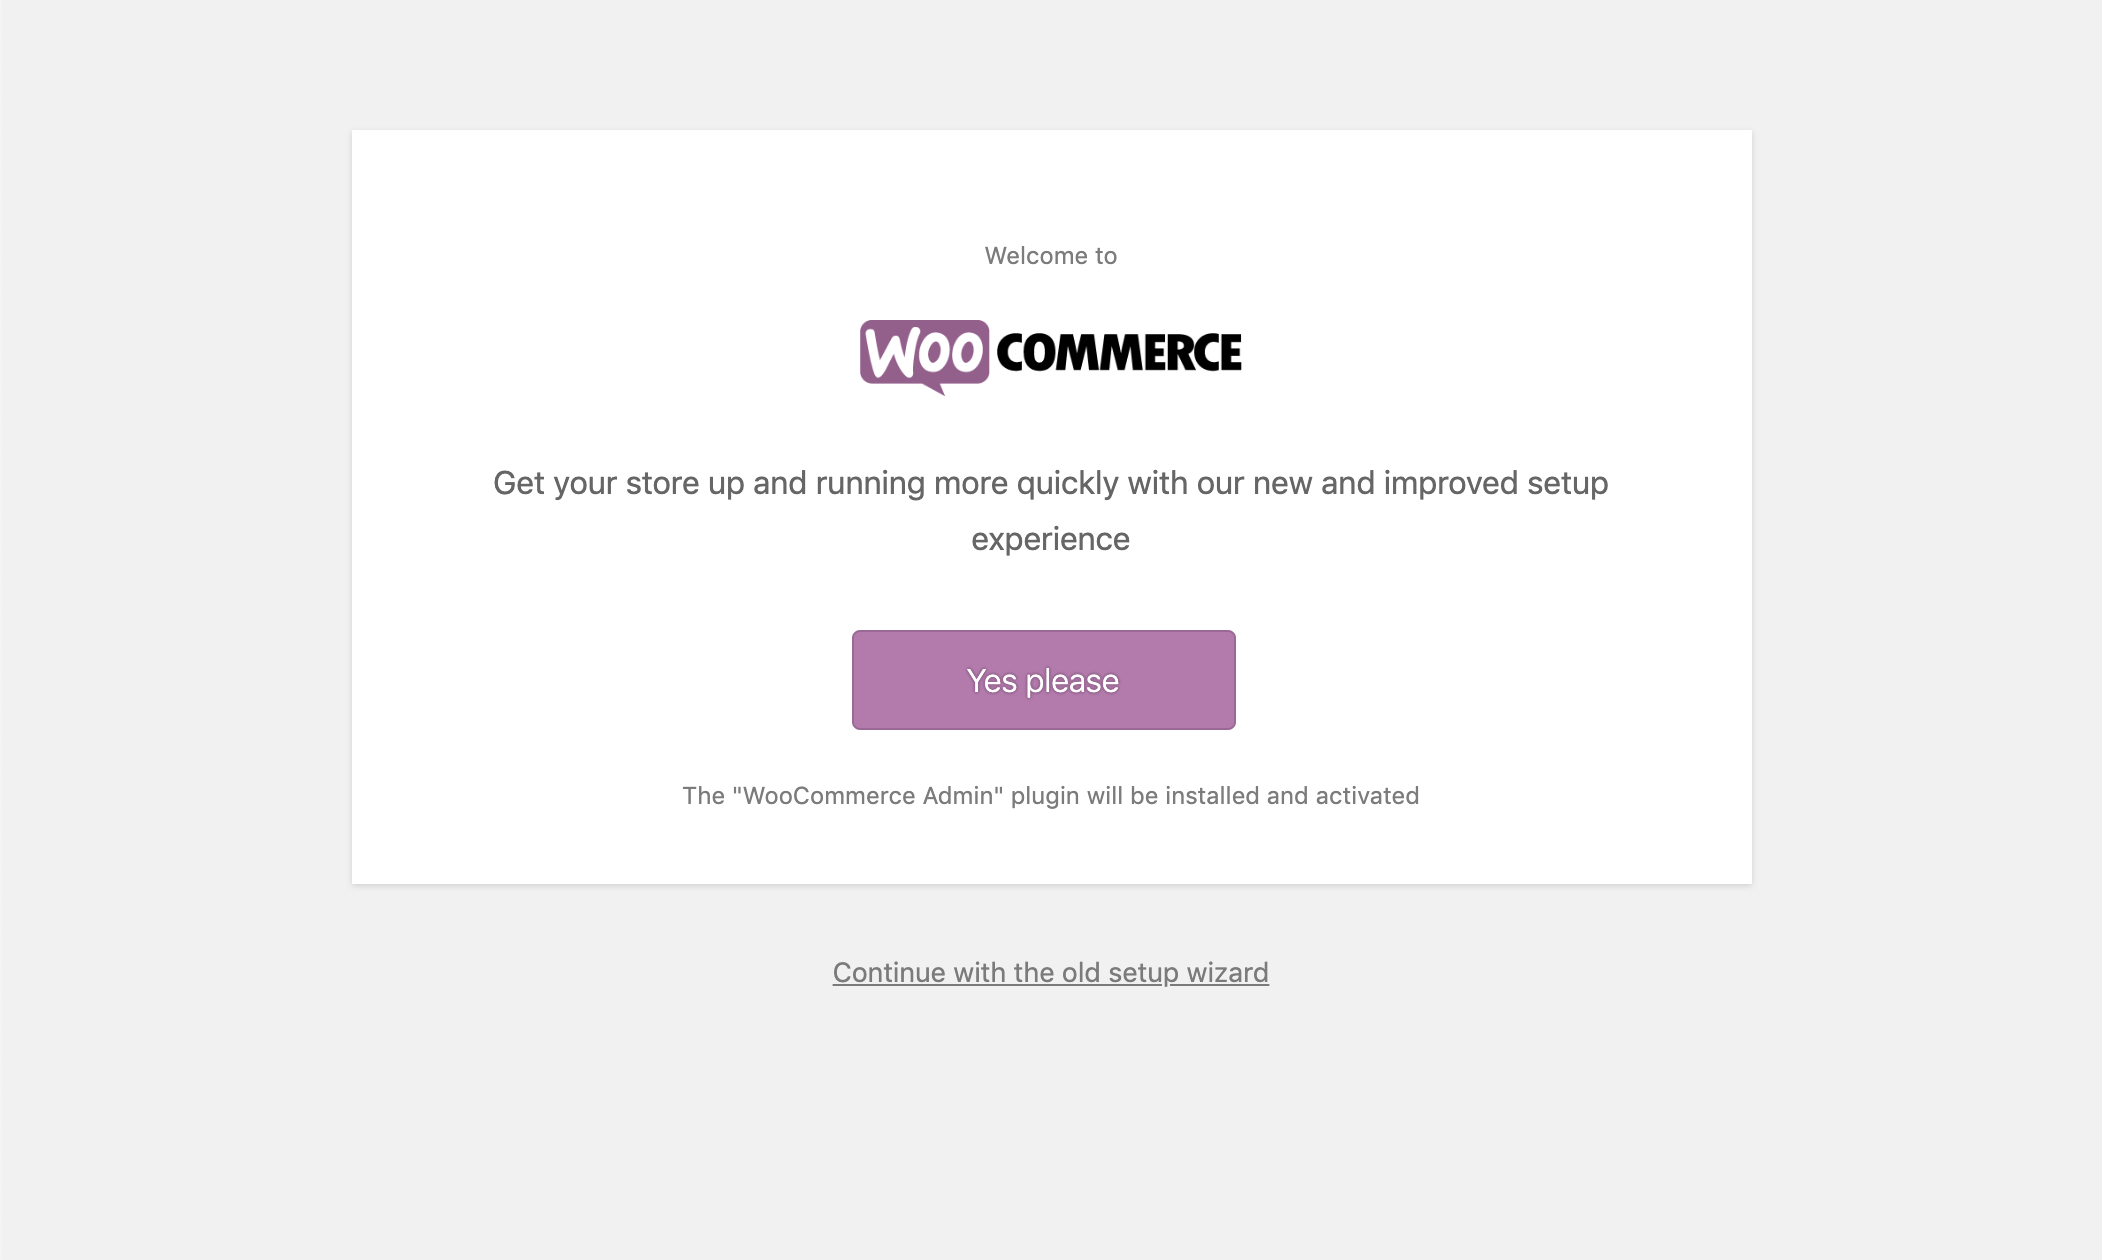
/wp-admin/admin.php?page=wc-setupand try your luck with the a/b test logic. If you are part of the 90% that gets selected for thea(control) old version, you should just see the normal setup wizard with no changes as shown below:

- Update the
woocommerce_setup_ab_wc_admin_onboardingoption in your database tobto enable new onboarding experience. The easiest way to do that is by using the snippet that you can find here. You can implement the snippet using the Code Snippets plugin; - Go back to
/wp-admin/admin.php?page=wc-setup- you should now see the new onboarding prompt screen that looks like this:
- Test the continue/skip link and make sure you can use the normal setup wizard;
- Go back to
/wp-admin/admin.php?page=wc-setuponce again, and clickYes Please; - WooCommerce Admin should be installed, and you should be redirected to the start of the new onboarding experience.
1) Corrected the media element player initialization for product variation descriptions.
To test:
- Create a product with a variation.
- Add an audio shortcode to the variation description -
[audio src="audio-source.mp3"]. - View the product page and select the variation.
- The play bar should be styled as shown below:
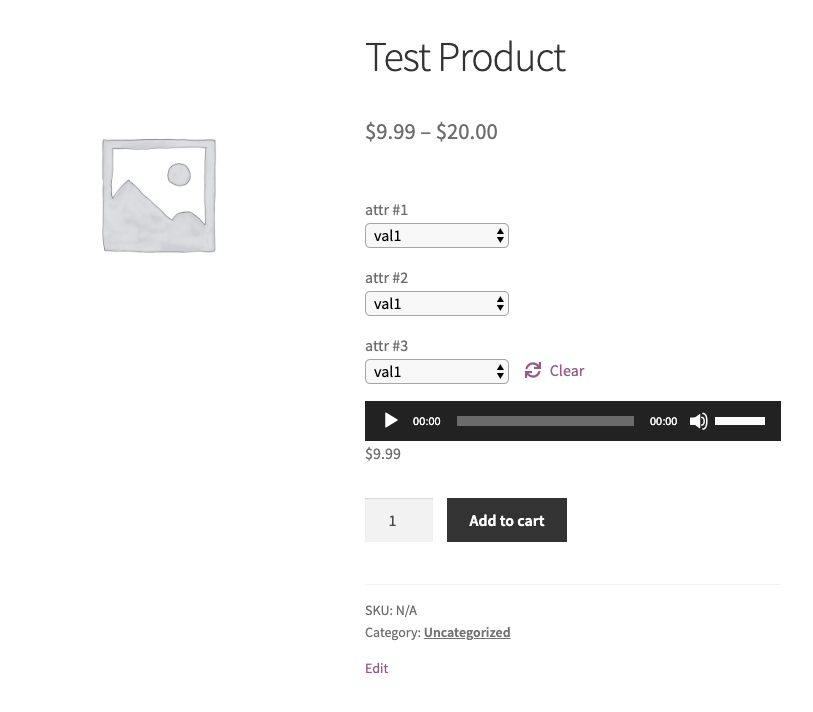
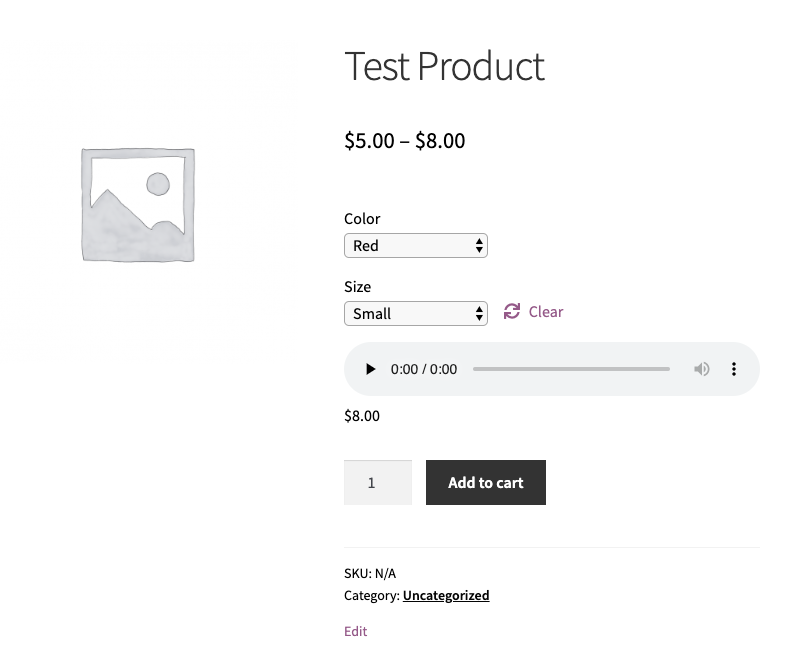
Note that if the bar is styled as shown below, something is not working correctly:
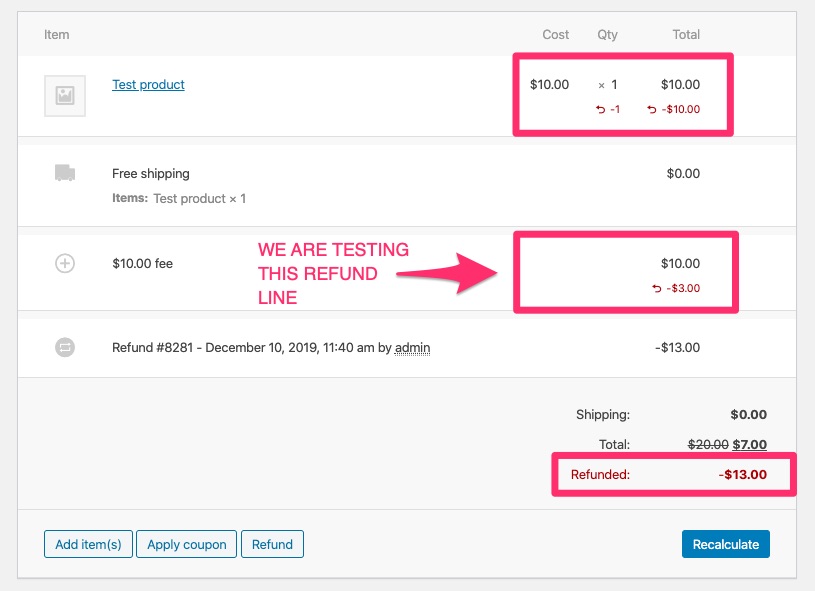
2) The refund of a manually added fee to order now shows the correct amount on the line item.
To test:
- Place an order and manually add a fee to that order (note that in order to do that, you'd need to change the order status to
on holdfirst and save it. Once done, you'd see an option toAdd itemsto an order. After clicking on it, you'd be able to add a fee to an order ); - Save the order with an added fee;
- Refund the product in the order and partially refund the fee;
- The refund shown on the fee should be the correct partial amount that was refunded. See screenshot below for an explanation:
3) Fix rounding issues/inconsistencies between cart page and order placed.
To test:
Case 1:
- Set tax to 7%, price inclusive of taxes and round at subtotal;
- Add 2 products with the following prices: $2 and $2.5;
- Complete order with a quantity 1 of $2 product and quantity 4 of $2.5 product. In the cart the total should be $12.00;
- Go to edit order in wp-admin. Click to recalculate total (order needs to be in
on holdorder status). Without this fix, the order total will change to $12.01. With this fix, it should stay at $12.00.
Case 2:
- Set tax to 20%, enabled on shipping as well, price inclusive of taxes and round at subtotal;
- Add a coupon for $5.00 flat cart discount;
- Add a product with price of $8.99;
- Add Flat Rate shipping for $7.99;
- Add the product (step 3), and apply the coupon (step 2) to the cart. Complete the order with Flat Rate shipping selected (after-tax it should be $9.59). The total in the cart should be $13.58;
- Go to wp-admin to edit the order. Set the status to
on holdand click to recalculate total. Without this fix, the coupon amount will change to $4.16, but with this fix, the discount should stay at $4.17.
Case 3:
- Set tax to 20%, price inclusive of taxes, and round at subtotal;
- Add 5 products with the following prices: $498, $99, $248, $44 and $69;
- Add all these products in the cart and complete the order;
- On the order received page, without this fix the subtotal amount will be $957.99, but with this fix, it should be correctly set to $958.
4) Added hover icon on password input fields to briefly toggle input text visibility for browsers.
To test:
- Logout of WooCommerce site (if logged in);
- Navigate to
My Accountpage; - Enter log in details;
- Click on the new "eye" visibility icon in the password input field;
- Make sure you can see the password.
5) MaxMind Geolocation Integration (added in WooCommerce 3.9 rc-3).
To test:
In order to enable geolocation:
- Navigate to
WooCommerce > Settings > General - Scroll to
General options - Next to
Default customer address, chooseGeolocateorGeolocate (with page caching support)
To complete the process of enabling Geolocation, it is necessary to configure the MaxMind Geolocation Integration with a MaxMind License Key:
- Create an account on MaxMind:
- To create an account on MaxMind Geolocation, navigate to https://www.maxmind.com/en/geolite2/signup;
- On the registration page, complete the form with your information such as name and company name. If you are not sure what to choose as
IndustryandIntended usefields you can fill aseCommerceandPrice localizationrespectively; - After submitting you’ll get an email in a few minutes with a link to set your password. Click on that link and set a password.
- Create a MaxMind License Key:
- Now that you have an account on the MaxMind website, you can access the license key section at
https://www.maxmind.com/en/accounts/{your_account_number}/license-key; - Select
Generate new license key; - Next, fill in the form to generate a license key;
- Add a description (just as the name of your store);
- Choose
Nonext toWill this key be used for GeoIP Update?; - Select
Confirm.
You will be presented with a new key. Copy this key straight away as it will be shown only once.
- Add MaxMind Geolocation License Key to WooCommerce settings:
- Navigate to
WooCommerce > Settings > Integration > WooCommerce MaxMind Geolocation; - Paste the license key;
- Select
Save changes.
Now your WooCommerce store is ready to geolocate customers.