Release Testing Instructions WooCommerce 4.4
WooCommerce 4.4 includes:
- Onboarding & Setup Updates
- New Centralized Coupon Management
- Updates to WooCommerce Product Blocks
- Notable Bug Fixes
WooCommerce 4.4 includes a number of additions and updates to the Onboarding and Setup Checklist features that help users get their new stores up and running.
This feature adds an option to dismiss the item in the Setup Checklist to purchase extensions chosen during the Onboarding Wizard flow.
- On a test site, launch the Onboarding Wizard, and when you arrive at the "Product Types" Step, check a product type like Subscriptions that has a cost associated with it:

- Proceed through the rest of the onboarding wizard, and when you arrive at the WooCommerce home screen, note that the Setup Checklist item for "Purchase and Install Extensions" has a dismiss link:

- Click the Dismiss link, and verify the item is removed from the check list, and a confirmation dialog is shown:

- Do a hard refresh on the page, and verify the item is still not shown in the check list.
This feature adds support for automatic creation of a PayPal account on sites that have Jetpack and WooCommerce Services installed and connected.
Using a new Jurassic Ninja site, go through the onboarding wizard.
- On the Store Details step, use a non-USA based address. This is to prevent WooCommerce Payments from being installed.
- And on the "Benefits Page" after you select your theme, be sure to answer "Yes Please":
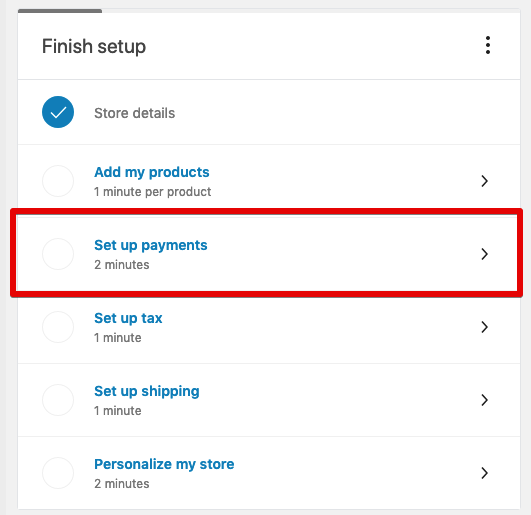
- You will then land on the WooCommerce Home Screen, find the Setup Payments step in the checklist, click it:
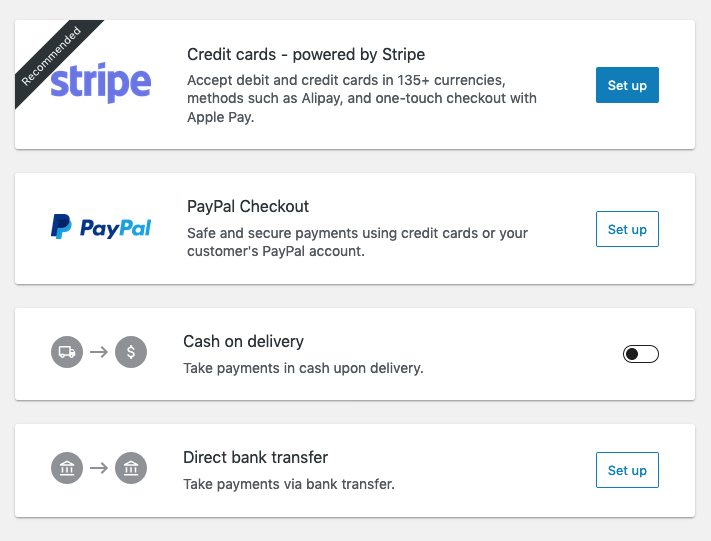
- On the payments task screen, click "Set Up" on the PayPal item:
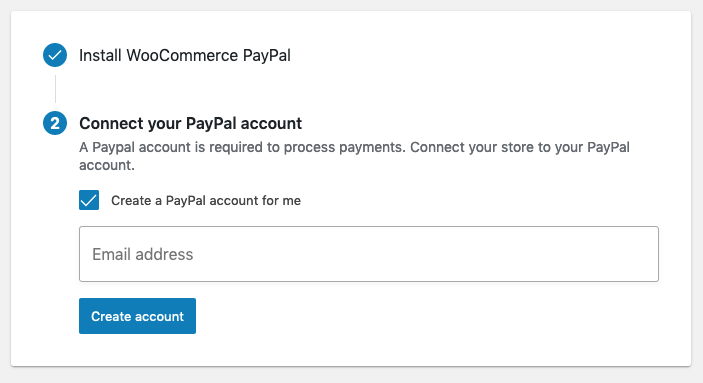
- When the PayPal setup task loads, verify that step 1 - the plugin install, completes, and then the step two has a checkbox to "Create a PayPal account for me" that is checked, and an email address field is shown:
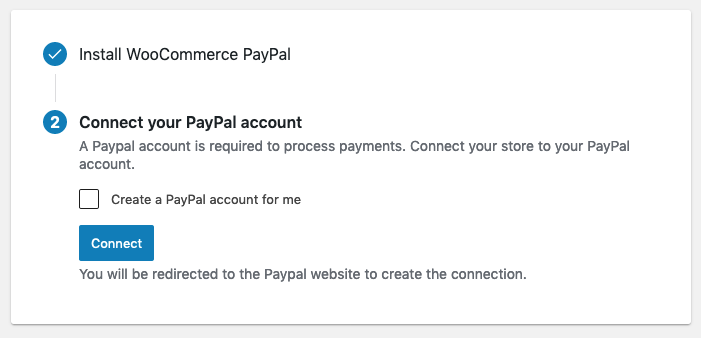
- Uncheck the "Create a PayPal account for me" checkbox, and verify the UI changes:
- Re-check the box, and then enter a valid email address ( that does not have a PayPal account associated with it ), and click "Create Account"
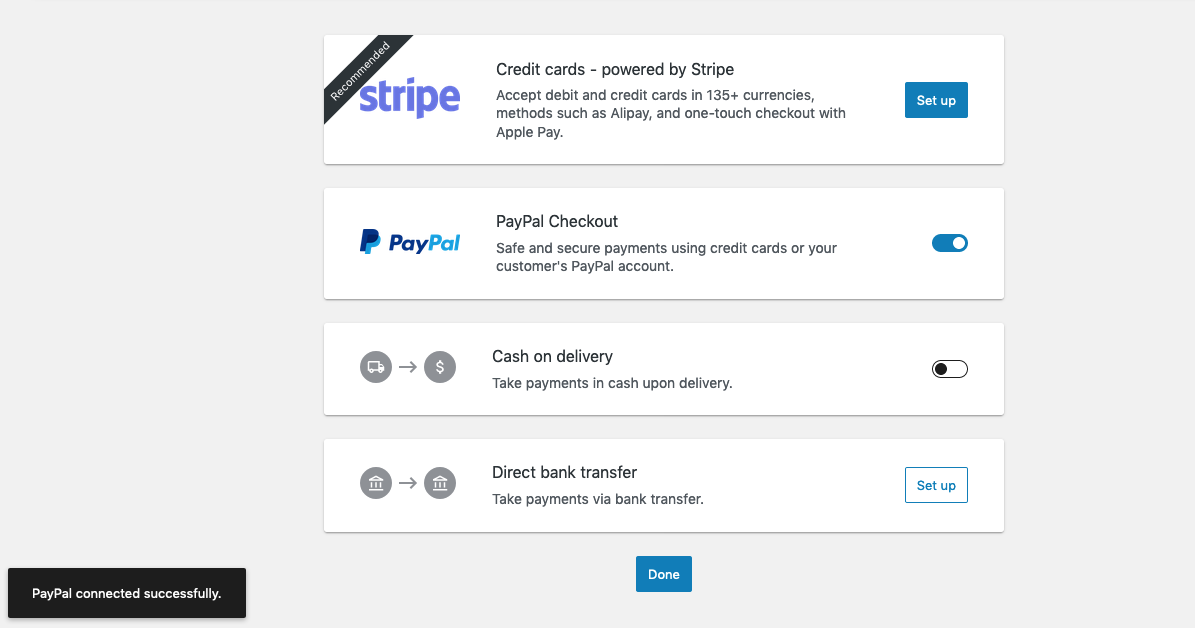
- You should then be redirected back to the payments screen, and you should see a notification informing you that PayPal has been setup:
- Next we will verify things have been setup properly on the back-end of the site by using the ssh credentials supplied by Jurassic Ninja. To access those, visit
wp-admin/on your test site, and find the box that looks like this:

- Using the terminal/command application on your computer, you can click the "clipboard/copy" button next to "SSH command" seen above, and use that command to connect to your site via SSH. When prompted for a password, use the password shown in the dialog above.
- Once logged in, again copy the "Server Path" in the dialog above and type in
cd INSERT_SERVER_PATH_HERE. This will put you into the base directory of the WordPress install. - Next type in:
wp option get woocommerce_ppec_paypal_settings, and verify the output looks like the following, and has the email address you used in step 7 above:

- Using a site you have already used in any of the prior test flows above, return to your WooCommerce Home screen:
/wp-admin/admin.php?page=wc-admin - From the Setup Checklist, click on the Proucts task:

- On the Product setup task page, verify that the standard Activity Panels are not shown on the right side of the navigation bar, but instead a "Help" panel is displayed. Click on that button, and verify help items about product management are shown:

- Return to the WooCommerce Home Screen, and repeat step 3 on the Payments, Tax, and Shipping steps... and that on each of those setup screens, all the content in the help menu is contextual to the screen you are currently viewing.
This new feature simplifies the screen where we prompt users to install reccomended extensions for their new store. Using a new test site:
- Launch the onboarding wizard via
/wp-admin/index.php?page=wc-setup, and click "Yes Please". - On the Store Details step, be sure to use a USA based address:

- Select any industries on the second step, but do not select CBD.
- On the Product Types step, just select Physical Products.
- On the Business Details step, verify that the screen looks like the following:

- Verify the checkbox to "Install recommneded free business features" is checked.
- Click the (i) icon next to this value, and verify a dialog shows details about what features are covered, and also verify the verbiage about which plugins will be installed is shown in the footer area of the step:

- Un-check the checkbox, and verify the screen updates to remove the text about which plugins will be installed:

- Check the box again, and then click "Continue" and verify that the step proceeds and a dialog is shown informing you that plugins have been installed:

- Next, navigate to
/wp-admin/plugins.php, and verify you see the following plugins have been installed and are active:

The existing coupon management interface in WooCommerce core is moving to be located within the Marketing Hub.
- Setup a new site with 4.4
- Ensure coupon management is enabled
- Navigate to WooCommerce > Coupons (click the menu item)
- Confirm you are redirected to the new location WooCommerce > Marketing > Coupons and that the admin notice is visible at the top of the page.
- Click the action button “Remove legacy coupon menu”
- The notice should close, you should be redirected to WooCommerce > Marketing > Coupons and legacy menu item WooCommerce > Coupons should no longer be available.
- Navigate to any other admin page
- Confirm the notice no longer appears
- Navigate to WooCommerce > Marketing > Coupons
- Setup a new site with 4.4
- Ensure coupon management is enabled
- Navigate to WooCommerce > Marketing > Coupons
- Add a coupon
- Confirm coupon is visible on WooCommerce > Marketing > Coupons
- Confirm able to perform coupon management actions like search, filter, edit, trash
- Setup a new site with 4.4
- Ensure coupon management is enabled
- Confirm WooCommerce > Marketing > Coupons is visible
- Now go and disable coupon management
- Confirm WooCommerce > Marketing > Coupons is not visible (note it will require a page refresh after saving the option for the menu items to update so you will need to click on another page or refresh - it does the same thing for the coupon menu in the existing location)
- Setup a new site with 4.4
- Ensure coupon management is enabled
- Ensure Marketplace Suggestions option is enabled
- Navigate to WooCommerce > Marketing > Coupons
- Confirm Recommended Extensions card is visible and populated with recommendations
- Click on a recommendation to be given the option to purchase
- Confirm back button redirects you back to WooCommerce > Marketing > Coupons
- Now go and disable Marketplace Suggestions
- Go back to WooCommerce > Marketing > Coupons and confirm the Recommended Extensions card is not visible
- Setup a new site with 4.4
- Ensure coupon management is enabled
- Ensure Marketplace Suggestions option is enabled
- Navigate to WooCommerce > Marketing > Coupons
- Confirm Recommended Extensions card is visible and populated with recommendations
- Click on a recommendation and follow process to purchase and install an extension or manually upload one https://wordpress.org/support/article/managing-plugins/#manual-upload-via-wordpress-admin
- Navigate to WooCommerce > Marketing > Coupons and confirm that the extension is no longer listed as a recommendation.
- Setup a new site with 4.4
- Ensure coupon management is enabled
- Navigate to WooCommerce > Marketing > Coupons
- Confirm that the “Knowledgebase Articles” card is visible
- Confirm that article can be clicked on and that you are directed to the article on WooCommerce.com
- Setup a new site with 4.4
- Change your profile color scheme
- Navigate to WooCommerce > Marketing and WooCommerce > Marketing > Coupons
- Confirm color schemes are adjusted to accommodate profile color scheme changes
These testing instructions are based on the testing instruction published specifically for WooCommerce Products Blocks 2.7.1, 2.7.2, 2.8.0, 2.9.0, and 3.0.0.
- Verify you can't add any of these blocks: Cart, Checkout and Single Product.
- Add a Product Categories List block to a page.
- Switch to Full Width align.
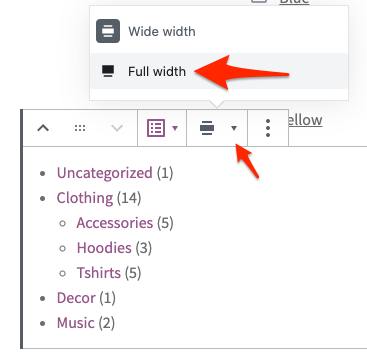
- Verify the block doesn't show an error.
- If you are using Storefront or another theme with sidebar, make sure the page has the Full Width template.
- Open the page in the frontend and verify the Product Categories List block is aligned as a full width block.
- Go to Appearance > Customize > WooCommerce > Product images and change the cropping options.
- Test the Review block (for Review blocs, you might need to change its attributes so it shows the product image instead of the customer image) and verify they show the cropped image.
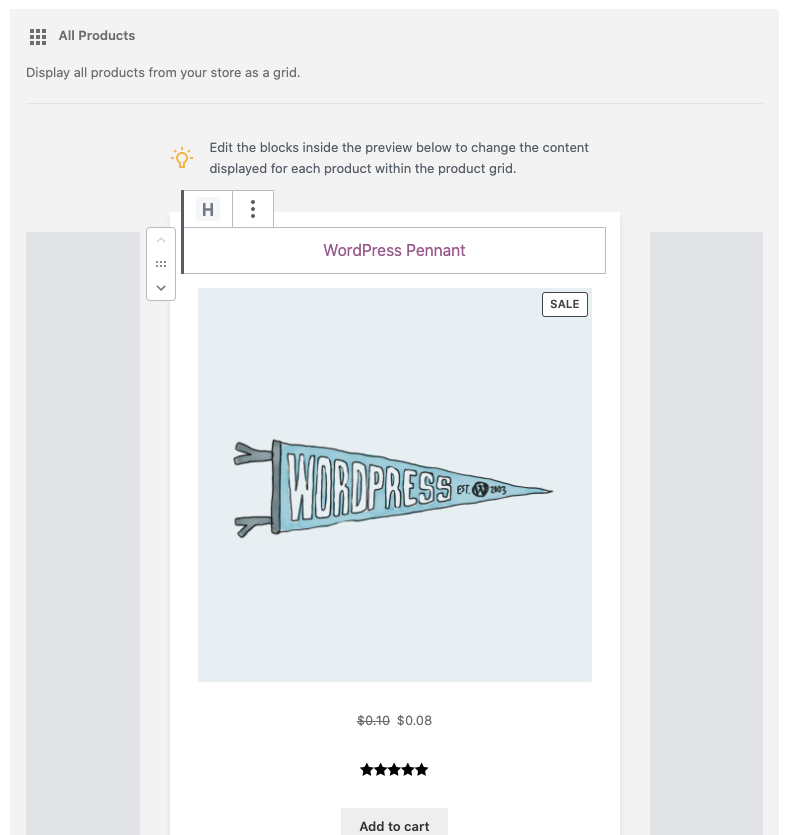
- Edit an old All Products block and verify the block didn't invalidate.
- Edit it and select the Product image inner block. There, toggle the Image sizing attribute.
- Verify when Cropped is selected, the cropped image is displayed.
- Repeat the process with the Product block.
- With IE11, create a page with the All Products block.
- Verify you can add the block without problems in the editor.
- Visit the page in the frontend, and verify the block works as expected and no JS errors are shown in the devtools console.
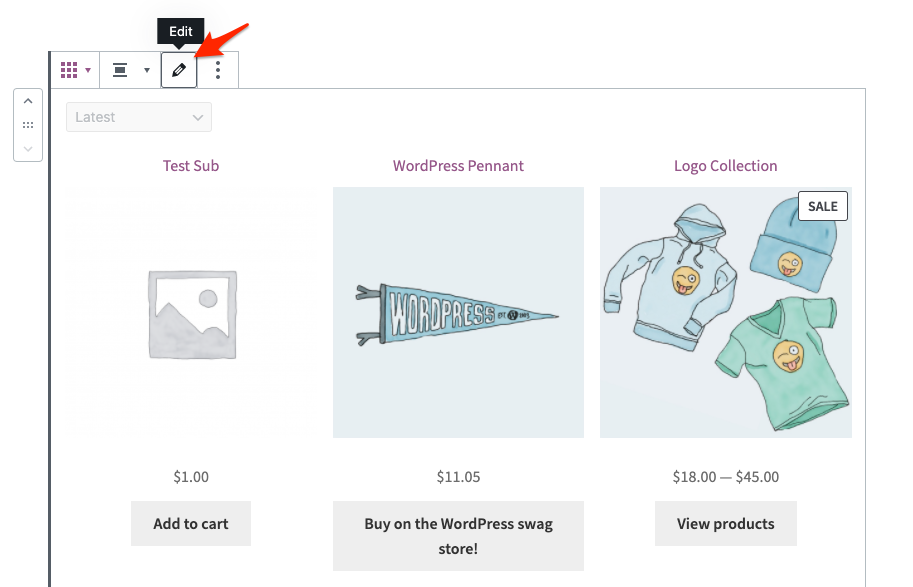
- Test the All Products block and verify that editing element blocks (the inner blocks that can be added/re-positioned for the rendered grid) on the backend and the behavior of those blocks on the frontend work as expected. The All Products block should work with existing filter blocks as well.
- Verify adding the All Products block to a new page works as expected with no errors.
- Verify loading a pre-existing page with the block from an earlier version of the blocks plugin works as expected.
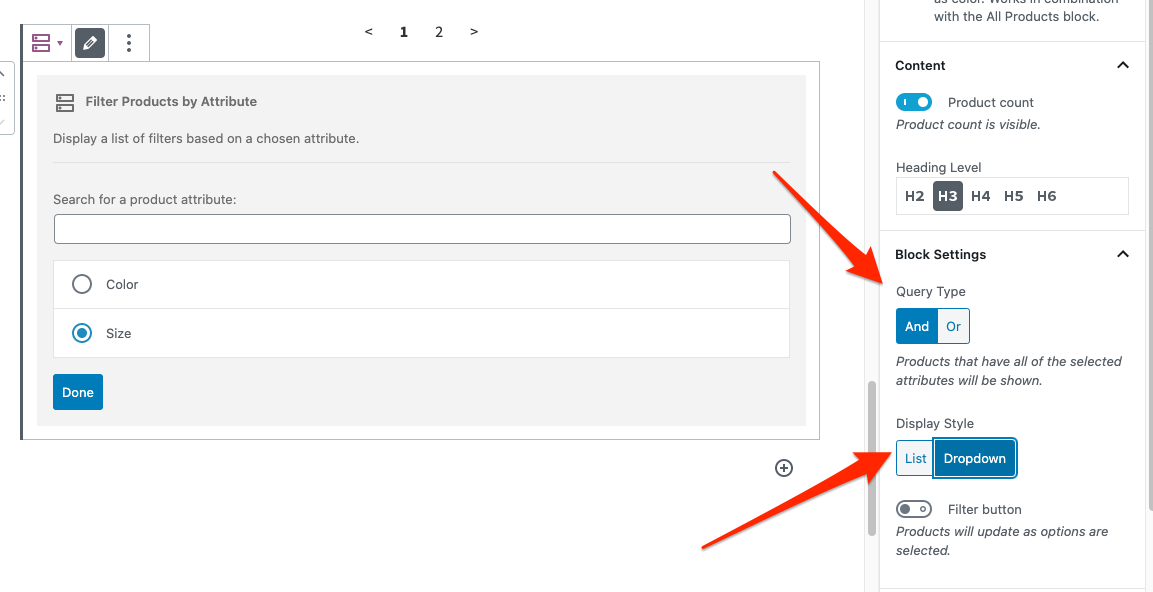
Filter Products by Attribute block: set Query Type: AND, Display Style: Dropdown. Then, select a value and check that the cross icon still shows up correct.
- Ideally, set your theme background to something different from white so you can verify inputs are still legible.
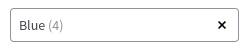
- Create a page with the All Products block and the Filter Products by Attribute block (set the attributes to Query Type: OR, Display Style: Dropdown) and Active Filters (Display Style: Chips).
- Filter Products by Attribute:
- Try adding new filters.
- Verify chips have the correct styles.
- Try removing them with the keyboard (backspace or Del).
- Try removing them clicking on the chip name.
- Active Filters:
- Verify chips have the correct styles.
- Catching regressions:
- Verify there are no regression in the Filter Products by Attribute and the Active Filters blocks with other attribute combinations: verify everything is still working and there are no visual bugs.
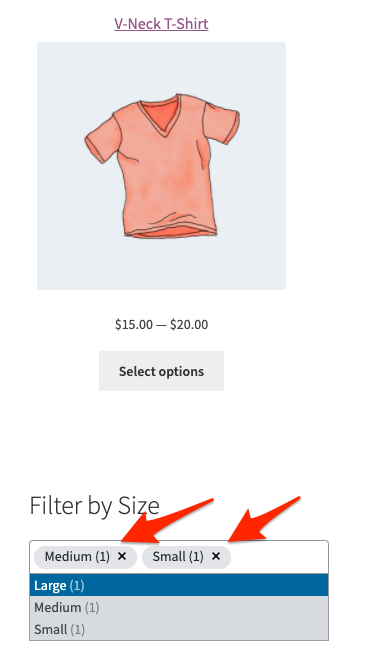
1. Fix the visibility of partially out of stock variable products when using the layered nav widget (#26260)
- Go to Settings > Products > Inventory, mark "Hide out of stock items from the catalog".
- Create an attribute named "Color", with the following terms: Black, Brown, Blue, Green, Pink.
- Create the following variable products: Big shoes, Medium shoes, Small shoes, Kid shoes. Create variations for all the existing colors on all of them. Assign any regular price to all the variations. (Hint: create one product, then duplicate)
- Modify the products so the following variations are in stock and the others are out of stock:
- Big: black, brown.
- Medium: blue, brown.
- Small: blue, green.
- Kids: green, pink.
- Add the "Filter by attribute" widget, filtering by color with OR.
- Try filtering by one or two colors and verify that the results make sense. For example when filtering by "blue" you should see only "Medium shoes" and "Small shoes" (without the fix you would see all four shoe types). Verify also that the results count that appear at the beginning and the end of the list is correct.
- Change the widget filtering type to AND and try different combinations again. Verify that selecting pink and black displays the "No products available" message.
With the same setup, verify that the counters display the following, no matter what attributes you select in the widget:

Now make sure that nothing is selected, then go and change the widget operator to AND. Reload the products page and verify that the behavior is the same.
- Create an attribute named "Style" with two terms: Classic, and Sport.
- Modify all the products so that all of them use the new style for variations, but leave the value for all variations as "Any style".
- Modify the Big shoes product so that the Black variation is Classic, and create a new variation that is Black Sport (leave both in stock).
- Modify the Medium shoes product so that the Brown variation is Sport (and still has stock).
- Add the "Filter by attribute" widget, filtering by style with any logic.
- Reload the page and verify that the counters now appear like this:

Note how there are two variations listed for Black, since we added a new one to the Big shoes. Also note how the two classic variations and the single sport variation are listed in the style filter.
- Select "Black" in the color filter and note how the style filter now displays a value of 1 for classic and 1 for sport, since there's one visible variation of each.
- Unselect all and select "Blue" in the color filter and note how the style filter disappears, since there's no variation that is blue and has a style associated.
- Unselect all in the color filter and select "Sport" in the style filter, you will see this:

While testing counters with multiple filters you may have noticed that regardless of what filters you selected in the style filter you were still seeing all the products in the catalog (if you don't filter by color). That's because all of the products have visible variations with "Any style" and thus they always match the style filter.
Modify the "Kid shoes" product so that all the variations have the sport style, then select "Classic" in the style filter while not filtering by color, and you'll see that the product disappears from the catalog.
2. Fix stock status saving for variable products on bulk and quick edit (#26174)
- Create a variable product with two variations. Set stock status to "Out of stock" for one of them and to "On backorder" for the other.
- Bulk edit the product, don't change anything and save. Verify that the stock status of the variations hasn't changed (without the fix, both would have changed to "In stock").
- Bulk edit the product again, se the stock status selector to "In stock" and save. Verify that this time the status of both variations has changed.
- Change the stock status of both variations to anything but "In stock" again.
- Quick edit the product. Verify that the preselected value for the stock status selector is now "No change". Leave it that way and save. Verify that the stock status of the variations hasn't changed.

- Quick edit the product again. Select "In stock" in the stock status selector. Verify that this time the status of both variations has changed.
3. Limit stock changes for order items to status methods for consistency. (#26642)
- Start creating a new order in the admin view, and add a product with managed stock.
- Product stock will only be reduced when order is saved and moved into
on-hold,processing, orcompletedstatus.
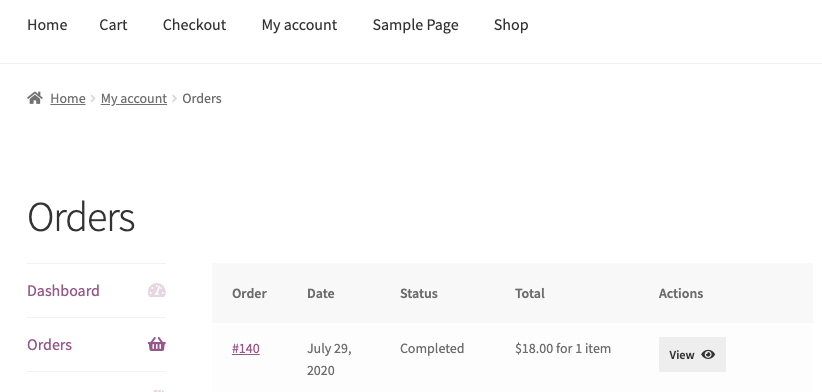
4. Fix Orders in My Account. (#27175)
- Login as a customer, go to the orders page in My Account
- Verify that all your orders are listed (place a new order if you didn't have any).
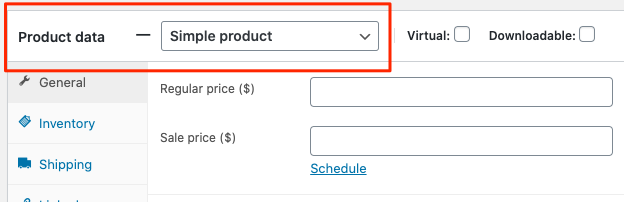
5. Fix "Product type" dropdown in Add New Product. (#27170)
- Go to
WooCommerce / Products / Add New - Make sure the Product Type dropdown is visible and contains the different Product Types.
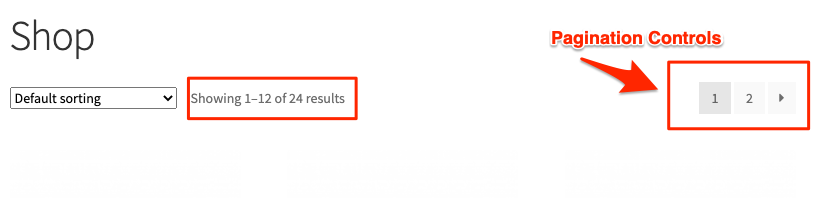
6. Fix pagination controls in products list. (#27190)
- Make sure that you have enough visible products to fill more than one page in
WooCommerce / Products(default page size is 12). - Go to the shop and list products. The counter says "Showing 1-12 of X results", with X>12 and the pagination controls display.