Release Testing Instructions WooCommerce 4.0
WooCommerce 4.0 includes 3 main features:
- Action Scheduler 3.0
- WooCommerce Admin
- New Onboarding Experience
It also contains several bug fixes and enhancements that we would like to be tested as well.
In this release, there is an upgrade of the Action Scheduler library to Action Scheduler 3.0. This upgrade is a new, more performant version of Action Scheduler which utilizes custom tables to provide a good experience even on stores with large volumes of orders and posts in the database. This should considerably reduce the load on the standard WordPress database tables while enabling advanced analytics to run even on large stores.
The main thing we want to test is that everything keeps working as usual after the upgrade.
There are 2 ways to test Action Scheduler. Feel free to pick the one you feel more comfortable with:
- Basic
- Advanced
Basic:
- Make sure you run WooCommerce 3.9.2 on your site and don't have WooCommerce Admin plugin installed;
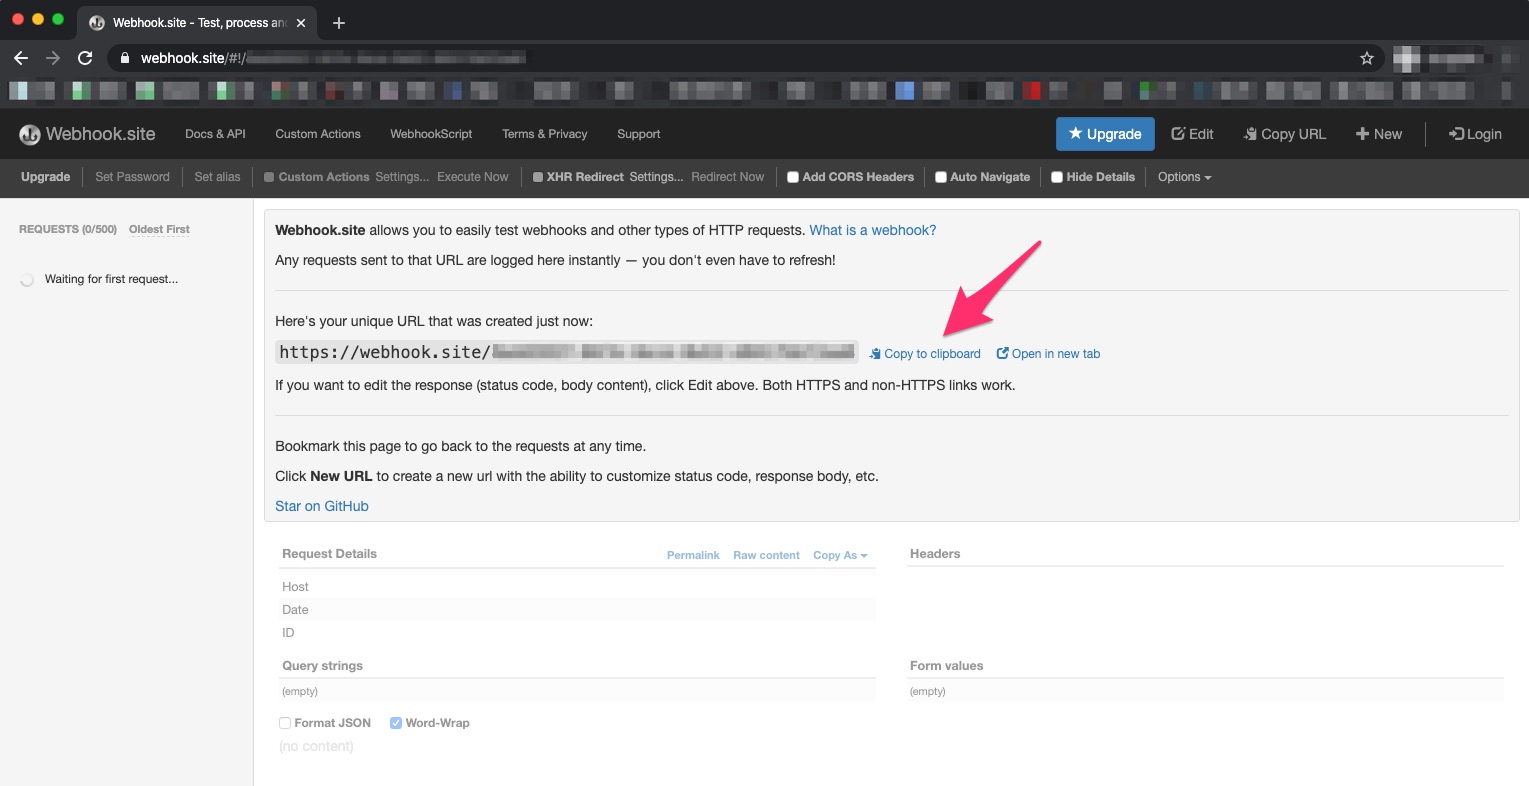
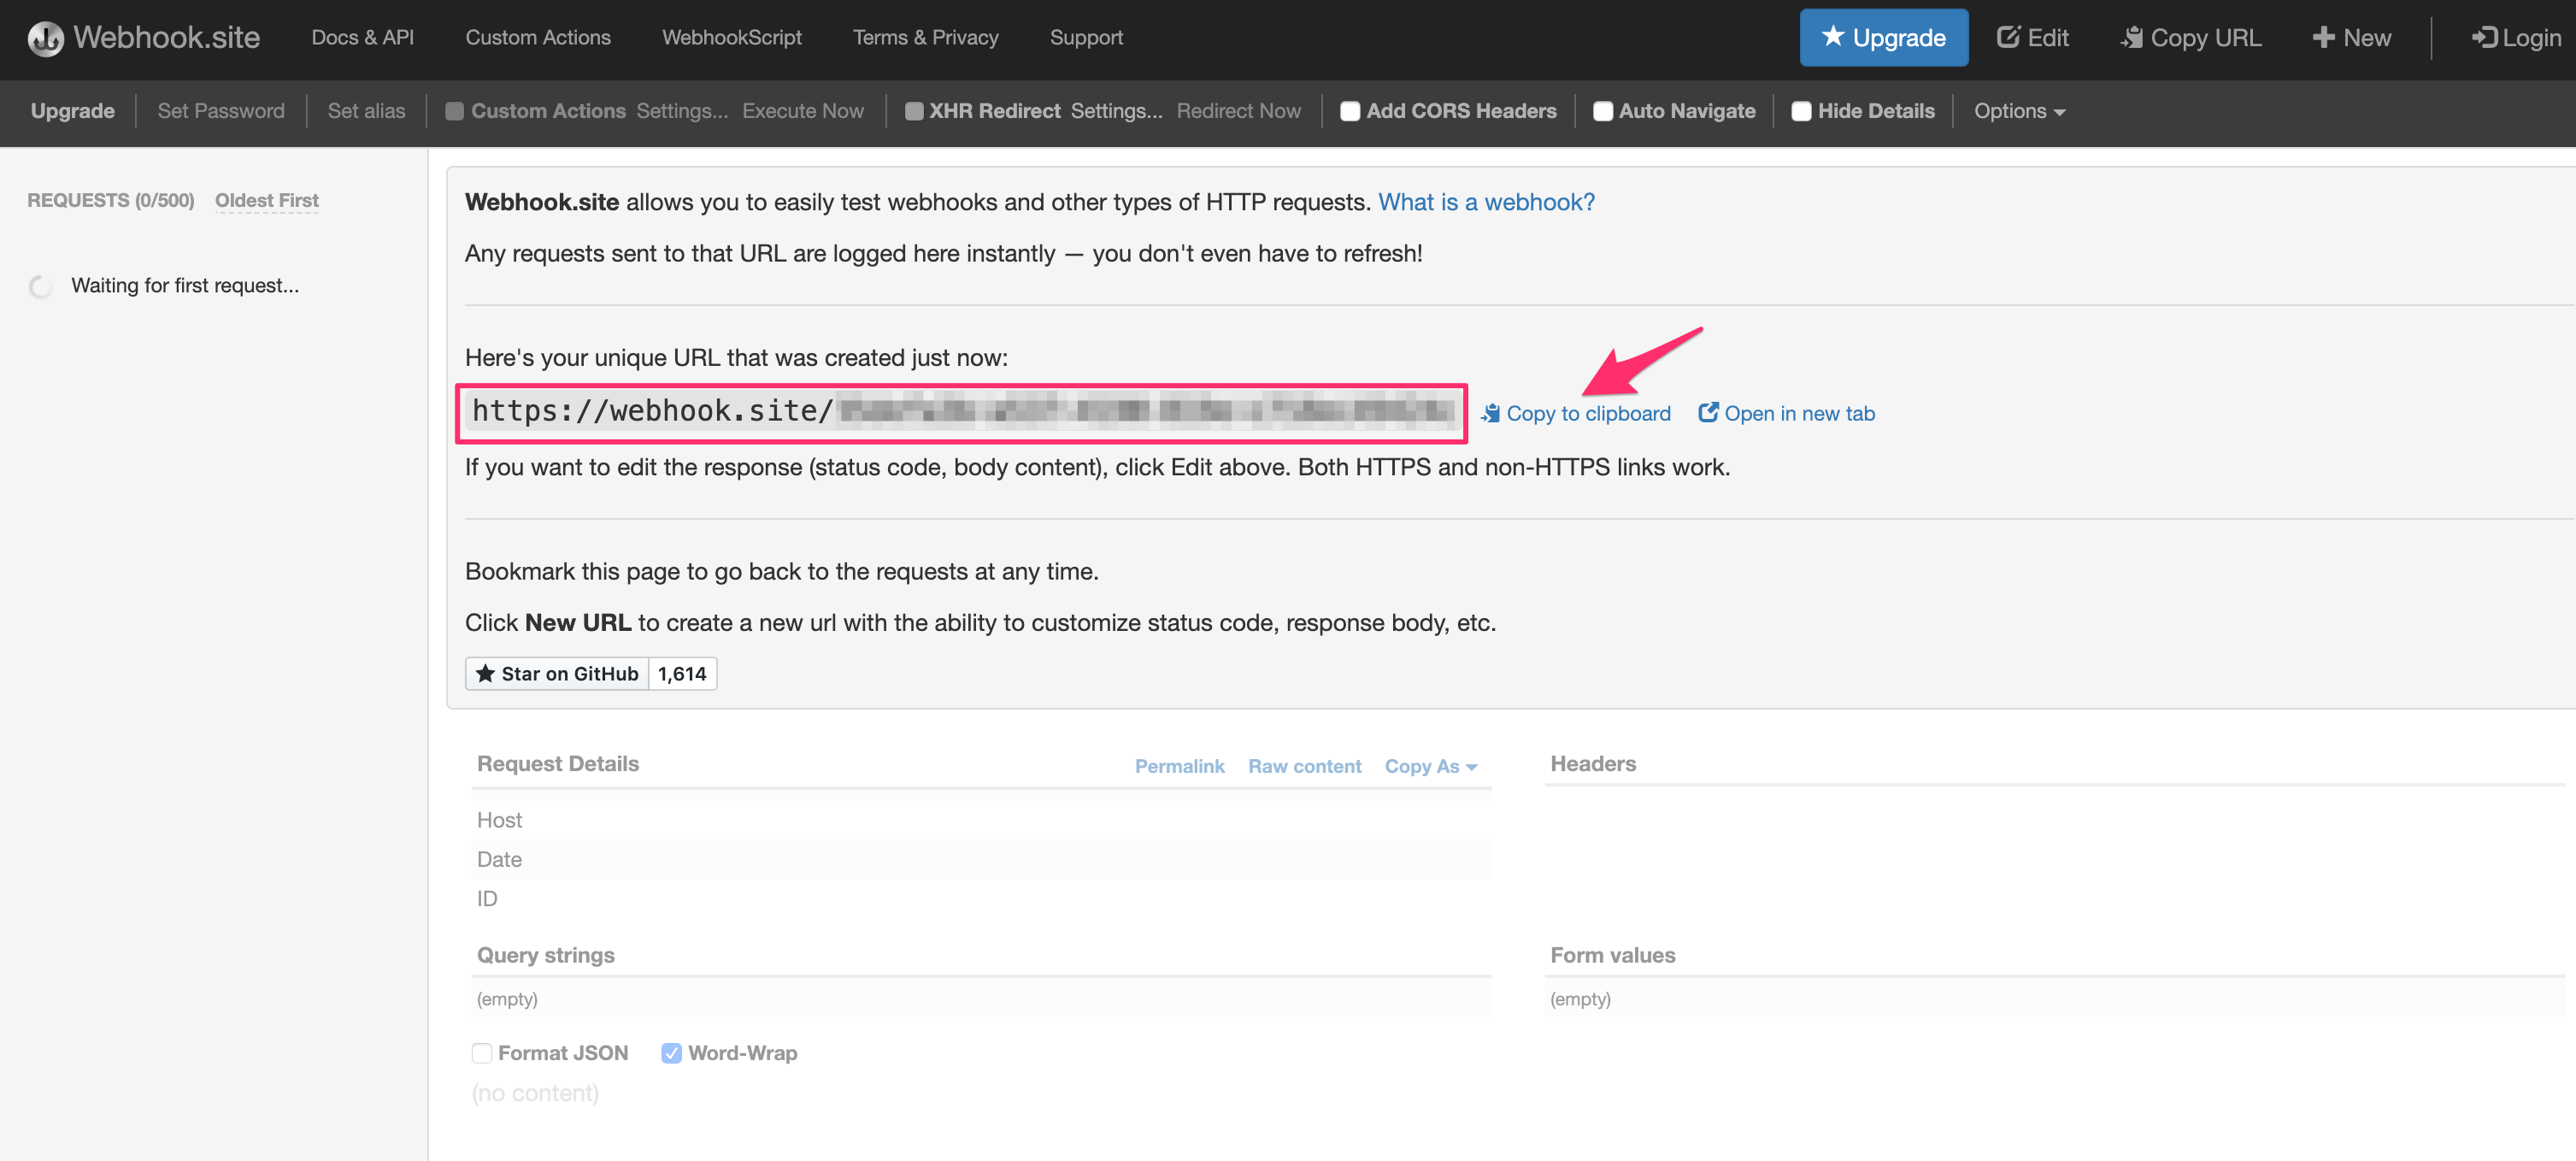
- Set up a Webhook delivery URL via https://webhook.site. The URL will be created automatically as soon as you visit the site. Copy the URL to clipboard:
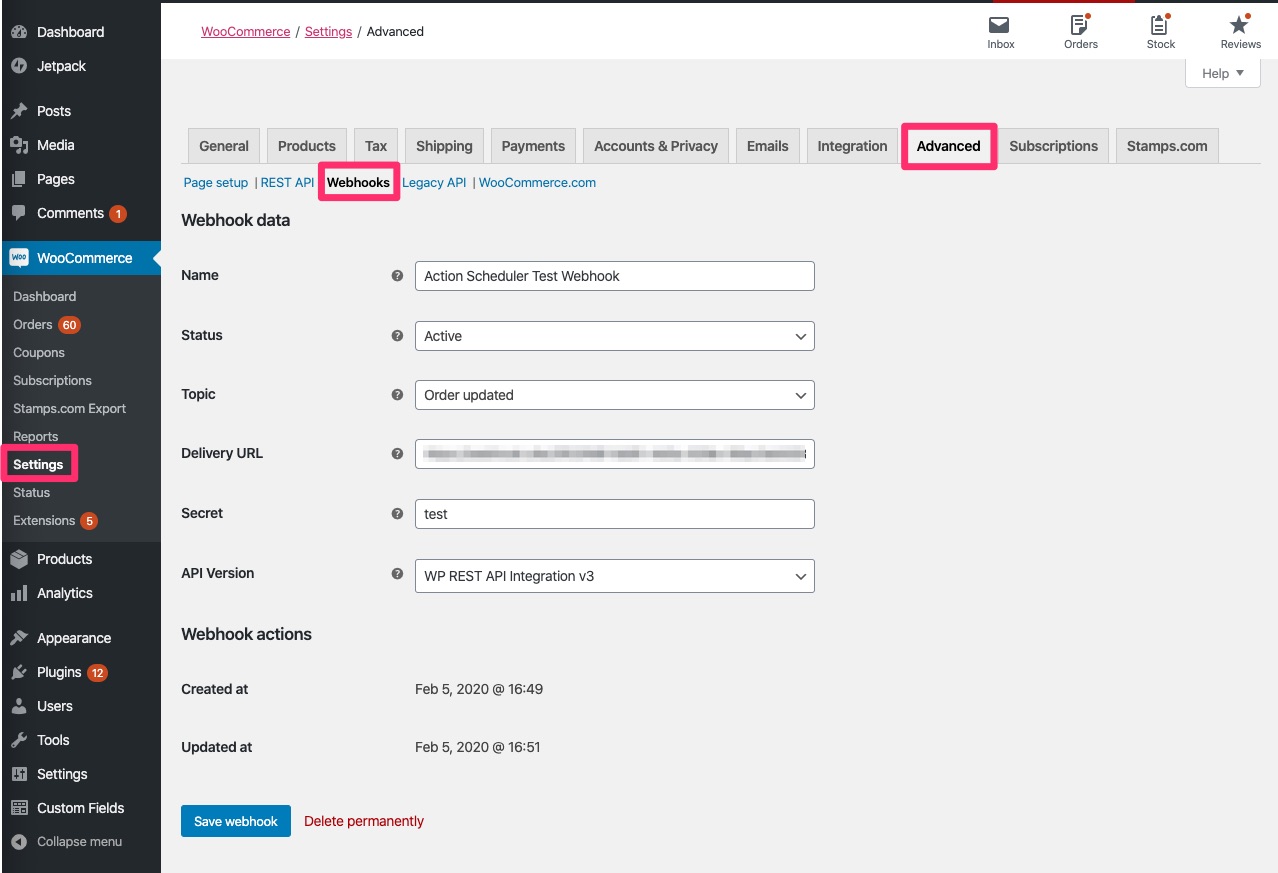
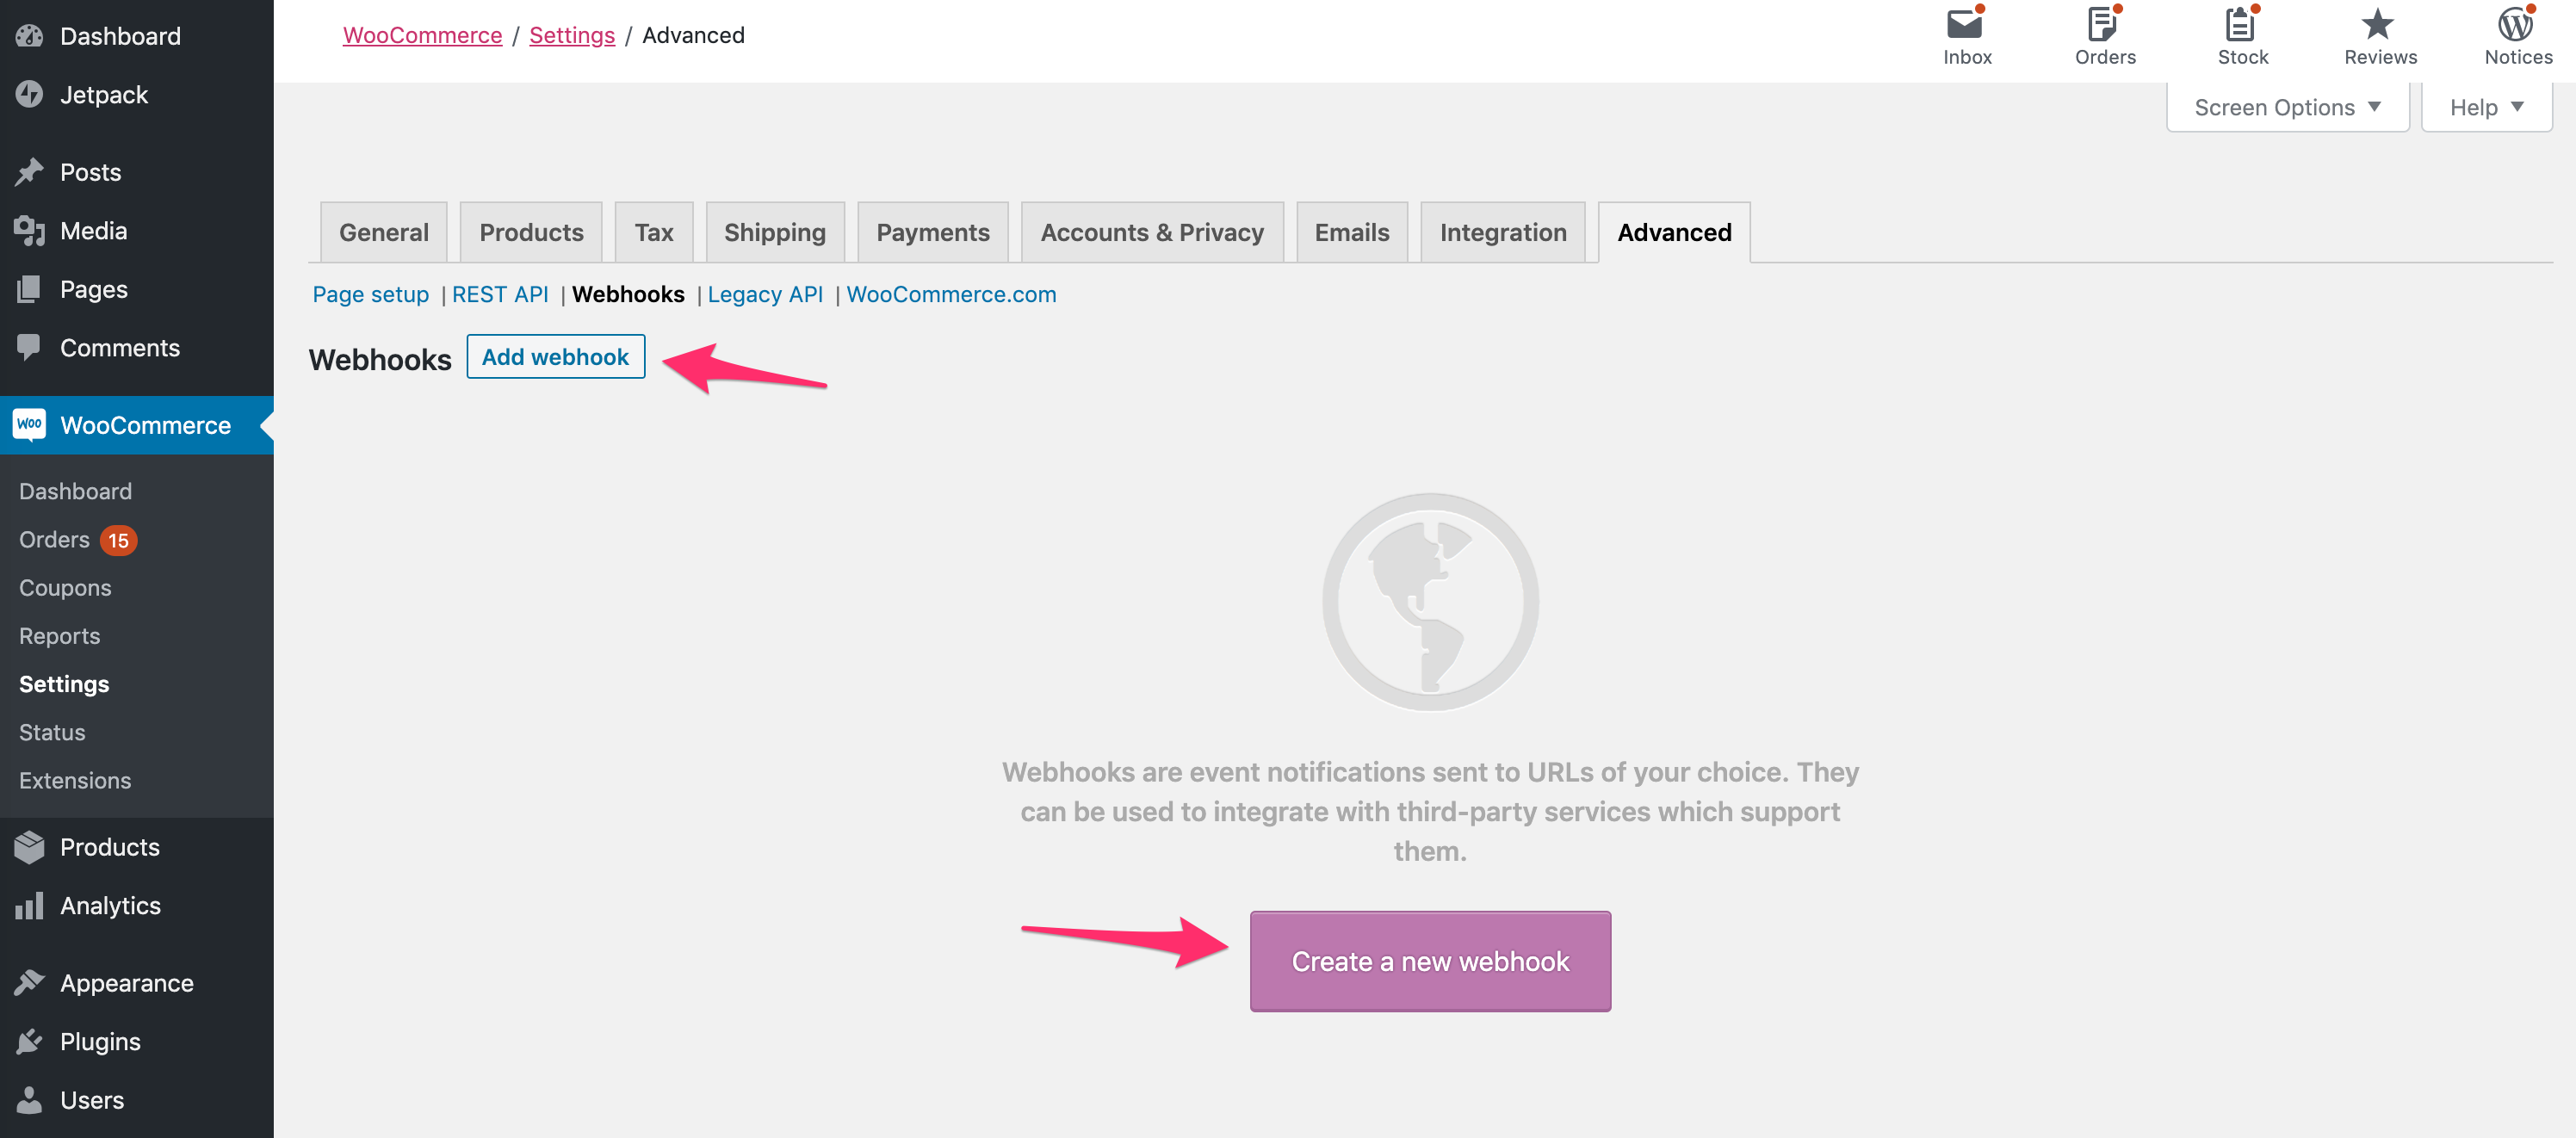
- Create a Webhook in WooCommerce by navigating to
WooCommerce > Settings > Advanced > Webhooks:
- Name:
Action Scheduler Test Webhook - Status:
Active - Topic:
Order updated - Delivery URL: paste the URL you copied in the previous step on
https://webhook.site - Secret:
test - API Version:
WP REST API Integration v3 - Save
Your Webhook data should look as follows:
- Next, navigate to any order on your site and change order status. For example, from
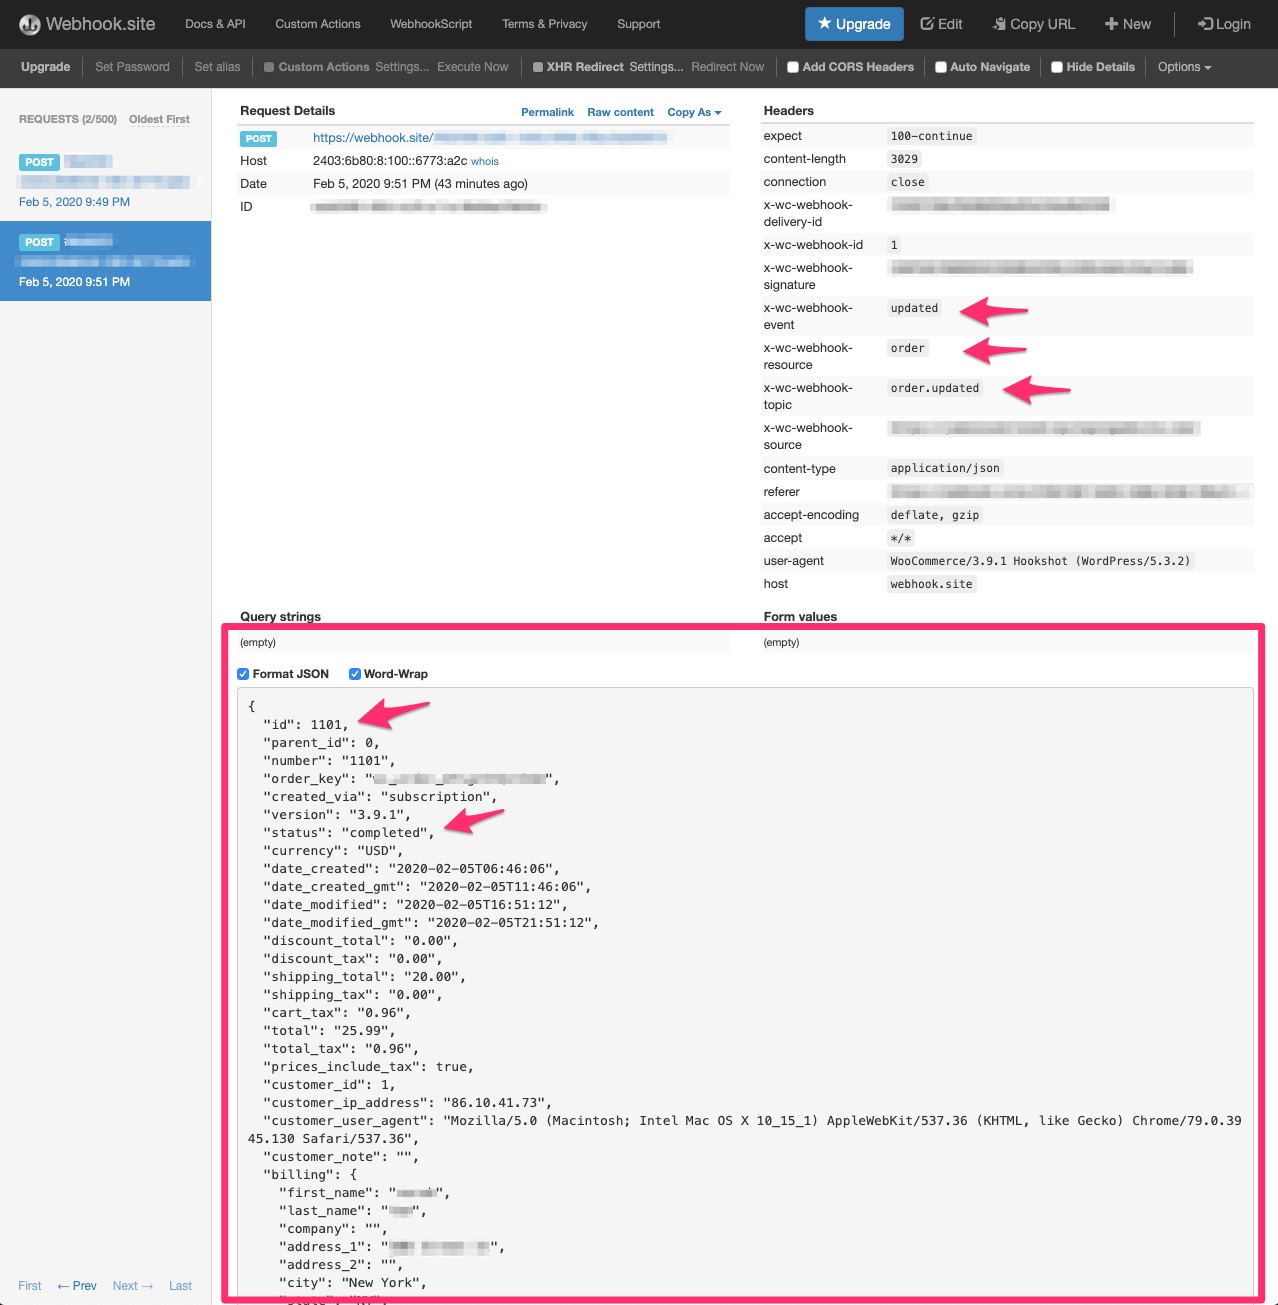
processingtocompleted; - The hook should be fired off which can be checked on the
https://webhook.site:
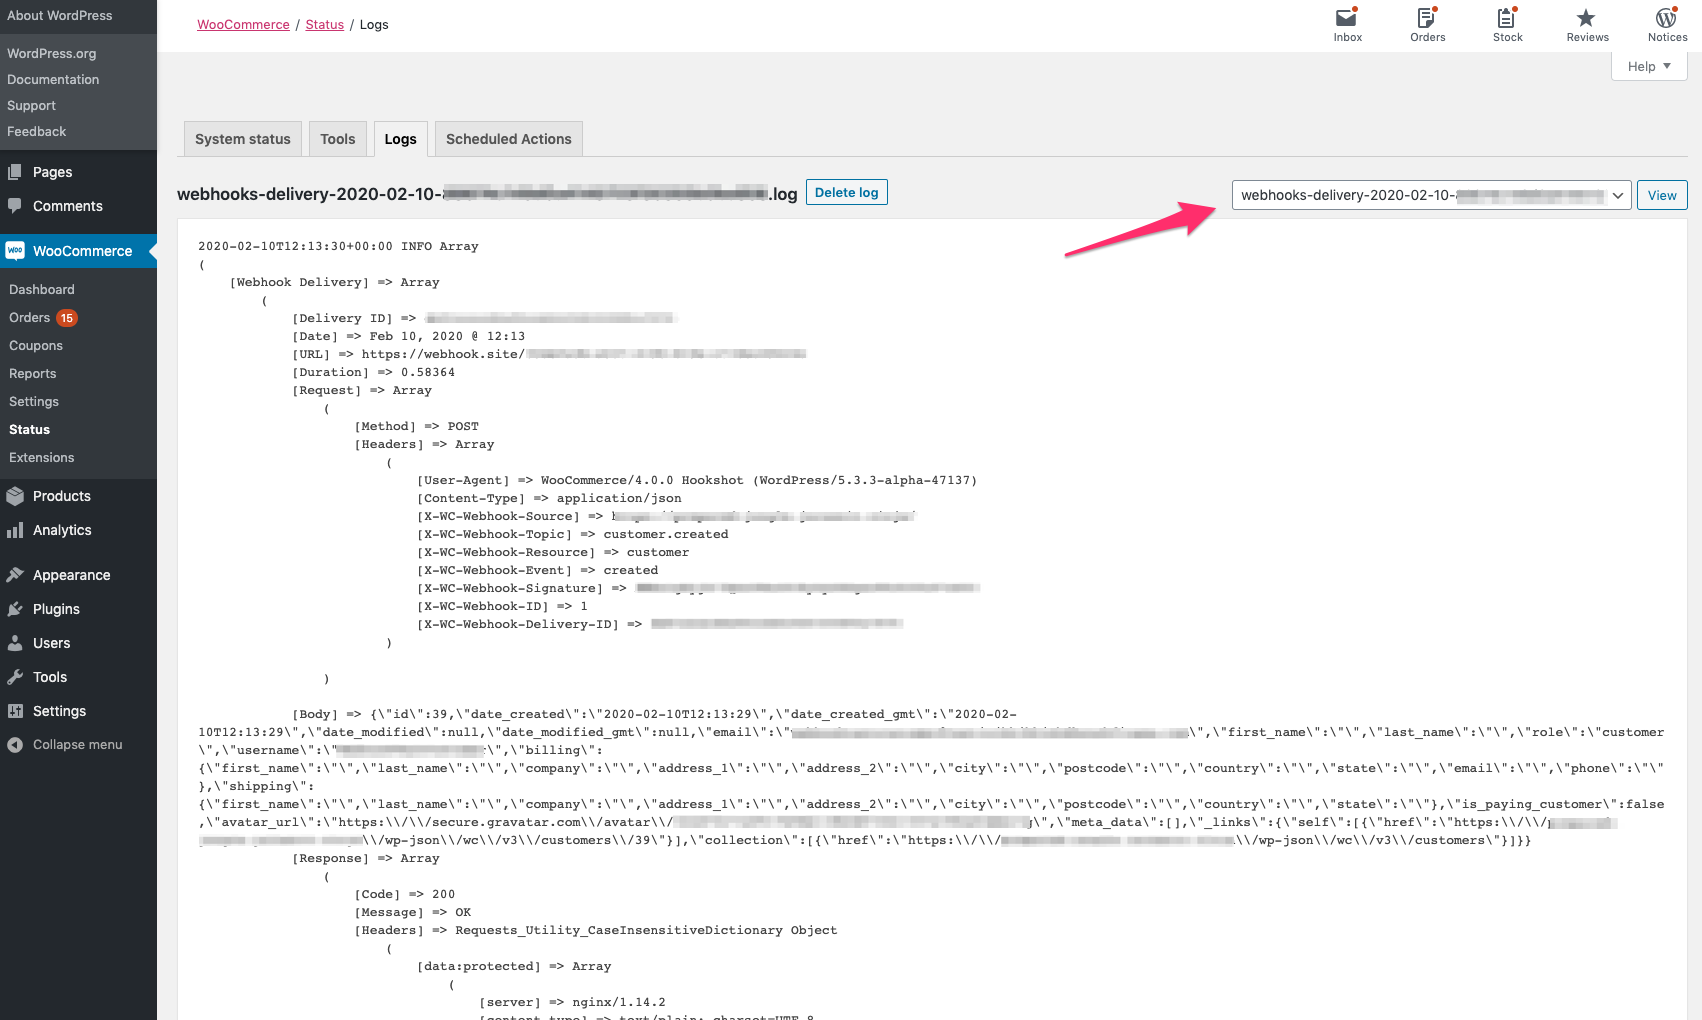
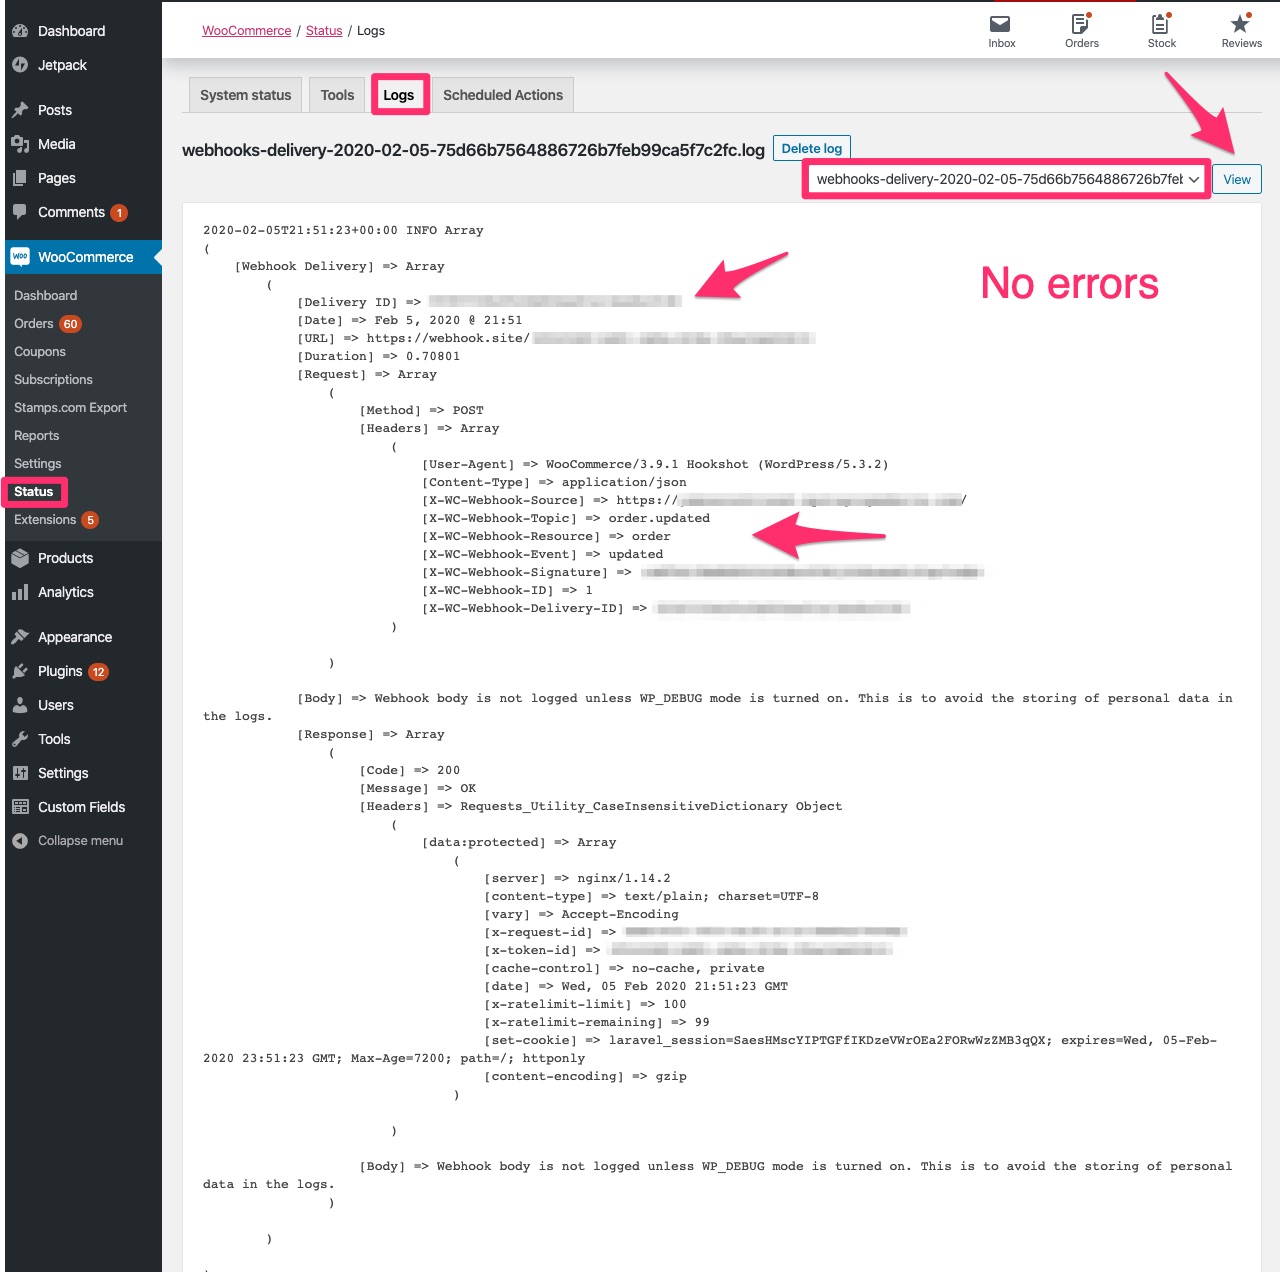
- Check error logs by navigating to
WooCommerce / Status / Logsand selectingwebhooks deliverylog in the dropdown field. Verify that your hook firing was logged and that there are no errors:
-
Update WooCommerce to beta version 4.0 and repeat the steps 4-6 (you can use the same webhook);
-
Make sure the hook fires and that there are no errors in the logs.
Advanced:
-
For more thorough testing, generate a lot of orders. You can use WC Smooth Generator to create fake customers, products, and orders.
-
Repeat steps 1-3 from Basic testing instructions;
-
Install WooCommerce Admin plugin and start processing data by navigating to
Analytics > Settings:
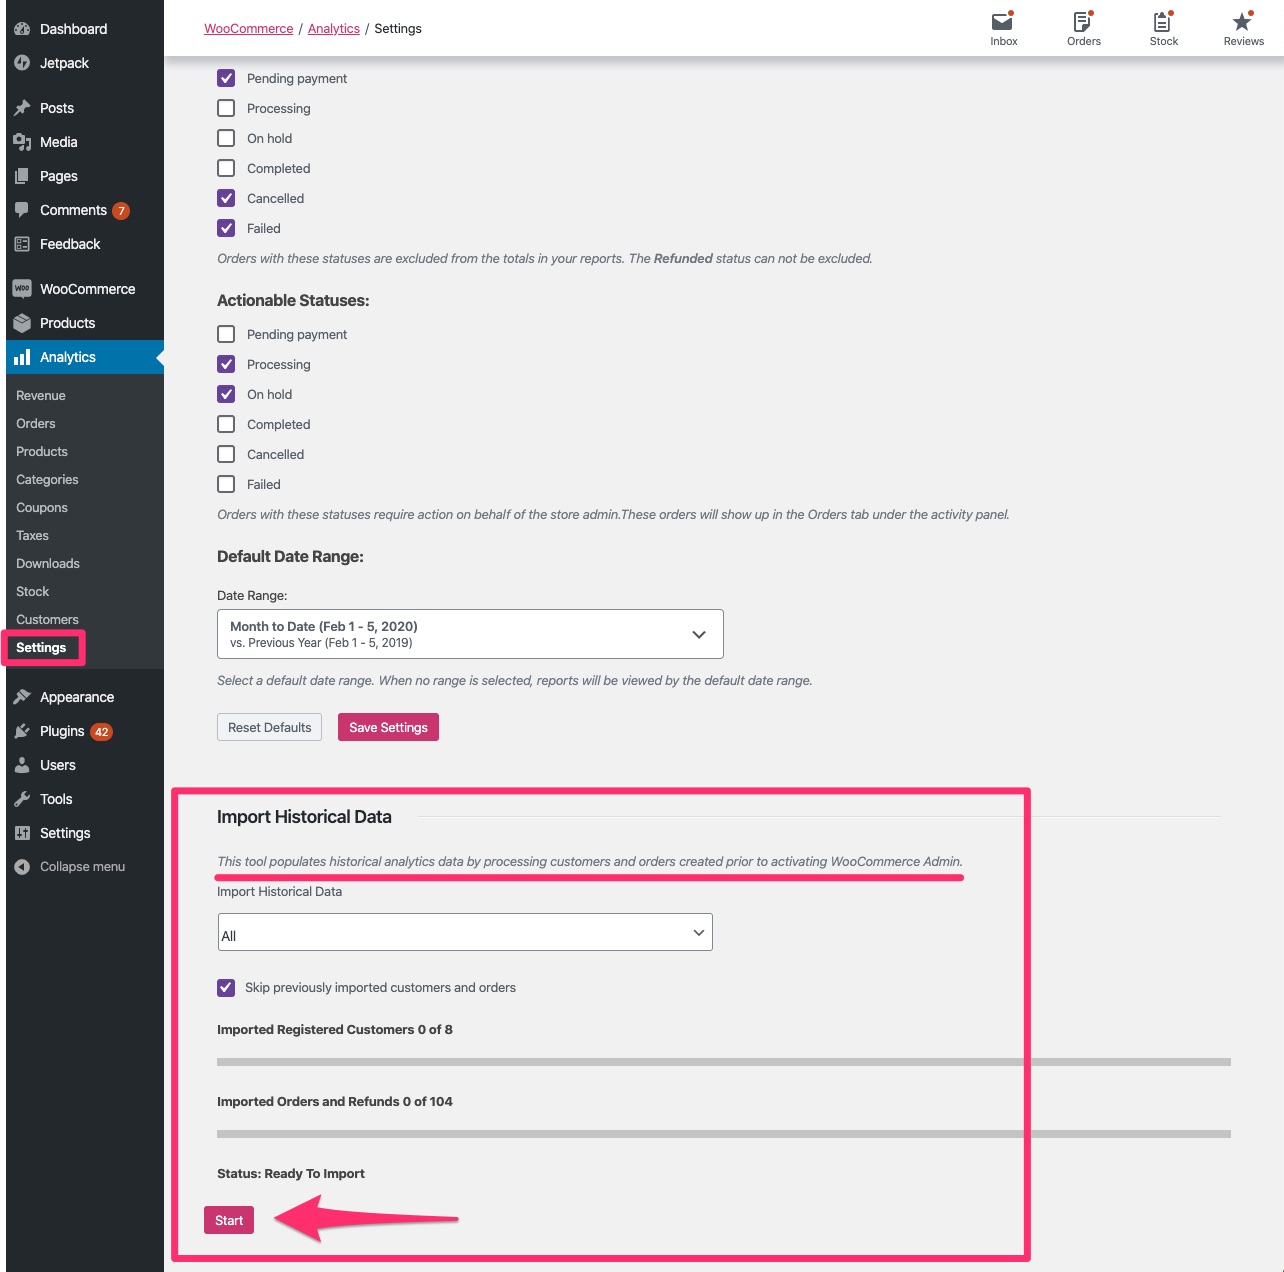
- While the data is being processed, update WooCommerce to beta version 4.0;
- Check the logs after the data is done processing. There should be no errors in the logs.
The new version of WooCommerce Admin plugin is included in this release. WooCommerce Admin is a new JavaScript-driven interface for managing your WooCommerce stores that is focusing on creating new and improved reports, and a dashboard to monitor all the important key metrics of your site.
To test you will need to have WordPress 5.3+. Store running older versions of WordPress will have WooCommerce Admin automatically disabled.
This testing assumes upgrading WooCommerce to version 4.0 on the existing site with no WooCommerce Admin plugin installed.
As the WooCommerce Admin plugin is now included in WooCommerce 4.0 you should no longer see a prompt to install it in WP Admin. This prompt usually appears at the top of WP-Admin on any WooCommerce page:

As we are merging all of the existing WooCommerce Admin functionality you may want to test all areas of it including:
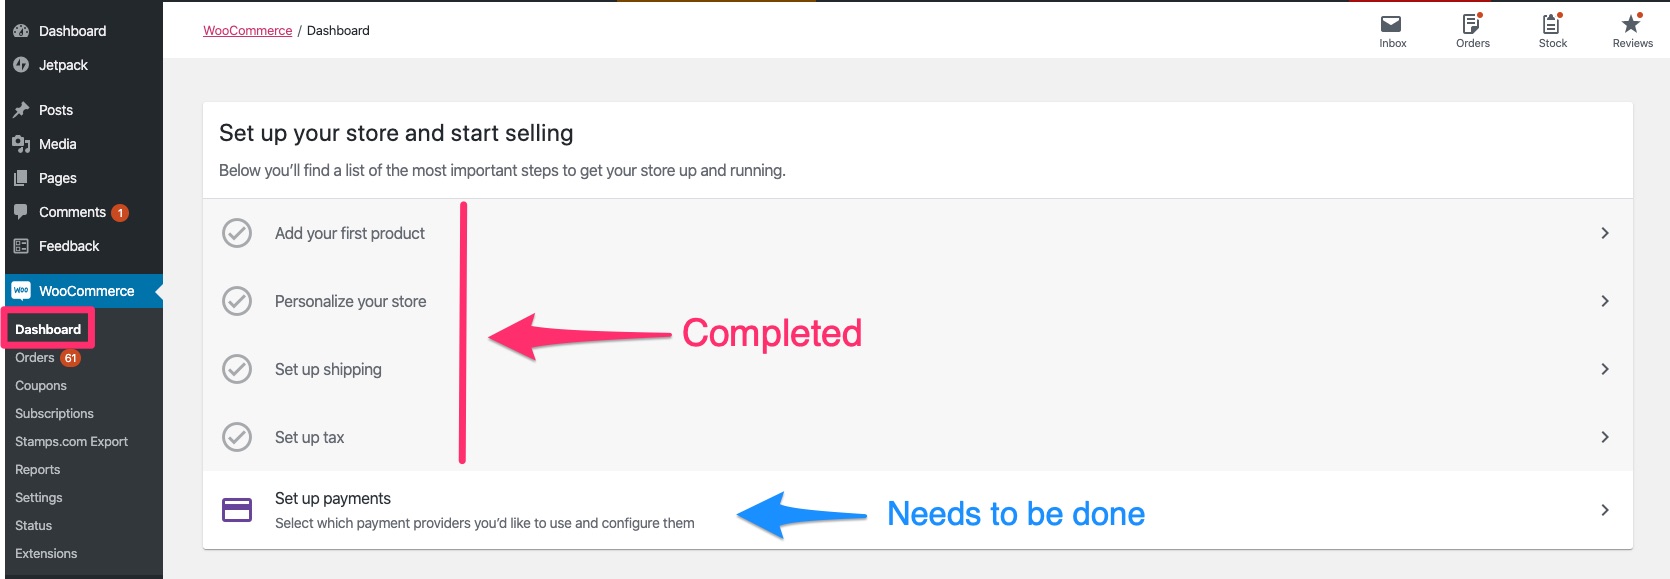
- Navigate to
WooCommerce / Dashboard; - Go through each step to set up the store - make sure you can complete each step successfully:
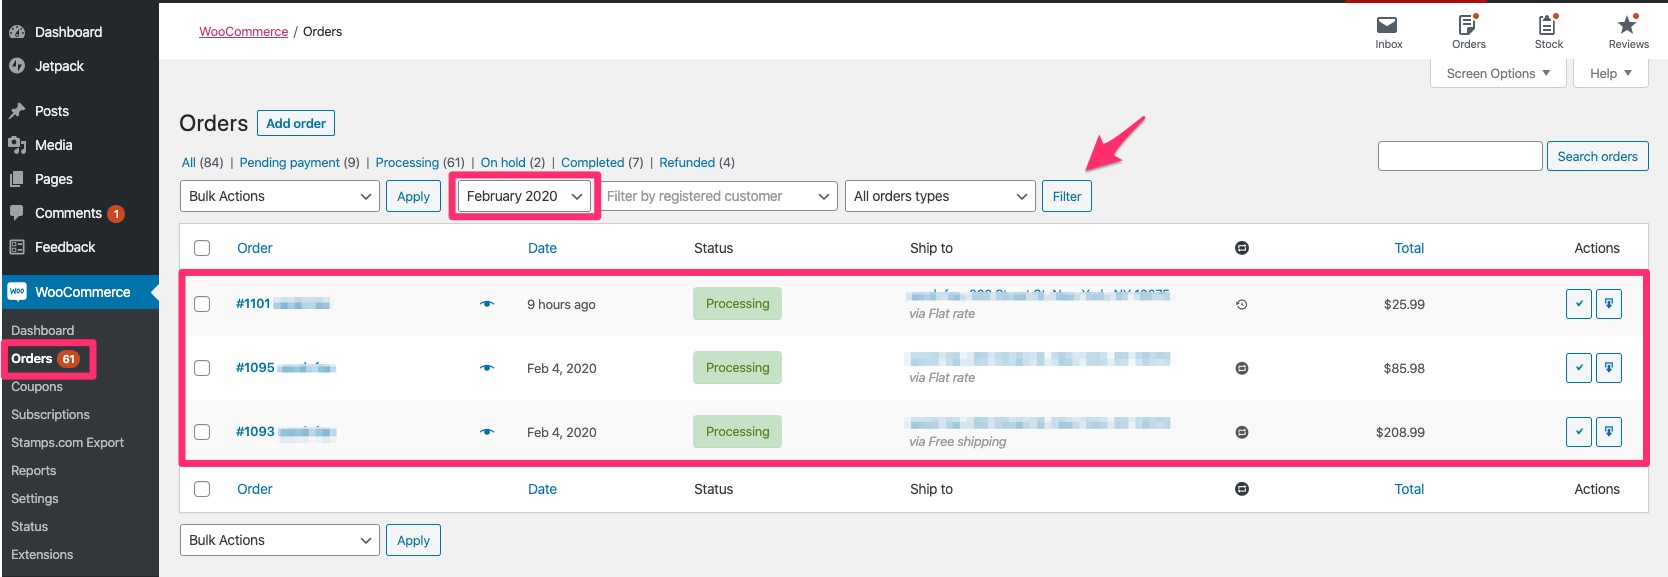
There is a brand new section with all kinds of analytics available. Please check a couple of reports to make sure they match what you expect. For example, you can check how many orders you received in February via Analytics / Orders (note that amounts shown are net):
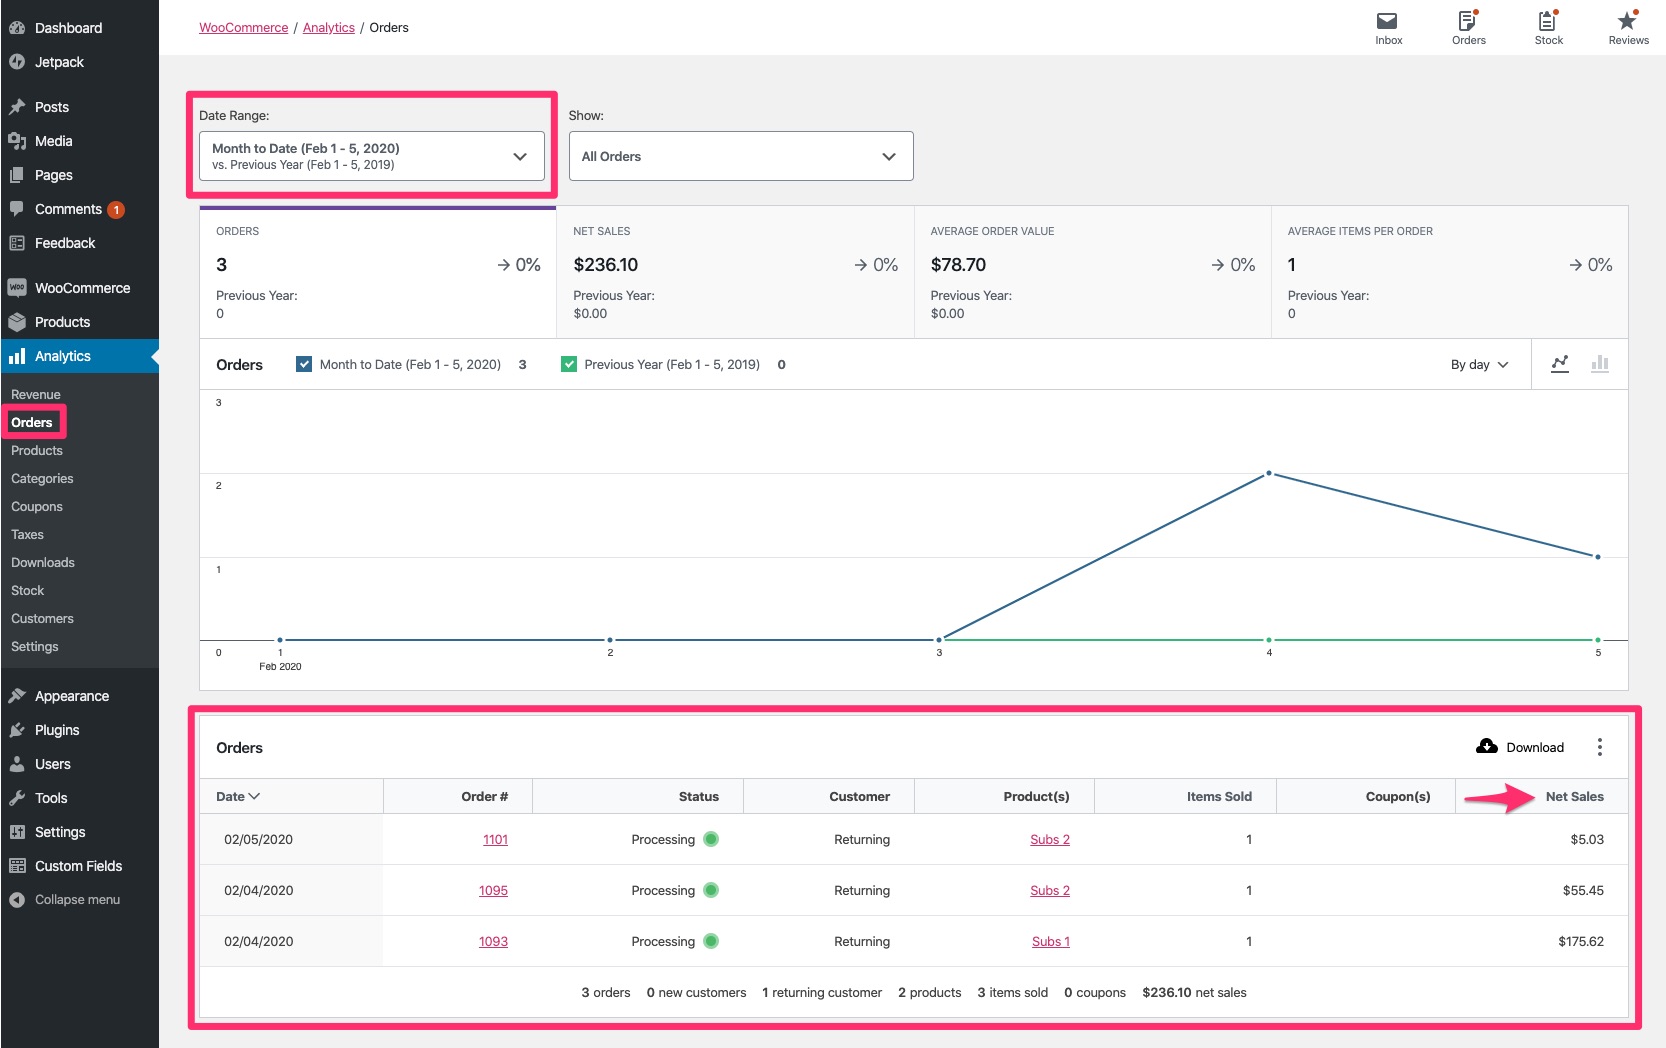
And compare it to what you see on the All Orders view via WooCommerce / Orders. Note that in order to compare net amounts, you'd need to open each order on the page:
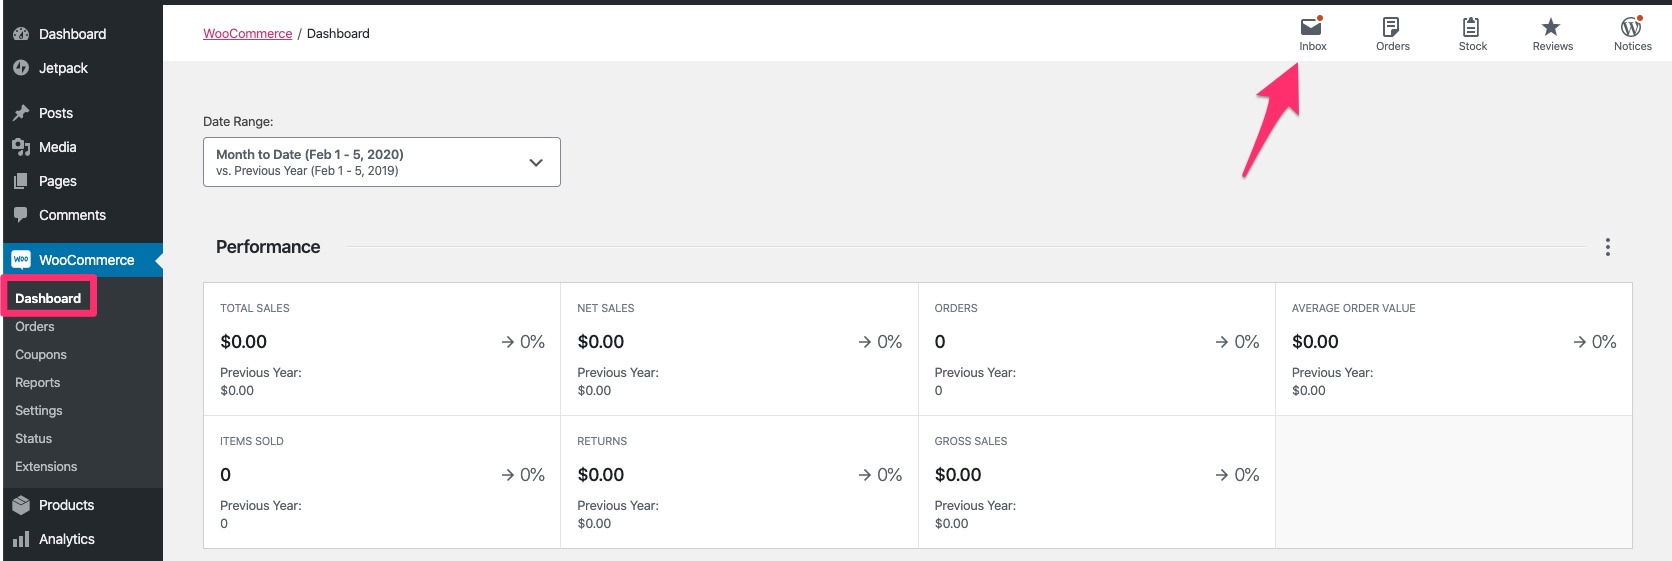
- Navigate to
WooCommerce / Dashboard; - Click on
Inboxon the panel in the top right corner; - Go through each option available via
Inbox- make sure you can complete each step successfully:
- Navigate to
WooCommerce / Dashboard; - Click on
Orderson the panel in the top right corner; - Proceed through actions available via
Orders- such asBegin fulfillment; - Make sure you can complete each step successfully.
- Navigate to
WooCommerce / Dashboard; - Click on
Stockon the panel in the top right corner; - Update stock of several products;
- Navigate to each of the products individually to make sure that stock was updated.
- Leave reviews on several products on your site;
- Navigate to
WooCommerce / Dashboard; - Click on
Reviewson the panel in the top right corner; - Proceed through the options available such as
Managereview; - Make sure you can complete each step successfully.
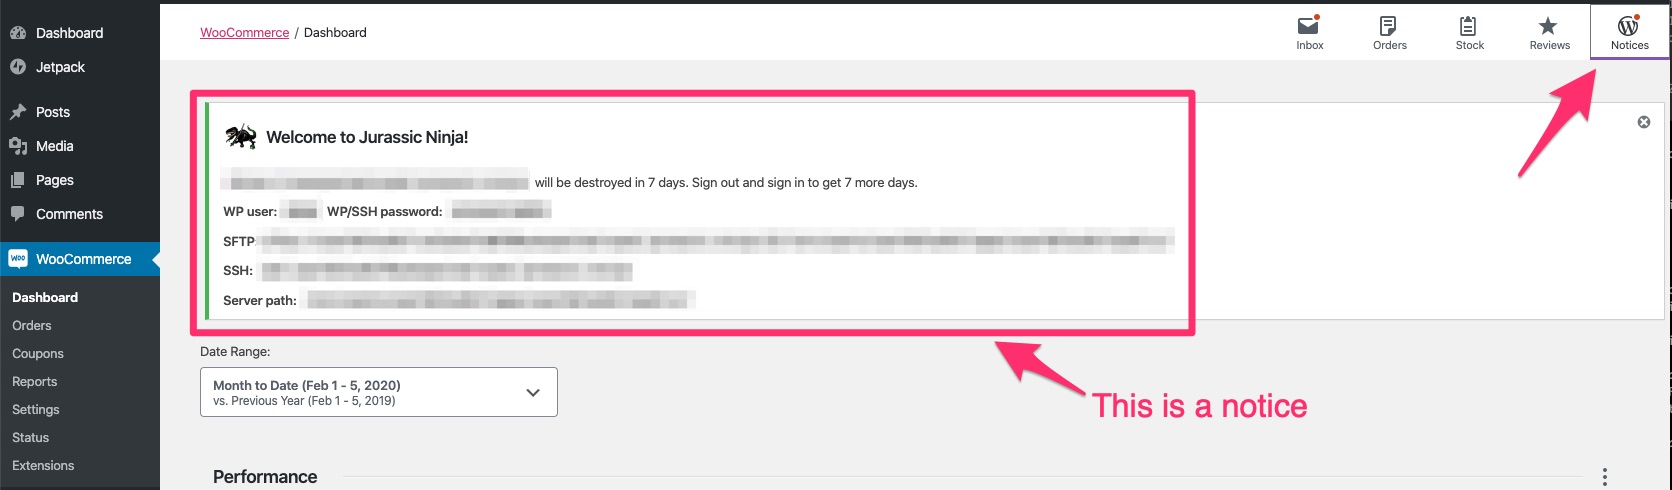
Your site may not have any notices (not all the sites do at any given moment) but if it does, you can test them as follows:
- Navigate to
WooCommerce / Dashboard; - Click on
Noticeson the panel in the top right corner; - Make sure that notices get displayed. It could a notice letting you know that your site needs a Database update, for example:
This release adds an a/b test to the setup wizard, which for 50% of users will allow opt-in to the new WooCommerce Admin onboarding experience. This allows us to test our changes, prior to launching for all new users next year.
Note that the new onboarding experience is available on sites running WordPress 5.3+.
For users in the test group, the WooCommerce Admin installation step is done before anything else, and the user is redirected to the new onboarding experience after install.
To test:
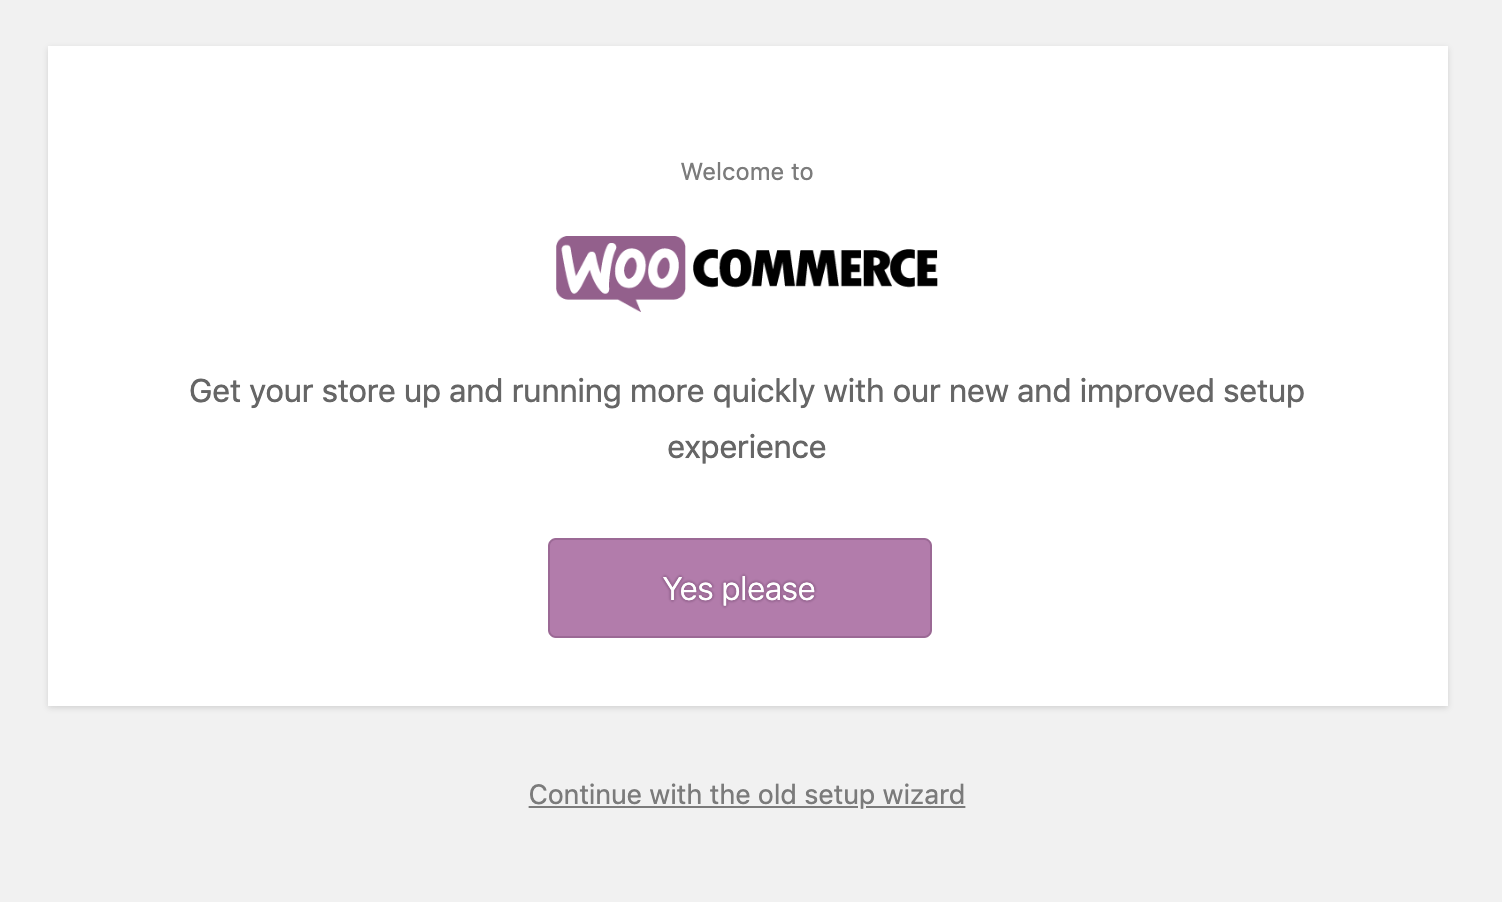
- Go to
/wp-admin/admin.php?page=wc-setupand try your luck with the a/b test logic. If you are part of the 50% that gets selected for thea(control) old version, you should just see the normal setup wizard with no changes as shown below:

- Update the
woocommerce_setup_ab_wc_admin_onboardingoption in your database tobto enable new onboarding experience. The easiest way to do that is by using the snippet that you can find here. You can implement the snippet using the Code Snippets plugin; - Go back to
/wp-admin/admin.php?page=wc-setup- you should now see the new onboarding prompt screen that looks like this:
- Test the continue/skip link and make sure you can use the normal setup wizard;
- Go back to
/wp-admin/admin.php?page=wc-setuponce again, and clickYes Please; - You should be redirected to the start of the new onboarding experience;
- Go through the new Setup Wizard and make sure you can complete all the steps successfully.
In addition to the above, we have also included the following user-facing enhancements and bug fixes in WooCommerce 4.0:
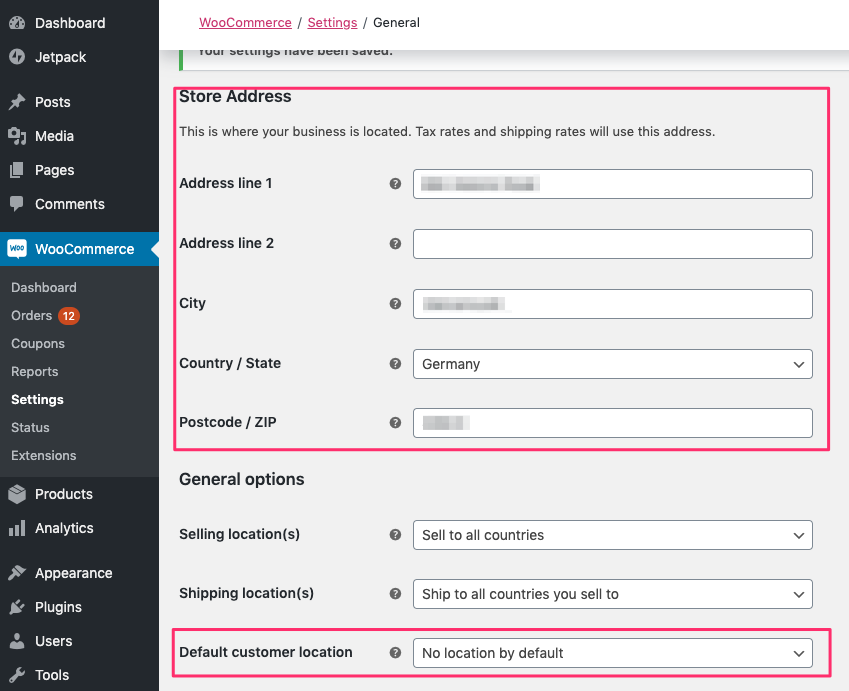
1) Changed the shipping options to not calculate until shipping address details are provided To test:
- Navigate to
WooCommerce / Settings / Generaland make sureStore Addressis filled out with a test location of your choice andDefault customer locationis set toNo location by default.
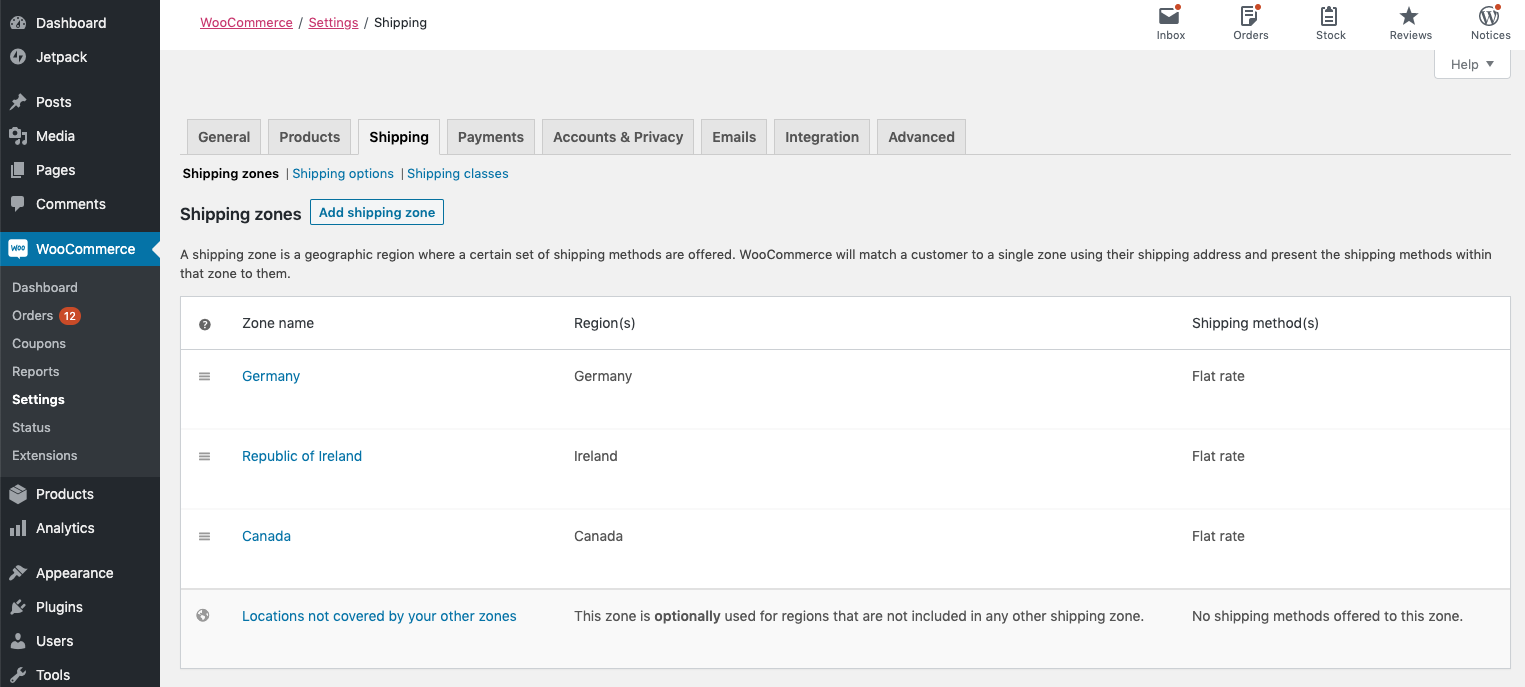
- Navigate to
WooCommerce / Settings / Shippingand set up some shipping zones with flat rate shipping methods
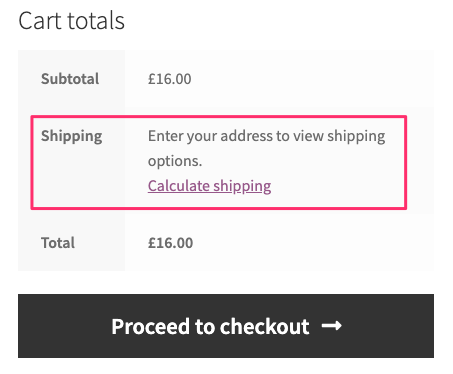
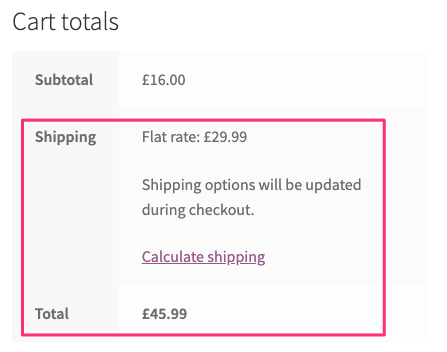
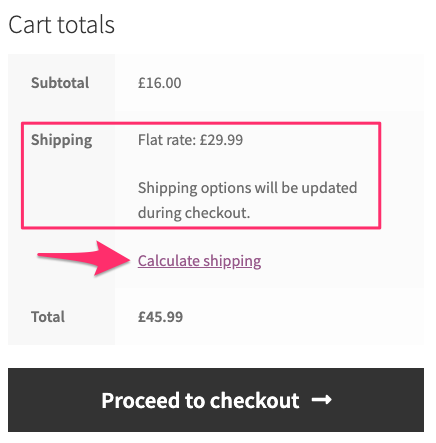
- Using your browser's incognito mode add any non-virtual product to your cart and view the cart. You will be prompted to enter your address to see shipping options as the store is not aware of your location due to the
Default customer locationbeing set toNo location by default
- Enter address details that match one of the shipping zones you have.
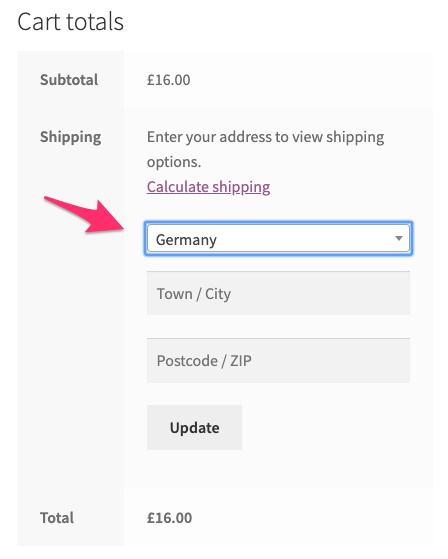
- Shipping options will update and match what you specified for the shipping zone
- Test further by repeating these steps but changing the
Default customer locationinWooCommerce / Settings / Generalto the other options and make sure the shipping options displayed match. For example if you setDefault customer locationtoShop base addressand you already have a shipping zone for your store address you should see in the cart the correct shipping option for that zone with the option to calculate shipping for your own address.
2) Enhancements and extra information on order details
To test:
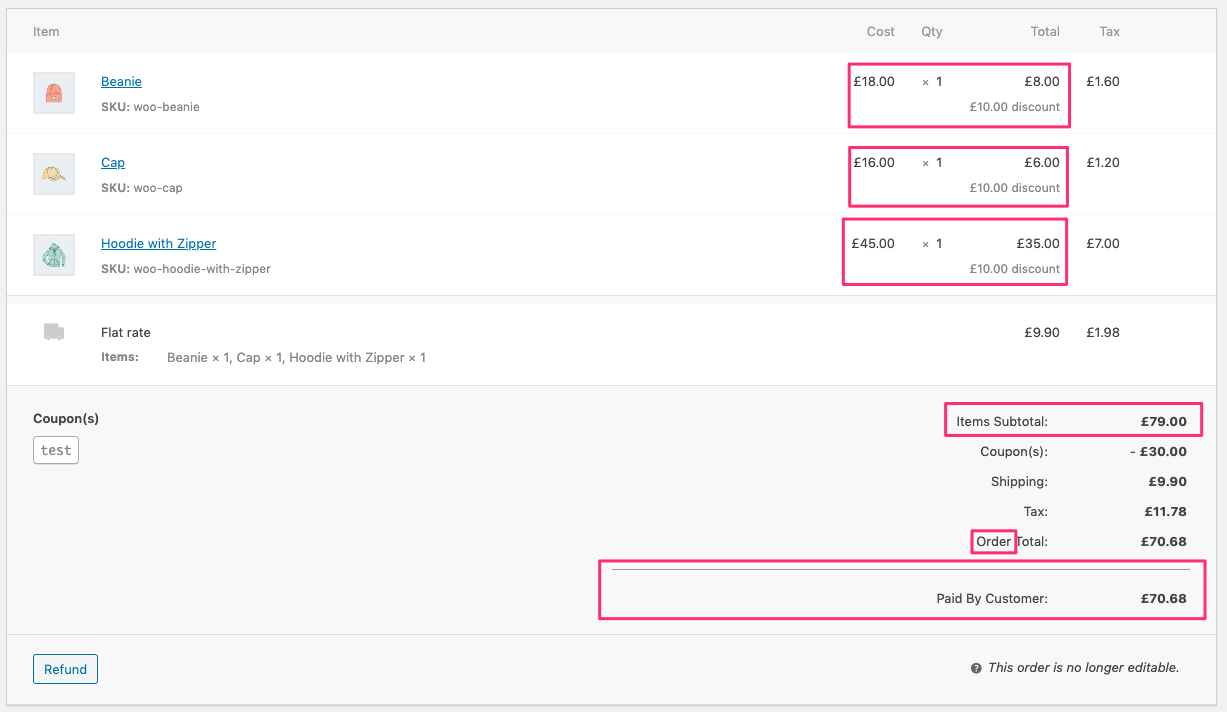
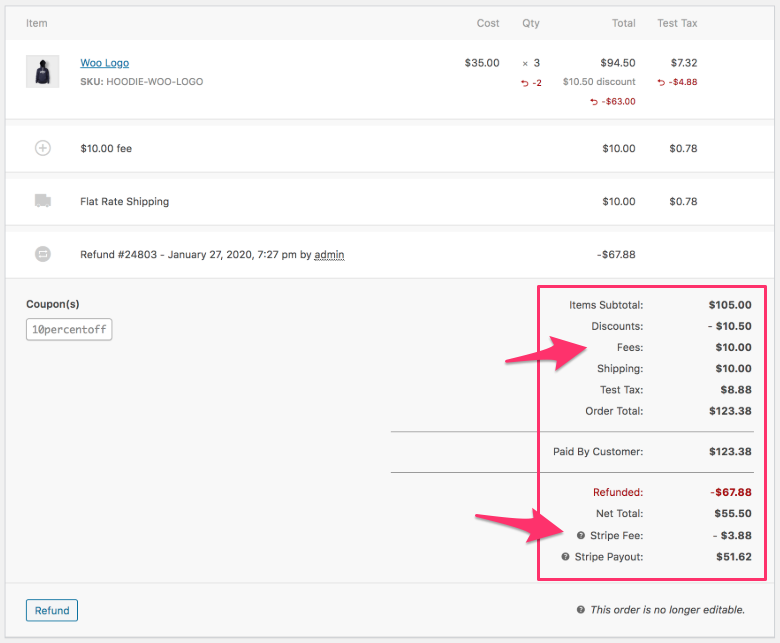
- Create a new order that has a mixture of items, discounts, shipping, taxes etc.
- Open that order in
WooCommerce / Orders- Verify that the cost of the line items now displays their gross amount (before any discounts are applied) This makes it easier to understand how a discount is being applied on a line by line basis.
- Verify the new information on the screen is present
-
Items Subtotal:andOrder Total - Displays
Paid by Customerwith the amount paid on a new line below the order total
-
- Verify the totals are correct
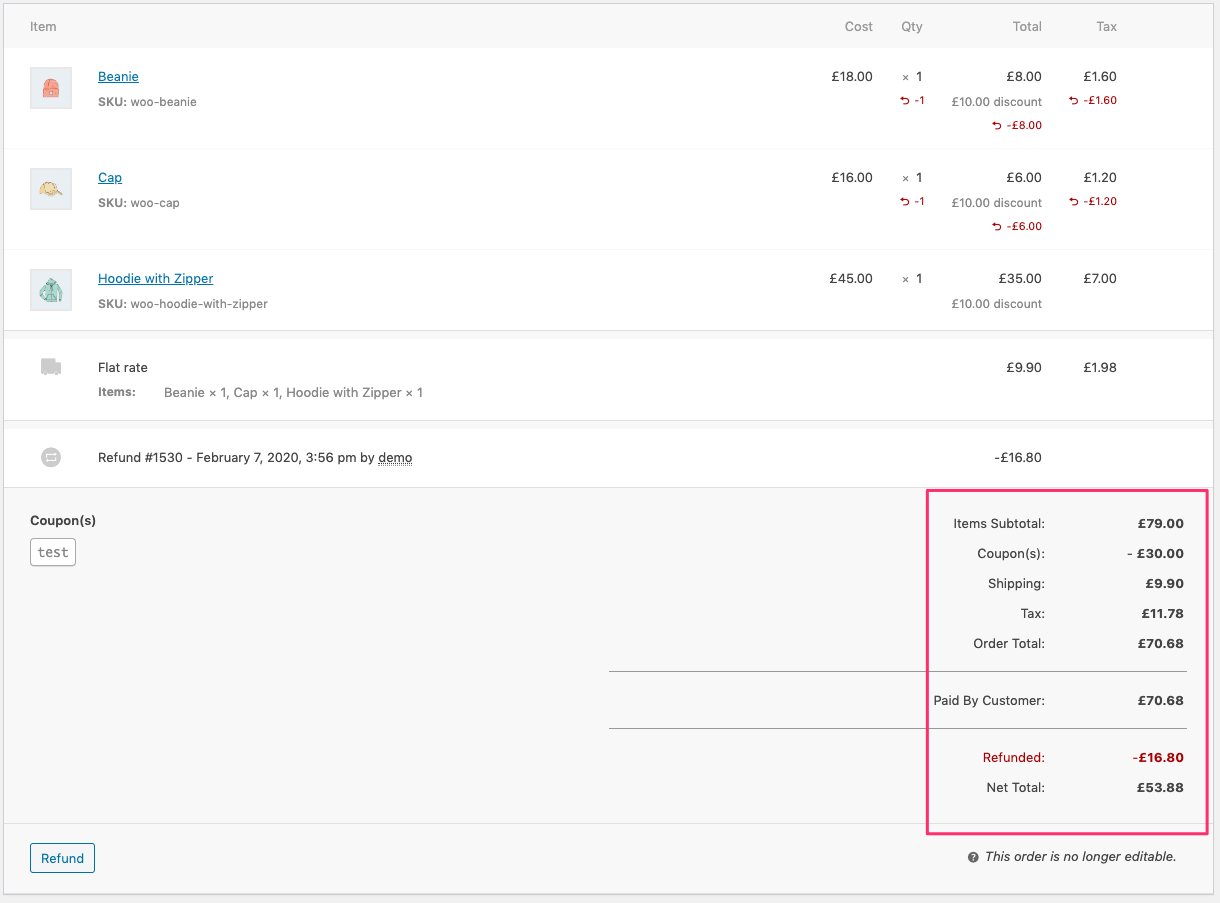
- Refund part or all of the order
- Verify the new information on the screen is present
- It displays the total amount refunded below "Paid by customer" along with a new net payment amount
- Repeat this testing for different payment methods and combinations of items, discounts, shipping, taxes and if you are using plugins that can add fees.
3) Fix for duplicate webhook deliveries
Previously there was a possibility that WooCommerce may sometimes trigger multiple webhook deliveries for a single webhook if the webhook topic has multiple hooks. The fix means only one delivery will now happen.
To test:
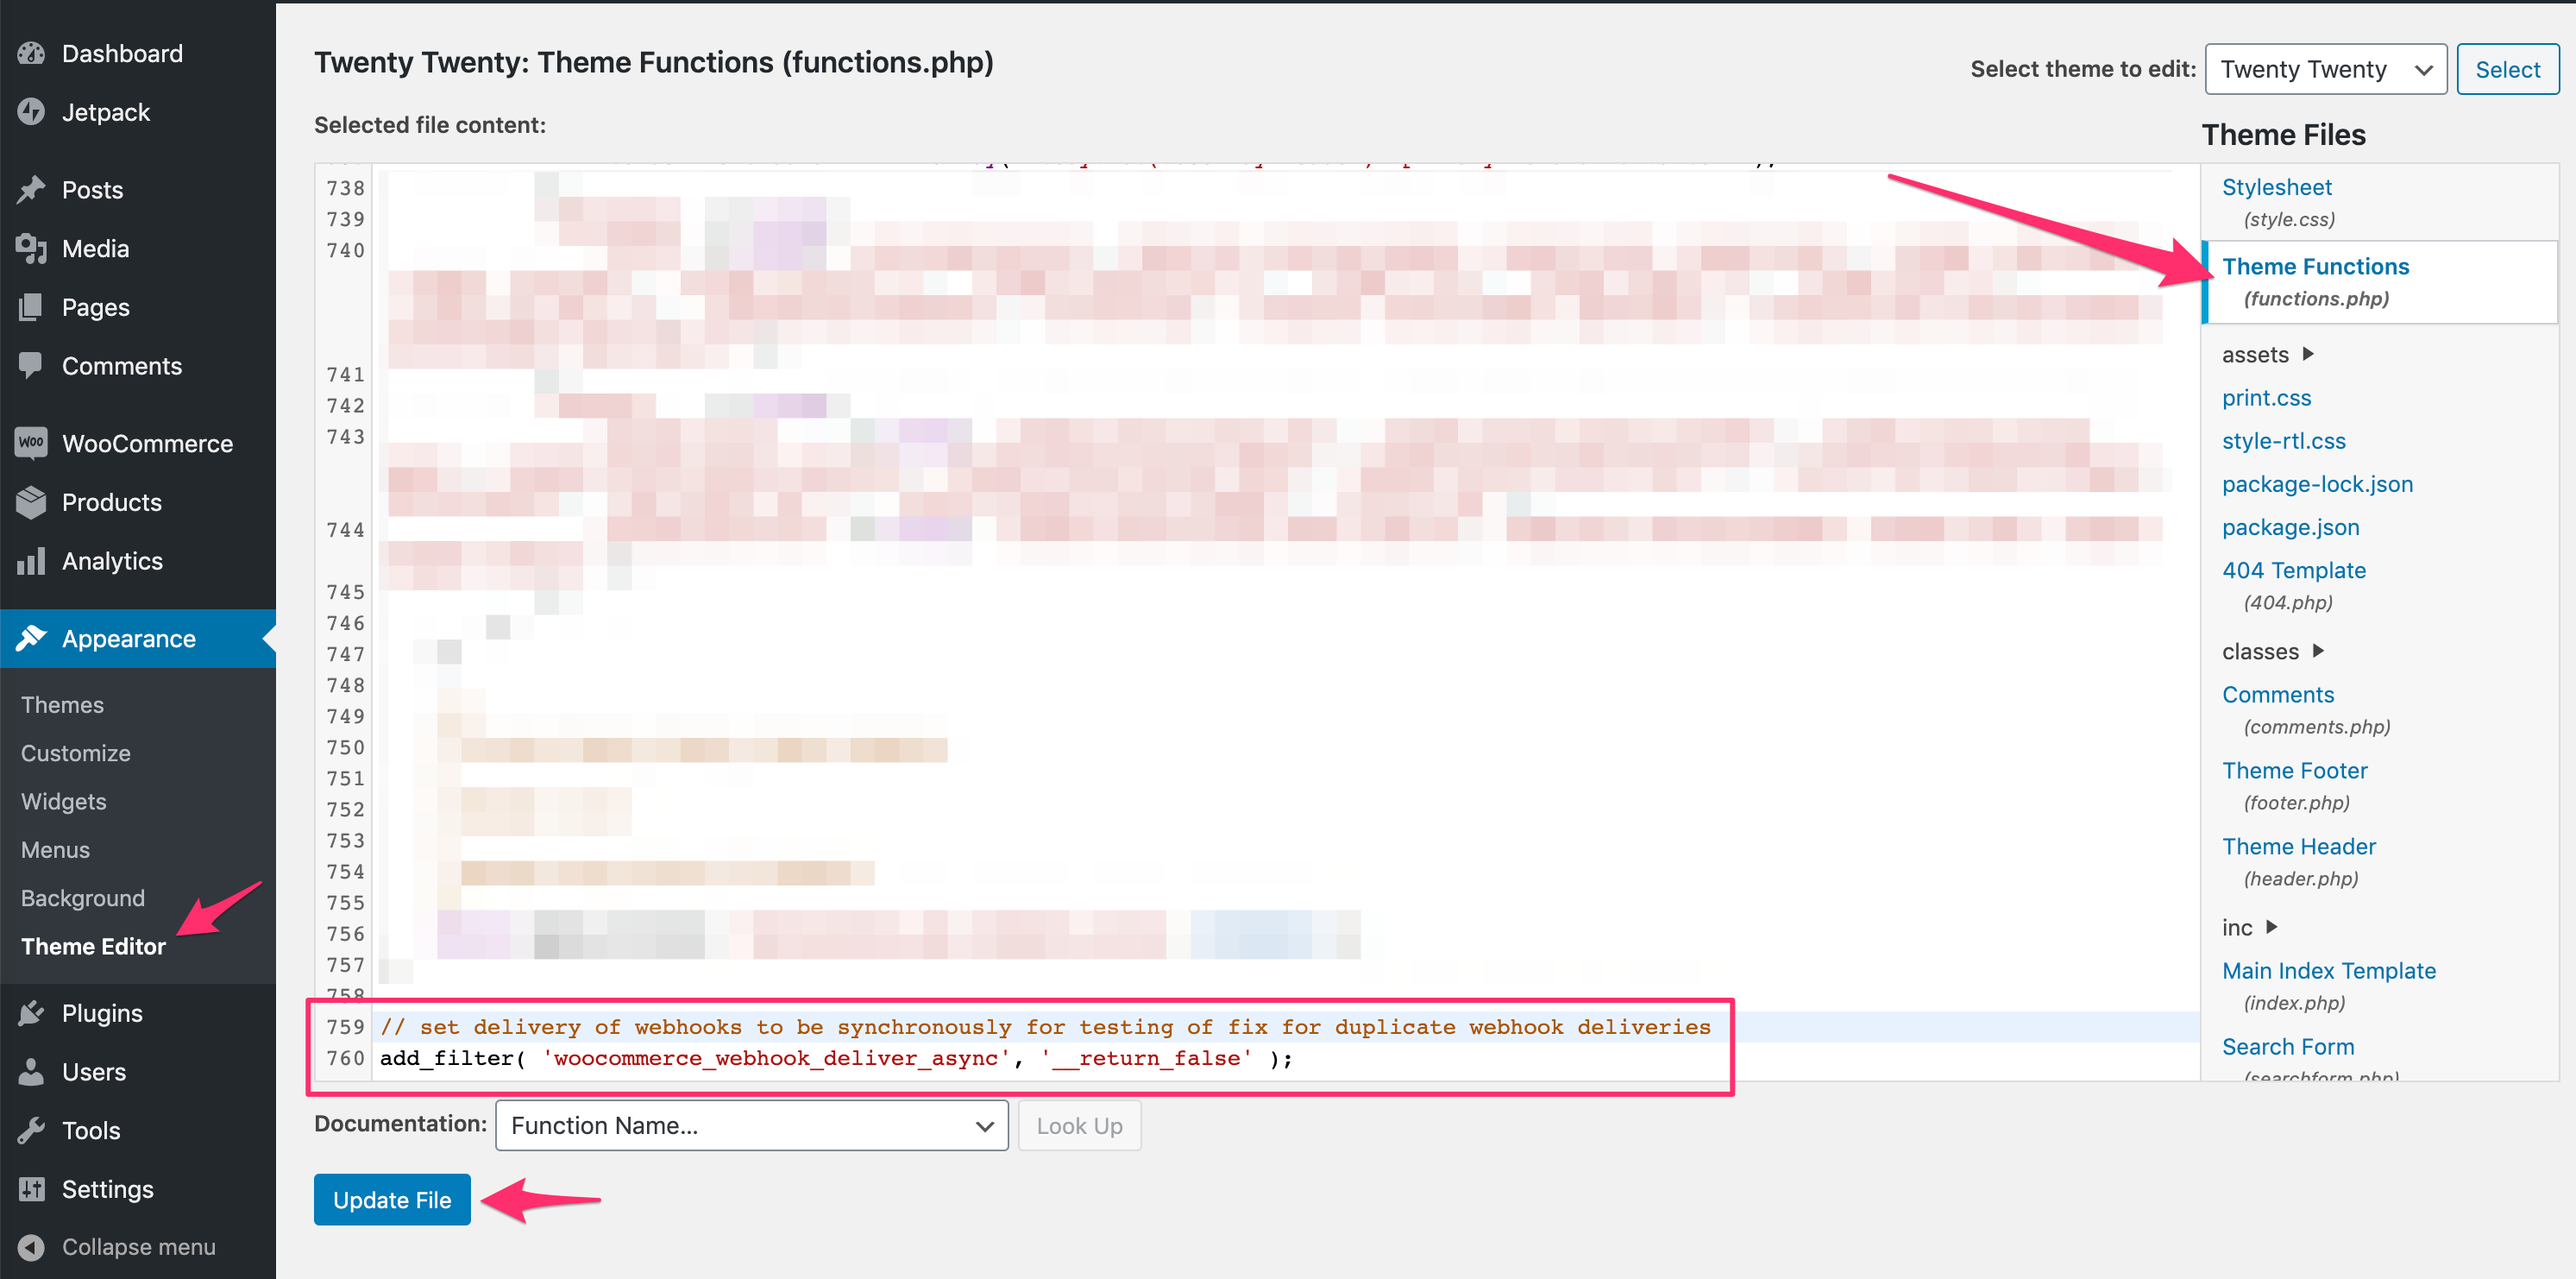
- Navigate to
Appearance / Theme Editorand select theTheme Functions (functions.php)file for editing.- Add this line of code to instruct your WooCommerce installation to delivery webhooks synchronously:
add_filter( 'woocommerce_webhook_deliver_async', '__return_false' );
- Save your changes by clicking
Update File
- Set up a Webhook delivery URL via https://webhook.site. The URL will be created automatically as soon as you visit the site. Copy the URL to clipboard:
- Navigate to
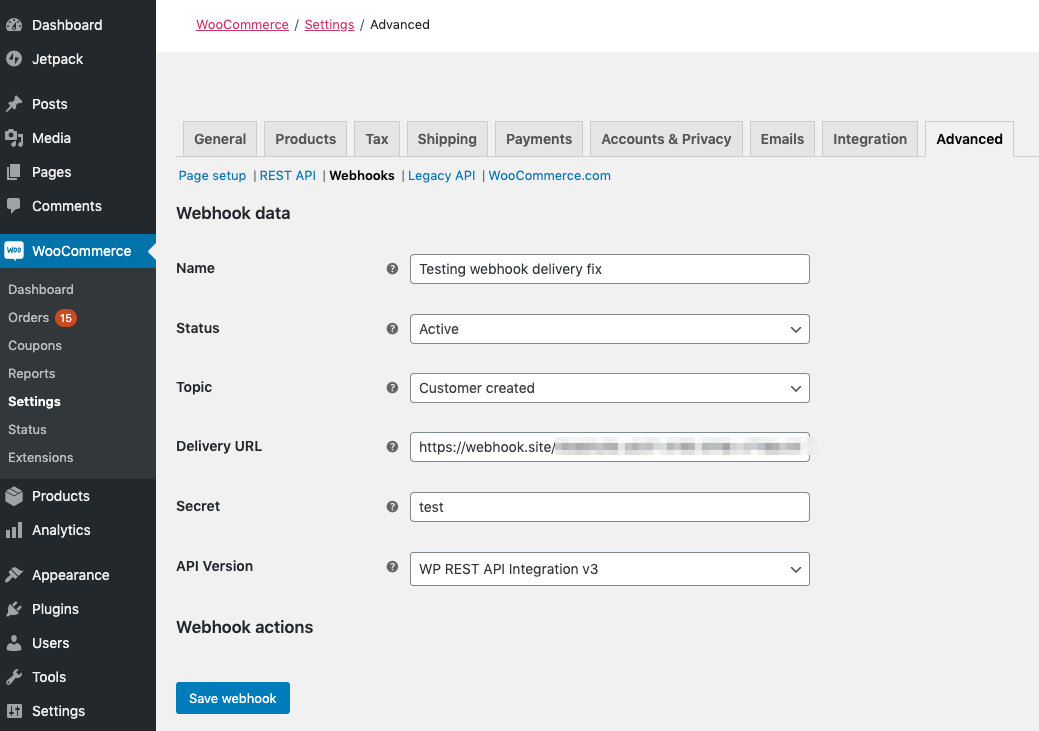
WooCommerce > Settings > Advanced > Webhooks:
- Create a new Webhook, choosing a webhook topic that has multiple hooks defined. For example, Customer Created (which has 3 defined).
- Name:
Testing webhook delivery fix - Status:
Active - Topic:
Customer created - Delivery URL: paste the URL you copied in the previous step on
https://webhook.site - Secret:
test - API Version:
WP REST API Integration v3 - Save
- Navigate to
Users / Add Newand manually create a customer in your WooCommerce Store (useRoleofCustomer)
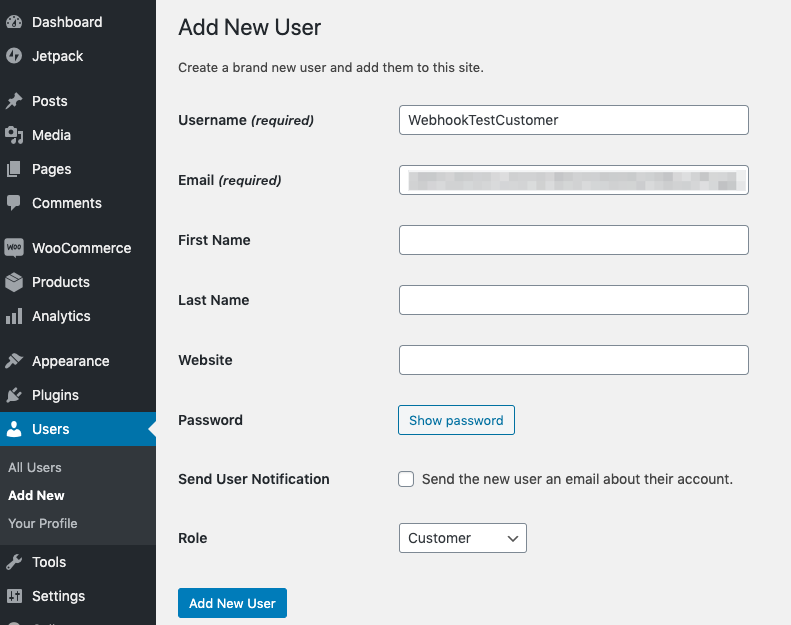
- The hook should be fired off which can be checked on the https://webhook.site
- Check error logs by navigating to
WooCommerce / Status / Logsand selectingwebhooks deliverylog in the dropdown field. Verify that the customer was delivered once (not 3 times):