Release Testing Instructions WooCommerce 5.9
WooCommerce 5.9 includes:
- WooCommerce Admin Updates
- WooCommerce Blocks Updates
- WooCommerce Core Updates
- WooCommerce Marketplace Updates
- On a fresh WC installation finish the Onboarding flow, make sure you install all the free extensions (important).
- Go to WooCommerce > Home and scroll down to the notes
- Click on Dismiss of one of the notes and click Dismiss all messages
- Click Yes, I'm sure
- Note that all notes should be removed and the empty inbox message should show up (see GIF as well)
- Click undo on the little notice that pops up in the bottom left, and make sure all the notes appeared again.

- Install one of the marketing extensions, but don't activate it.
- Navigate to the marketing task in the task list.
- Attempt to activate the plugin.
- Note the successful activation.
- Complete the onboarding setup wizard.
- Add some products.
- Go to Shop page and purchase some products.
- Go to WooCommerce->Orders.
- Make a Refund for some orders.
- Now go to Analytics->Revenue screen.
- Note that Return amount is displayed.
- Go to Analytics->Settings.
- Select "Completed" for Excluded Statuses.
- Click on Save settings.
- Go to Analytics->Revenue and refresh the page.
- "Returns" amount should get updated on the Revenue report screen
- On a new site install WooCommerce 5.8.0
- Don't complete or start the OBW wizard
- Switch to the latest version of WooCommerce 5.9.0 being tested.
- Navigate to WooCommerce > Home
- Make sure the page loads with task list, isn't blank, and there no JavaScript errors in the browser console.
- Load WooCommerce and finish the onboarding
- Create some products
- Edit one of you products and go to Inventory tab and enable the Manage stock?, and set the Low stock threshold to 10, make sure Stock quantity is lower than the threshold
- Go to WooCommerce > Home and hide the task list
- Expand the Stock activity panel, the item should load correctly.

- Make sure Query Monitor is installed.
- Go to orders screen and add new order.
wp-admin/edit.php?post_type=shop_order - Click on Add items. Then Add products.
- Don't type anything in the search box and click on Add.
- Ensure there are no PHP notices generated from that process.
** Instructions updated with those from the fix in #31015**
- Install and activate Code Snippets plugin.
- Add a new snippet with the following code:
add_filter( 'woocommerce_adjust_non_base_location_prices', '__return_false' ); - Make sure that you have the "Prices entered with tax" option set as "Yes, I will enter prices inclusive of tax" (WooCommerce - Settings - Tax - Tax options).
- Let A be the country where your currently logged in user is based, and B the country where the shop is based. Create an user U based on a different country C.
- Go to WooCommerce - Settings - Tax - Standard rates and set 30% for country A, 20% for country B and 10% for country C.
- Create a simple product, taxable with standard rates, with a price of 110.
- Create an order from admin area, don't set any customer for it and save it ("Create" button in "Order actions").
- Add the product you just created to the order. You should see that the price that will appear in the line item is 91,67 (110 minus 20% of taxes), and if you click "Recalculate", the tax for country B is added and the final order price is 110.
- Remove the line item from the order
- Set U as the order customer and save the order ("Update" button in "Order actions").
- Add the same product to the order again. This time the price that will appear in the line item is 100 (110 minus 10% of taxes), and if you click "Recalculate", the tax for country C is added and the final order price is again 110.
- Add the following snippet using the code snippets plugin:
add_action('woocommerce_init', function() {
    wc_get_container()
    ->get(\Automattic\WooCommerce\Internal\ProductAttributesLookup\LookupDataStore::class)
    ->show_feature();
});- Go to the WooCommerce - Status - Tools page. You will see a new tool with the title "Create and fill product attributes lookup table":

- Click the "Create" button. After the page reloads you'll see that the button is disabled and shows a number corresponding to the number of products processed so far (the table is filled in increments using scheduled actions):

- Remove the
&action=regenerate_product_attributes_lookup_tablepart from the page URL and reload it until the button changes to "Regenerate" and is enabled again. At this point the table is ready for use.

- Go to WooCommerce - Settings - Products - Advanced. Mark the "Use the product attributes lookup table for filtering" option and save.

- Setup some additional products, use this csv file https://raw.githubusercontent.com/woocommerce/woocommerce/dbac025535e29f5f67bdd96ba256ca4531662b4e/DATA_FOR_POC/FilterByAttributeUsingLookup_Products.csv
- Trash a variable product
- Create/delete/modify products and variations as follows and verify that everything continues working.
- A new product is created
- A new variation is added to a product
- A product or variation that had been trashed previously is untrashed
- The product visibility changes to "search" or "hidden"
- The attributes for a product change, this includes:
- New attributes are added or deleted for a product
- Terms are added or removed from the attribute definition for a product
- The attribute changes between "used for variations" and not
- The attributes for a variation change
- Delete the lookup table (from the WooCommerce > Status > Tools page)
- Setup a variable product with taxes:

- Set prices in the store to show including taxes:

- Set up taxes for the site, it's the easiest to reproduce with just one tax rate for every location:

- Use one logged in user and save a location as well as a matching VAT number in their account:
- Install EU VAT Number extension;
- Use one of the test VAT Numbers from the EU VAT Number Test Data. e.g. a valid Austrian VAT Number
ATU66889218; - Place order using this VAT number so the address and VAT number will be saved for the user and also to see if the VAT number is valid indeed:

Order placed:

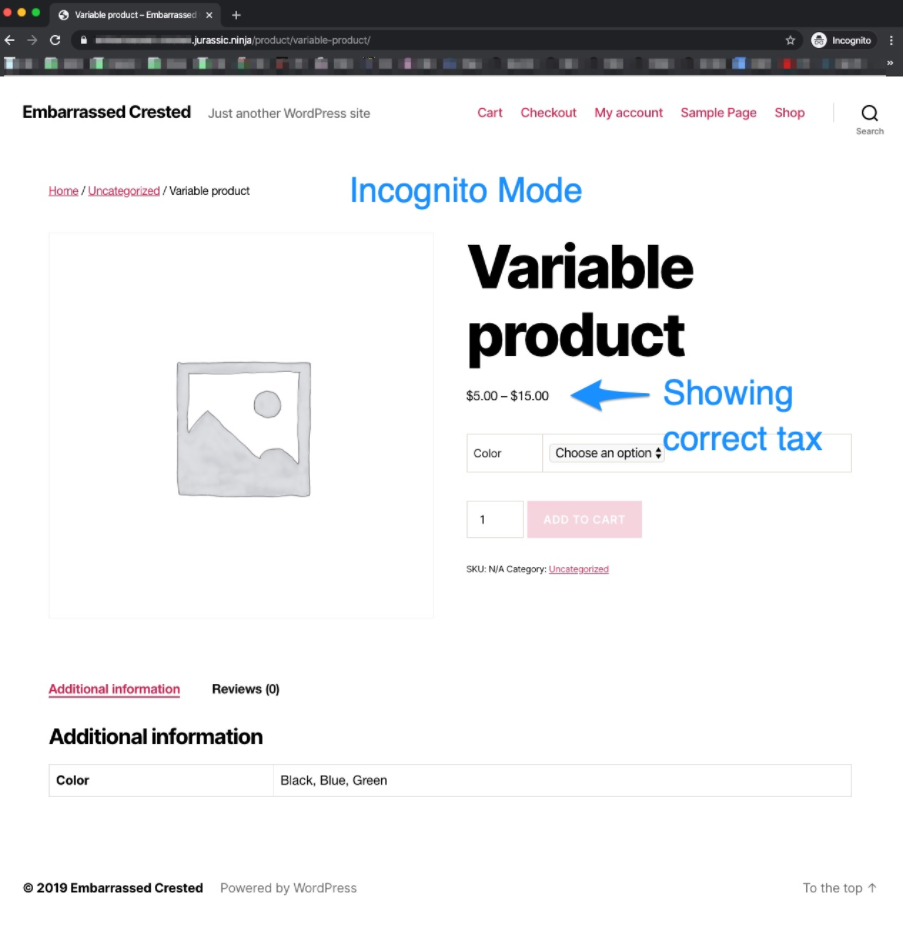
- View the shop page and you should now see the variable product with no tax (user is tax exempt):

- In an incognito window view the same shop page and verify that the variable product is shown with taxes
- Clear the transients in WooCommerce > Status > Tools:

-
Refresh the incognito window and see the variable product including taxes
-
Now refresh the shop page again for the logged in user and verify the variable product still shows without taxes
Text to be displayed when invalid data is entered into search input field and no search results are found #30641
- Go to WooCommerce -> Marketplace.
- Search for non existing product in search field.
- Screen displays Sorry, could not find anything. Try searching again using a different term.
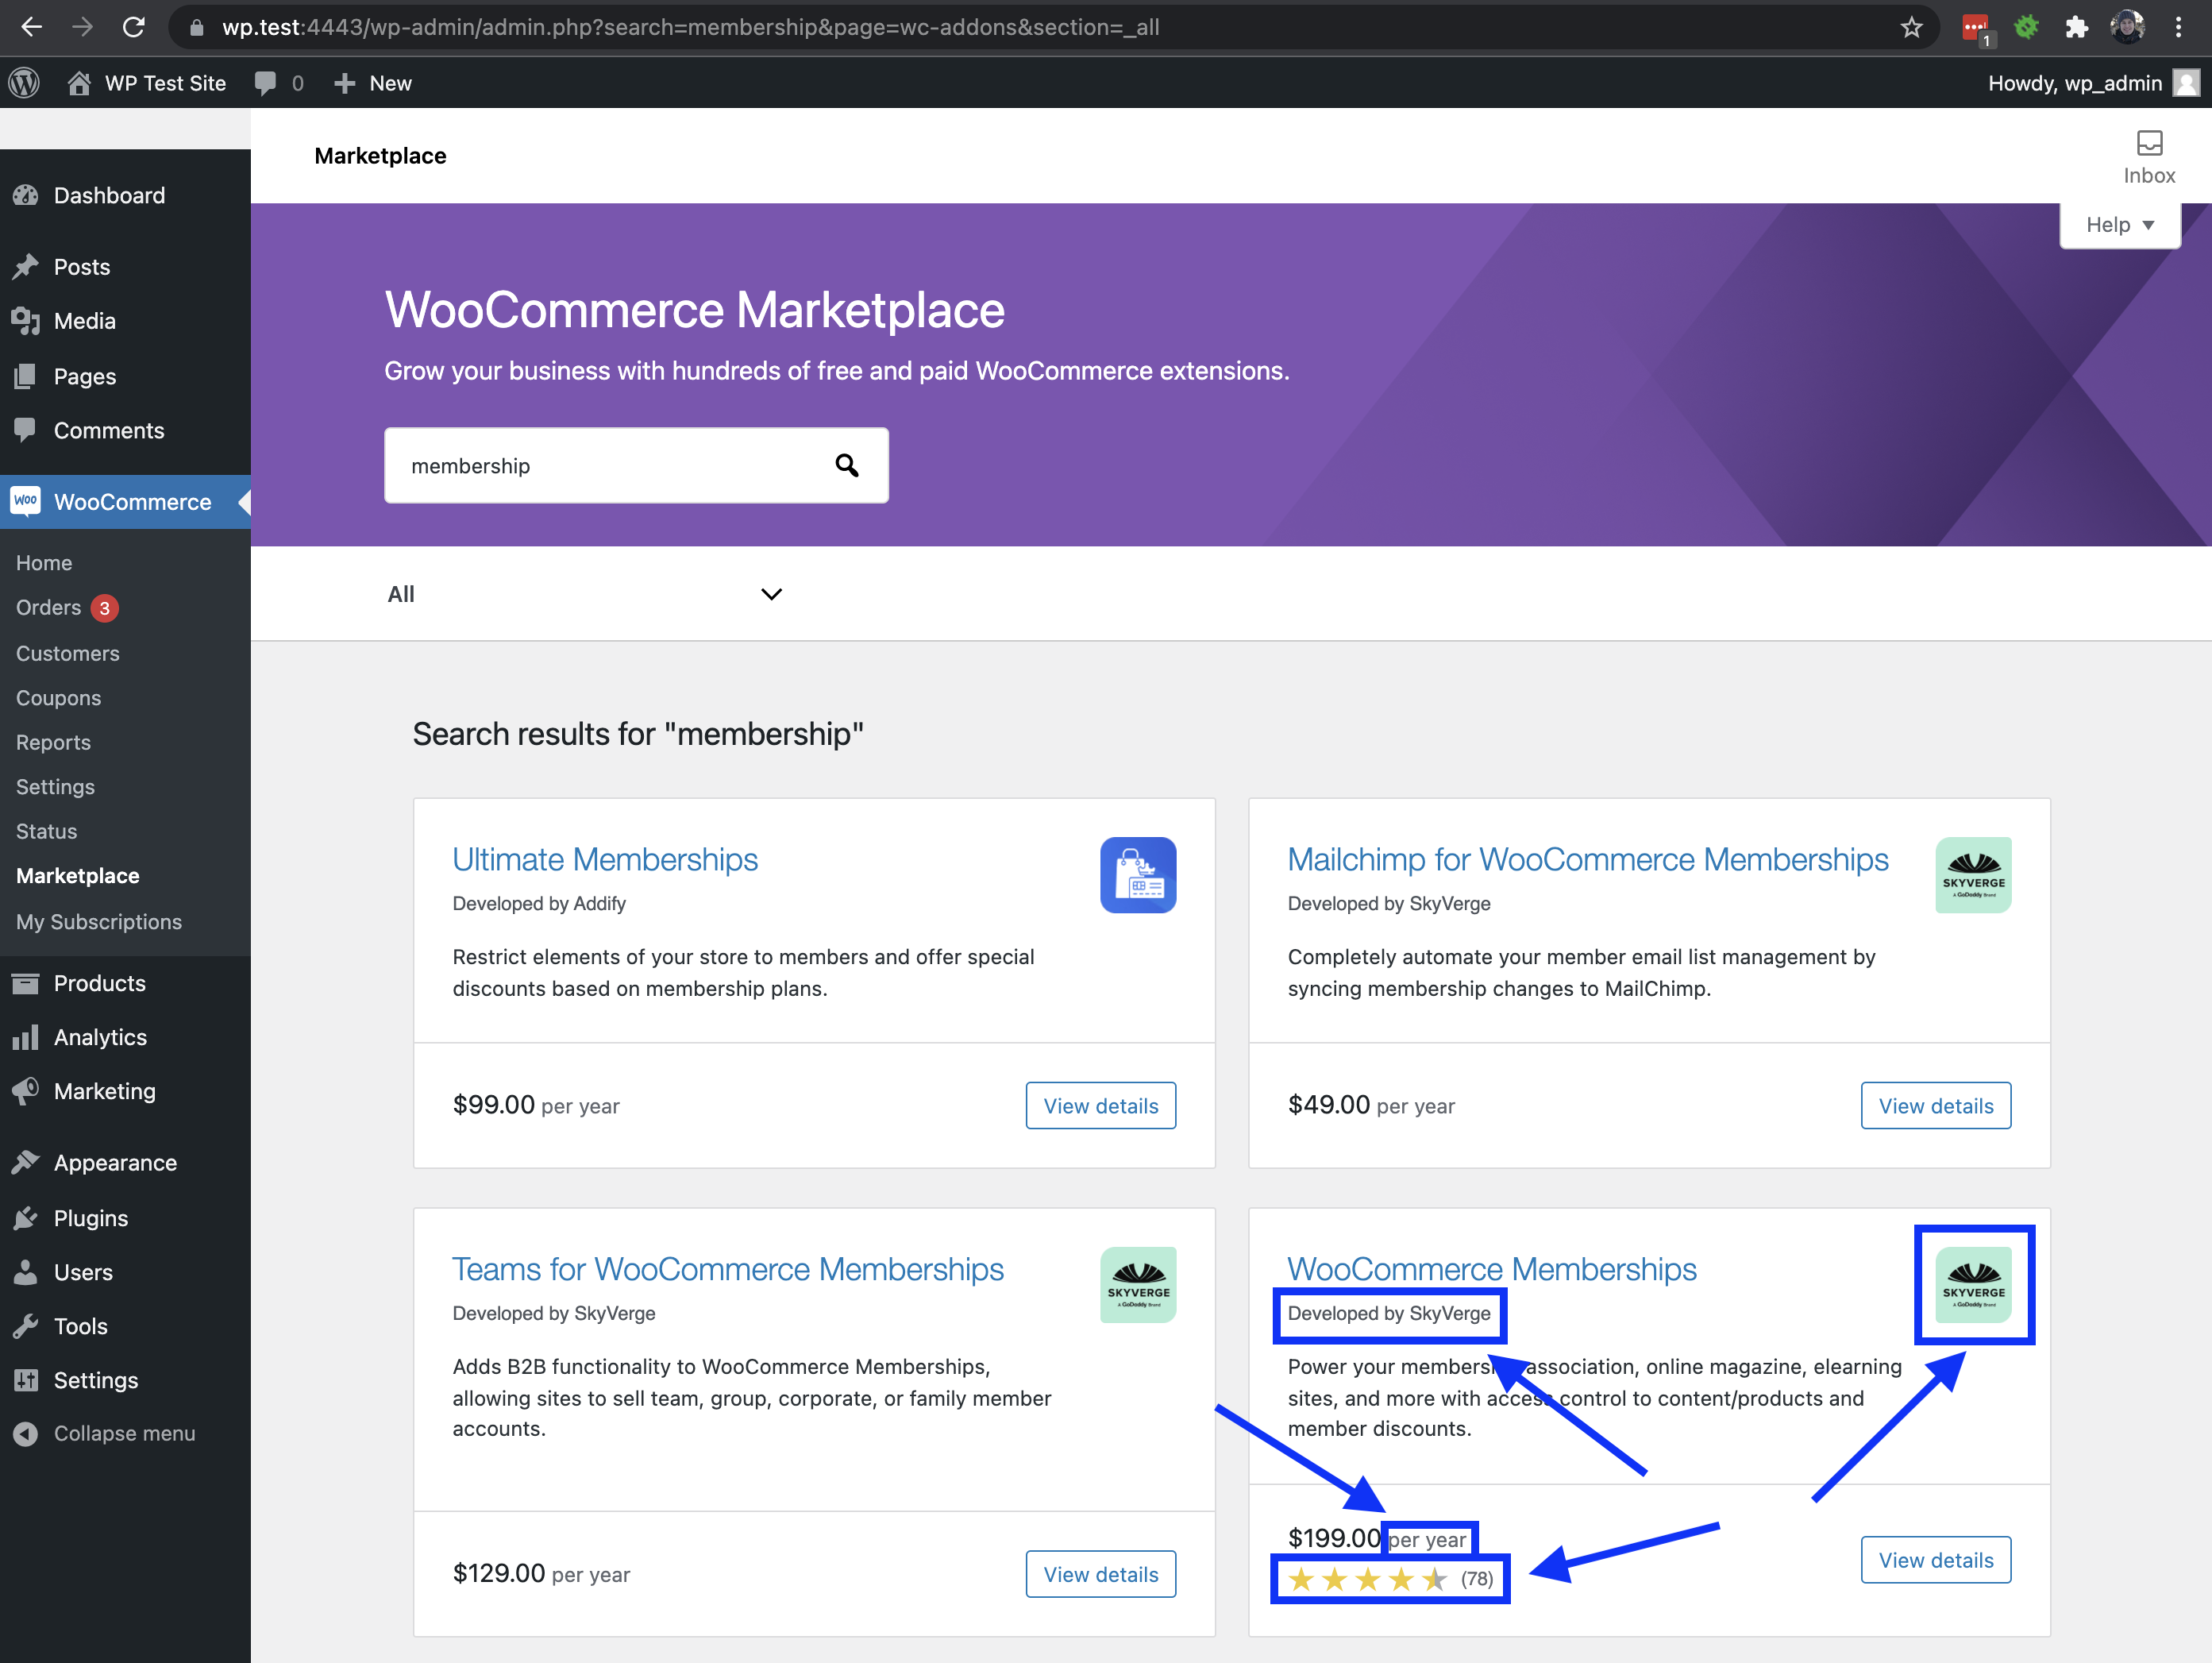
- Go to WooCommerce > Marketplace
- Search for "memberships"
- Ensure you see products like WooCommerce Memberships that contain:
- icon (instead of a product image),
- developed by ... (with a link to a vendor page on WooCommerce.com)
- average rating represented as stars
- number of reviews left by customers
- Go to WooCommerce > Marketplace
- Go to the bottom of the page
- Confirm the Storefront banner isn't full width anymore and displays nicely
- Confirm links to Storefront still work
- Confirm the display is OK on large and small devices
-
Open WP Admin > WooCommerce > Marketplace page, make sure that you are viewing the "Featured" section
-
You should see something similar to the image below:

-
Try extensions search (e.g. via typing "memberships"), the page should look as expected
- Ensure your store country is set to US
WooCommerce -> Settings - In WP-Admin visit
WooCommerce -> Marketplaceand verify products are still shown - Now navigate to the Payments category in
WooCommerce -> Marketplaceand verify the WC Payments banner is displayed above the products, if you have WC Payments installed it should not show so test with the plugin activated and deactivated. - Now navigate to the Shipping category in
WooCommerce -> Marketplaceand verify the WC Services banner is displayed above the products, if you have WC Services installed already it should not show so test with the plugin activated and deactivated.
- On a new site install WooCommerce 5.8.0
- Go to WooCommerce > Marketplace.
- Notice the layout of the items on the page.

- Switch to the latest version of WooCommerce 5.9.0 being tested.
- Refresh the Marketplace page.
- Note this loads the new layout of the page.

- View the Featured page of WooCommerce > Marketplace on your WooCommerce site
wp-admin/admin.php?page=wc-addons§ion=_featured. - In the
Discover our favoritesgroup you should see the two new styles of card shown in this screenshot:
- View a category page like
wp-admin/admin.php?page=wc-addons§ion=marketing-extensionsor search results page. You should see the two styles of card shown here at the top: