Repository navigation
Model Toolkit Effects
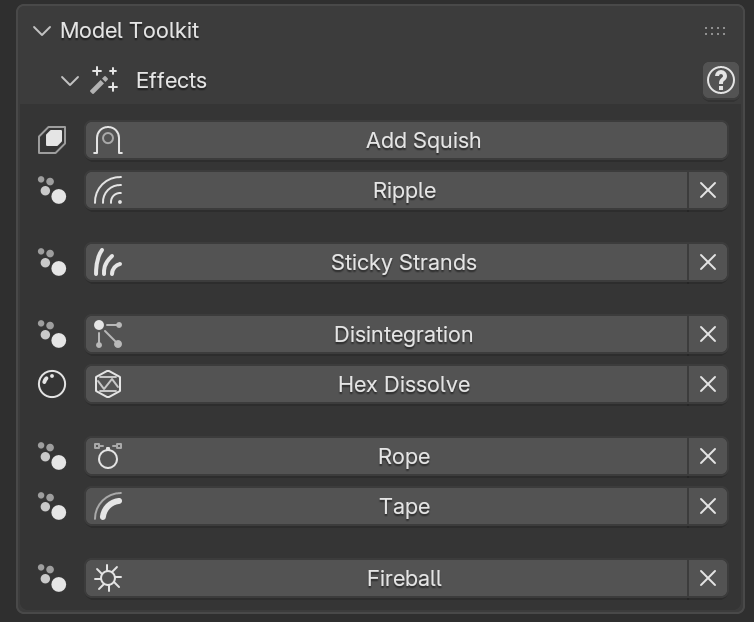
Effects that can be added to the model and its outfits in a few clicks.
Important
All the effects except Squish require Blender 5.2 or above.
In the Model Toolkit, the icon on the left of each effect tells how it is made:
- Shape Key — the effect is baked in a Shape Key.
- Geometry Nodes — the effect is a Geometry Nodes modifier, which can be tweaked from the Modifier properties.
- Material — the effect is added to the materials of the objects.
Each effect has an X button on its right to remove it from the selected objects, together with the objects it created when they are not used anymore.
Most effects are driven by a Control Empty, created by the tool and named after the effect (and after the object, when only one is selected). Move, rotate, scale or animate the Control to drive the effect. When the effect grows over time (e.g. Disintegration), the scale of the Control is already animated from the current frame.
Creates a Shape Key on the Active Object (e.g. the body) squished by the other selected Objects (e.g. clothes, straps, hands). This is a live preview tool, and works on the Rest Pose of the models.
- Mode — Surface pushes the body vertices poking out of the squishing surface under it (e.g. clothes, straps); Volume pushes the body vertices inside the squishing volume out of it (e.g. hands, closed objects pressing on the body).
- Tightness (Pressure) — moves the squishing surfaces inwards along the body normals, for a tighter squish. Enable Move Squishers to also move the squishing objects by a fraction of the Tightness, with Shape Keys.
- Bulge and Bulge Radius — push the vertices around the squished area outwards, as the flesh does.
- Offset, Max Depth and Smooth — distance of the squished vertices from the surface, maximum penetration depth considered, and distance the squish is smoothed over.
- Vertex Group and Rigid Vertex Group — restrict the effect, and move the rigid parts (e.g. buttons) without deforming them. Similar options are available for the squishing objects.
- Auto Influence — restrict the effect around the intersections between the meshes.
- Outfit Property — if the squishing objects belong to a MustardUI Outfit, drive the Shape Key with a custom property of that Outfit, so the squish is switched on and off with the Outfit. Enable Hidden to keep the property hidden in the UI.
Tip
The Debug section of the settings shows some statistics of the squish (e.g. maximum depth, moved vertices, maximum movement), useful to tune the settings.
Ripples the selected meshes where the flattened sphere of a Control Empty cuts them. Move the Control to move the ripple.
Adds simulated strands of saliva or goo from the selected meshes to the active one. The strands start inside the sphere of a Control Empty, placed where the selected meshes are closest to the active one and parented to the bone that moves that area the most.
- With only one mesh selected, the strands connect the mesh to itself, from the Start Vertex Group to the End Vertex Group (set them in the modifier), with the Control at the 3D cursor.
- The modifier has a Smooth option to smooth the strands.
- The length, factor and normalized length of the strands are available to the material as attributes, to shade them.
Note
If the selected mesh is a collider (e.g. a cloth collision object), the strands are put on the active mesh instead, to avoid a dependency cycle with the physics.
Disintegrates the selected meshes into particles inside the sphere of a Control Empty, growing over them in Duration frames from the current frame.
Dissolves the materials of the selected meshes in glowing hexagons inside the sphere of a Control Empty, growing over them in Duration frames from the current frame. Enable Show to shrink the Control instead, so the meshes appear.
Note
The effect is added to the materials: materials shared with other objects dissolve on them too.
Wraps the selected curves around the active mesh as tight ropes or tapes. If no curve is selected, a new loop of the given Radius is created around the 3D cursor, on its plane, and parented to the mesh.
Set a Vertex Group of the mesh to wrap around only that part of it, or leave it empty to wrap around the whole mesh.
Adds a fireball on a Control Empty at the 3D cursor, in a new Fireball collection. The fireball leaves a trail of flames as the Control moves: animate the Control to move it.
Note
The Fireball object is locked and follows the Control: move the Control, not the Fireball object.