Installation
OpenHPSDR Zeus can be run two ways:
-
Desktop mode — install on the same machine you operate from. The
installer puts
Zeus.Serverplus a small launcher on your computer. Double-click and your default browser opens athttp://localhost:6060. -
Server (browser) mode — install on a headless or shared host
(a Raspberry Pi, NUC, NAS, lab PC, garage shack box) and connect to it
from any browser or PWA on the LAN. Same installers, same
Zeus.Server, just a different way of using it.
Both modes use the same installer files — there is no separate
"server build". What changes is which device you point your browser at
and whether you use the launcher or run Zeus.Server directly.
| Platform | File | Notes |
|---|---|---|
| Windows (x64) | Zeus-X.Y.Z-win-x64-setup.exe |
Inno Setup; opens browser on launch |
| macOS (Apple Silicon) | Zeus-X.Y.Z-macos-arm64.dmg |
drag to Applications, see xattr below |
| Linux (x64) | zeus-X.Y.Z-linux-x64.tar.gz |
extract and run ./zeus
|
Installers are published with every tagged release on the Releases page.
Each native installer ships Zeus.Server — a self-contained .NET 10
publish that serves the React UI, the SignalR hub, and the WDSP native
library on http://localhost:6060 — wrapped in a tiny per-platform
launcher.
The launcher's whole job is to start the backend, wait for port 6060 to
listen, open your default browser at http://localhost:6060, and clean
the backend up when you quit.
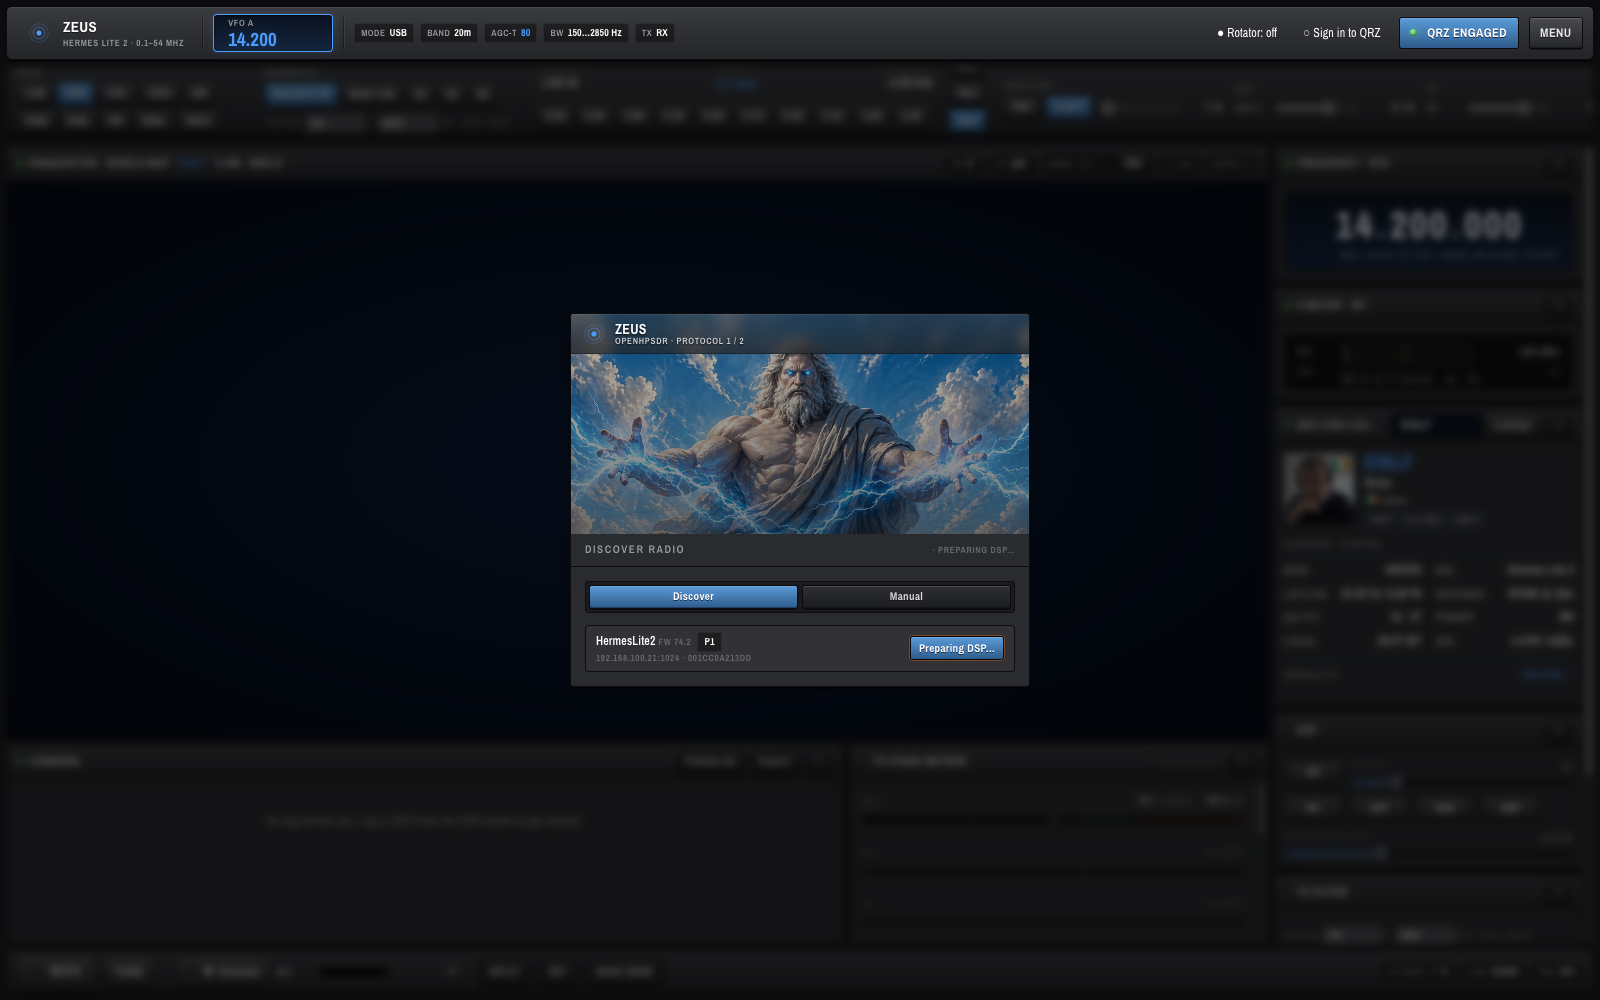
That is what OpenHPSDR Zeus looks like on first launch. The Discover panel is centred on screen; pick your radio and the panadapter, waterfall, and meters go live.
Use Desktop mode when the machine you operate from is also the machine talking to the radio. This is the simplest path and what most users want.
- Download
Zeus-X.Y.Z-win-x64-setup.exefrom the Releases page. - Run it. SmartScreen may warn that the installer is unsigned — click More info → Run anyway.
- After install, launch Zeus from the Start Menu or the desktop
shortcut. Both shortcuts run
zeus.cmd. - A small console window appears showing
Zeus.Serverlog output (handy on the first run while WDSP wisdom is being built — see First run below). - Your default browser opens at
http://localhost:6060.
Closing the console window stops the server.
- Download
Zeus-X.Y.Z-macos-arm64.dmg. - Mount the DMG and drag Zeus.app to Applications.
- Clear the Gatekeeper quarantine flag (see Removing the Gatekeeper warning below) — required because the app is not Apple-Developer signed.
- Launch Zeus from Launchpad or
/Applications. - Your default browser opens at
http://localhost:6060.
Zeus.app/Contents/MacOS/launch.sh is the bundle's main executable.
Cmd-Q from the Dock gracefully terminates Zeus.Server.
- Download
zeus-X.Y.Z-linux-x64.tar.gz. - Extract:
tar -xzf zeus-X.Y.Z-linux-x64.tar.gz cd zeus-X.Y.Z-linux-x64 - Run the launcher:
./zeus
./zeusbackgroundsZeus.Server, opens the URL viaxdg-open, and forwards termination back to the backend. - Your default browser opens at
http://localhost:6060.
If xdg-open is missing, install xdg-utils from your package manager,
or just point any browser at http://localhost:6060 yourself once the
console says the server is listening.
Use Server mode when the box running Zeus.Server is not the one
you sit in front of. Common shapes:
- A Raspberry Pi 4/5 in the shack with the radio, no keyboard or monitor. You operate from a laptop, tablet, or phone over Wi-Fi.
- A NUC / mini-PC in the garage or attic close to the antennas, with the radio plugged in via Ethernet.
- A shared workstation that several operators connect to from their own desks.
The install steps are the same as Desktop mode above — pick the
matching installer for the host's OS — but you skip the launcher and run
Zeus.Server directly so it stays up without a browser. Then connect
from any client device.
Important: Currently only x64 builds are published. Running on a Raspberry Pi (arm64) or other ARM Linux host requires building from source — see Developer Guide. An official arm64 build is on the roadmap.
Install the same Zeus-X.Y.Z-win-x64-setup.exe, but instead of using
the Start Menu launcher, run Zeus.Server.exe directly so it stays up
without opening a browser:
cd "C:\Program Files\Zeus"
Zeus.Server.exe --urls http://0.0.0.0:6060
To run as a Windows Service, register it with sc create or use
NSSM pointed at Zeus.Server.exe with the same
--urls argument.
Install the DMG as in Desktop mode, then run the embedded backend directly:
/Applications/Zeus.app/Contents/Resources/server/Zeus.Server \
    --urls http://0.0.0.0:6060
For an unattended setup, wrap that command in a launchd plist under
~/Library/LaunchAgents/.
Extract the tarball as in Desktop mode. The simplest path is to keep
using the bundled ./zeus launcher and just bind it to all interfaces
via ASPNETCORE_URLS:
cd zeus-X.Y.Z-linux-x64
ASPNETCORE_URLS=http://0.0.0.0:6060 ./zeus
If you'd rather invoke Zeus.Server directly (e.g. under tmux /
screen / a process manager) you must add the bundled native
runtime directory to LD_LIBRARY_PATH first — Linux does not search the
executable's directory by default, and without this you'll get
System.DllNotFoundException: Unable to load shared library 'wdsp':
cd zeus-X.Y.Z-linux-x64
LD_LIBRARY_PATH="$PWD/runtimes/linux-x64/native:$LD_LIBRARY_PATH" \
    ./Zeus.Server --urls http://0.0.0.0:6060
The ./zeus wrapper sets this for you — it's only when you skip the
wrapper that you need to export it yourself. Same libwdsp.so /
libfftw3.so.3 / libfftw3f.so.3 either way.
For a real service, drop a unit file at
/etc/systemd/system/zeus.service:
[Unit]
Description=OpenHPSDR Zeus
After=network.target

[Service]
Type=simple
User=zeus
WorkingDirectory=/opt/zeus
Environment=LD_LIBRARY_PATH=/opt/zeus/runtimes/linux-x64/native
ExecStart=/opt/zeus/Zeus.Server --urls http://0.0.0.0:6060
Restart=on-failure

[Install]
WantedBy=multi-user.target
The Environment=LD_LIBRARY_PATH=… line is what lets Zeus.Server
find libwdsp.so when started by systemd (which doesn't go through
the ./zeus wrapper). On linux-arm64 boxes, swap linux-x64 for
linux-arm64.
Then:
sudo systemctl daemon-reload
sudo systemctl enable --now zeus
--urls http://0.0.0.0:6060 is what makes Zeus.Server listen on every
network interface instead of just localhost. Without it, only the
server itself can reach the UI.
Standalone Zeus.Server also opens an HTTPS listener on
:6443 with a self-signed LAN certificate. You don't need to ask
for it — it comes up automatically alongside :6060. This is the port
you want for any remote client that will transmit, because browsers
refuse to grant mic access (getUserMedia) on plain HTTP over a LAN IP.
See Mobile → A note on HTTPS and mic access
and Developer Guide → Ports and HTTPS modes
for the full picture.
Allow inbound TCP 6060 (HTTP) and 6443 (HTTPS) on the server. The HTTPS port is the one remote clients must use to transmit — without it, phones / tablets / other-machine browsers will load the UI but the mic will refuse to engage.
-
Windows —
netsh advfirewall firewall add rule name="Zeus HTTP"  dir=in action=allow protocol=TCP localport=6060
netsh advfirewall firewall add rule name="Zeus HTTPS" dir=in action=allow protocol=TCP localport=6443
-
macOS — System Settings → Network → Firewall → Options → allow
incoming connections for
Zeus.Server. -
Linux (ufw) —
sudo ufw allow 6060/tcp && sudo ufw allow 6443/tcp -
Linux (firewalld) —
sudo firewall-cmd --add-port=6060/tcp --add-port=6443/tcp --permanent && sudo firewall-cmd --reload
You also need UDP broadcast to reach the radio from the server — this usually just works on a flat home LAN, but VLANs / managed switches / guest-network isolation will block it.
From any laptop, desktop, tablet, or phone on the same LAN, open a browser at:
https://<server-ip-or-hostname>:6443
e.g. https://shack-pi.local:6443 or https://192.168.1.50:6443.
The first time you visit, your browser will warn about the self-signed certificate — accept it once (on iOS / Safari you may need to install and trust the cert in Settings) and the PWA install picks up the HTTPS origin from then on.
Use HTTPS /
:6443whenever the server is not on the same machine as the browser. Browsers refusegetUserMedia(mic input for TX) on non-localhost HTTP origins, so a phone or remote desktop talking tohttp://<server>:6060will load the UI fine but be unable to transmit. The plain-HTTP:6060URL still works for RX-only operation if you just want to listen.
For an app-like experience, use the
PWA install flow
below — install it from the https://<host>:6443 origin so the PWA
inherits microphone access.
The first time Zeus.Server runs on a machine, WDSP/FFTW builds a
one-shot "wisdom" cache that plans the FFT sizes OpenHPSDR Zeus uses.
It takes 1–3 minutes on a modern CPU. You'll see lots of lines like:
Planning COMPLEX FORWARD  FFT size 64
Planning COMPLEX BACKWARD FFT size 64
... (many lines) ...
Don't click Discover or Connect until you see wdsp.wisdom ready result=1 (built) in the console. Connecting before wisdom completes
will crash the backend with a native double-free.
The wisdom file is cached so subsequent launches come up instantly:
| OS | Path |
|---|---|
| macOS | ~/Library/Application Support/Zeus/wdspWisdom00 |
| Linux | ~/.local/share/Zeus/wdspWisdom00 |
| Windows | %LOCALAPPDATA%\Zeus\wdspWisdom00 |
In Server mode this build happens once on the server and never again, regardless of how many clients connect.
OpenHPSDR Zeus is a fully-featured PWA, so you can get the "feels like a
native app" experience without any of the desktop installers — and right
now this is arguably the cleanest path. It works against either a local
Zeus.Server (Desktop mode) or a remote one (Server mode).
- Open OpenHPSDR Zeus in Chrome, Edge, or Safari (Safari 17+):
-
Desktop mode (same machine):
http://localhost:6060. -
Server mode (remote host):
https://<host>:6443— use HTTPS here, otherwise the installed PWA won't be able to access the microphone for TX.
-
Desktop mode (same machine):
- Click the Install icon in the address bar (Chrome / Edge) or File → Add to Dock… (Safari).
- OpenHPSDR Zeus now lives in the Dock / Start Menu / Application Launcher with its own window, no browser chrome, and works offline for the static shell.
The PWA path keeps a real browser engine underneath, so devtools and "open in tab" remain available — useful while OpenHPSDR Zeus is still in heavy active development.
OpenHPSDR Zeus is not signed with an Apple Developer certificate, so macOS will block it on first launch. To clear the quarantine flag, open Terminal and run:
xattr -cr /Applications/Zeus.appIf you still see a security warning, go to System Settings → Privacy & Security and click Open Anyway.
The current installers are deliberately minimal — a self-contained .NET app plus a launcher that opens your default browser. This is the same shipping pattern used by Jellyfin, Sonarr, and Plex. It works, but it flashes a console / shell window on launch and depends on the OS browser.
A Phase 2 packaging pass will replace the launcher with a native-window host (most likely Photino, which wraps WebView2 / WKWebView / WebKitGTK from C# and reuses the same self-contained .NET publish we already build). That gets us a single double-click app with no console pop-up and a real OS window.
It is not a current priority. The focus until then is on radio functionality — protocol coverage, TX behaviour, and DSP correctness. There is no ETA. Use the PWA install path above for a windowed, dock-friendly experience right now.
Once OpenHPSDR Zeus is running, head to Getting Started for the first-minute walkthrough.