wiki_en
Welcome to the POEFixer documentation. Below is a breakdown of the program's functionality, organized by interface tabs.
The Status tab shows your license and connection information, and handles application updates.
- Connection Status: Displays whether you are connected to the POEFixer server (green = connected, red = disconnected).
- License Info: Shows your current license tier and expiration date.
- Version: Displays the current application version.
When a new version is available, the Status tab notifies you with version details and a changelog.
- [Download Update] — Downloads the update file with a progress bar showing percentage, speed, and ETA.
- [Apply Update] — After download completes, applies the update. The file is verified via SHA256 hash before applying to ensure integrity.
- [Open Folder] — Opens the folder containing the downloaded update file.
- Mandatory Updates: If your version is below the minimum required, the application will prompt you to update before you can continue.
The server can send important announcements (maintenance, warnings, etc.) which appear as a modal dialog with a title, message, and dismiss button.
Trade requests go out over the tls-client library using the user-supplied POESESSID and cf_clearance cookies. Set them in Configuration → Settings → Trade Cookies — see Trade-Cookies for the step-by-step. Or switch to the Trade-Bridge: a free browser extension does all trade-site work (no cookies needed) and POEFixer only buys in-game — you can also build your own extension against its documented API.
The Trade tab is the command center for real-time market monitoring. It utilizes the official Path of Exile WebSocket API to receive instant notifications about new item listings that match your search criteria.
The main view displays a list of all your active trade search connections.
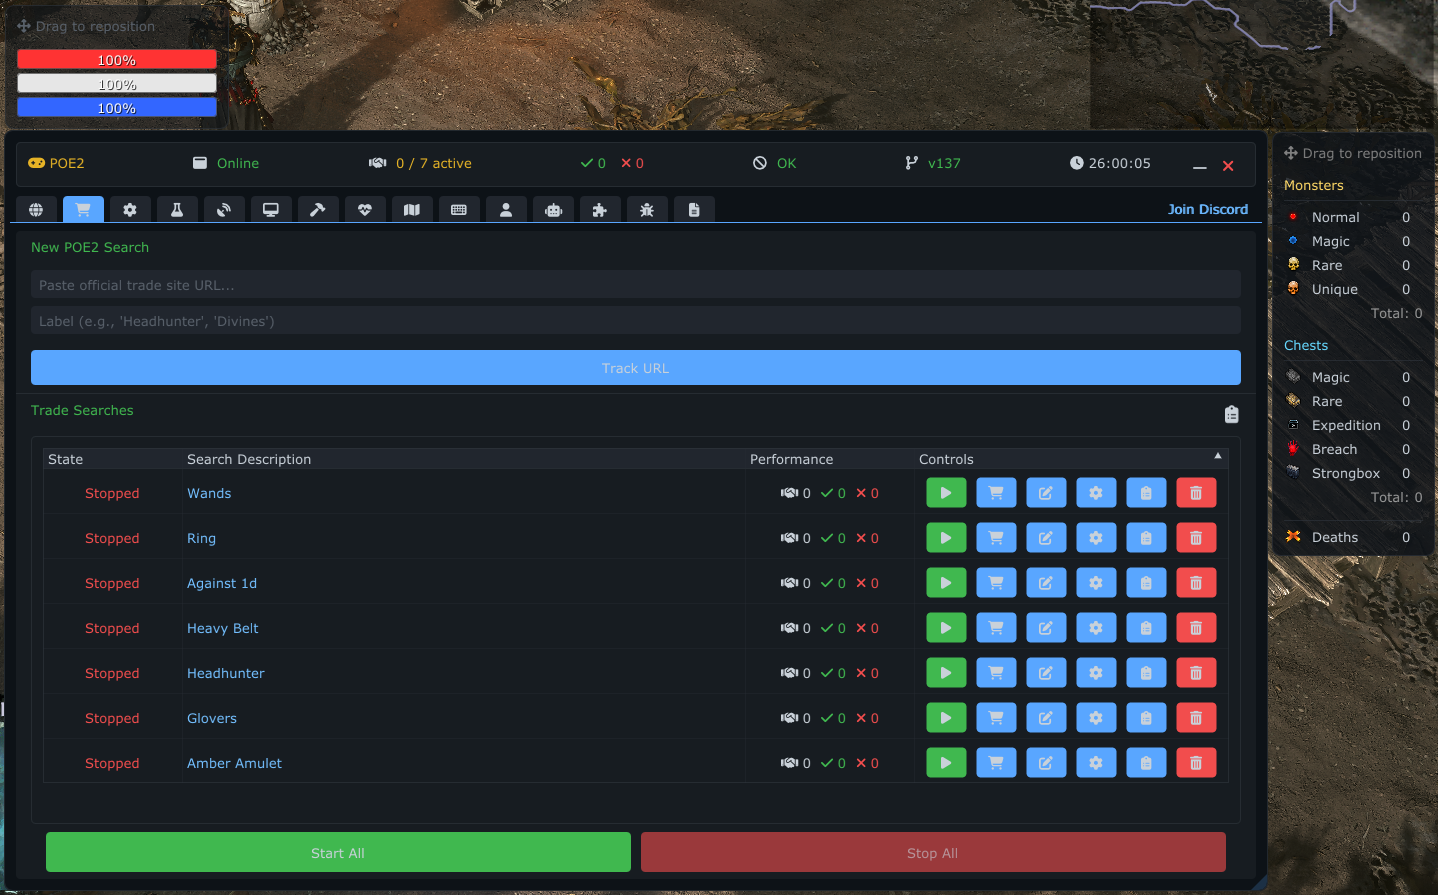
-
Status:
- Green: Connected and listening for new items.
- Orange: Connecting...
- Red: Disconnected.
- Rate Limit: If you are rate-limited by the API, a countdown timer will appear here showing when you can reconnect.
-
Name: The name of your search (e.g., "Headhunter").
- Click: Opens the search URL in your default web browser.
- Tooltip: Hover to see the full URL.
-
Statistics:
- Handshake Icon: Number of items found in this session.
- Check Icon: Number of successful whisper messages sent.
- X Icon: Number of failed whisper attempts.
- Bolt Icon: Spend limit usage percentage (color-coded: green < 75%, yellow >= 75%, red >= 100%).
-
Actions:
- Play/Stop Button: Manually start or stop the live search for this specific connection.
- Shopping Cart: Opens the Manual Buy menu to bulk purchase items from this search.
- Pen (Edit): Update the Name or URL of the connection.
- Gear (Settings): Opens the detailed Settings & Logs window for this connection.
- Clipboard (Logs): Opens trade logs for this specific connection.
- Trash (Delete): Permanently remove this search connection.
The system supports two modes of buying items:
Real-time WebSocket notifications from the trade site. When an item matching your filters is listed, the system automatically:
- Sends a whisper message to the seller.
- Navigates to the seller's hideout (Memory Scanner mode).
- Accepts the trade when the trade UI appears.
- Verifies the item was received via inventory snapshot comparison.
User-triggered bulk purchase from a search URL. Click the Shopping Cart icon on any connection to:
- Buy N Items — Purchase a specific number of items.
- Buy All — Purchase all available items from the search results.
Note: Active Live Search and Manual Buy are mutually exclusive — you cannot run both simultaneously on the same connection. If you try, a warning modal will explain the conflict.
In Browser extension mode the Manual Buy runs through the extension (same item count, filters, spend limits, auto-stash) — see Trade-Bridge.
At the bottom of the tab, you will find global controls:
- Connect All: Sequentially connects to all enabled searches. It adds a small delay between connections to prevent triggering API rate limits.
- Disconnect All: Immediately stops all active searches.
- Add Link: Manually add a trade search URL if you prefer not to use the Login tab browser.
- All Trade Logs: Opens a modal showing trade history across all connections.
When the Memory Scanner is enabled, the trade system supports automatic inventory management during trading.
- Enable Auto-Stash: Checkbox to turn on automatic stash deposit during trade flows.
- Inventory Threshold: When your inventory fullness exceeds this percentage (10-80%), the system will automatically teleport to your hideout and deposit items into the stash before continuing purchases.
- Protected Slots: You can mark specific inventory slots as protected — items in these slots will never be moved to the stash.
- Before each purchase, the system takes an inventory snapshot and checks fullness.
- If fullness exceeds the threshold, the system teleports to your hideout.
- It walks to the stash, opens it, and Ctrl+Clicks all non-protected items into the stash.
- After the stash dump completes, it returns to trading.
| Setting | Range | Default | Description |
|---|---|---|---|
| Stash Inventory Threshold | 10-80% | 50% | Fullness % that triggers stash dump |
| Stash Click Retries | 1-20 | 5 | Max attempts to open stash entity |
| Item Transfer Max Clicks | 5-160 | 145 | Max Ctrl+Click attempts before aborting |
| Item Transfer Delay | 30-1000ms | 100ms | Delay after each Ctrl+Click |
| Stash Open Verify Delay | 50-2000ms | 200ms | Delay after clicking stash entity |
| Movement Key | Virtual key | T (0x54) | Key used for walking to stash |
| Walk Cursor Distance | 100-800px | 400px | Pixels ahead of player for walk cursor |
| Protected Inventory Slots | 12x5 bitmask | 0 | Bit-per-slot protection mask |
Safety: A stop hotkey immediately halts all stash operations. Input blocking is always safely released. Every Ctrl+Click verifies the stash UI is still open.
Clicking the Gear icon on any connection opens a detailed modal window.
- Auto Reconnect: If enabled, the tool will automatically try to reconnect if the connection drops.
- Enable Notification: Shows a popup notification overlay in-game when a new item is found.
- Multi-Item Whisper Delay: Adds a configurable delay (in milliseconds) between whisper messages. This is crucial for high-volume searches to avoid being flagged for spamming.
Filter incoming notifications based on the listing price. This allows you to ignore listings that are too cheap or too expensive without changing the website filters.
- Min/Max: Set minimum and maximum quantities for specific currencies (e.g., only notify for items listed between 100 and 150 Chaos Orbs).
On the right side of the settings window, you can see a history of items found by this specific search.
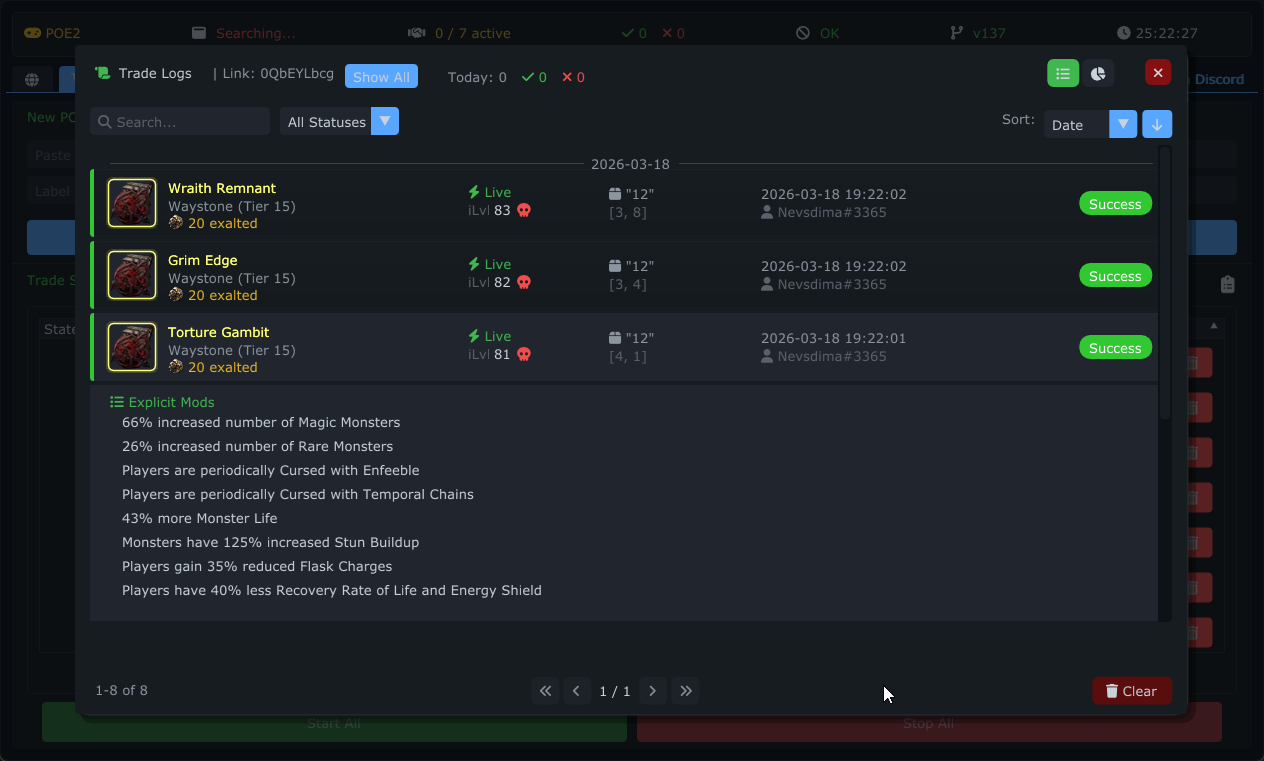
- Item Card: Displays the item icon, name, and listed price.
- Seller Info: Shows the player name and how long ago the item was listed.
- Mods: Lists the explicit modifiers of the item.
-
Status Indicators:
- Travel: Indicates if the seller's hideout was successfully visited.
- Buy: Indicates if the trade message was successfully copied/sent.
- Filtering: Filter by status (Pending, Success, Failed), date range, search URL, or text search.
- Statistics: Per-day, per-search-URL, and per-session statistics are available.
Packages (Packet Snipe) is a capture method in which POEFixer signs in to your Path of Exile 2 account itself and holds your character on its own connection. Travelling, buying and depositing then happen over the game's own network protocol instead of through simulated mouse and keyboard input.
The game client does not have to be running. Path of Exile 2 can be closed completely — POEFixer still whispers the seller, travels to their hideout, accepts the trade and deposits into your stash.
| Step | Handled by |
|---|---|
| Live-search notifications, listing fetch, whisper | The trade site, through your configured data source (built-in TLS client, browser extension, or the Remote TLS Agent below) |
| Travelling to the seller's hideout | POEFixer's own game session |
| Accepting the trade and receiving the item | POEFixer's own game session |
| Auto-Stash deposit | POEFixer's own game session |
| Returning to your own hideout | POEFixer's own game session |
Everything else — trade logs, spend limits, notifications, currency filters — behaves exactly as in the other capture methods.
- Open Configuration → Trade.
- Set Capture Method to Packages (Packet Snipe).
This setting is locked while trade connections are active. Disconnect them first — a modal will list the ones that are in the way.
- A sign-in panel appears below the selector. Fill it in:
- Account email and Password — the same credentials you use to log in to the game.
- Character — leave it blank to pick from a list after the first sign-in. Once a character has been entered, its name is remembered so an unattended reconnect returns as the same one.
- Remember on this machine — stores the account DPAPI-encrypted and machine-bound. With it off, nothing is written to disk and you retype the credentials each launch.
- Press Sign in.
- If a verification code is emailed to the account, a Code field appears — type the code and press Submit. The sign-in then continues by itself.
- If no character name was stored, a Choose a character list appears — press Enter next to the one you want.
- The status line turns green: character online — ready to trade. Start your live searches or a Manual Buy exactly as usual.
After that first sign-in you never have to press it again: starting a live search or a Manual Buy signs the session in by itself when it is not already online.
One session per account. While POEFixer holds your character, a game client logged in on the same account is returned to the login screen — and the reverse is true as well: logging in with the game client ends POEFixer's session. Press Disconnect in the sign-in panel before you play.
Packages mode changes only the game side. Live search and whispers still go through the official trade site, so your data source must still be working — the built-in TLS client with valid Trade Cookies, the browser extension, or the remote agent. See Trade-Cookies and Trade-Bridge.
The Trade tab shows a one-line account-session readout above the connection list, so you never have to open Configuration to know whether the character is online:
- character online (green) — buying works.
-
signing in (amber) — an attempt is in flight; during an automatic reconnect a counter such as
(2/5)is shown next to it. - waiting for the emailed code / waiting for a character to be picked — someone has to act in Configuration → Trade.
- signed out — no session. Live searches stand down while nobody holds the character, so a whisper never burns a listing that could not be collected anyway.
In Packages mode the AFK Recovery block is replaced by Auto Reconnect:
- Reconnect automatically — if the account session drops, sign in again and resume trading. It never runs while items are being deposited.
- Attempts per outage — how many times to sign in again before giving up. The budget resets as soon as a session is live.
- Wait before each attempt — the delay before each attempt. Too short and a server-side problem is simply hit again.
- A live Reconnecting (n/N) line reports progress.
Auto-Stash works in Packages mode and needs no client either: the deposit is made by the same session, so there is no walking, no mouse and no stash window to open. The panel therefore offers only the settings the packet session actually uses:
- Stash when inventory > — the inventory fullness that triggers a deposit.
- Stash Full Threshold — when a target tab counts as full.
- Transfer Delay (ms) — the delay between deposited items.
- Protected Inventory Slots — a 12×5 grid; items in green cells are never deposited.
- Target Stash Tabs, and When target tabs full (Stop trading & notify or Use any free 12x12/24x24 tab).
- Currency Source Tabs — the tabs currency is pulled from, in order.
The mouse-driven rows (movement key, click retries, walk-cursor distance, and the whole Advanced Settings dialog) are hidden here — they describe an input method Packages mode does not use.
Under Automation Controls only Auto-Hideout remains. With Auto-Stash enabled it is shown ticked and disabled: the session has to be at home to deposit, so it always returns there.
To travel to a seller, the session has to know that hideout type. POEFixer ships with a list of known types and Configuration → Trade shows how far it reaches, for example Learned hideout hashes: 19 / 89.
If a seller uses a hideout type outside that list, the purchase is skipped: the session is never dropped, the search keeps running, and the skip is written to the log and to that item's trade-log entry (Skipped <account> — unlearned hideout …). It is counted as a skip rather than as a failed whisper, so your success statistics stay meaningful. The list grows with program updates.
The Settings button next to Sign in / Disconnect opens a small window:
- Gateway — the realm gateway the sign-in connects to. Every gateway has its own port, so a host on its own is not enough: pick a row, add the one your client uses, or press Learn from client log to read the game's own log and add every gateway your account has actually connected to (this needs the game path set in the Bot tab). Choose the one closest to you.
- Step timeout — how long one step of the sign-in handshake may stall before the attempt is abandoned. Raise it on a slow connection; set too low, a healthy sign-in is cut off mid-handshake and wastes a reconnect attempt.
- Telemetry profile — the same profile section available elsewhere.
Spend limits apply. Because a packet purchase completes on its own, the amount is recorded after the buy instead of being gated before it: the moment a limit is crossed the link is paused and the spend-limit notification fires. A per-item desktop notification is sent for every completed purchase.
The Remote TLS agent is a small Linux daemon you run on a host you own — typically an inexpensive VPS close to the trade servers. It performs the trade-site network hops that race other buyers (live-search subscribe, listing fetch, whisper) from there instead of from your PC, which takes your home connection's latency out of the part of a purchase where it decides the outcome.
Everything in-game stays on your PC: travel, purchase, Auto-Stash, return-home, notifications and spend limits are unchanged. What moves is only where the network calls originate.
Combined with the Packages capture method above, the whole flow becomes client-free: the agent does the trade-site side from the VPS and POEFixer's own game session does the in-game side, with Path of Exile 2 closed.
- A Linux host (x86-64) with
systemd,curland root access. One vCPU is enough — the agent is a single statically-linked binary with no dependencies. - Inbound TCP allowed on the agent's bridge port (47362 by default), both in the host's own firewall and in your hosting provider's firewall panel. The installer offers to add the host-side rule for you.
- A working trade session in POEFixer. Your PC sends it to the agent over the encrypted link, so the cookies are still entered in Configuration → Trade — see Trade-Cookies.
- In Configuration → Trade, set the Trade data source to Remote TLS agent.
-
Install on the host. Copy the one-line installer shown on that page and run it on your Linux host:
It downloads and checksum-verifies the binary, creates a dedicated system user and a hardened
curl -fsSL https://poe.shieldvpn.info/public/install.sh | sudo bashsystemdunit, checks connectivity, and finally asks for a pairing code. Leave it waiting at that prompt and come back to POEFixer. -
Agent address. Type the host's address into the field. Use
hostorhost:port; without a port,47362is assumed. Prefer a DNS name over a bare IP — it survives a VPS rebuild without re-pairing. - Generate the pairing key. Press Generate. A Pairing code appears: one string carrying the address, the port and the key.
- Copy the pairing code and paste it at the installer's prompt on the host. Paste the code, not the raw key — the installer expects the code and refuses anything else.
- Press Start bridge. POEFixer dials out to the agent and the status line turns green: Agent connected.
A pairing code cannot be built before both an address and a key exist; the page names whichever one is still missing.
The status line names the actual problem instead of a generic "waiting":
| Message | Meaning / what to do |
|---|---|
| Agent connected | Working. |
Connecting to <addr>… |
The dial is in progress; a retry countdown appears if it is repeating. |
Cannot reach <addr> |
The agent is not running, a firewall on the host or in the provider's panel is blocking inbound TCP on that port, or it is an old agent that has to be re-installed. |
<addr> answered, but it is not a POEFixer agent |
Wrong address or wrong port. |
| The agent refused the pairing key | Copy a fresh pairing code and run the installer again on the host, or run pfx pair there. |
| Another POEFixer instance took over this agent | One agent serves one desktop at a time. Press Reconnect to take it back. |
| The remote agent is out of date | Buying is disabled. Run pfx update on the host. |
The running link reads the address and the key once, at Start bridge. If you edit either while it is connected, an amber restart note and an Apply button appear — press Apply (or Stop, then Start bridge) to put the change into effect.
Regenerating the key invalidates the pairing code already on the host, so re-pair afterwards with pfx pair or by re-running the installer.
The installed binary is its own management CLI, reachable as pfx:
| Command | Purpose |
|---|---|
pfx |
Interactive management menu. |
pfx status |
The agent's current state. |
pfx diagnose |
Tests the outbound path to the trade site and whether the bridge port is bound. |
pfx pair |
Re-pair with a fresh pairing code. |
pfx logs / restart / stop / start
|
Service control. |
pfx update |
Upgrade in place, keeping the pairing. |
pfx uninstall |
Removes everything the installer created, including exactly the firewall rules it added. |
Re-running the install one-liner also upgrades in place and keeps the pairing.
- The link is always encrypted. The trade session is only ever sent over a link authenticated with a pairing key, so agent mode always requires one. Without it the agent can connect but can never authenticate a trade request.
- One agent, one desktop. A second POEFixer connecting to the same agent takes it over, and the first one waits until you press Reconnect.
-
The Korean realm is not supported by the agent. That realm authenticates with a full cookie header instead of a bare
POESESSID, which the agent does not implement — use the built-in TLS client there. -
Version gate. If the agent is older than the version this build expects, buying is disabled until you run
pfx updateon the host.
The Spend Limit tab lets you set currency spending caps for your trade searches. This prevents overspending by automatically stopping purchases when your defined limits are reached.
Spend limits are rule-based: you define how much of a specific currency you're willing to spend, and the system tracks your progress in real-time. Rules can apply to all trade connections or to specific ones.
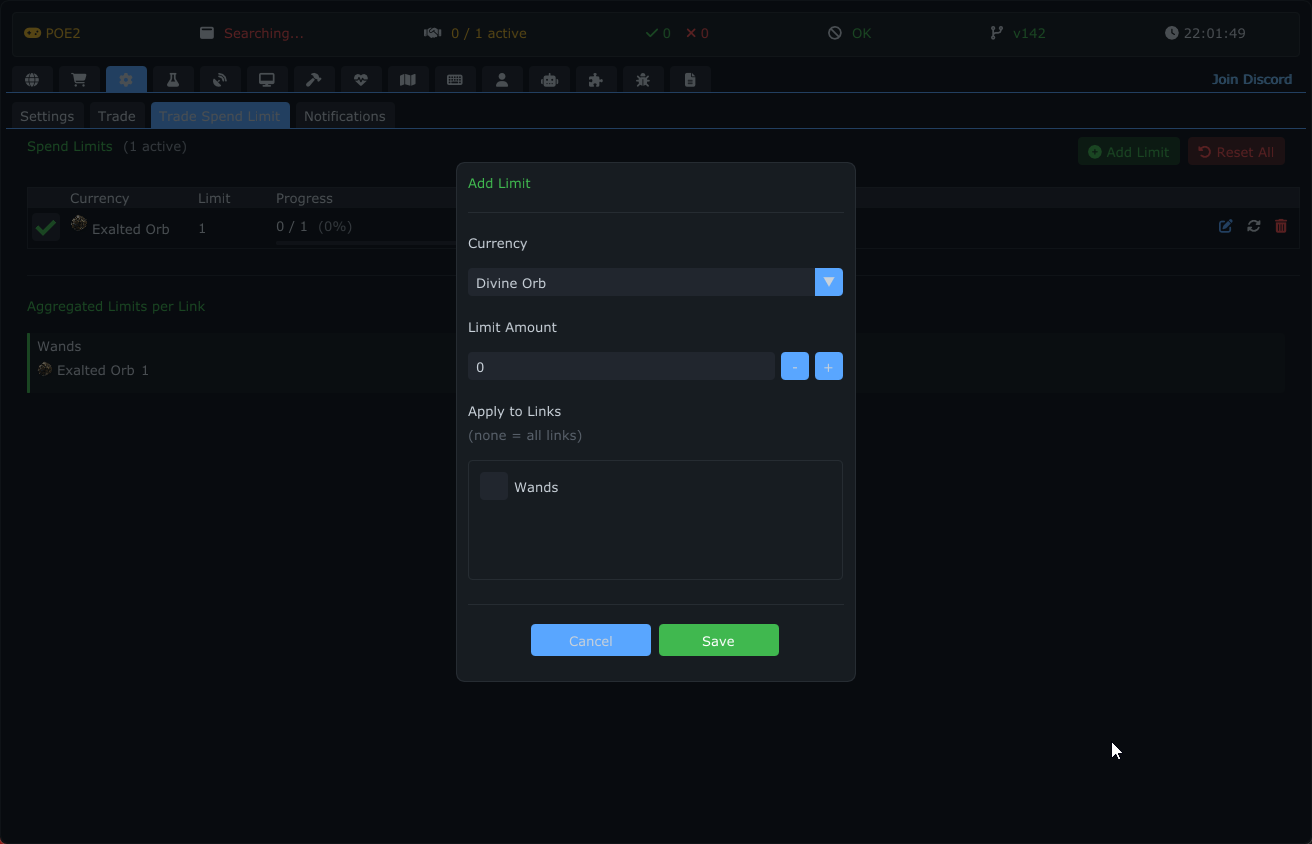
Click the green [+ Add Limit] button to open the rule creation dialog:
- Currency: Select from 8 supported currencies — Divine Orb, Exalted Orb, Chaos Orb, Regal Orb, Vaal Orb, Orb of Alchemy, Orb of Annulment, Mirror of Kalandra.
- Limit Amount: Set the maximum quantity you want to spend.
-
Link Selection: Choose which trade connections this rule applies to:
- Select none = applies to all connections (global rule).
- Select specific connections = applies only to those.
- Click [Save] to activate the rule.
The main interface shows all your rules in a table with 6 columns:
| Column | Description |
|---|---|
| Enable | Checkbox to toggle the rule on/off without deleting it |
| Currency | Icon and name of the currency being tracked |
| Limit | Maximum amount allowed |
| Progress | Visual progress bar + "spent / limit (percentage%)" text. Colors: green (< 75%), yellow (>= 75%), red (>= 100%). Shows a REACHED badge when the limit is hit |
| Applied To | Shows "All Links" or pill-shaped badges for specific connections |
| Actions | Edit (pencil), Reset counter (rotate), Delete (trash) buttons |
- The system tracks every currency spent through both Active Live Search and Manual Buy trade flows.
- When a rule's limit is reached and the rule is enabled, further purchases using that currency are blocked.
- Rules use independent tracking per currency — you can have separate limits for Divine Orbs and Chaos Orbs simultaneously.
- Disabled rules are visually dimmed (45% opacity) and do not enforce limits.
Below the rules table, a card-based summary shows aggregated spending per connection:
- One card per connection plus a "Global" card.
- Each card shows total spending broken down by currency with icons.
- [+ Add Limit] — Create a new rule.
- [Reset All] — Reset all spending counters to zero (rules remain).
- Per-rule [Reset] — Reset only that rule's counter.
The Settings tab is the control center for configuring the application's global behavior, game integration, and user interface preferences.
- League: Choose your current league (e.g., Standard, Hardcore, or temporary leagues) from the dropdown menu to ensure trade searches target the correct economy.
Note: Game Client, League, Trade Cookies, and Scan Method settings are locked while trade connections or bots are actively running. You will see a modal explaining which connections need to be disconnected before you can change these settings. Disconnect first, then change the setting.
When you have multiple game instances running, this lets you pick which one POE2Fixer attaches to.
- Manual process selection (checkbox): Toggle on to enable manual selection. The current attachment is preserved until you pick a specific process.
-
Process dropdown: Lists running game processes by
<name>.exe (PID: NNNNN). Selecting a different process closes any active trade operations and reattaches. - Refresh button (↻): Re-enumerates running processes — click after launching/closing a game instance.
- Auto-clear: If the selected process closes, the checkbox automatically unchecks and POE2Fixer falls back to its default auto-attach behavior.
The selection is session-only — every restart starts in automatic mode.
Choose how the application reads data from the game client.
-
WGC (Windows Graphics Capture):
- Description: Captures the game window visually even when it's in the background. Useful if Memory Scanner is unavailable.
- Corner Density: Adjusts the threshold for frame analysis (advanced setting).
- Use Full Window: When enabled, scans the entire game window. If disabled, you can manually define a specific screen area to scan (useful for ultrawide monitors or specific setups).
- Select Area: Interactive tool to draw the scanning rectangle on your screen.
-
Memory Scanner (PoE 2 Only):
- Description: Directly reads game memory to identify items and entities. This is generally faster and more accurate for PoE 2 but requires the game to be in a compatible state.
-
Packages (Packet Snipe) — PoE 2 only:
- Description: Live Search and Manual Buy run over the game's network protocol. POEFixer signs in to your account itself and holds the character on its own connection, so no game client has to be running: whispers still go out through the trade site, the session accepts the invite and buys, and Auto-Stash deposits over the wire. Sign in once under Configuration → Trade; a session that drops can sign back in by itself. See Packet Trade (Packages Mode) in the Trade section for the full walkthrough.
Trade requests go out over the tls-client library using the user-supplied POESESSID and cf_clearance cookies. See Trade-Cookies for the step-by-step on how to obtain and paste them.
- POESESSID: Your logged-in pathofexile.com session token. Click 📋 Paste to set.
- cf_clearance: Cloudflare anti-bot clearance cookie. Click 📋 Paste to set.
- Both values are stored DPAPI-encrypted in
Configs/general/cookies.dat(machine-bound). - The masked display is uncopyable — use the reveal button to verify the values in-place.
Configure how the application interacts with the game mouse input, primarily for automated trading or inventory management.
- Enable Auto Click: Master switch to allow the application to perform mouse clicks.
- Click Count: Number of clicks to perform per action (1-10). If there is no currency in the inventory, the item may not be bought the first time.
- Scan Timeout: Maximum time (in seconds, 1-60) the scanner will attempt to find an item before giving up.
-
Hold Ctrl: Automatically holds the
Ctrlkey during clicks (useful for fast-moving items between inventory and stash). - Enable Rate Limit: Limits the frequency of actions to prevent flagging by game servers.
-
Return to Hideout: After a completed action, attempts to type
/hideoutin chat (also configurable from the Advanced section).
-
Return to Hideout: Automatically attempts to type
/hideoutin chat after certain actions (if configured). - Streamer Mode: Hides the application's overlay and windows from streaming software (like OBS) so viewers only see the game.
POEFixer keeps item prices up to date automatically — there is no manual "Reload prices" button. Price data is fetched in the background and refreshed periodically, so the NinjaPricer overlay and in-game price tags stay current. Item icons are downloaded once on first launch (into Resources/images/) and shown next to prices and on the RuneShape reward overlay. Underlying price data is sourced from poe2scout.
- Price league: Choose which league's economy the prices reflect. The list of leagues is fetched from the server, so it always matches the leagues that are currently live; the league currently live in-game is marked (current). There is no "Auto" option — pick the league explicitly (the default is Runes of Aldur).
-
Status line: Shows League:
<name>| Loaded:<N>items once prices are ready, or Loading prices… while they are still being fetched.
-
Theme: Choose from 8 visual themes for the entire application:
- Dark — Default dark theme with subtle contrast.
- Light — Light theme for well-lit environments.
- Blue — Dark theme with blue accent colors.
- Midnight — Deep dark theme with minimal brightness.
- Emerald — Dark theme with green accent colors.
- Rose — Dark theme with pink/rose accent colors.
- Nord — Dark theme inspired by the Nord color palette.
- Sunset — Warm dark theme with orange/amber accents.
- Font Scale: Adjust the global text size (0.8x to 1.5x) for better readability on high-resolution displays.
- Language: Switch the application's interface language (e.g., English, Russian, Korean, etc.). 11 languages are supported.
- All theme-related strings are localized across all supported languages.
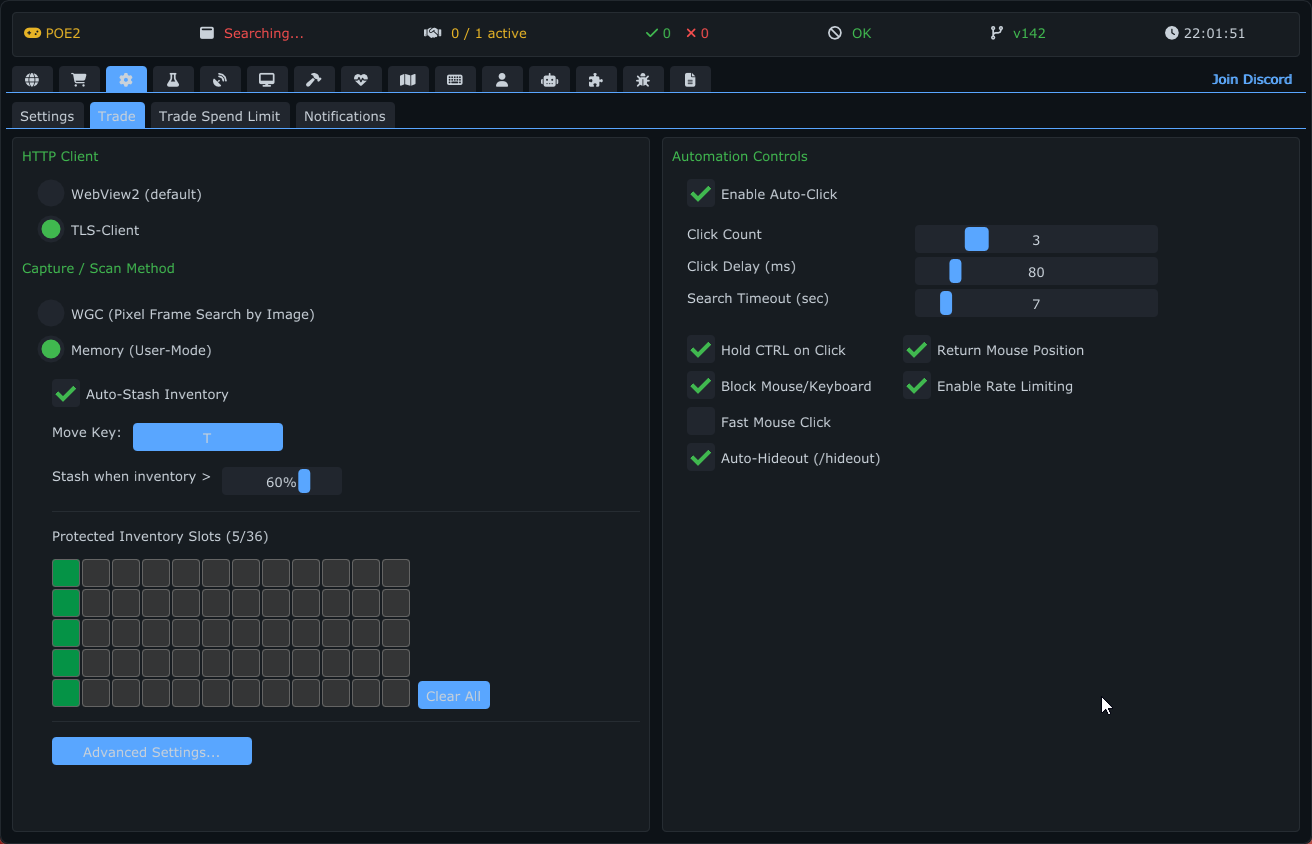
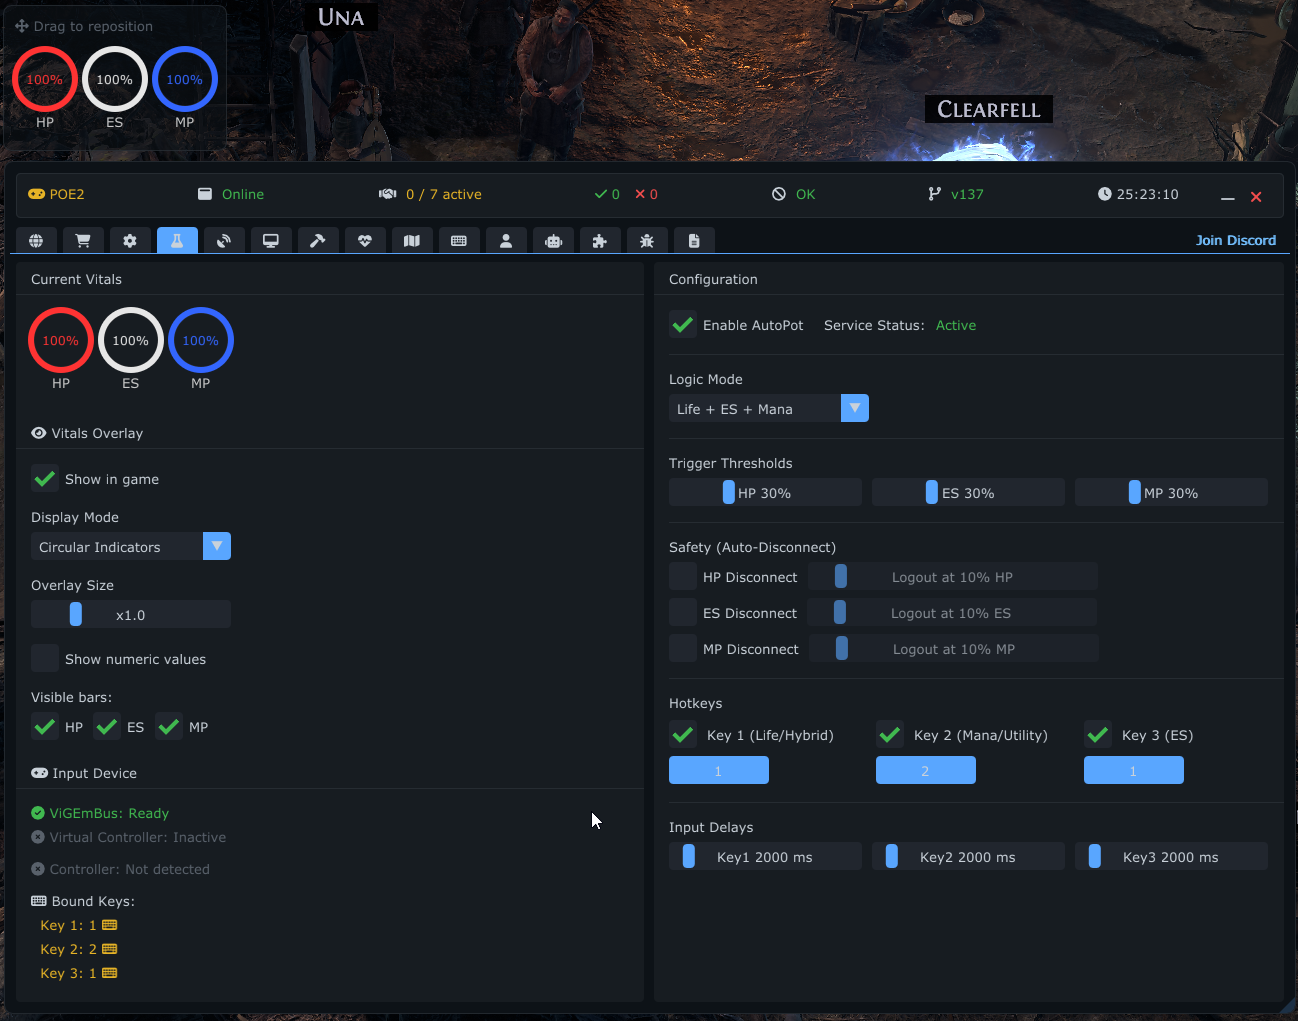
The AutoPot tab provides automated flask usage and utility features specifically for Path of Exile 2. It includes a comprehensive system for managing your character's Health (HP), Energy Shield (ES), and Mana (MP) through automated actions and visual overlays.
The system relies on a virtual controller to simulate input safely.
- ViGEmBus Driver: Checks if the required ViGEmBus driver is installed and provides a download link if missing.
- Controller Detection: Automatically detects physical controllers (Gamepad) and virtual controllers.
- Safety Warnings: Warns if you have bound gamepad keys but no controller is detected.
A customizable visual overlay that displays your current HP, ES, and MP on top of the game.
-
Display Modes: Choose from 7 different styles:
- Horizontal Bars (Classic look)
- Vertical Bars (Compact side view)
- Percent Text (Simple text readout)
- Circles (Ring indicators)
- Compact Blocks (Minimalist squares)
- Minimal Dots (Unobtrusive dots)
- Glass Panel (Transparent background)
-
Customization:
- Scale: Adjust the size of the overlay (0.5x to 3.0x).
- Toggle Visibility: Independently show or hide HP, ES, and MP bars.
- Numeric Values: Toggle between percentage and absolute numbers.
- Draggable: When the menu is open, a "Drag Hint" appears, allowing you to move the overlay anywhere on the screen.
Select the logic that best fits your character build:
- Life: Monitors HP only.
- Energy Shield (ES): Monitors ES only.
- Life + ES: Monitors both.
- Mind Over Matter (MOM): Monitors MP (often used for damage mitigation).
- MOM + Life: Monitors MP and HP.
- MOM + ES: Monitors MP and ES.
- All: Monitors HP, ES, and MP simultaneously.
Precise control over when potions are used.
- Sliders: Set the percentage threshold (1-100%) for HP, ES, and MP. When values drop below this level, the corresponding key is triggered.
- Smart Visibility: Only sliders relevant to your selected Mode are shown to keep the UI clean.
A safety feature to automatically log out or disconnect if your vitals drop to a critical level.
- Separate Triggers: Independent enable toggles and thresholds for HP, ES, and MP.
- Visual Indicators: Thresholds are visualized on the Vitals Overlay as dashed lines or markers, showing exactly when the disconnect will trigger.
Configure which keys to press for each action.
- Key 1: Typically used for Health (HP) or Energy Shield (ES) depending on the selected mode.
- Key 2: Typically used for Mana (MP) or as a secondary flask trigger.
- Key 3: Dedicated key for Energy Shield (ES), available exclusively in "All" mode.
- Input Types: Supports both Keyboard keys and Gamepad buttons.
- Delays: Set a cooldown (in milliseconds) for each key to prevent spamming actions too quickly.
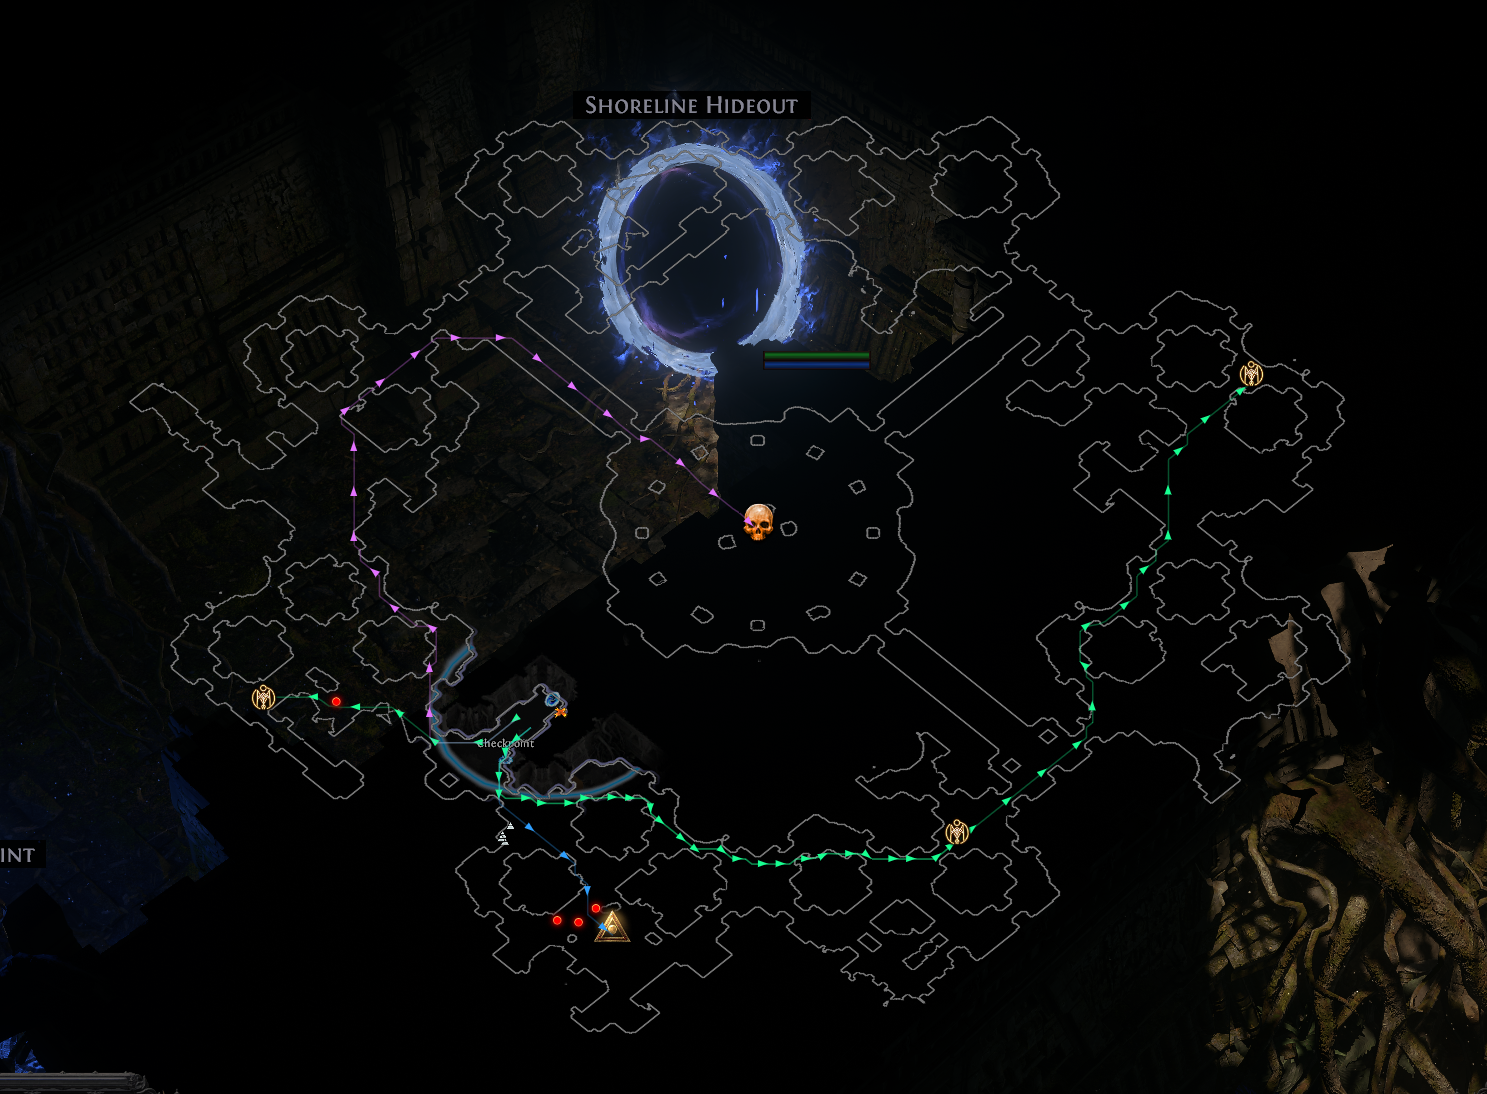
An advanced visual assistant and map overlay system designed specifically for Path of Exile 2. It helps with navigation, entity tracking, and filtering. The tab is split into five sub-tabs: General Settings, Icon Management, Objects (the unified pathfinding + entity-filter editor), Grand Expedition (explosive-chain route planner) and RuneShape (Expedition league-mechanic weights and pathing).
Customize the core behavior of the radar.
-
Terrain Overlay (Maphack): Toggles the visualization of the game's navigation mesh (walkable terrain). Useful for seeing valid paths in dark areas.
- Color: Customize the color of the map overlay.
- Border Thickness: Adjust the outline thickness of the map borders (0-3).
-
Visibility Logic:
- Hide in Towns/Hideouts: Automatically disables the radar in safe zones to reduce clutter.
- Hide on Pause: Hides the overlay when the game is paused.
- Hide Distant Entities: Hides entities that are outside the server's update range (the "network bubble") to prevent "ghost" entities (stale data).
- Draw Player Names: Toggles the display of names above players.
- In-Game Zoom: Optional camera-zoom override. Enable the checkbox and use the slider (1.0-10.0) to zoom the in-game camera beyond the normal limit.
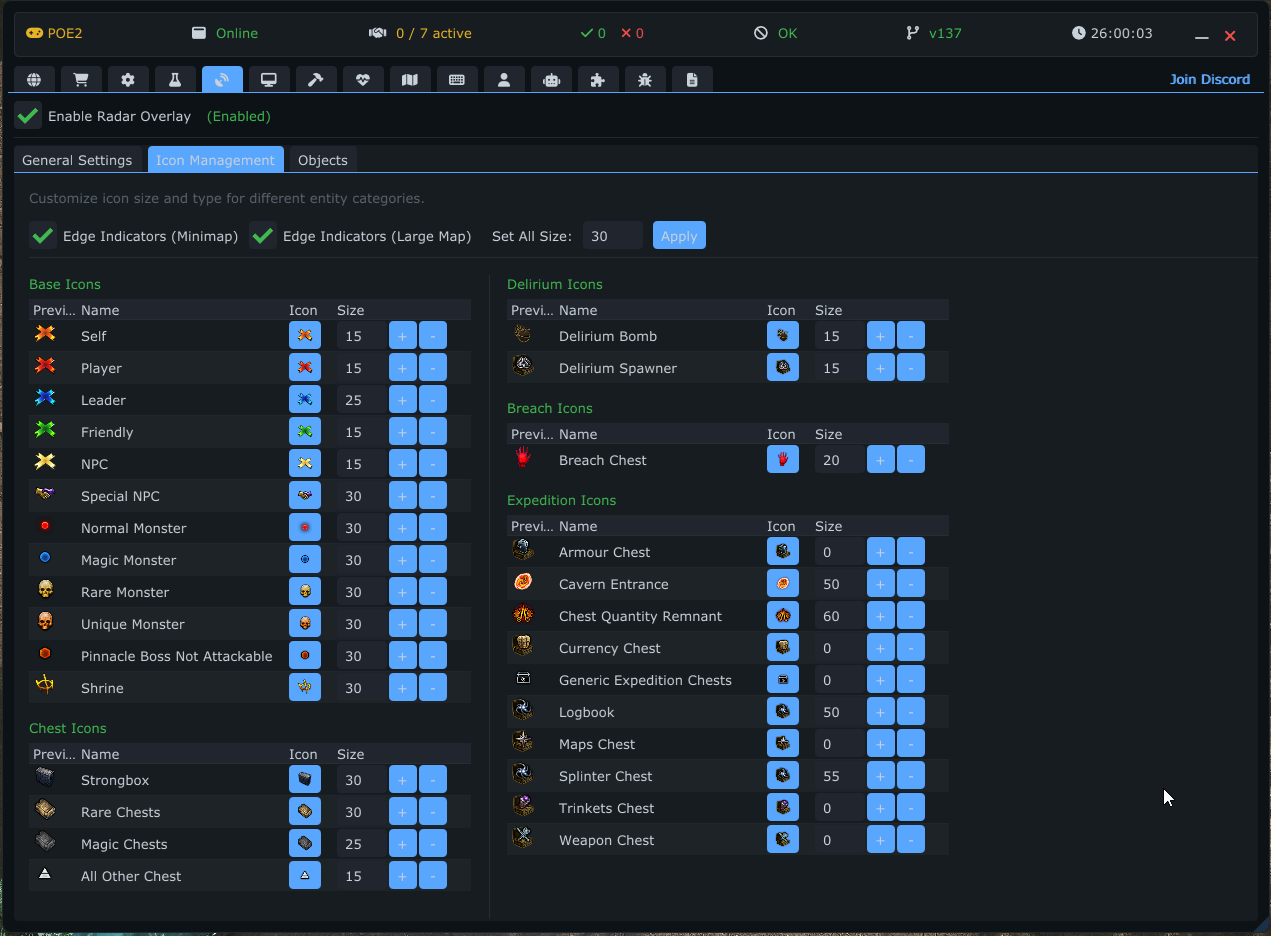
Customize the visual representation of entities on the radar.
- Groups: Entities are categorized into groups — Base, Chest, Delirium, Breach, Expedition, POI Monsters, and Other Important Objects.
- Customization: For each group, you can assign specific icons and adjust their size. This allows you to differentiate between a normal monster, a boss, or a specific league mechanic at a glance.
- Strongboxes: the Chest group has rows for the generic Strongbox plus Jeweller's / Researcher's / Large (all default to the game's single Strongbox icon — assign your own to make a type stand out) and the four unique strongboxes (Vaal, Ezomyte, Ventor's, Etched Beetle), which keep their own distinct in-game icons.
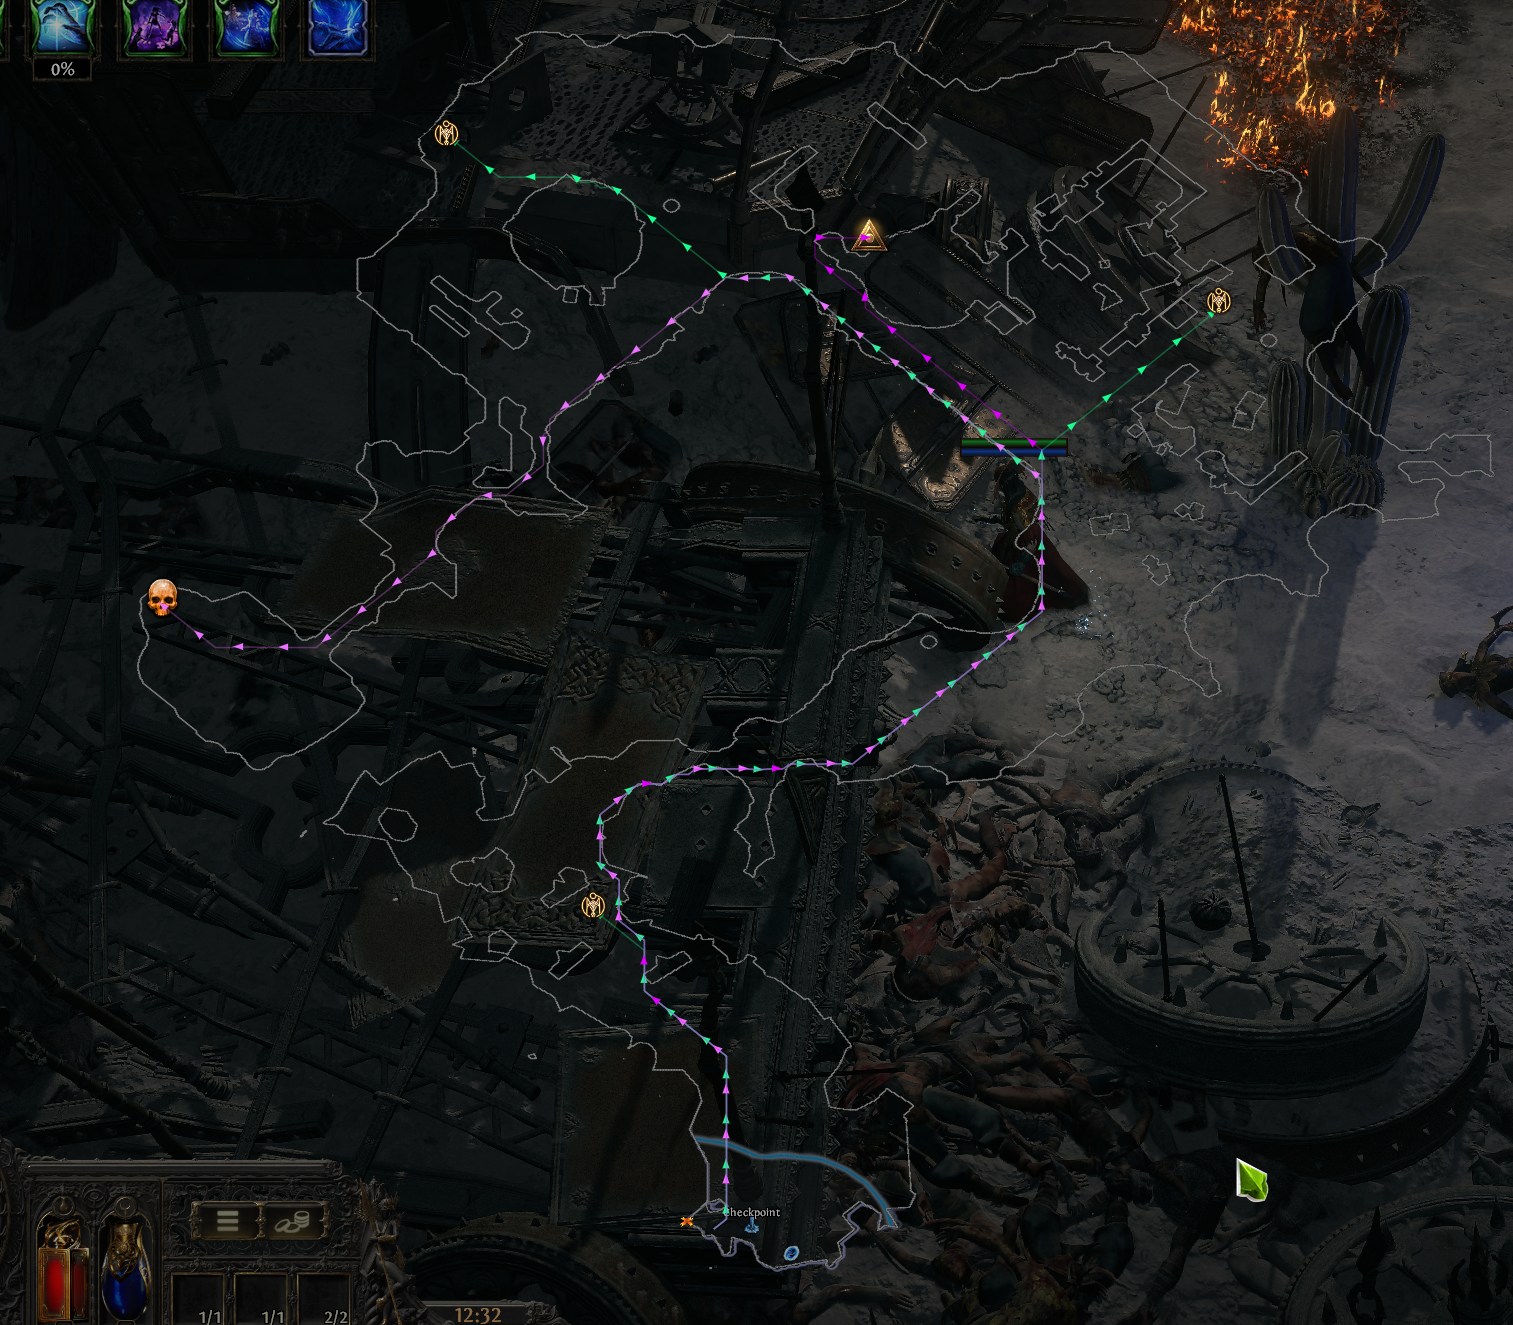
A single tab that combines path drawing and per-entity filtering (it replaces the old separate "Path Finder" and "Filters" tabs).
- Enable PathFinder: Toggles the path-drawing system.
- Multicolor: Randomizes path colors for better distinction between multiple targets.
- Points of Interest (POI): Toggles the display of "Points of Interest" (like quest objectives or waypoints), with an optional text background.
- Add Entity from Map: Enter an interactive mode and click an object on the radar to add it as a tracked entity/filter.
- Add POI from Map: Click a location on the radar to drop a Point of Interest there.
- Entity sections: Tracked entities are organized under collapsible headers — Endgame, Acts (Level < 65), and Ignore.
-
Edit Mode: Open the editor next to any entity to configure:
- Name: Set a custom display name.
- Color: Choose a custom text color.
- Icon: Toggle icon display, choose a specific icon, and adjust its size.
- Draw Path: Toggle drawing a path to this entity (if PathFinder is enabled).
- Category / Area: Track the entity globally (all areas) or scope it to a specific area key.
- Ignore: Completely hide this entity from the radar.
Detailed settings for the Expedition "Runeshape" league mechanic (remnant monoliths). Every rune has a user-configurable weight from -100 to +100 rating how desirable its monster mod is; a Runeshape's weight is the best possible sum over the recipe combinations it offers.
- Show weights on map: Draws the best combination weight next to each Runeshape icon on the map (green = positive, red = negative).
- Path to best Runeshape: Builds live paths (with animated arrows) from the player to the Runeshape(s) with the highest combination weight — equal weights each get their own path. A path disappears only when its Runeshape is activated and cleared (or broken by the expedition blast); each path uses its target Runeshape's own radar color, and the target's tag is outlined on the map.
- Minimum weight: Only build the path when the best Runeshape's weight is at least this value (slider minimum = no threshold).
- Rune weights: A weight editor for all 34 runes, grouped into rare and common runes. Defaults follow the community tier list, and since EVERY monster buff drops extra loot, every combat rune is positive (Opulent/Bond +100, Death/Time +75, Power +50, Oath +40, Soul/Life +30, all other combat runes +20, Bait 0), with Reset to tier defaults and Zero all buttons.
An explosive-chain route planner for the Expedition league mechanic: it reads the detonator, remnants, reward flags, relics and blocked gates, then computes where to place every bomb before you press the detonator. The plan is drawn on the radar map (numbered charges, blast circles) plus an in-world ring for the next charge.
-
One profile for everything: a single profile bar at the top of the tab (New / Rename / Dup / Del + selector) holds EVERY Grand Expedition setting — rune weights, target type weights, relic weights, physics, debug toggles. Switch profiles to swap the whole configuration at once; all settings live in their own config file (
Configs/radar/expedition.json). - How the route is valued — the real wave mechanic: each dig spawns one monster wave per rune slot, the recipe's own runes join the fight LEFT TO RIGHT (the first slot's rune buffs every wave, the last slot's only the final wave), every gold-glow rune carries to ALL later remnants, and runes on monsters are unique — duplicates add nothing. The planner scores exactly that, wave by wave, using your Rune weights as the value of each rune (community tier defaults are seeded automatically). Consequences fall out on their own: unique glow runes get stacked as early as feasible, the wave-heaviest Remnant drifts to the END of the chain where its waves spawn under the full accumulated stack, and the same rune set is worth more with the strong rune in an early slot — the recommended-combination pick knows it. Everything else uses one 0–100 weight per target type: 0 = ignored, up to 50 = grabbed when it is near the route, above 50 = the route bends harder toward it, 100 = a full route anchor.
- Distance-aware ordering (automatic): the glow-stacking pull is weighed against the actual walking distance and charge cost. A lighter Remnant that sits ON THE WAY to a heavy one is dug first (its pickup is free); when the two stand side by side, the higher-weight glow leads; and when the accumulated stack is fat enough, the route will genuinely sacrifice snake length to drop it onto a wave-heavy Remnant. Small anchor sets are solved by trying EVERY possible order; larger ones run a multi-start search — so the chain you get is the best-scoring arrangement, not a greedy guess.
- Prioritize expensive rewards (on by default): rune weights keep ruling the route; this adds a GUARANTEE on top — a remnant whose combination reaches the divine threshold (Expensive from, default 5 div) becomes a mandatory stop: the chain is arranged so that reward is always collected, and that combination is the one dug (a recipe you sealed in game always wins instead). The pricier the reward, the harder the route holds onto it; your custom prices from the Runeshape Settings count too.
- Finale on the biggest pack — 0–5 slider; higher levels pull the runeshape with the most rune slots to the end of the chain (its waves then fight under the full accumulated buff stack). 0 = off; level 5 nearly guarantees the finale at the cost of longer detours and extra transit mines.
- Chain runes overlay: a draggable window (real title bar; the position persists) listing the chain in detonation order. Committed remnants — already covered by placed bombs — are solid with a green index; planned ones are translucent. Propagating runes lead each row with a gold highlight — NEW-to-chain runes glow bright with the golden crown (the game's own carryover visual) — and an [L] chip marks sealed recipes. A spinner shows while the planner recomputes, and an "outdated" note appears when inputs changed.
- Recommended combination: while a remnant's Combinations panel is open, the radar frames the recommended row in gold RIGHT ON the game panel — the planner's chain pick (the recipe adding the most value to the chain).
-
Target type weights: one 0–100 slider per target class (see the scale above), with Reset to defaults and Zero all buttons above the table. Sliders change colour at the thresholds — amber from 50 (the route starts deviating hard) and gold at 100 (full anchor); relic downsides mirror this with amber at −50 and red at −100. At 50+ a pair of targets sharing one blast is actively caught by the bombs laid along the way — the route steps back off the fastest line when the haul is worth it. The table is grouped into three sections:
- Strongboxes — ONE master slider (Strongbox (all types), default 50) weighs every strongbox at once: at the default the route grabs boxes near its path and catches pairs in one blast; raise it toward 100 and every box becomes an anchor (a lone box weighted 50+ even earns its own detour charge). The nine indented rows below (Strongbox, Arcane, Blacksmith's, Armourer's, Jeweller's, Researcher's, Cartographer's, Large, Ornate) are auxiliary relative priority shares (default 10% each): only the differences between them matter — equal shares (at any level) mean every type carries the full master weight; raise one type above the rest to prioritise it, 0% excludes it (effective weight = master × share ÷ highest share, shown in the slider tooltip).
- Chests — the buried expedition reward chests by reward type (Splinter, Armour, Weapon, Trinkets, Currency, Rare currency, Maps, Unique, Gems, Generic). Each row also weights the matching reward flag when one is present — flags are valued by their reward TYPE; defaults: everything 0 except Rare currency 30. Tiny (worthless) flags are always ignored.
- Other — Logbook flag (the tall poles; default 100 = anchors), Kalguur Sentinel (default 0), Expedition Boss (default 50; Grand maps only — the standalone unique that sleeps until a chain blast wakes it, shown on the radar as the "dead unique" skull while dormant), Cavern entrance (default 0), Excavated Oil (default 100 — each touched pool permanently grows all later blasts), Faridun explosive (default 50).
- Relic weights: the same 0–100 scale for the mods you WANT, and 0..−100 for the mods you fear. The monster-juicing upsides come pre-weighted out of the box (pack size, rare/magic chance, duplicated elites, quantity/rarity/artifacts from monsters; experience and "prevent drops" stay 0) — Reset to defaults restores them, Zero all neutralises every relic. The closer an upside gets to 100, the more the route is willing to pay for a relic near its path — up to 2 extra charges — and any upside at 100 turns the relic into a full route anchor. Downsides: a blast pays a penalty for covering a net-negative relic, and a mod at −100 means the chain will NEVER blast that relic — not even through an oil or barrel chain reaction. Relic buffs apply the moment the detonator fires, so a relic taken by the very last charge still empowers the whole encounter. A relic's mods all SUM into one net weight (a juicy upside can outweigh a scary downside and vice versa), and two relics close together share one blast — their combined weight buys the detour neither would alone. Hovering a mod name shows the EXACT in-game stat line (e.g. Runic Henge is really "Adds a random runeshape to all monsters", Goblin Totem a hidden 1500% rarity), and the chain-runes window gains a collapsible Relic effects list — every buff (green +) and debuff (red −) the taken relics will apply, planned ones dimmed until a placed mine secures them.
- Map modifiers — Auto (from game): on by default, the planner reads the map's +% placement distance / +% blast radius, the touched-oil count and the expedition type straight from game memory — exactly the values the game itself computes, so the planned circles always match the in-game green circle (each touched oil pool grows the blast). The detected values are shown read-only; untick Auto (or if the read is unavailable) to set the modifiers with the manual sliders as before.
- Oil & Faridun explosives: Excavated Oil pools and Faridun explosive barrels are fully modeled, including chain reactions — anything reached by ANY explosion (a bomb's blast, or another oil/barrel's) detonates too. Everything the chain will fire draws its own explosion circle on the map; the planner counts those big blasts as free coverage (no bomb is spent on targets they destroy) and knows each DIRECTLY touched oil enlarges every LATER bomb by +8 base radius, while already-placed bombs keep the radius they were placed with. Give them a Bonus in Target type weights (Excavated Oil / Faridun explosive rows) to make the route actively seek them. Explosion radii are read automatically from each object (oil 110, faridun 80, exploding barrels 60 — the game's own values); the two Debug sliders are only a fallback, and Show Oil/Faridun blast circles lets you verify against a real explosion.
- Live chain continuation: placed bombs are tracked at their REAL in-game positions — they draw grey with their own blast rings, and every placement triggers an automatic replan that continues the chain from your actual last bomb (not from the theoretical plan), so going off-plan never desyncs the route.
- A manual total-charges fallback and debug overlays are also configured here.
The Smoother tab is a comprehensive tool designed to optimize game performance and customize visual elements. It works by modifying the game's data files (.ggpk or similar) to disable or alter specific graphical features.
-
Path Configuration: You must specify the path to the game's
Content.ggpkfile (orBundles2directory for PoE 2). The tool includes a file browser and validation to ensure the correct path is selected. -
Backup System:
- Create Backup: Automatically creates backups of original files before applying any patches.
- Restore All: A single button to revert all changes and restore the game to its original state.
- Clear Backup: Deletes stored backups and hashes (useful if you want to start fresh).
- Game Updates: Automatically detects if the game has been updated and prompts you to create a new backup to prevent corruption.
Toggle individual patches to disable specific graphical effects. This can significantly boost FPS on lower-end systems.
- Fog / Atlas Fog: Removes fog effects from maps and the Atlas.
- Shadows / Lights: Two separate patches that disable dynamic shadows and lighting calculations.
- Particles: Split into separate Rain, Clouds, and Environmental Particles patches.
- Minimap: Strips/adjusts minimap rendering.
- Delirium: Removes the visual fog and overlay associated with the Delirium league.
-
EpkRemoval: Removes effect packages (
.epk) for cleaner visuals. - Camera: Enables an extended camera zoom limit (configurable via a slider, range 1.2-2.4).
- Show HP Bar: Forces monster health bars to render.
The advanced tools below — Color Mods, Spell Effects, and Black Screen — are also patches, each exposed through its own dedicated configuration window.
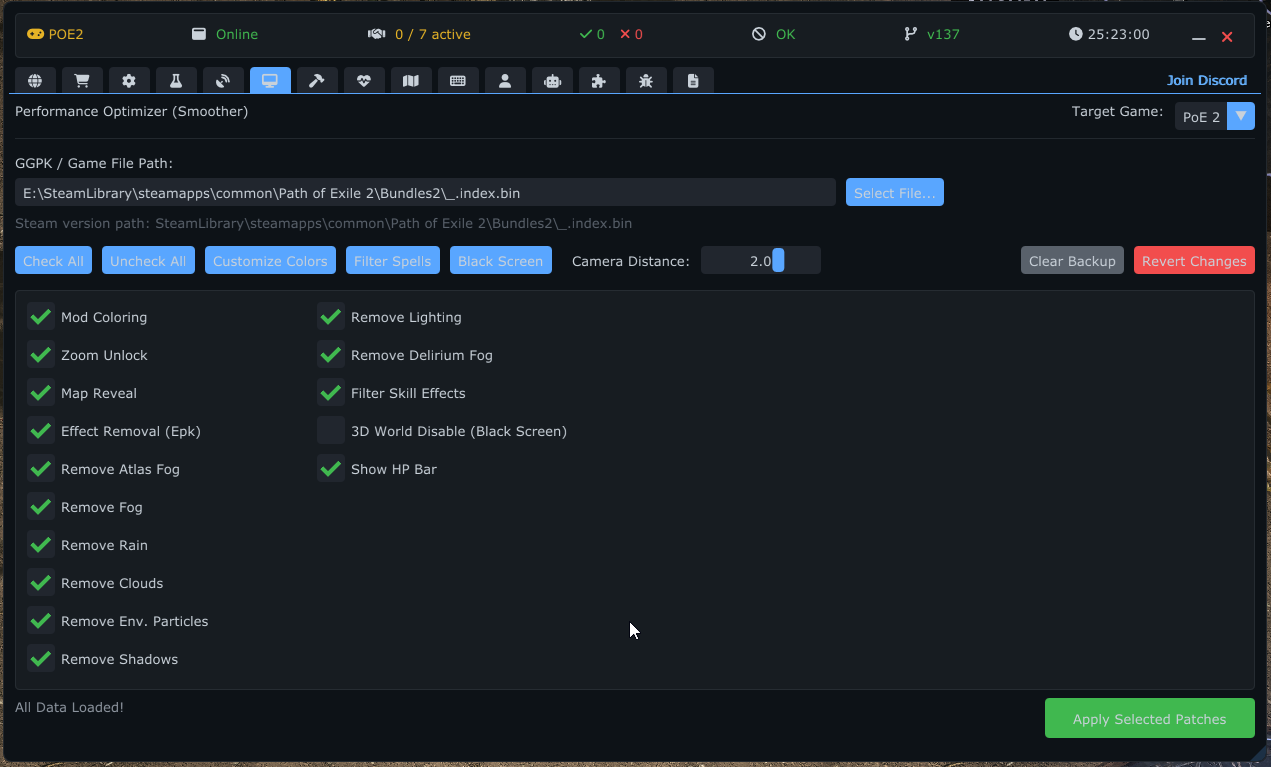
Customize the text colors of item modifiers and stats.
- Search & Add: Search for specific stats (e.g., "Physical Damage") and assign them a custom color.
- Presets: Includes default presets for dangerous mods (Reflect, No Regen) or valuable drops.
- Export/Import: Share your color configurations with others via JSON files.
- Edit Descriptions: You can even rewrite the text description of mods for better clarity.
- Mod Language: Pick the language of mod descriptions from a dropdown listing every language found in the game files, independent of the app's interface language. Players on non-English clients (for example Traditional Chinese) can search and match mods in their own language. Mod data is fetched automatically, so no manual extraction step is required.
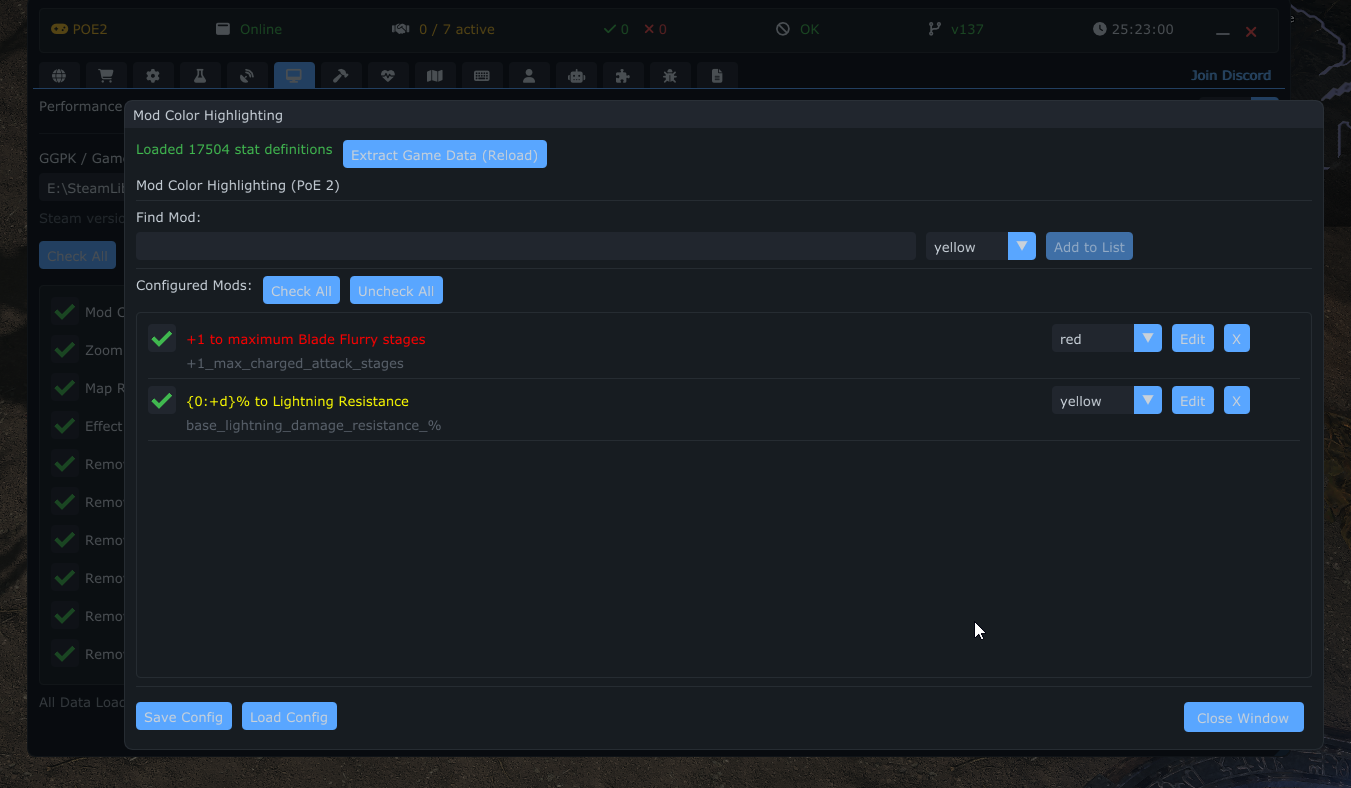
A powerful tree-based editor to disable specific spell effects.
- Tree View: Browse through all game effects organized by category.
- Selective Disabling: Disable effects for specific skills (e.g., "Discharge", "Tornado Shot") to reduce visual clutter without removing everything.
- Search: Quickly find effects by name.
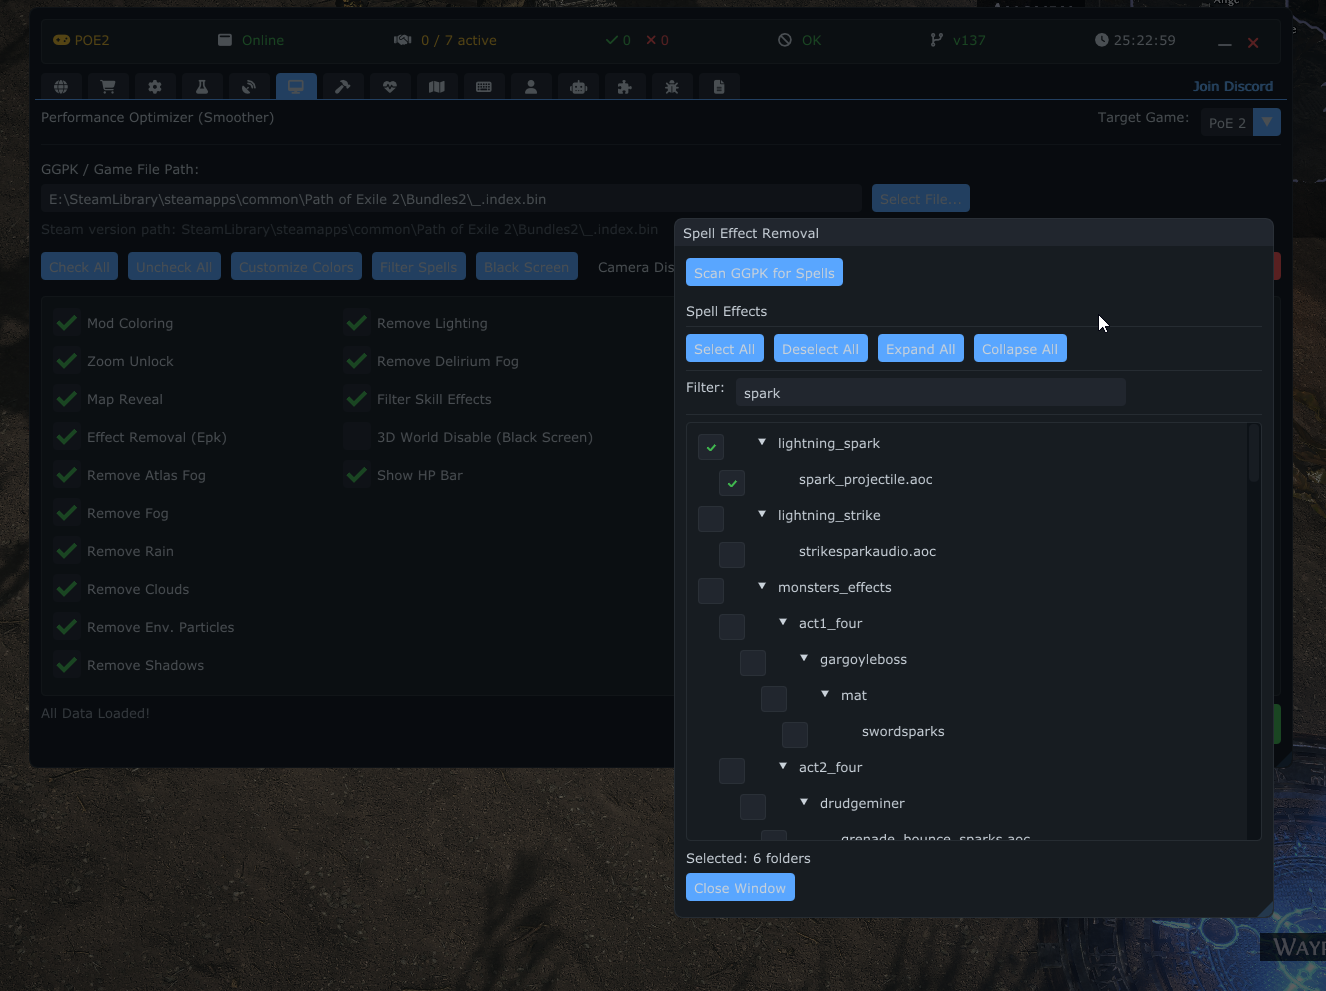
An extreme optimization mode that removes textures and shaders, rendering the game world mostly black while keeping essential gameplay elements visible.
-
File Extensions: Choose which file types to ignore (e.g.,
.ddstextures,.wavsounds). - Animation Blocks: Disable specific animation categories like ParticleEffects, Lights, or WindEvents.
-
SkinMesh Settings:
- Ignore List: Select specific 3D models (metadata) to keep visible even in Black Screen mode. This is crucial for keeping your character, specific bosses, or important mechanics visible.
- Scanning: The tool scans game files to build a complete list of available models for you to toggle.
The AutoCraft tab provides a powerful automation tool for crafting items using currency spam (e.g., Chaos Orb) until specific modifiers are hit.
AutoCraft works by automatically applying a selected currency to an item repeatedly. After each application, it scans the item's modifiers to check if they match your desired criteria. If a match is found, the process stops immediately.
Mod data is downloaded automatically from the server on startup — no manual setup is required. (You do not need to load GGPK data in the Smoother tab for AutoCraft.)
- Enable the Module: Go to the AutoCraft tab in the main POEFixer window and check the "Enable AutoCraft" box.
-
In-Game Activation:
- Switch to the game window.
- Hover your mouse cursor over the item you wish to craft in your inventory.
- Press
Ctrl + Alt. - This will open the AutoCraft Overlay window.
The crafting process is managed entirely through the in-game overlay window.
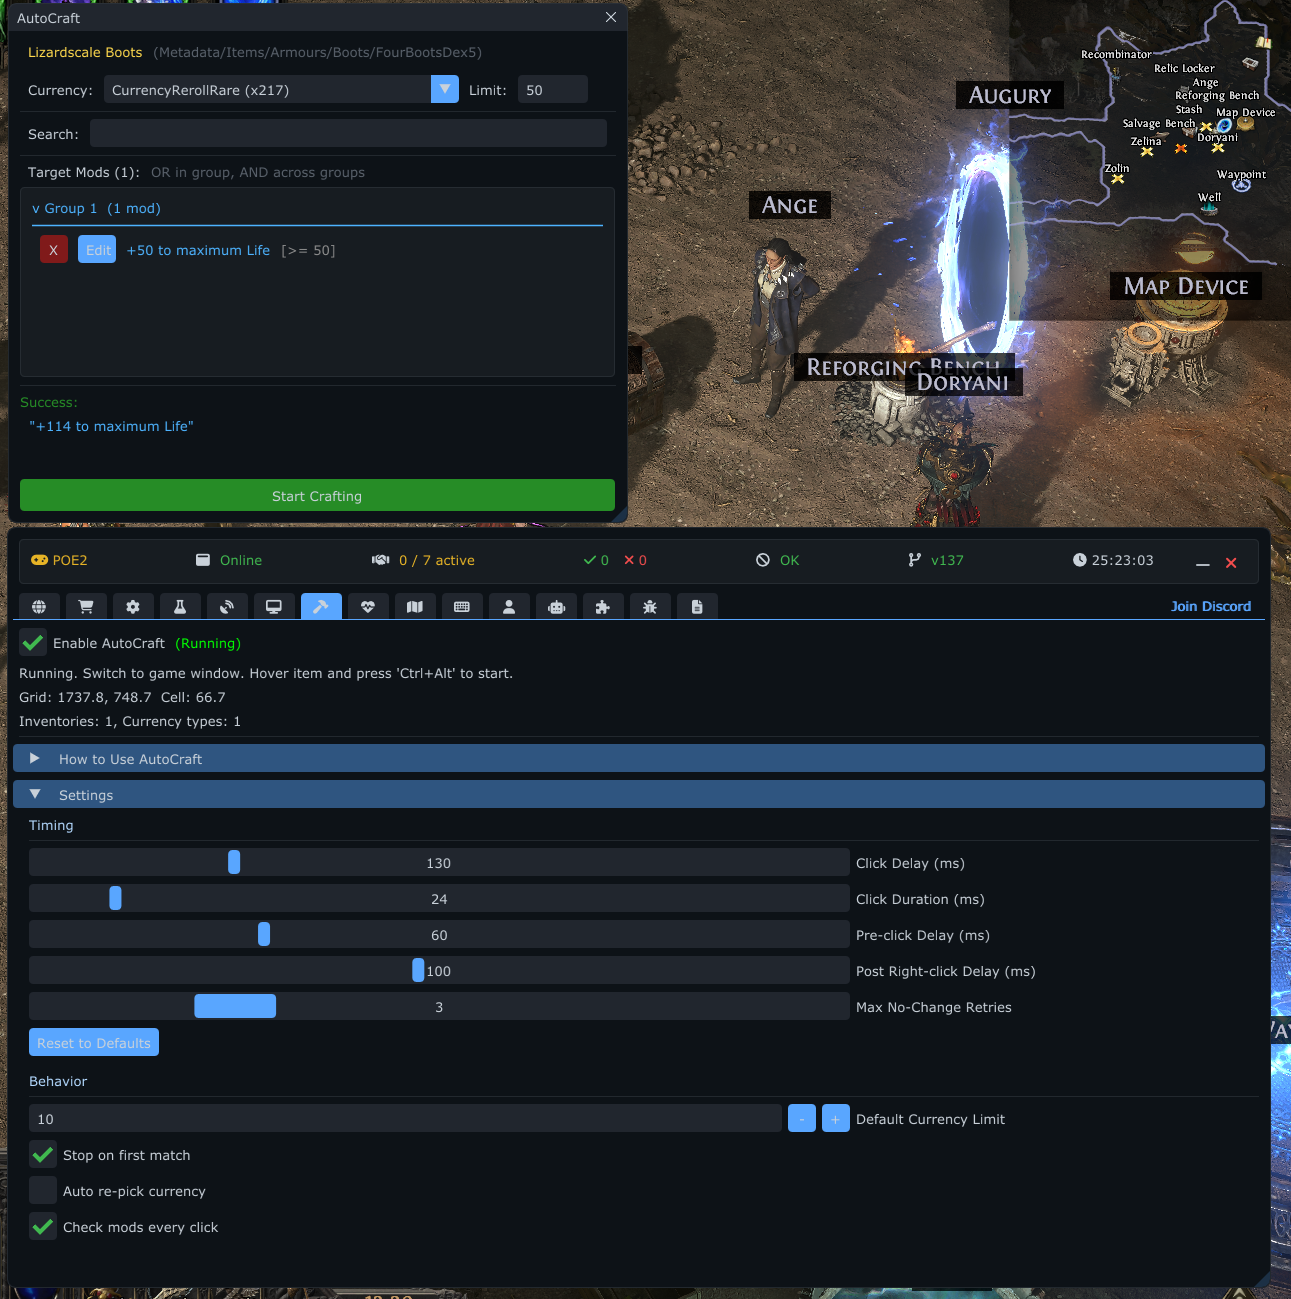
- Target Item: Displays the name of the item currently selected for crafting.
- Currency: A dropdown menu to select the currency type you want to use (e.g., Chaos Orb, Orb of Alteration). The tool automatically detects available currency in your inventory.
- Limit: A safety feature that sets the maximum number of currency items to use. The default is 10. The bot will stop if this limit is reached, preventing accidental loss of all currency.
-
Search Mods:
- Type in this field to search for specific modifiers (e.g., "maximum life", "resistance").
- A list of matching mods will appear below. Click a mod to select it for configuration.
-
Mod Configuration:
- Once a mod is selected, you can set minimum values for its stats (e.g., if you want at least "+80 to Maximum Life", set the value to 80).
- Click the "+ Add" button to add it to your Target List.
-
Target Mods List:
- Displays all the criteria you are looking for.
- Logic: The system uses "OR" logic. This means if any single mod in this list is found on the item with the required values, the crafting process will stop as a "Success".
- Use the "Edit" or "X" (Delete) buttons to manage your targets.
- Setup: Ensure you have enough of the selected currency in your inventory.
- Start: Click the green "START CRAFT" button in the overlay.
-
Execution:
- The bot will automatically right-click the currency.
- It will hold Shift to enable bulk application.
- It will left-click the target item to apply the currency.
- After each click, it instantly reads the item's new modifiers.
-
Stopping:
- Success: A matching mod is found.
- Limit Reached: The configured currency limit is hit.
- Manual Stop: You click the "STOP" button.
- Emergency Stop: Press the emergency stop hotkey (default: Escape).
- Error: If the item or currency is moved/lost.
Warning: The bot simulates mouse clicks. Do not move your mouse or use the keyboard while the crafting process is running (except to press the emergency Stop hotkey or clicking Stop in the UI).
The AutoCraft module has configurable settings:
-
Speed Dial: a
-10..+10slider (geometric scale, default:+7).0≈ 500 ms per click,+10≈ 50 ms,-10≈ 3000 ms. The numeric value shown next to the slider is the live per-click delay in milliseconds. Lower the dial if crafting is unstable on a slow connection. -
Behavior:
- Default Max Currency (1-1000, default: 10) — maximum currency to use per session.
- Stop on First Match — halt on first successful mod match.
- Auto Pick Currency — automatically select the right currency.
- Check Mods Every Click — verify mod changes after each application.
-
Safety:
- Emergency Stop Key (default: Escape) — instantly stops the crafting process.
- Craft Log: Toggle display of a scrollable crafting history log (max 50 entries by default).
The overlay supports multiple named craft templates. Each template stores its own currency selection, currency limit, and target mod list independently.
-
Switching templates: Click any tab in the template strip to make it the active template. The active tab is highlighted.
Start Craftingalways runs the currently active (highlighted) template. -
Creating a template: Click the
+button at the right end of the strip to create a new template with default settings. -
Renaming a template: Click the
[Rename]button next to the active tab to open an inline text field. Edit the name, then press Enter or click OK to confirm, or Cancel to discard. -
Deleting a template: Click the
[Delete]button next to the active tab. An inline confirmation prompt appears — click Yes to confirm or No to cancel.
Note: Ctrl+Alt on a base item opens the craft overlay window. The template you had active last time is restored automatically.
The Import/Export panel appears below the Enable Auto Craft checkbox (click to expand it).
-
Quick clipboard actions (collapsed panel):
- Copy all — copies all templates to the clipboard as JSON.
- Paste — replaces all templates with the clipboard content (prompts for confirmation if templates already exist).
-
Expanded panel — Export:
- Select one or more templates from the list, then either Copy to clipboard or Save to file (saved as a
.jsonfile underConfigs/auto_craft/exports/; you choose the file name).
- Select one or more templates from the list, then either Copy to clipboard or Save to file (saved as a
-
Expanded panel — Import:
-
Paste from clipboard or Load from file — select a previously exported
.jsonfile. - If an imported template name already exists, it is imported as a copy named
Name (2)(or(3), etc.) to avoid overwriting existing work.
-
Paste from clipboard or Load from file — select a previously exported
The Custom Craft sub-tab within AutoCraft provides a visual node-graph editor (similar to Unreal Engine Blueprints) for building complex crafting automation workflows. Instead of simple currency spam, you can create multi-step crafting recipes with conditions, loops, and stash interactions.
- Switch to the AutoCraft tab and select the Custom Craft sub-tab.
- Click [+ New Config] to create a new crafting configuration.
- Drag nodes from the context menu (right-click on the canvas) onto the editor.
- Connect nodes by dragging from output pins to input pins.
- Click [Run] to execute the graph.
- Canvas: Drag to pan, scroll to zoom. Right-click for the node creation context menu.
- Toolbar: New/Save/Load/Import/Export configurations, Run/Stop execution.
- Config Tabs: Multiple configurations can be open simultaneously as tabs.
- Properties Panel: Right sidebar showing settings for the selected node.
- Undo/Redo: Ctrl+Z / Ctrl+Y (up to 50 history steps).
- Auto-Save: Dirty configurations are auto-saved after 2 seconds of idle time.
Pins are the connection points on nodes. Each pin has a type that determines what data it carries:
| Pin | Color | Shape | Description |
|---|---|---|---|
| Exec | White | Triangle | Execution flow (determines order of operations) |
| Bool | Red | Circle | True/False values |
| Int | Green | Circle | Integer numbers |
| Float | Lime | Circle | Decimal numbers |
| String | Orange | Circle | Text values |
| Item | Purple | Diamond | Item references |
| Inventory | Cyan | Diamond | Inventory references |
| Entity | Yellow | Diamond | Entity references |
Flow Control (6):
- Start — Entry point of the graph.
- If / Branch — Routes execution based on a Bool condition (True/False outputs).
- While Loop — Repeats execution while a condition is true.
- For Loop — Repeats execution a fixed number of times.
- Delay — Pauses execution for a configurable duration.
- Log — Outputs a message to the execution log.
Crafting (5):
- Find Currency — Finds a currency item by name in inventory or stash.
- Use Currency On Item — Applies currency to an item (right-click currency, shift+click item). Supports cross-tab crafting when currency and item are in different stash tabs.
- Currency Reroll — Repeatedly applies a currency to an item until a condition is met.
- Activate Inventory Item — Right-clicks / activates an item in the inventory.
- Find Item In Inventory — Locates an item in player inventory or stash (with visual item picker).
Stash & Inventory (10):
- Open Stash — Opens the stash by walking to it and clicking.
- Switch Stash Tab — Switches to a specific stash tab by name.
- Take Item From Stash — Picks up an item from a stash slot.
- Ctrl+Click Item — Ctrl+clicks an item (quick-move between inventory and stash).
- Move Item Between Tabs — Moves an item from one stash tab to another.
- Close Stash — Closes the stash UI.
- Check Inventory Visible — Checks whether the inventory panel is open.
- Check Stash Visible — Checks whether the stash panel is open.
- Open Inventory — Opens the inventory panel.
- Check Cursor — Checks if an item is currently attached to the cursor.
Item Inspection (5):
- Get Item Mods — Reads all modifiers from an item.
- Get Mod At Index — Gets a specific modifier by index.
- Has Mod — Checks if an item has a specific modifier (supports Any/Minimum/Maximum/Exact matching).
- Get Item Rarity — Returns the rarity of an item.
- Get Item Base Name — Returns the base type name of an item.
Comparison & Logic (5):
- Compare Int — Compares two integer values.
- Compare String — Compares two string values.
- AND / OR / NOT — Boolean logic gates.
Variables (3):
- Set Variable — Stores a value in a named variable.
- Get Variable — Retrieves a value from a named variable.
- String Constant — Provides a constant text value.
Utility (2):
- Comment — A non-functional note for documenting your graph.
- Reroute — A pass-through node for cleaner wire routing.
Custom Craft supports crafting with currency and target items in different stash tabs:
- The graph finds currency in one tab and the target item in another.
- Right-clicks the currency (attaches to cursor), then switches to the target item's tab.
- Shift+clicks the target item to apply the currency.
- Automatically handles tab switching for each iteration in loops.
A built-in Chaos Orb Reroll template is included as a starting point — it demonstrates a loop that applies Chaos Orbs until a desired modifier is found.
The For Each Item node walks every matching item in your inventory (filter by base-type substring or metadata path, plus a rarity filter) and runs the connected nodes once per item — useful for rolling target mods onto a stack of tablets, waystones, or any base.
The ready-made Batch Craft Mods template uses it: Normal/Magic items get an Orb of Alchemy then Chaos-spam to your target mods; Rare items go straight to Chaos. Set the item base in For Each Item, your target mods in Currency Reroll, and the currency + its source (inventory or a stash tab) in the currency nodes.
Currency-using nodes now stop the craft with an out of currency log when the chosen currency is missing or empty in its source, and the cursor rests on the item being crafted for visual feedback. If an item does not roll the target within the attempt limit, it is logged and skipped so the batch continues.
Configurations are saved as JSON files in Configs/custom_craft/. You can import/export configurations to share with others.
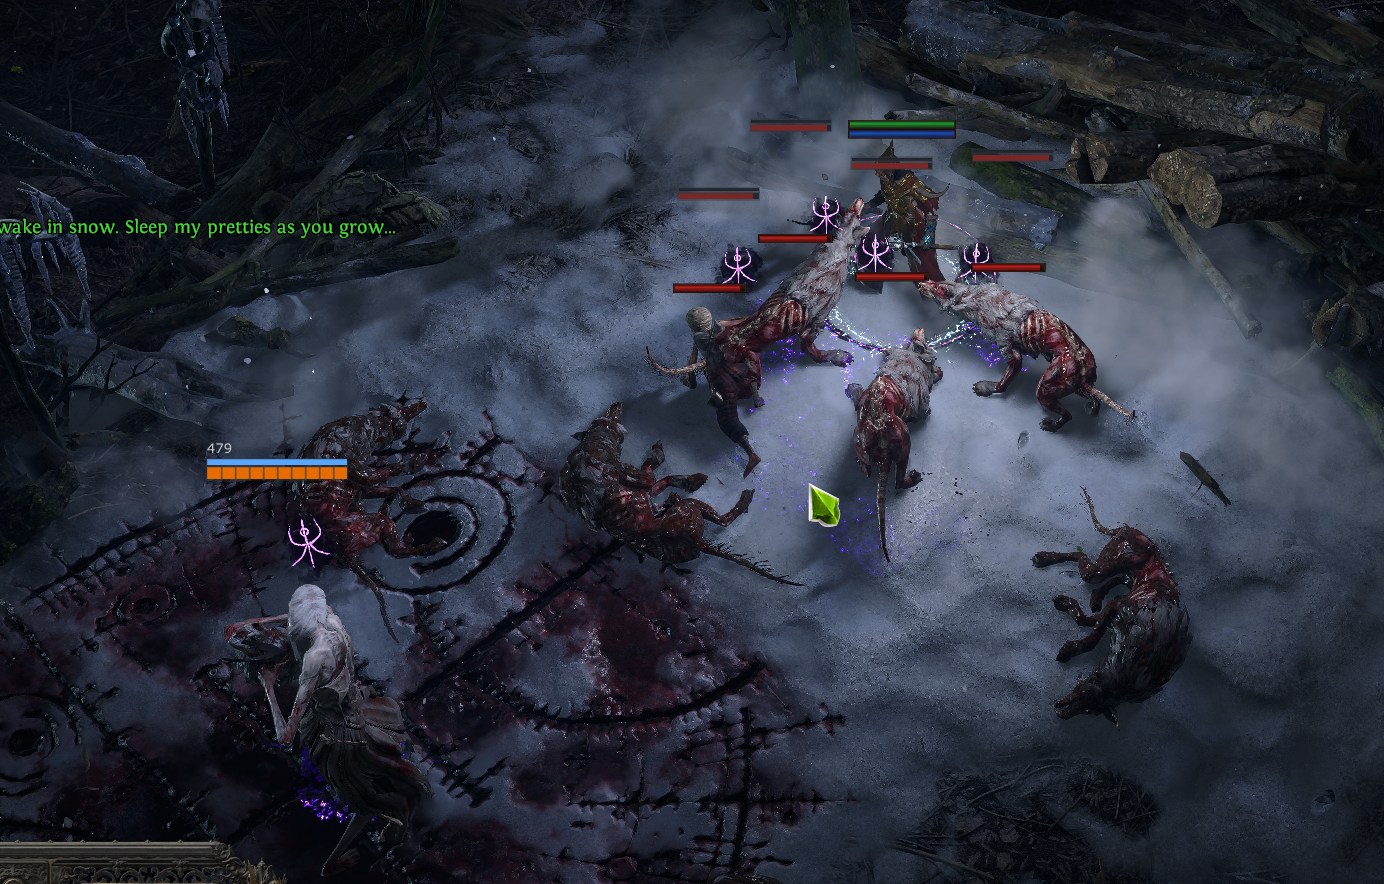
The HealthBars tab offers a highly customizable overlay system that displays Health (HP) and Energy Shield (ES) bars directly over entities in the game world. This visual aid helps you quickly identify high-priority targets, monitor your own status, and execute mechanics like Culling Strike with precision.
These settings apply to the entire HealthBars system or define defaults.
- Enable HealthBars: Toggles the entire feature on or off.
- Draw in Town / Draw in Hideout: Choose whether to display health bars when you are in safe zones like towns or your hideout.
-
Interpolate Position: Smooths the movement of the health bars to match the entity's movement.
- Interpolation Rate: Adjusts the smoothness speed (in milliseconds). Lower values are more responsive, while higher values are smoother.
- Height Offset: Globally adjusts the vertical position of all health bars relative to the entity model (useful if bars are floating too high or clipping into the model).
-
Culling Strike Thresholds:
- Define the percentage of HP at which the bar changes color to indicate the monster is within Culling Strike range.
- Configurable separately for White, Magic, Rare, and Unique monsters.
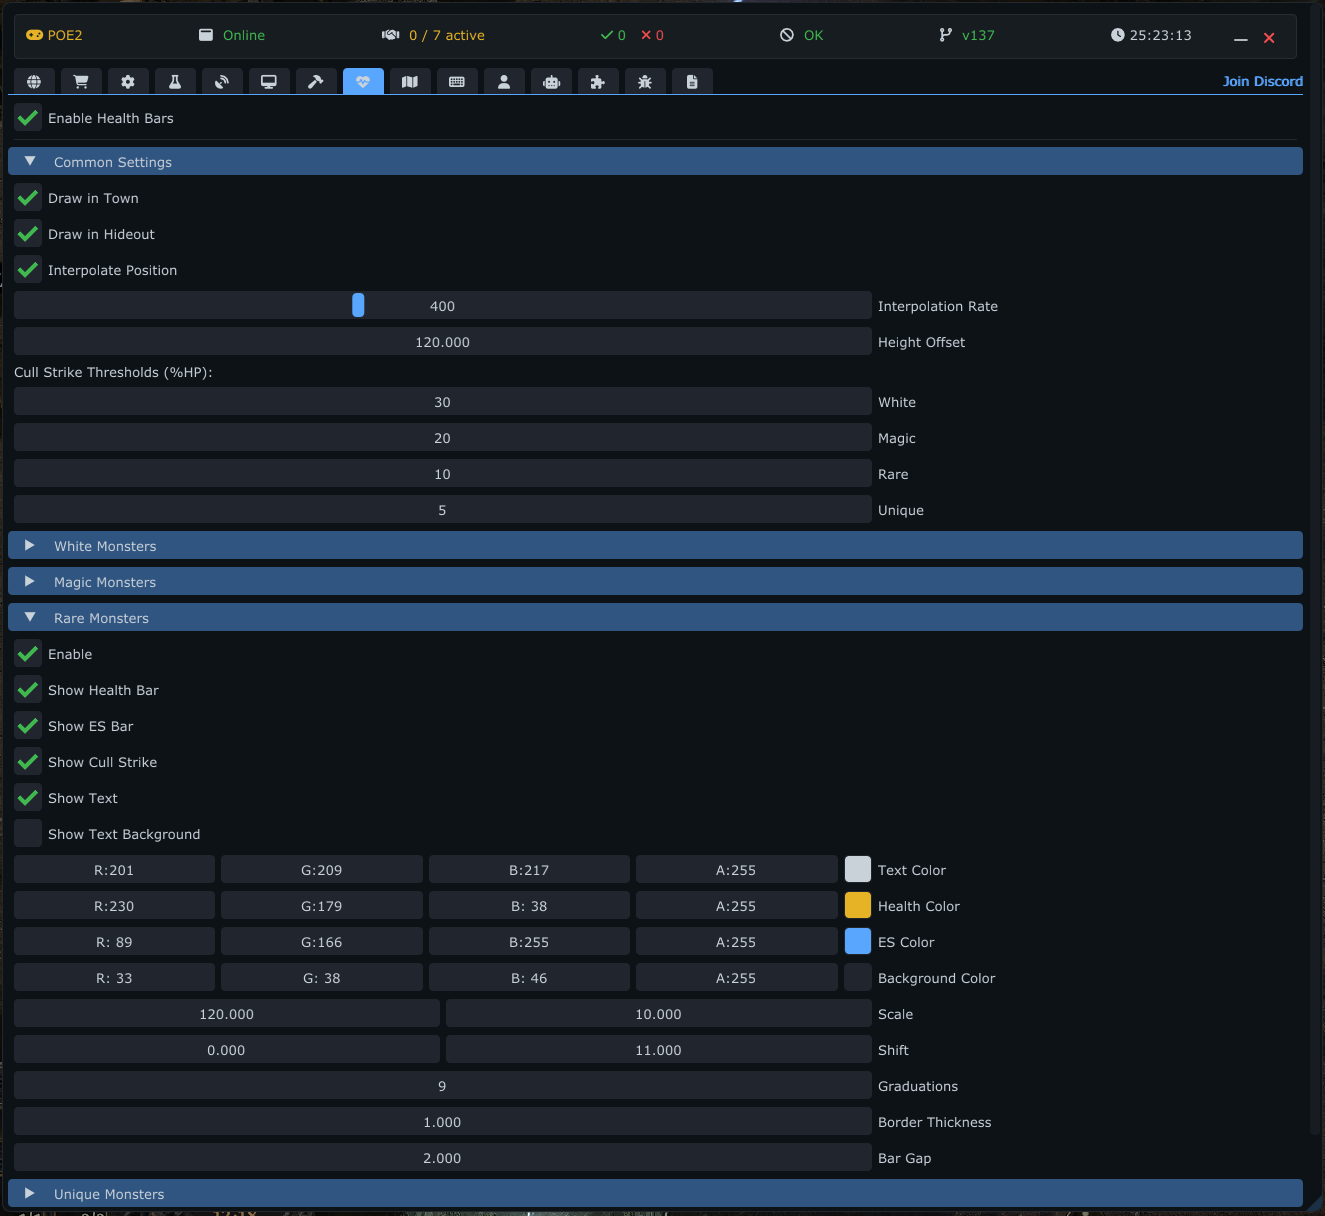
You can independently configure health bars for different types of entities. This allows you, for example, to have large, distinct bars for Unique bosses while keeping White monster bars subtle or hidden.
Supported Groups:
- White Monsters: Normal enemies.
- Magic Monsters: Blue enemies.
- Rare Monsters: Yellow enemies.
- Unique Monsters: Bosses and unique enemies.
- Friendly Monsters: Minions and allied NPCs.
- Player: Your character and other players.
Each group has its own collapsible section with the following options:
- Enable Group: Toggles health bars for this specific group.
- Show Health Bar: Displays the main HP bar.
- Show ES Bar: Displays the Energy Shield bar (stacked above the HP bar).
- Show Culling Strike: Changes the HP bar color when the target is below the defined Culling Strike threshold.
-
Show Text: Displays the numerical HP value (e.g., "1.5M", "100K").
- Show Text Background: Adds a background box behind the text for better readability.
Customize the visual appearance with a full color picker (supports transparency):
- Health Color: Color of the HP bar.
- ES Color: Color of the Energy Shield bar.
- Background Color: Background color of the empty portion of the bars.
- Text Color: Color of the numerical text.
- Text Background: Color of the text background box.
- Scale (Width/Height): Adjusts the size of the health bar.
- Shift (X/Y): Fine-tune the position of the bar relative to the entity (pixel offset).
- Graduations: Adds vertical tick marks to the bar to help estimate HP percentages.
- Border Thickness: Adjusts the thickness of the black outline around the bars.
- Bar Gap: Sets the vertical spacing between the HP bar and the ES bar.
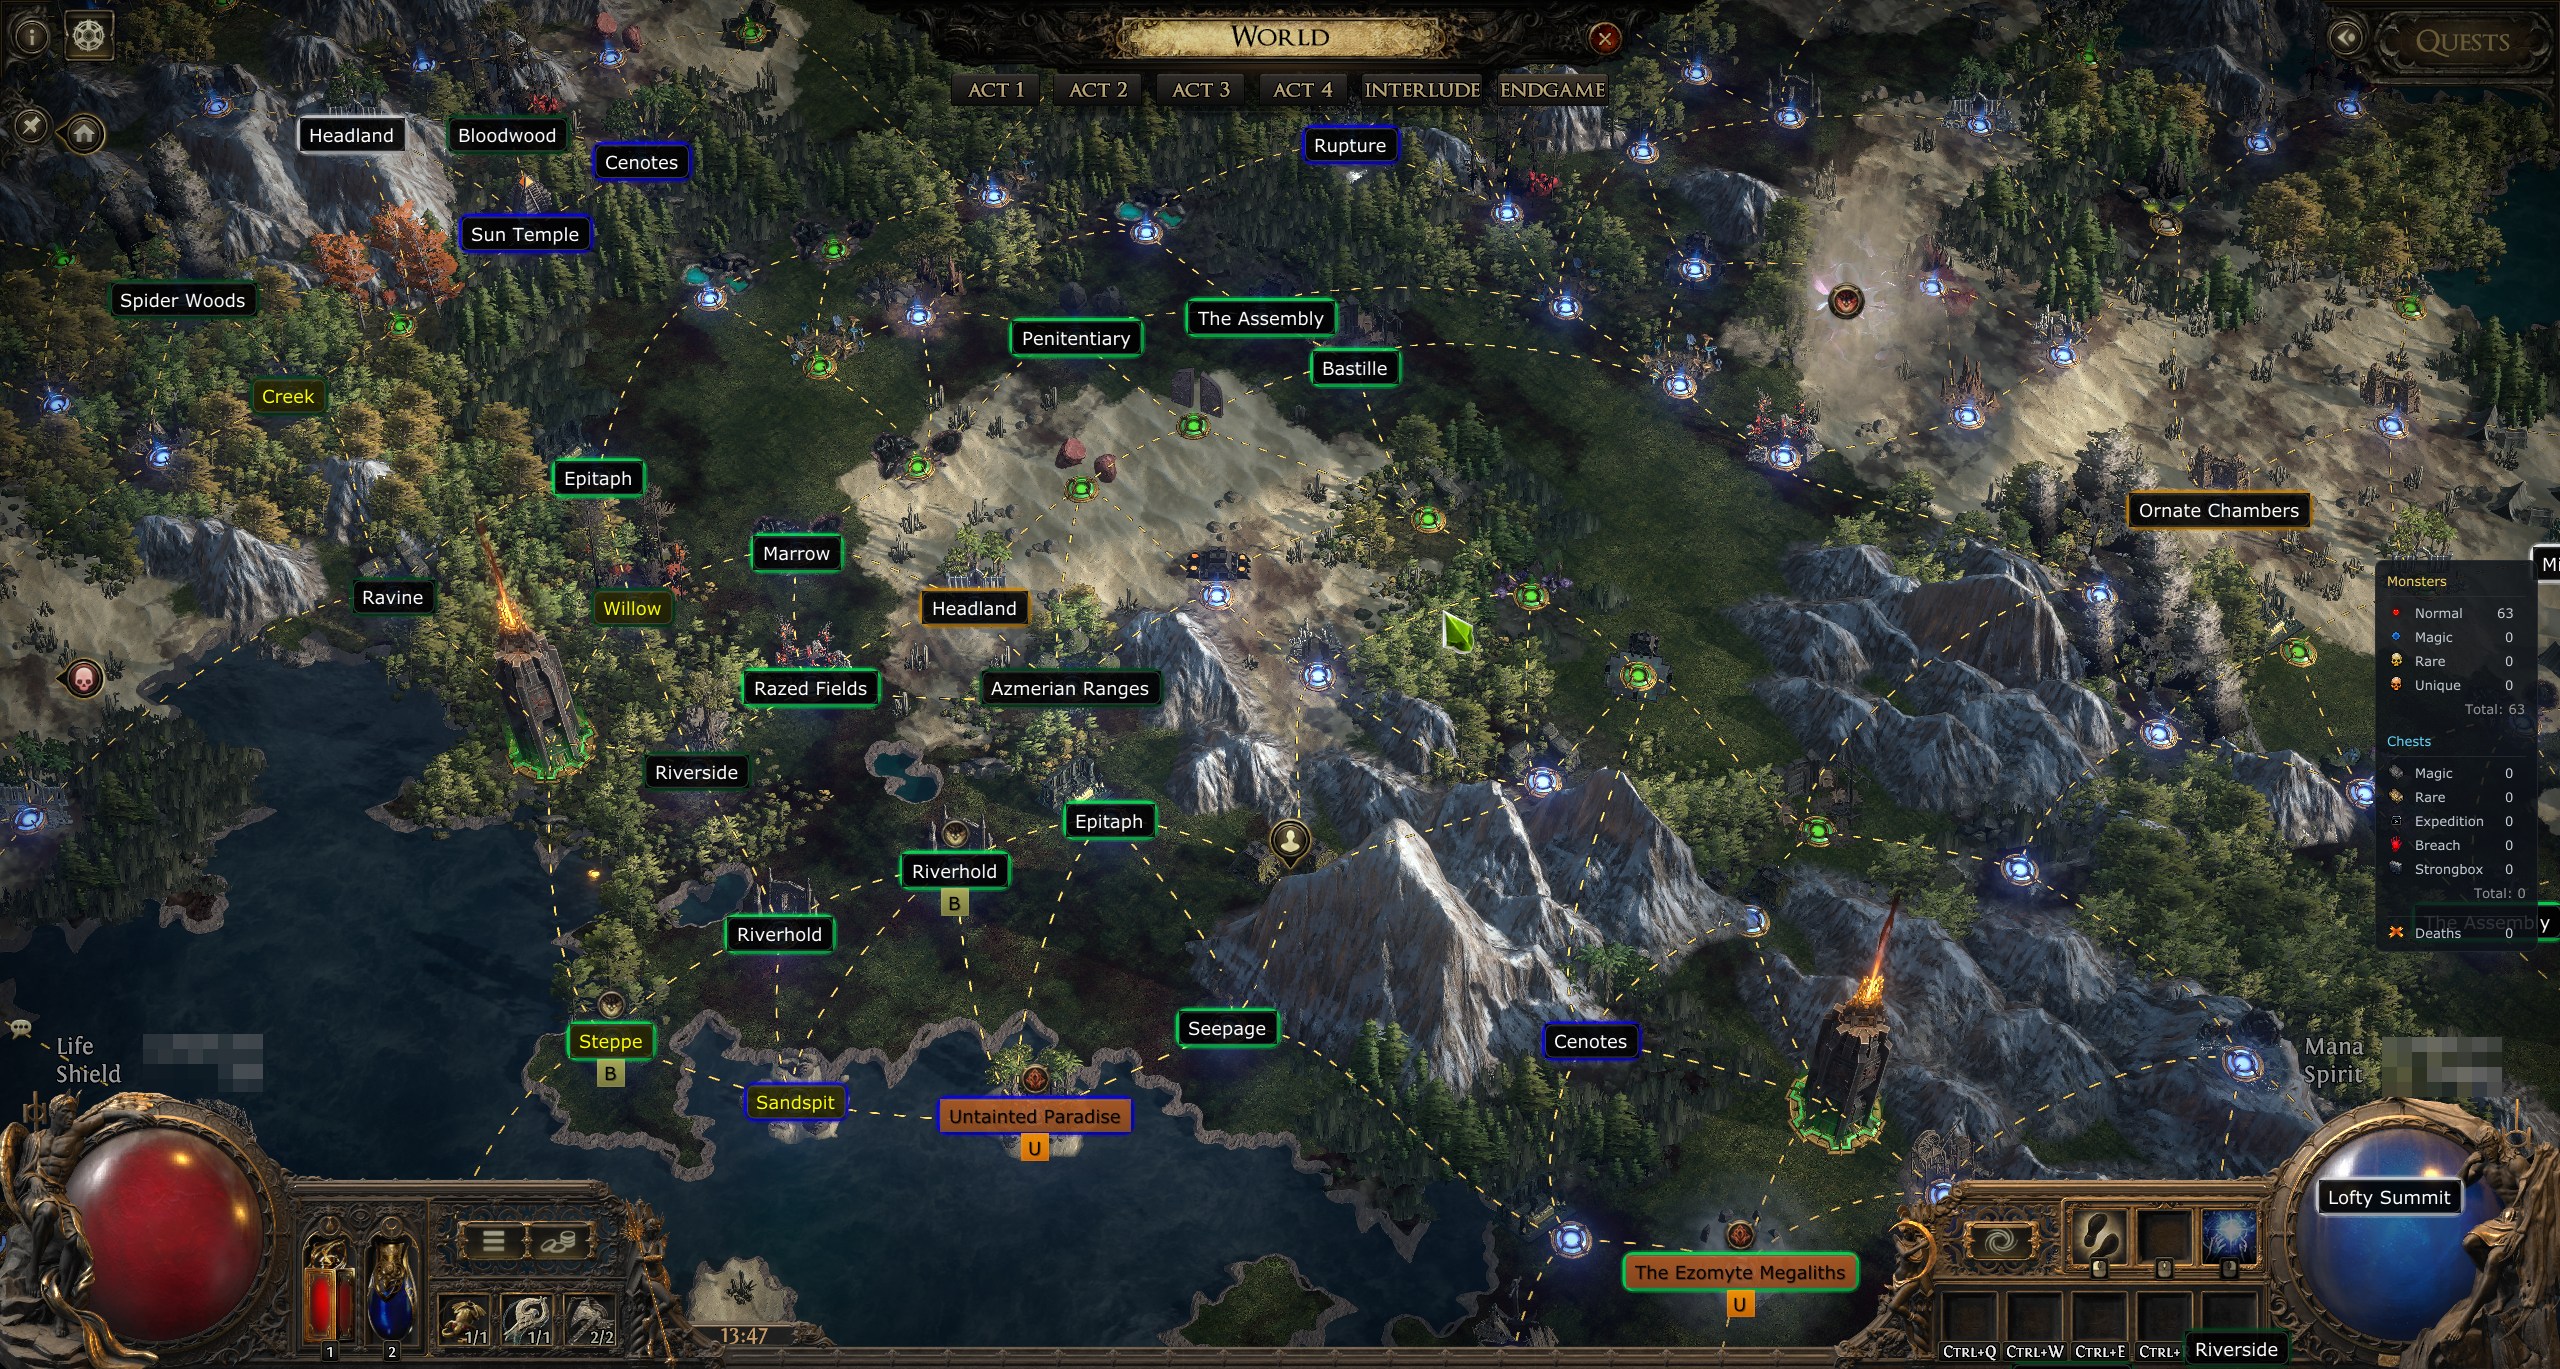
The Atlas tab provides a comprehensive overlay for the in-game Atlas, offering enhanced visualization, pathfinding, and management tools to streamline your mapping strategy. It helps you track completion, find specific maps, and plan your route through the Atlas.
The core feature is a highly customizable overlay that draws directly over the in-game Atlas screen.
- Enable Overlay: Toggles the entire Atlas overlay system on or off.
- Controller Mode: Optimized navigation and display adjustments for players using a controller.
- Island Rumours cheatsheet: Hovering an expedition island or an uncharted ship shows the full community rumour table (rumour, map, mods, rating) beside it, with the hovered destination's rows highlighted. The table can be repositioned: press Ctrl+Alt while it is open — it detaches and follows the mouse; press Ctrl+Alt again to pin it (the hint in the table header shows the current action). Once pinned it always opens at the chosen screen spot; the Reset table position button in Atlas settings (shown while a custom position is set) returns it to automatic placement beside the hovered island.
- Ship reveal highlight: Hover an Uncharted Waters ship icon to see exactly what its Logbook will chart: every map it opens gets a colored glow, the connections between those maps are colored too, and lines point from the ship to the rumour islands. The in-game popup lists only 3 random rumours — the highlight shows the full set. Ships that open the same territory share one color (up to 4 ships ring one area), so two nearby ships with the same color reveal the same maps. Hold the pin key (Ctrl by default, rebindable) over a ship to lock the highlight while you move the cursor to inspect the maps; release it to clear. Configurable in Display settings: pin key, custom highlight color and highlight thickness.
- Grand Mirror targeting: The atlas overlay keeps working when an item opens the World screen from inside a map (the Grand Mirror of Delirium's "Select 1 Map" view), and every map the mirror can be placed on gets a colored glow — the game's own small swirl animation is easy to miss. The radar and health bars hide while the World screen is open so they never draw over the atlas. Toggle and glow color: Atlas settings (Grand Mirror target highlight).
Easily locate specific maps and see exactly how to reach them.
- Search Maps: A dedicated search bar allows you to type a map name (partial matches supported, comma-separated multi-search). The overlay shows only matching maps.
- Search in map properties: A search term also matches a map's content (Breach, boss, essence, effect descriptions...) and its biome name — type "breach" to light up every revealed map carrying a Breach.
-
Line mode — how found maps are pointed at:
- Straight line from center: the classic dashed pointer from the screen center toward every match, with optional grid distance label, distance limit slider and edge-pinning of off-screen matches.
- Route through maps: the line follows the actual atlas connections from your nearest accessible map to the target, and a counter badge next to the map shows how many maps you must complete before you can enter it (0 = enterable right now). A green dot marks the map to start running. Unreachable phantom matches get no line at all.
- Route thickness / colors: Both line styles are fully color- and thickness-customizable.
- Search Groups: Save searches as named, toggleable groups. While a group is enabled its terms work exactly like text typed into the search box, and matching maps get lines/routes in the group's own color — keep one group for "Breach farm", another for unique maps, and flip them on/off as needed.
See what every map contains at a glance — using the game's own icons.
- Content icons: Each map's content (Breach, Delirium, Expedition, Ritual, Essence, bosses, corruption and more) is drawn as a row of in-game icons above the map name. Three modes: Off, All maps, or Only hidden (fog) maps — the latter avoids doubling the icons the game already draws on revealed maps.
- Tooltips: Hover an icon to see the content's name and full effect description (in your client language).
- Per-type visibility: Toggle individual content types on/off in the settings, with icon previews.
- Icon size: Adjustable.
Filter what is shown to focus on your current goals.
- Hide Completed: Hides maps you have already completed — including their search lines and routes (completed Citadels remain visible as landmarks).
- Hide Inaccessible: Hides maps that you cannot currently enter — including their search lines and routes.
- Biome Borders: Draws a colored border around maps belonging to specific biomes — per-biome colors and visibility, adjustable thickness.
-
Colors & Scaling:
- Background/Font Colors: Set global default colors for the map cards.
- Scale Multiplier: Adjust the size of overlay elements relative to the game UI.
- Anchor Nudge: Fine-tune the alignment of the overlay if it doesn't perfectly match the game window.
- Map Name Height: Raise or lower the map-name card relative to the map icon (positive values raise it; scales with the atlas zoom, unlike Anchor Nudge which is a raw-pixel calibration).
Create custom collections of maps for tracking specific strategies (e.g., "Citadels", "Farming", "Boss Rushing").
- Ctrl+Click on the Atlas: Hold Ctrl and click any map card right on the atlas — a small picker pops up with two sections: Map groups (assign/remove the map) and Search groups (toggle the map as a search term). No need to type names.
- Add to search group: Each map group has an Add to search group button that seeds (or refreshes) a Search Group from the group's maps. The resulting Search Group is what draws the lines/routes (with the maps-to-complete counter) to every uncompleted map, in its own color — perfect for Citadels, Towers or any custom target list.
- Custom Groups: Create named groups of maps; reorder, rename or delete them. Map entries are editable in place and can be copied to the clipboard with one click.
- Styling: Assign unique background, font and route colors to each group for quick visual identification on the Atlas. The Overall size slider scales names, cards and content icons together.
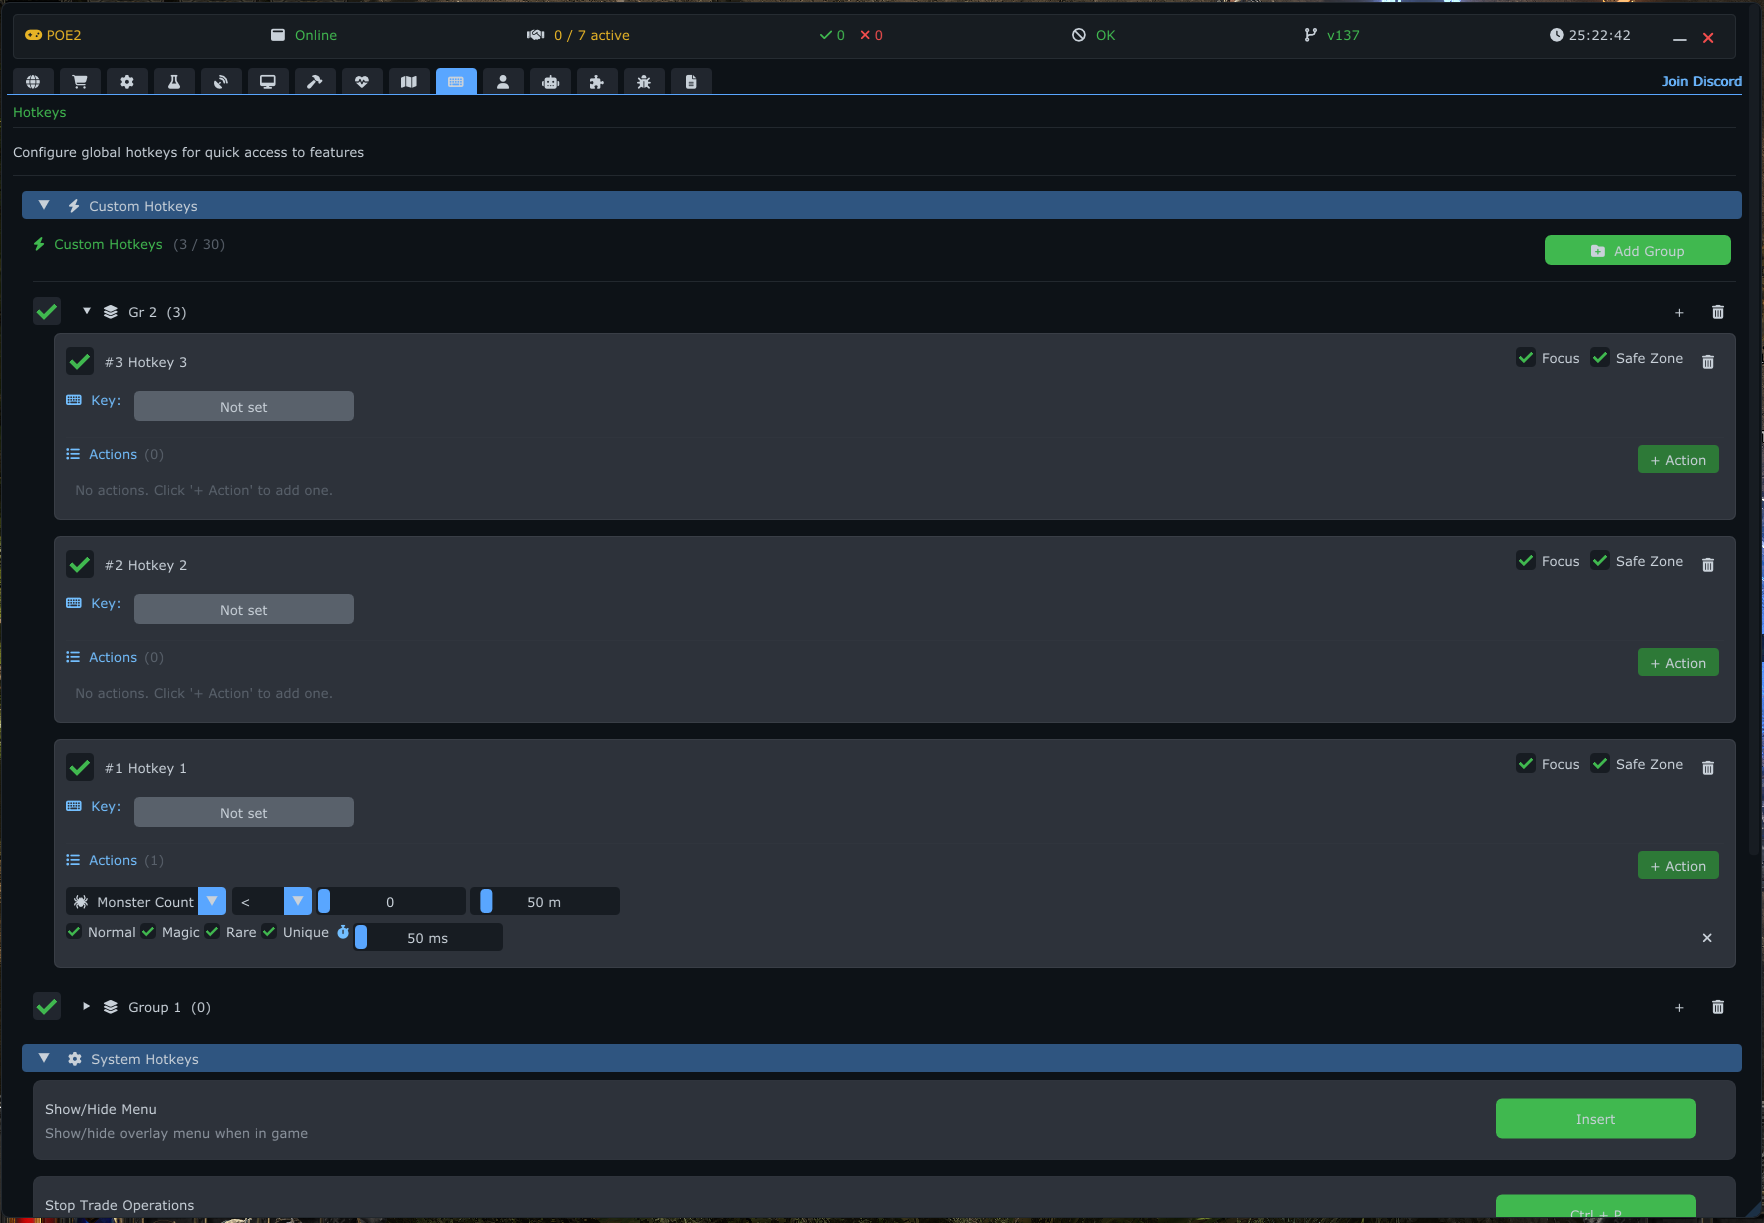
The Hotkeys tab is a powerful automation and macro system that allows you to create complex behaviors, auto-aim scripts, and reaction-based triggers. It has two subtabs — Custom Hotkeys (manual macros) and Skills (per-skill action sequences); the System Hotkeys (built-in shortcuts) are a collapsible section inside the Custom Hotkeys tab.
This section allows you to define your own macros. You can organize them into groups, set specific conditions, and chain multiple actions together.
- Add Group: Create a new folder to organize your hotkeys (e.g., "Combat", "Buffs").
- Toggle: Enable or disable entire groups at once.
- Rename: Double-click a group name to rename it.
Each hotkey consists of an identity, a trigger/output key, global conditions, and a list of actions.
-
Identity:
- Enabled: Toggle individual hotkeys.
- Name: Double-click to rename (e.g., "Auto Pot", "Aim Bot").
- ID: A unique number (e.g., #1) used for chaining macros.
-
Global Conditions:
- Focus: If checked, the hotkey only works when the game window is in the foreground (prevents accidental triggers while alt-tabbed).
- Safe Zone: If checked, the hotkey is disabled in Towns and Hideouts (prevents wasting resources).
-
Output Key (Trigger):
- Click the button to assign a key (Keyboard, Mouse, or Gamepad).
- Function: This is the key the program will simulate pressing when actions are executed. It can also serve as a manual trigger for "Chain" actions.
- Modifiers: Supports Ctrl, Shift, Alt, and Gamepad LT.
You can add multiple actions to a single hotkey. They execute in sequence or loop based on their settings.
-
Repeat:
- Simply presses the Output Key repeatedly.
- Infinite: Runs forever while the hotkey is active.
- Count: Runs a specific number of times.
- Interval: Time (ms) between presses.
-
Chain (Link Hotkeys):
- Triggers another hotkey by its ID.
-
Trigger Mode:
- Program Only: Fires only if this hotkey was triggered automatically.
- User Only: Fires only if YOU physically pressed the key.
- Always: Fires in both cases.
- Delay: Time to wait before triggering the next hotkey.
-
Vitals (Health / Energy Shield / Mana):
- Triggers the key press when your HP/ES/Mana meets a condition (e.g.,
< 50%). - Useful for Auto-Pot, Auto-Logout, or panic skills.
- Triggers the key press when your HP/ES/Mana meets a condition (e.g.,
-
Buffs / Charges:
- Charges: Triggers based on Power/Frenzy/Endurance/Spirit charge counts.
- Buff/Debuff: Triggers if a specific buff name is present/absent or has a certain stack count/time left.
- Charged Staff: Specific check for "charged_staff_stack".
-
Monster Count:
- Triggers when a certain number of monsters (with optional Rarity filters) are within a specific radius.
- Useful for using AoE skills automatically when surrounded.
-
Hold:
- Holds the Output Key down for a specified duration (ms).
-
MouseMove (Auto-Aim):
- The most advanced action. It finds a target, moves the mouse cursor to it, and (optionally) presses the key.
-
Target Types:
- Monster: Filter by Rarity (Normal/Magic/Rare/Unique).
- Chest: Filter by type (Strongbox, Expedition, Breach, etc.).
- Player/NPC: Select specific names from the current area.
- Shrine: Target shrines.
- Custom: Target any entity by its Metadata path.
-
Settings:
- Radius: Max distance to search for targets.
- Hold Time: How long to track the target.
- Debug Mode: Draws a red circle (radius) and white text (entity metadata) in the overlay.
- Scan All: Ignores standard filters and targets everything (for testing).
-
Custom Craft:
- Runs a saved Custom Craft node-graph configuration as a hotkey action.
A second subtab of Hotkeys (alongside Custom Hotkeys) for building per-skill macros. You bind a Global Key to a sequence; pressing it runs a configurable tree of Skill Actions (key presses, delays, cooldown / cast-time waits, mouse targeting, conditional blocks, …) with in-game verification and a global Esc abort. Sequences are organized into groups and can be exported / imported.
Holds a channeling skill's key until a buff reaches a target charge count, then releases — useful for skills like Snipe that build up stages while the key is held.
-
Buff name: the buff to watch — the "Chg" column in Debug → Buffs (e.g.
channelling_seconds_70). A From buffs picker lists your current buffs with their charge counts; a partial name also matches (the game appends a per-gem suffix to gem-sourced buffs). -
Charges
< > =Value: release the key the moment(buff charges) <op> valuebecomes true. Use>or=to build up;<is for buffs that decay. - Max hold ms: safety timeout (default 6000). If the buff never reaches the target, the key is released anyway and the sequence continues.
-
While charging:
- Block (wait) — hold here until charged (or timeout), then continue with the next action.
- Continue (bg) — keep running the following actions while the key stays held; it releases in the background the moment the buff charges.
- Use custom key: by default it holds the sequence's skill key; enable this to hold a different key.
The Mouse Move action and the Monster / Player conditional blocks can filter targets by a buff/debuff on the target itself, combined with the existing Rarity / HP / distance filters:
- Buff name + Has / Lacks: match only entities that have (or do not have) the named buff/debuff.
-
Charges
< > =: optionally require the buff to be at a certain stack count.
Example: Mouse Move → Monster, Rarity = Rare, Has debuff "X", Hold-and-continue → (child) press your skill homes the cursor only onto a Rare monster that carries that debuff and uses the skill on it.
Built-in global shortcuts for controlling the application.
- Show/Hide Menu: Show/hide the overlay menu. Supports modifiers (None, Ctrl, Shift, Alt).
- Stop Trade Operations: Emergency stop for trade automation. Supports modifiers.
- Pause Live Search: Pause all live search notifications. Supports modifiers.
- Follow Bot: Start/stop the bot.
- Add Entity from Map: Adds the entity under your cursor to the Radar object list. (Shown only when the Radar is available.)
- Add POI from Map: Adds a Point of Interest at the cursor location. (Shown only when the Radar is available.)
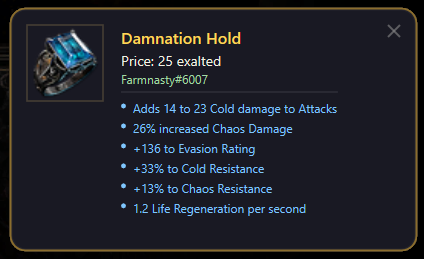
The Notifications tab configures how and where you receive alerts about trade events and game activity. It supports three notification channels: Desktop pop-ups, Discord DMs, and Telegram messages.
System-level Windows toast notifications that appear on your screen.
- Enable Desktop Notifications: Master toggle.
- Position: Choose where notifications appear — Top-Right, Top-Left, Bottom-Left, Bottom-Right.
- Display Time: How long the notification stays visible (3-30 seconds).
- Enable Sound: Plays a sound effect when a notification appears.
-
Display Options:
- Show Icon: Displays the item's icon image.
- Show Price: Shows the listed price and currency.
- Show Seller: Shows the seller's account name.
- Show Mods: Lists the item's explicit modifiers.
- [Test Notification] — Sends a sample notification to preview your current settings.
Receive notifications on your phone or desktop via Discord or Telegram when you are away from the game.
Note: Remote notifications require a paid license tier.
- Status Indicator: Shows "Linked" (green) or "Not Linked" (yellow).
- [Link Discord] — Opens an OAuth2 flow to connect your Discord account. You will receive trade notifications as Discord DMs from the POEFixer bot.
- [Unlink] — Removes the Discord connection.
- Status Indicator: Shows "Linked" (green) or "Not Linked" (yellow).
- [Link Telegram] — Initiates the linking process via the POEFixer Telegram bot. Follow the deep-link to start a conversation with the bot.
- [Unlink] — Removes the Telegram connection.
- [Send Test] — Sends a test notification to all linked services. Has a 30-second cooldown between tests (shows countdown timer).
Configure which game events trigger remote notifications (Discord/Telegram):
| Event | Description |
|---|---|
| Game Problem Detection | Alerts when game crashes or disconnects |
| Inventory Full | Alerts when player inventory reaches capacity |
| Stash Full | Alerts when stash tab reaches capacity |
| Update Available | Alerts when a new POEFixer version is released |
| Spend Limit Reached | Alerts when a currency spending limit is hit |
| Currency Not Found | Alerts when the system cannot find a specified currency item |
Each event has an independent toggle checkbox.
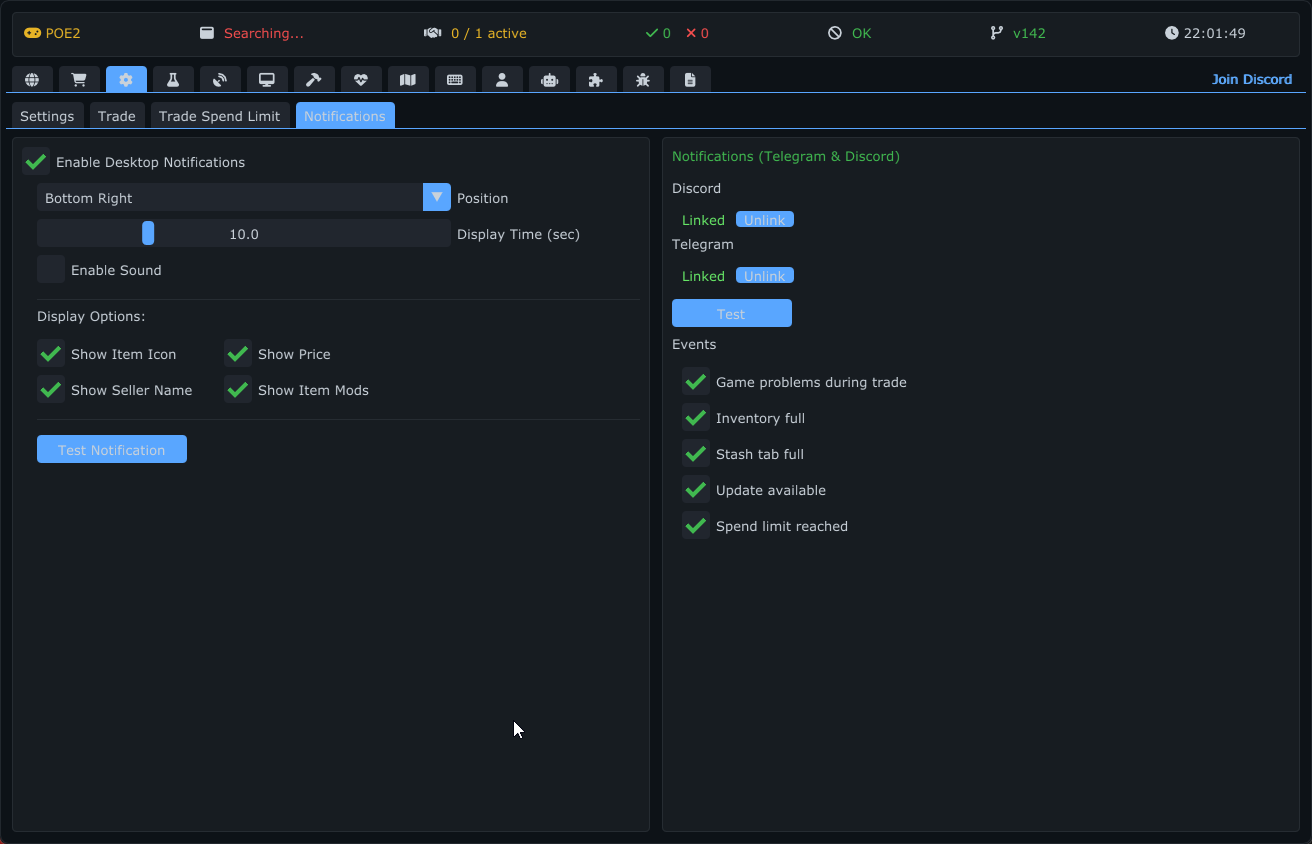
The Follow Bot tab allows your character to automatically follow another player or entity. This is particularly useful for playing with a support character (Aurabot) or dual-boxing.
- Enable Follow Bot: Master switch to start/stop the bot.
- Status Indicator: Displays the current state of the bot (e.g., Following, WaitingForTarget, Stuck) with color coding for quick status checks.
Configure who to follow and how close to stay.
- Target Name: Manually enter the name of the player/character to follow.
- Pick Player: A dropdown list showing nearby players. Select one to automatically fill the Target Name.
- Stop Distance: The distance at which the bot will stop moving towards the target (default: 80 units).
Fine-tune how the bot moves and interacts with the game.
- Move Key: Assign the key used for movement (usually your "Force Move" key in-game). Click the button and press the desired key to bind it.
- Click Ahead Distance: How far ahead of the current position the bot should try to click (1.0-80.0 grid units).
- Click Interval: Time (in ms) between movement clicks (16-500ms).
- Update Interval: How often the bot logic runs (8-200ms).
- Path Recalc Interval: How often the pathfinding algorithm recalculates the route to the target (50-2000ms).
- Require Focus: If enabled, the bot only moves when the game window is in the foreground.
- Disable in Town: Automatically pauses the bot when in town or hideout.
Makes mouse movement look natural instead of teleporting the cursor.
- Enable Human Mouse: Toggle realistic cursor movement.
- Speed: Movement speed multiplier (0.3-3.0).
- Curvature: How curved the mouse path is (0.0-3.0).
- Tremor: Natural hand shake simulation (0.0-3.0).
- Overshoot: How much the cursor overshoots the target (0.0-0.5).
- Dodge Roll Key: Key to press for dodge rolling (default: Space).
- Dodge When Stuck: Automatically dodge roll when the bot gets stuck.
- Dodge Roll Cooldown: Minimum time between dodge rolls (500-30000ms).
Mechanisms to handle situations where the bot gets stuck.
- Stuck Timeout: How long (in ms) to wait without successful movement before declaring "Stuck" (1000-10000ms).
- Max Recovery Attempts: Number of attempts to un-stuck before giving up (1-10).
If the game is not running, the bot can automatically:
- Launch the game process.
- Wait for the login screen and click "Log In".
- Wait for character select and click "Play".
- Wait for the game to load, then start the bot.
Configure the Game Path field to point to your game executable for this feature.
Visual tools to diagnose pathfinding and logic.
- Debug Overlay: Enables drawing debug information on the screen.
- Show Path: Draws the calculated path to the target.
- Show Waypoints: Highlights the specific points the bot is clicking.
- Show Stop Radius: Visualizes the circle around the target where the bot will stop.
A safety feature to avoid getting surrounded by too many monsters.
- Enable Avoid Surround: Toggle the flee mechanic.
- Minimum Monster Count: Number of nearby monsters that triggers fleeing (1-20).
- Detection Radius: How far to check for surrounding monsters (50-1000 pixels).
- Enable Item Pickup: Toggle automatic loot collection.
- Pickup Radius: How far to look for items (50-3000 pixels).
- Max Pickup Attempts: How many times to try picking up an item (1-20).
- Animation Wait Time: How long to wait for pickup animation (100-3000ms).
The Launcher tab provides a secure and isolated environment for running the game. It allows you to create and manage "Limited Users" — Windows accounts with restricted permissions — and launch the game under these specific user contexts. This is particularly useful for security (Sandboxing) and for running multiple instances of the game with separate configurations/permissions.
The core of this tab is the management of restricted Windows user accounts.
- User Selection: A dropdown menu lets you choose which Limited User account to use for launching the game.
- Create New User: Click the "Create New" button to open a dialog where you can define a new username and password. This creates a real Windows user account on your system with limited privileges.
- Delete User: Remove the currently selected Limited User from your system.
- Manage All Users: View a list of all users on the system. Warning: This allows you to delete any user, so use this with caution.
-
Game Path: Specify the full path to your game executable (e.g.,
PathofExile.exeorPathofExile_x64.exe). - Browse: Use the "..." button to open a file explorer and select the executable file.
- Launch Game: The large button at the bottom starts the game using the credentials of the selected Limited User. The application handles the complex process of logging in the user in the background and starting the process securely.
- Isolation: By running the game as a different user, the game process is isolated from your main user's files and other running processes.
- Configuration Saving: The launcher automatically saves your selected game path and user preferences, so you don't need to re-enter them every time.
- Security: Passwords and credentials are managed securely by the application's backend.
The Logs tab is a powerful system event viewer that allows you to monitor the application's internal state, debug issues, and track automated actions in real-time. It offers extensive filtering and management tools to keep the information relevant and readable.
The interface is divided into four main areas: the Control Bar, Category Filters, the Log List, and the Status Bar.
Located at the top of the tab, this bar provides quick access to global filters and window management.
- Search: A real-time text filter. Type here to instantly filter logs by message content or timestamp.
-
Level Filters: Toggle buttons to show/hide logs based on severity:
- Info: General informational messages (Blue).
- Warning: Potential issues or important alerts (Yellow).
- Error: Critical failures or errors (Red).
- Debug: Deep internal state information (Grey, available in Debug builds only).
- Category Filter Toggle: Click the filter icon to expand/collapse the detailed Category selection panel.
- Detach/Attach Window: Moves the Logs tab into a separate, floating window. This is useful for keeping logs visible on a second monitor while using other tabs in the main application.
-
Save to File: Exports the current log history to a text file in the
logs/directory. Useful for sharing with developers for support.
When expanded, this section allows fine-grained control over which modules generate logs.
- Categories: You can enable or disable logs for specific features like Trade, Radar, AutoPot, Craft, Smoother, Atlas, Hotkeys, Bot, etc.
-
Trade Subgroups: The Trade category is further divided into subgroups for precise debugging:
- Connection: Status of the trade site connection.
- Buy: Buy actions and clipboard operations.
- WebSocket: Live data stream events.
- RateLimit: Warnings about API rate limits.
- Icon: Item icon loading status.
-
Bot Subgroups: The Bot category has subgroups:
- Settings: Bot configuration changes.
- Skill: Skill usage and cooldowns.
- Monster: Monster detection and combat.
- Objects: Chest interaction.
- Items: Item pickup events.
- All / None: Quick buttons to enable or disable all categories at once.
The main area displays the chronological history of events.
- Format: Each entry shows the Timestamp, Level Icon, Category Icon, and the Message.
-
Context Menu: Right-click on any log entry to access copy options:
- Copy Line: Copy the selected log line to clipboard.
- Copy Visible: Copy only the currently filtered logs.
- Copy All: Copy the entire log history.
- Auto-Scroll: The list automatically scrolls to the newest entry unless you manually scroll up to inspect older logs.
Displays statistics and maintenance tools.
- Counters: Shows the "Total" number of logs in memory and the "Shown" number based on current filters.
- Clear All: Permanently deletes all log entries from memory.
- Clear Filtered: Deletes only the logs that are currently visible (passing the active filters).
The Debug tab provides low-level inspection tools for examining game memory structures in real-time. It is primarily designed for plugin developers and advanced users who need to understand entity data, component values, and UI element hierarchy.
The Debug tab is organized into nine sub-tabs.
Low-level process and world state: the attached game process and base address, area/world data (area name, hash, level, town/hideout flags), GameScale & cull values, and screen metrics.
The game-state hierarchy and which state is currently active (LoginState, SelectCharacterState, InGameState, AreaLoadingState, etc.).
Real-time performance monitoring:
- Frame Timing: FPS counter, total milliseconds per frame.
- Worker Thread Breakdown: Per-stage timing for UpdateGameData, UpdateEntities, UpdateInventories, etc.
- PathFinder Status: Initialized state, grid dimensions, cached paths count.
- Plugin Performance: Per-plugin UI/settings rendering time.
Current player state inspection:
- Vitals: HP, ES, MP — current, max, and percentage values.
- Buff List: Scrollable table of all active buffs with name, charges, time remaining, total duration, flask slot, effectiveness, and source entity ID.
- Position: Grid position, world position, terrain height.
- Component Cache: Addresses for all player components.
- Active Skills + Stat Sets: Every skill on the player's Actor with cooldown/charge state, per-level gem data, and a Stat Sets (evaluated) viewer — the game's own evaluated stat containers per skill, including the skills-panel DPS values (attacks/casts per second, damage per second, average damage).
- Minions: Lists friendly summoned monsters in the area (skeletons, djinns, wolves, …) with each minion's own skills and their evaluated stat sets — this is where a summon's "Basic Attack" DPS lives.
A filterable table showing all entities currently loaded in the game.
- Columns: Entity ID, Address, Metadata Path, Type, SubType, State, Rarity, Zone (InnerCircle/OuterCircle/Far).
- Type Filters: Quickly filter by entity type — Monsters, Chests, NPCs, Players, Items, Shrines, AreaTransitions, ExpeditionMarkers, ExpeditionRemnants, etc.
- Distance Filter: Slider to show only entities within a specific range (0-5000 grid units).
- Search: Text-based search by metadata path.
- Entity Watch: Click an entity to "watch" it — the worker thread then reads detailed component data for it every frame. Parsed components include Life, Render, Positioned, Targetable, Animated, Stats, Actor, and Buffs, plus an "All Components" view listing every component name → address pair.
Inspect the game's inventory system in detail (two nested tabs: Inventory and Stash).
- ServerData: Displays the ServerData component address.
- Inventory List: Shows all player inventories (ID, Address, Name).
- Inventory Watch: Select an inventory to inspect — slot grid (occupied/empty), item list (metadata path, rarity, slot position), and full mod breakdown (Implicit, Explicit, Enchant, etc.) with values.
The loaded-files registry (dat files and other game resources) and recent error/diagnostic information.
Navigate the game's UI element tree hierarchy.
- Game UI Root: Inspect elements under the in-game UI root (panels, menus, buttons).
- Tree Navigation: Expand/collapse UI elements to see children, addresses, and properties.
- Search: Filter elements by name/path.
- GameCullValue: Displayed for UI scale calculations.
Live view of the player's flask and charm slots — the active flask/charm in each slot and its current state.
Components: The game exposes 22 entity component classes (the latest addition is
Pathfinding). All but two (NPCandDiesAfterTime, which are stubs) parse their memory into typed fields; the most detailed parsing — full field breakdowns in the watch panels — covers Life, Render, Positioned, Targetable, Animated, Stats, Actor, and Buffs.
The Plugins tab manages native C++ DLL plugins that extend POEFixer's functionality. Plugins can render overlays, access game data, and integrate seamlessly with the existing UI.
-
Plugin List: Shows all discovered plugins from the
Plugins/directory. - Enable/Disable: Toggle individual plugins on or off. State is saved between sessions.
- Per-Plugin Settings: Each enabled plugin can render its own settings section directly in the Plugins tab.
- SDK Version Check: The host validates plugin SDK version compatibility on load. Current SDK version: 6.
All plugin source code is available on GitHub:
- ExamplePlugin — SDK reference implementation with examples
- KillCount — Kill/chest/death tracking overlay
- NinjaPricer — item price overlay (prices from the core price service)
- Hiveblood — Hiveblood total overlay (PoE2 Breach / Genesis Tree resource)
- Radar — minimal radar overlay built entirely on the v6 SDK (monsters, NPCs, chests, transitions, walkable terrain)
- FarmCounter — farming session tracker (per-map loot value, run history, kills, Hiveblood / Atziri beacon counters)
Each repository is self-contained with SDK headers, ImGui, and a Visual Studio solution — clone, open, and build.
A comprehensive kill/chest/death tracking overlay with persistent statistics.
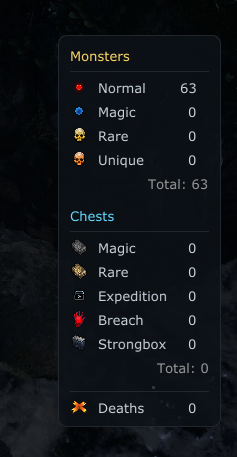
- Monster Kill Tracking: Counts killed monsters by rarity (Normal, Magic, Rare, Unique, Unknown) using disappearance-based detection — monitors entities within InnerCircle (~60 units) and OuterCircle (~120 units) zones.
- Chest Tracking: Counts opened chests by type (Magic, Rare, Expedition, Breach, Strongbox) by detecting state transitions (closed -> opened).
- Death Counter: Tracks player deaths by monitoring HP transitions.
- Per-Map Counters: Automatic reset when entering a new area. Old counters remain visible until first kill in new area.
-
Lifetime Totals: Persistent statistics stored in a SQLite3 database (
Plugins/KillCount/data/killcount.db). Tracks session history per area (name, hash, level, timestamps, all counters). -
Overlay:
- Draggable when the program menu is active ("Drag to reposition" hint appears).
- Non-interactive and title-bar-free when menu is hidden.
- Configurable opacity (0-100%).
- Tab bar for switching between Map and Total views (both can be enabled simultaneously).
- Color-coded sections: orange headers (Monsters), light blue (Chests), red (Deaths).
-
Icon Atlas: Displays entity type icons from the shared
Resources/radar/icons.pngsprite sheet with fallback icons for all categories. - Settings: Configure which counters to display (5 monster types + 5 chest types + deaths), opacity, overlay mode, reset buttons for map/lifetime stats.
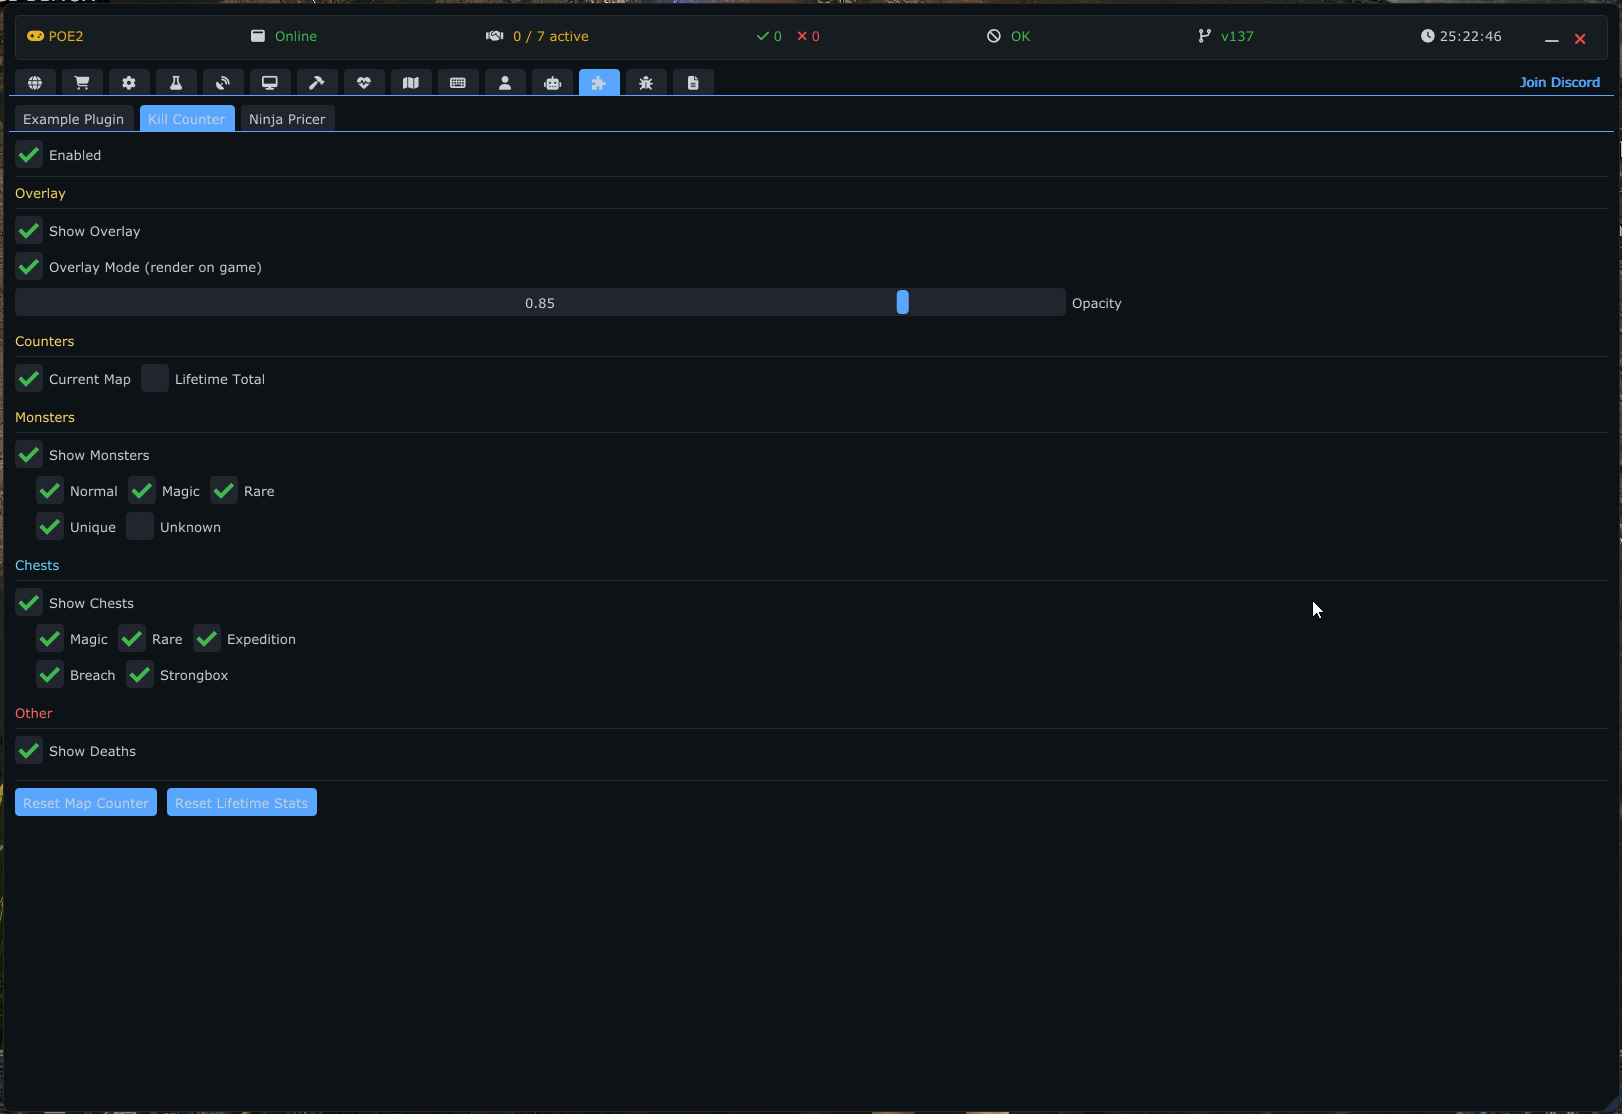
A real-time item price overlay that displays prices on ground items, inventory, and stash tabs. Prices come from POEFixer's built-in price service — choose your league in Settings → Prices (the plugin no longer fetches prices or leagues itself).
- Coverage: Currency, Fragments, Abyssal Bones, Uncut Gems, Essences, Soul Cores, Idols, Runes, Ritual Omens, Expedition, Delirium, Breach, Lineage Support Gems, Reliquary Keys, Incursion, plus unique items (Accessories, Armour, Flasks, Jewels, Maps, Weapons, Sanctum Research). Item icons are shown next to prices.
-
Three Display Locations:
- Ground Items: Shows prices on dropped items in the game world. Detects stack counts (e.g., "2x Divine Orb" -> doubled price). Position configurable: Top, Bottom, Left, Right of the item label.
- Inventory: Shows prices on items in the player inventory grid. Adaptive font sizing for small cells. Position configurable: corners of each cell.
- Stash Tabs: Shows prices on items in the currently open stash tab. Auto-detects stash UI and active tab index.
-
Price Display:
- Three currency modes: Divine (D), Exalted (E), Chaos (C).
- Color-coded: gold (>= 1 Divine), white (>= 0.1 Divine), gray (< 0.1 Divine).
- Adjustable text size (0.5x to 2.0x).
- Always up to date: Prices are kept current automatically by POEFixer's core price service — there is no manual refresh and no per-plugin refresh interval to configure. A local cache provides offline fallback.
-
Visibility Controls:
- Hide when game not focused.
- Hide hotkey (hold to temporarily hide overlay).
- Per-category toggles (enable/disable individual price categories).
- Settings: Currency mode, text scale, display position per location, category display toggles, and hide hotkey. (League and price data are configured centrally in Settings → Prices.)
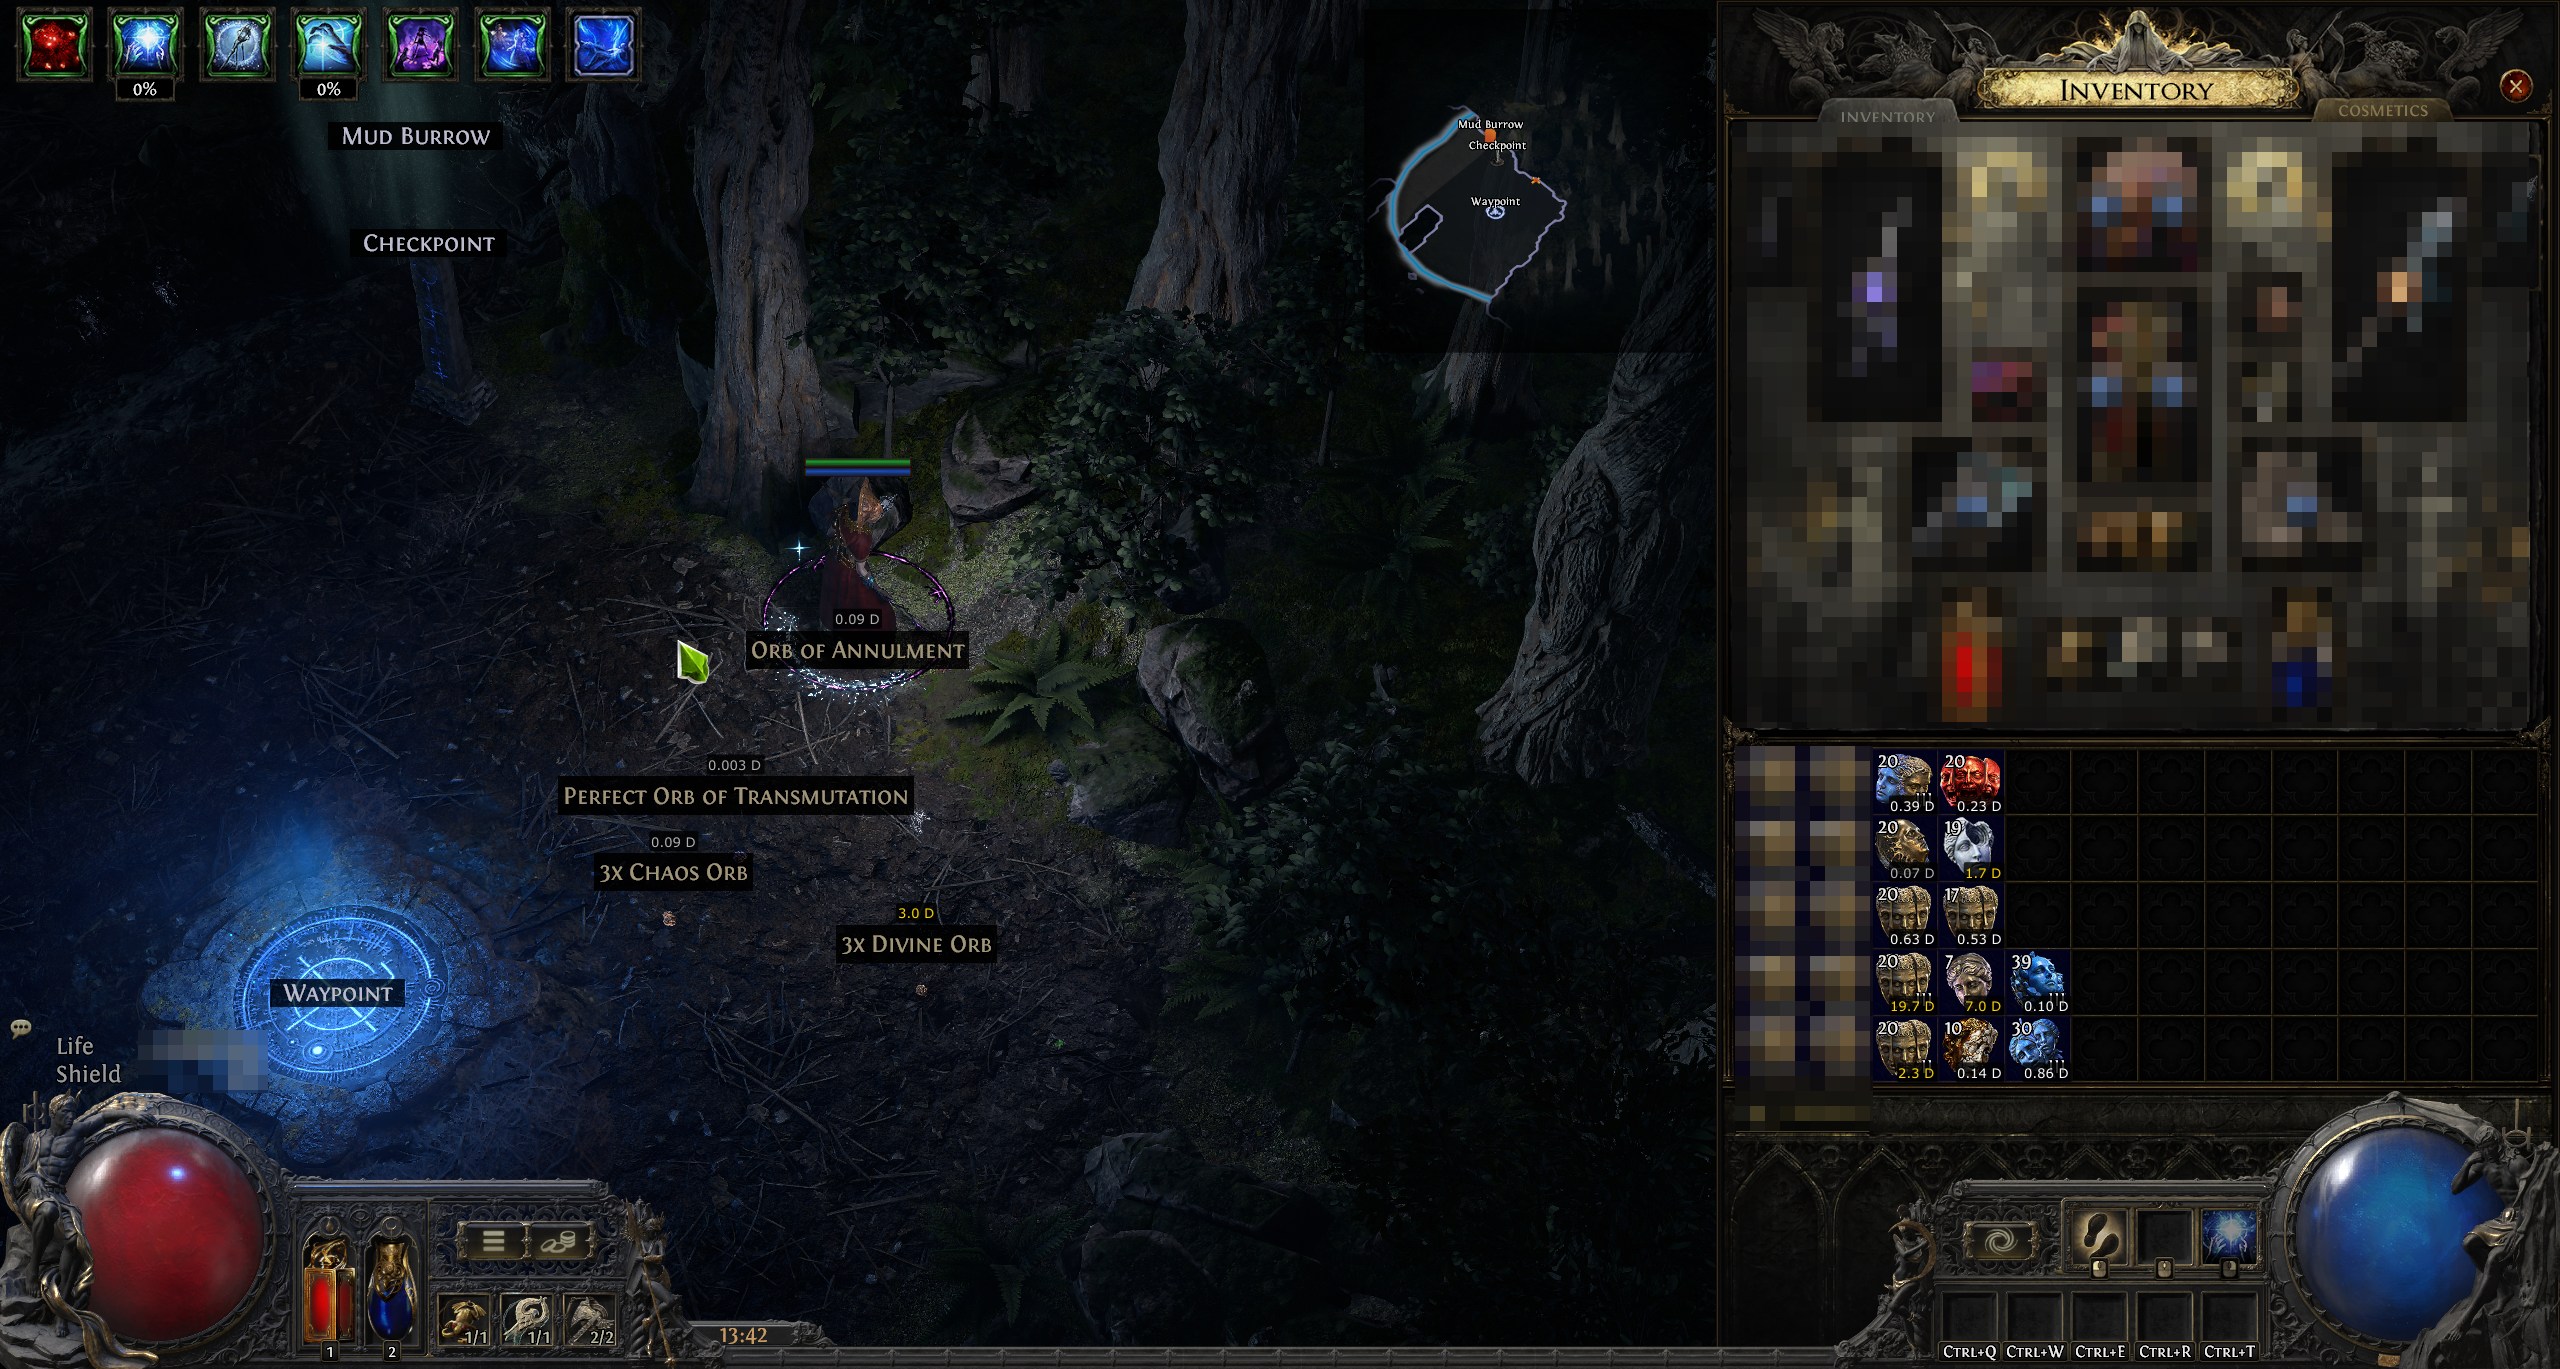
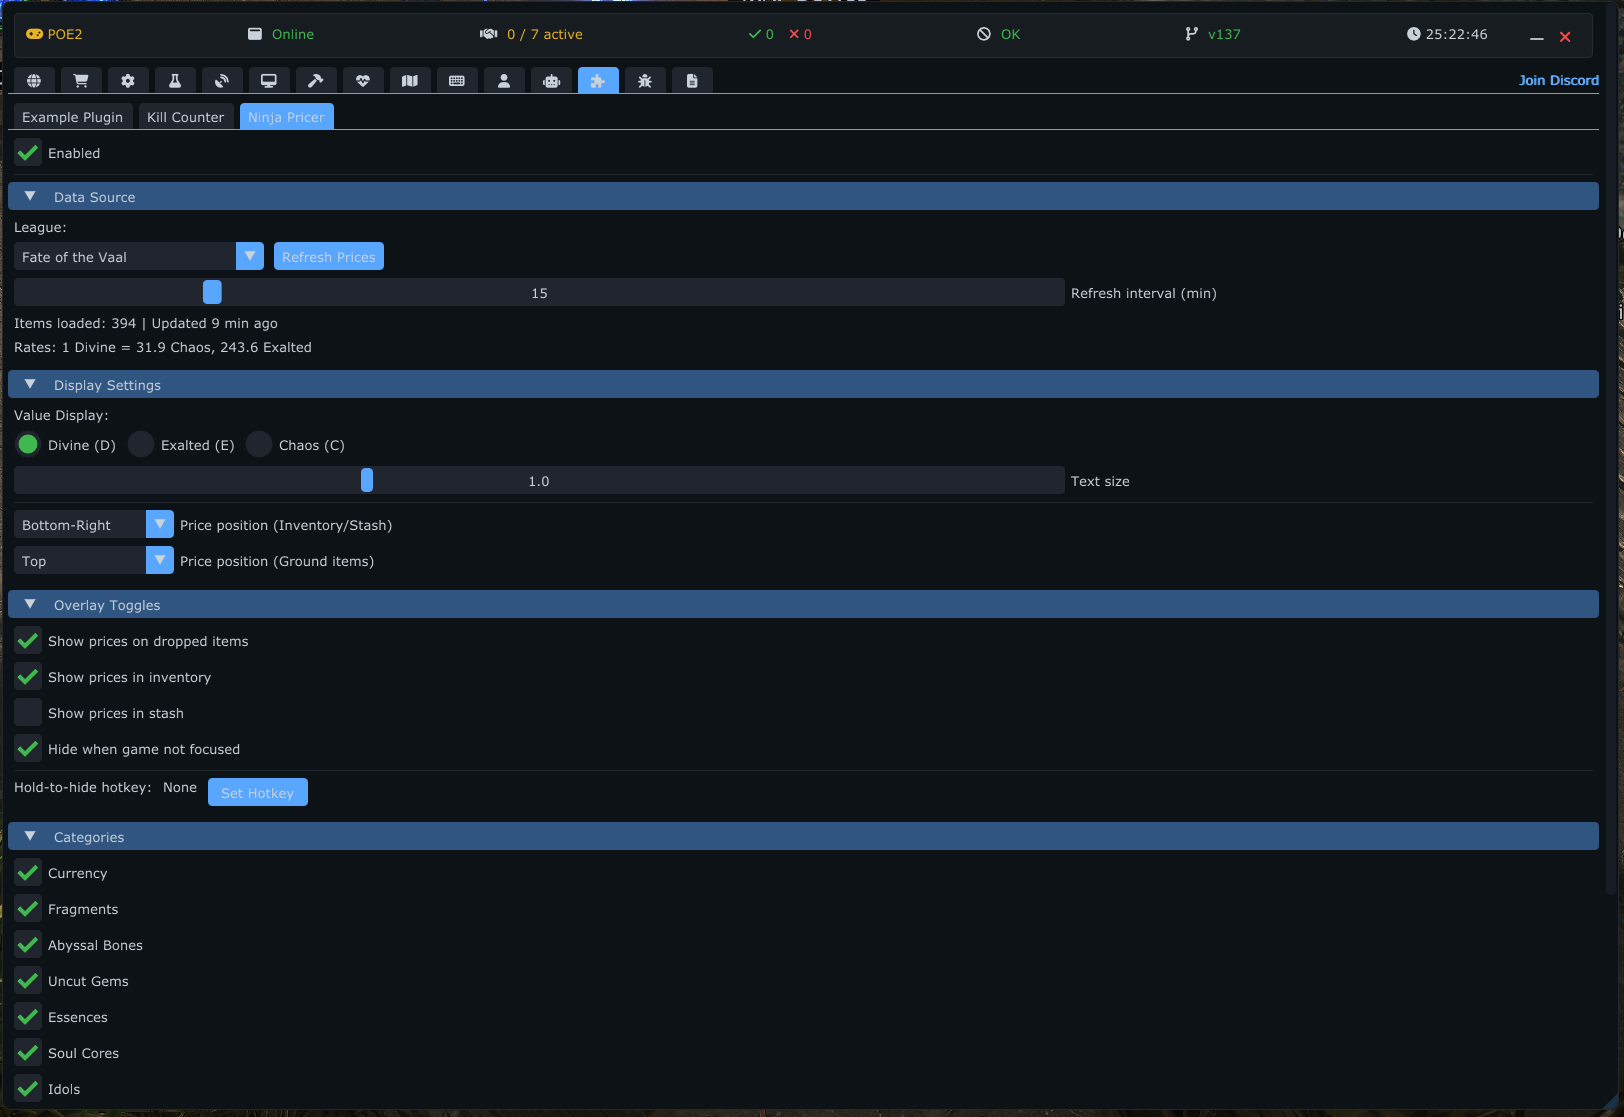
Shows your Hiveblood total (the Path of Exile 2 0.5 Breach / Genesis Tree crafting resource) as an in-game overlay, read directly from memory — available anywhere without opening the Genesis Tree.
- Total Anywhere: Reads the live total where Hiveblood actually changes (at the Genesis Tree on spend, on maps on Breach gain). In idle areas like a hideout it shows the last value it read, which stays correct because the total only changes at the tree or on maps.
-
Per-Map Gains: A
+N this mapline that resets on each area change, so you can see how much a map yielded. - Cap Warning: The text turns orange-red and blinks above a configurable threshold (default 95,000) as you approach the 100,000 cap.
- Settings: Overlay position, font scale, text color, cap-warning threshold, and a per-map gain toggle.
A lightweight radar overlay built entirely on the public v6 SDK (it also serves as a reference for radar-style plugins). It draws colored dots on the large map for monsters (by rarity, alive only), NPCs, chests (a distinct color once opened), area transitions, and the player, and can optionally render the walkable terrain. All data comes through SDK services — the plugin performs no direct memory reads.
A farming session tracker: it shows what each map actually earned you, with persistent history.
- Live Loot Tracking: On map enter the plugin snapshots your backpack (with a stability gate, so the game's delayed inventory fill can't skew the baseline) and then lists every item gained or lost with stack counts and icons. Leaving to the hideout and returning to the same map resumes the run — loot, duration and resource baselines carry over.
- Pricing via the Core: Item values come from POEFixer's central price service (league is chosen in Settings → Prices); the plugin performs no network requests of its own. Items the database misses can be given custom prices (entered in exalts) right from the settings tab, with an "unpriced items in inventory" helper list.
-
Map-Run History & Sessions (SQLite): Every run is stored in a local database (
data/farmstats.db) with its date, duration, total value, loot (with item icons), per-rarity kills and Hiveblood/beacon gains. Runs are archived into numbered sessions with top-drop summaries and profit/hour; an all-time block shows total maps, farm time, value and your best run. Old runs, whole sessions or all archived history can be deleted right from the Statistics tab (two-click inline confirm). Overlay shows the session timer (auto-pauses after 60s in hideout), maps run, current-map profit and a live loot table in exalted/divine/chaos. - Pause-Aware Timers: While the game is paused in the Esc menu (solo play), the map timer and session active-time freeze with it.
- Kill Counter: Per-rarity kills (Normal/Magic/Rare/Unique) near your character, shown with the same monster icons the Radar uses; per-run and per-session totals accumulate in Statistics. Rogue Exiles are counted separately (with their own icon), not lumped in with Uniques.
- Gold: The character's gold total in the overlay with a "(+N)" picked-up-this-map counter; per-run and per-session gold gains are stored in the statistics (spending at vendors between map visits doesn't distort the numbers).
- Map Modifiers: Each run records the area's modifiers — the same lines the in-game area-info panel shows ("27% increased Rarity of Items found in this Area", "Area has 519% increased chance to contain Essences", ...) — collapsible under the run in the Statistics tab.
- Hiveblood: Genesis-tree resource total with per-map gains and a near-cap warning flash.
- Atziri Beacons: The temple-entry counter (N / 60) as an overlay bar (inline or separate window) with an optional chime on each gain. The counter is located by scanning the UI for its text pattern, so patches that shuffle UI panel indices don't break it.
- Zone Names: Rename raw zone names to friendly display names.
A built-in helper for Path of Exile 2's "Rite of the Nameless" foretold-rewards mechanic on the Atlas. It activates only on the Rite reward-selection screen: hover a revealed map and press Ctrl+Alt to lock it as a route start. A background worker enumerates every linear reward chain (the start map plus the maps it leads to) and lists them in a filterable window; selecting a chain draws numbered lines directly on the live Atlas with the reward names and prices. Includes text search, a "most valuable path" mode, and user-editable map/biome exclusions.
A built-in file browser for Path of Exile's packed content (standalone Content.ggpk or the Bundles2 layout, auto-detected). It renders entirely inside its settings panel: a navigable file tree with a breadcrumb bar, type-specific viewers (hex, image/DDS, audio, .dat tables with a cell editor, terrain, skill tree, PSG), search, bookmarks, and an extract dialog. The archive opens asynchronously and uses Oodle for decompression.
A reference implementation demonstrating all Plugin SDK features:
- Buff Inspector: Lists player buffs with filtering and progress bars.
- Entity Explorer: Entity debug list with watch mechanism, component trees.
- Inventory Inspector: ServerData viewer, inventory selector, slot grid, item mods.
-
Memory Viewer: Hex dump viewer,
Read<T>demo, pattern scanner. - UI Explorer: Full UI element tree navigator with search and highlighting.
See the Plugin Development Guide for detailed instructions on creating your own plugins, including:
- Project setup and build configuration
-
PluginSDK::Pluginbase class implementation - PluginContext API reference (v1-v6)
- Data structures and enums
- Common recipes and patterns
- Draggable overlay pattern
- Troubleshooting guide