Trip Members and Sharing
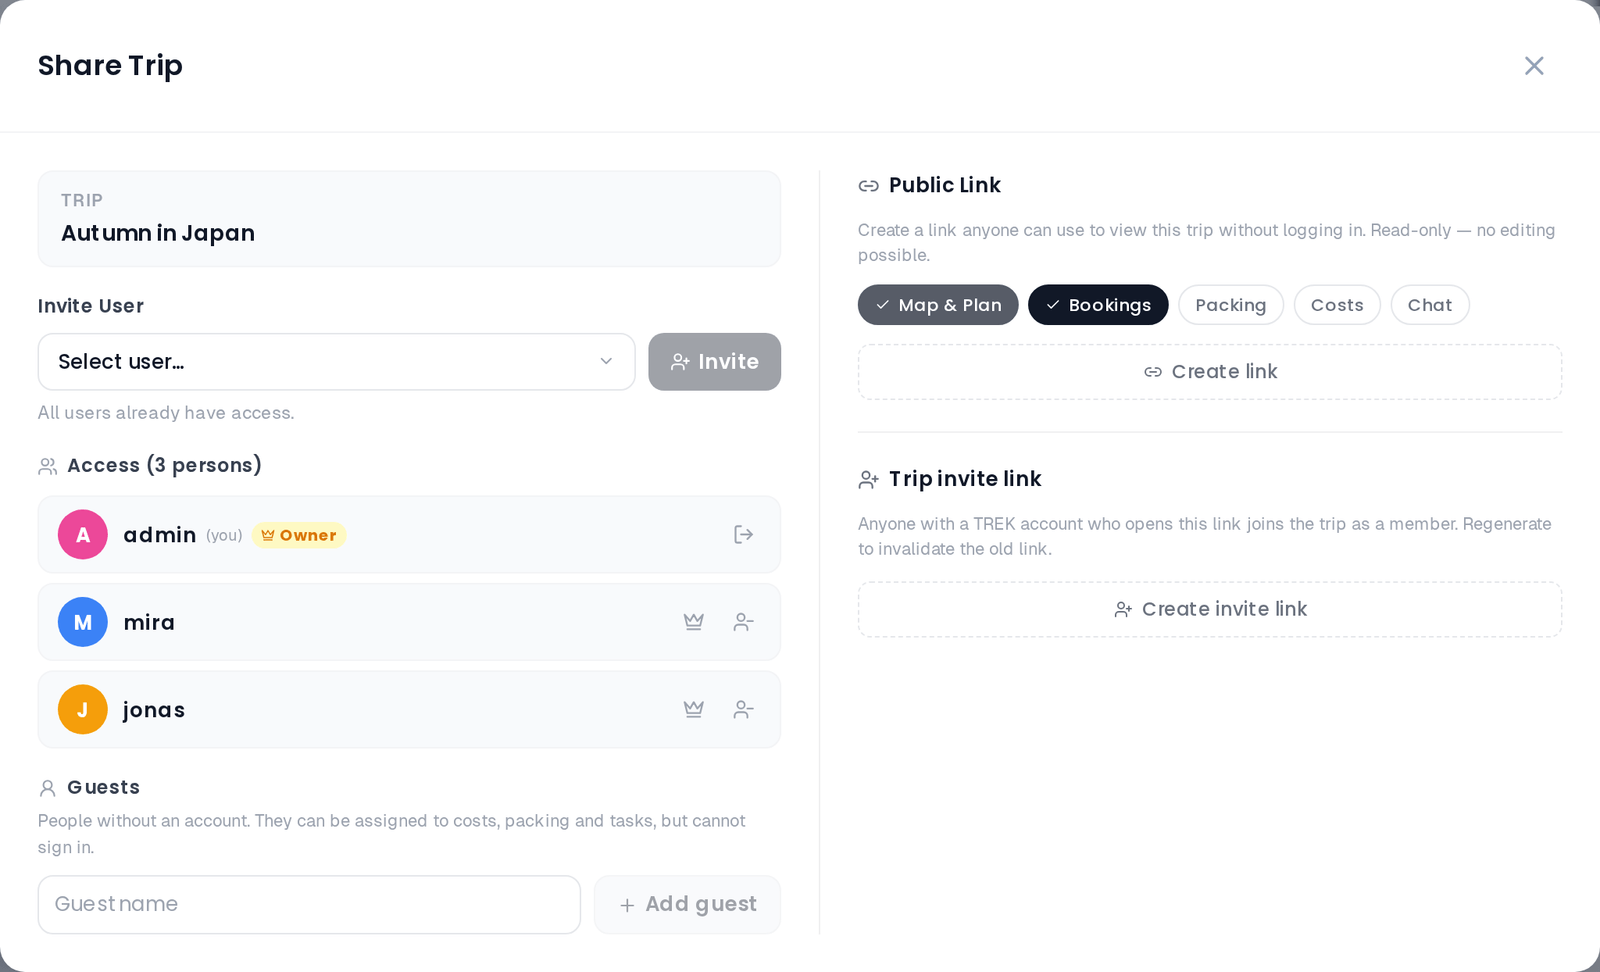
- From the dashboard: click the share/members icon on a trip card.
- From the trip planner: click the Share button in the top navigation bar.
When you have the share_manage permission the modal opens to a two-column layout on wider screens (members on the left, share link on the right). Without that permission only the members column is shown. On narrow screens the columns always stack.
The left column lists everyone who has access to the trip.
- The trip owner is marked with a crown badge.
- Your own entry is labeled (you).
- Each non-owner member shows a remove button.
If you have the member_manage permission (default: trip owner), an invite control appears above the list. Select a user from the searchable dropdown and click Invite. The user is looked up by username or email on the server, added immediately, and the list refreshes. The invited user also receives an in-app notification.
Click the remove icon next to any member's name. A confirmation prompt appears before the member is removed.
If you click the remove icon next to your own name, the action is labeled Leave trip and uses a "log out" icon. Leaving reloads the page and returns you to the dashboard.
The trip owner cannot be removed through this panel.
Not everyone on a trip has — or wants — a TREK account. Guests let you add travel companions by name only, so you can assign them to costs, packing and tasks just like a real member, without creating a login for them.
Guests appear in their own Guests section below the members list, each with a Guest badge:
People without an account. They can be assigned to costs, packing and tasks, but cannot sign in.
Only the trip owner can manage guests (this is stricter than inviting members, which uses the member_manage permission). In the owner's view, the Guests section has a Guest name field and an Add guest button — type a name and click Add. A guest has a display name only: no email, no password, and no way to sign in.
Other members see the Guests section too (when guests exist) but cannot add, rename or remove them.
If two guests share a name, TREK keeps them distinct internally (the second "Anna" becomes "Anna 2"), so assignments never get confused.
Once added, a guest can be picked anywhere a member can:
- Costs — added to expense splits (see Budget-Tracking).
- Packing — assigned to packing items and categories (see Packing-Lists).
- To-dos — set as a task assignee.
- Day plan — added as a participant on activities and places.
Guests are firmly scoped to the one trip. A guest can never:
- sign in (they have no credentials — password, SSO and password-reset all ignore guest accounts);
- receive notifications (no email and no in-app notifications are ever sent to a guest);
- appear anywhere outside the trip (they are excluded from the global user directory, the admin user list, invite pickers, and search);
- be made the trip owner.
These limits are enforced on the server, not just hidden in the UI.
In the owner's Guests section, each guest row has a Rename (pencil) and a Remove access (trash) button. Removing a guest is destructive and cascading:
Remove this guest? Their assignments and cost shares will be removed too.
There is no limit on the number of guests per trip.
The right column is only visible to users with the share_manage permission (default: trip owner).
A share link creates a read-only, token-based URL:
<your-instance>/shared/<token>
Viewers do not need to log in. The link can be shared with anyone.
Click Create share link. A URL is generated and shown with a copy button.
Before or after creating the link, you can control what the link exposes. Toggle each section on or off with the pill buttons:
| Toggle | Default | What it shows |
|---|---|---|
| Map | Always on | Trip map with place markers — cannot be disabled |
| Bookings | On | Reservations and accommodations |
| Packing | Off | Packing list |
| Budget | Off | Budget tab |
| Collab | Off | Read-only view of notes, chat, and polls |
Changes to toggles take effect immediately for an existing link.
Click Delete link (red button below the URL) to revoke access. The token is invalidated and existing viewers are redirected.
Below the public share link, users with the share_manage permission can also create a trip invite link — a single rotating link that lets people join the trip as members:
<your-instance>/join/<token>
Unlike the read-only share link, this one is not anonymous:
- Whoever opens it must have a TREK account and be signed in. If they are not, they are sent to the login page and returned to the invite afterwards — there is no registration from this link.
- Anyone who opens it while signed in is added to the trip as a member (the same access a manually-added member gets). The owner and existing members are simply taken straight to the trip.
- To invite people who do not yet have an account, use an admin invite link with an optional trip binding instead — see Invite-Links.
- Click Create invite link to generate the link, then copy it with the copy button.
- Click Regenerate to rotate the token — the previous link stops working immediately.
- Click Disable to remove the link entirely.
Admin: To invite users who do not yet have an account, create invite links in the admin panel. See Invite-Links.