Repository navigation
Map Point Telemetry
Select a recorded route point to see what the tracker reported at that moment. The point popup and Vehicle Status card complement one another: the popup is a compact view, while the card can show a larger selection of fields.
- In Trips, expand a month and day, then select one of that day's trips.
- Zoom into part of its route until the individual dots are easy to select.
- Click a route dot. The popup shows its timestamp, location, speed, and enabled telemetry fields.
- Check the Vehicle Status card. It updates to the selected point's timestamp and values.
- Click another dot to compare a different moment. Use × to close the popup.
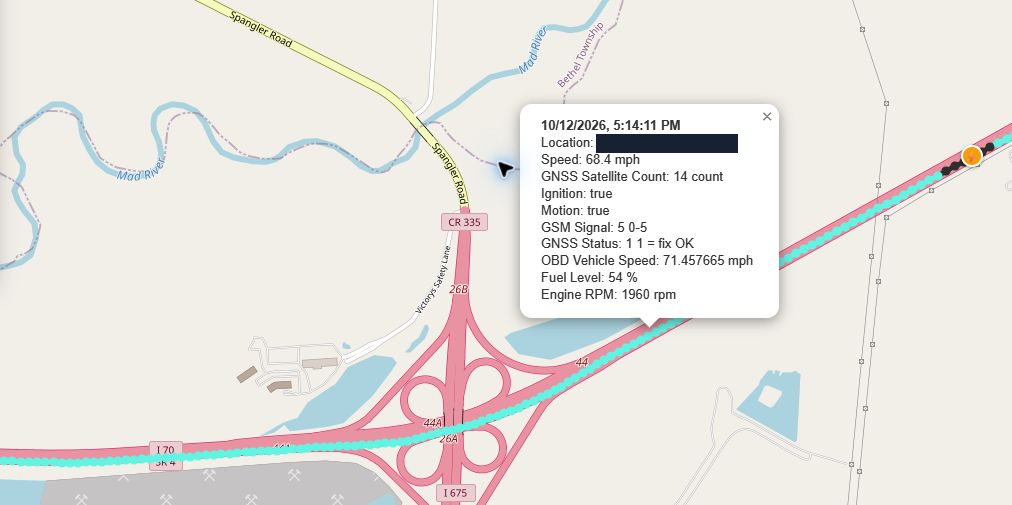
This highway example shows both the point's Speed and its OBD Vehicle Speed, plus fuel level, RPM, ignition, motion, satellite count, and tracker signal. The two speed fields are separate measurements and need not be identical. Read each field's label and unit rather than treating them as the same source.
Route colors follow the selected vehicle's Speed Bands. A dense trail represents many recorded points; zooming helps you select the moment you want.
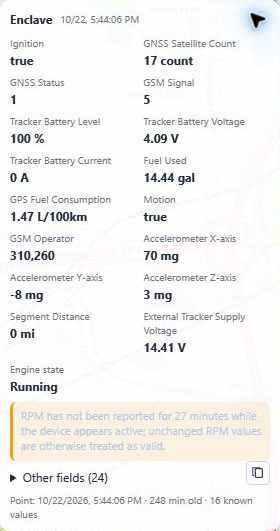
Start with the Point timestamp and age at the bottom. A historical point may be many minutes old while still being the correct point for the selected trip. It is not a live reading simply because the card shows an engine state.
| Fields | What to inspect |
|---|---|
| Engine RPM, throttle, mass air flow | Recorded engine activity at the selected point. |
| Ignition, motion, engine state | Tracker-reported activity flags. The displayed Running/Off state follows ignition data. |
| OBD vehicle speed | Speed reported through the configured OBD field. |
| External tracker supply, control module, tracker battery voltage | Separate electrical readings; keep their labels distinct. |
| Satellite count, GNSS status, GSM signal | Positioning and tracker connection context. |
| Temperatures, pressures, fuel trim | Available readings interpreted by the assigned protocol profile. |
Available fields depend on what the tracker recorded and which profile and display preferences the vehicle uses. Values that are absent, invalid, or unavailable may not appear. A missing field alone is not a diagnosis.
- Open Settings → Vehicle Catalog and select the vehicle.
- Find the telemetry field selection grid.
- Use a field's checkbox to include it in Vehicle Status.
- Use the adjacent switch to include it in map point popups.
- Choose Save Status Card Fields when ready to apply your preferences.
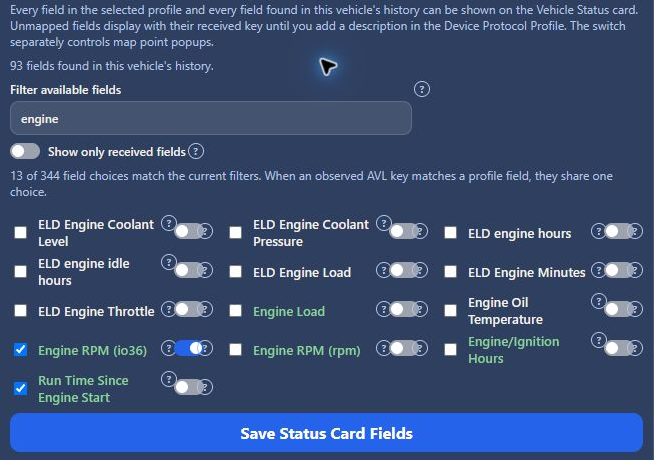
The example combines received fields (green labels) with other known profile fields. Card checkboxes and popup switches are independent, so a field can appear in either display. Show only received fields narrows the choices to measurements found in the vehicle's history.
Expand Other fields to see the displayed attribute data in JSON form. It can include attributes also represented in the main card. Its count describes the attribute list; the footer's known values count describes the values visible on the card.
The copy icon beside Other fields copies the displayed attribute JSON. Remove VINs, device identifiers, or other private values before sharing it.
Drag the card by its heading to move it. Use − to collapse it and + to expand it again. See Device Protocol Profile Editor if a field label or conversion needs review.