Repository navigation
Setup on PC
If you have a Windows computer, Visual Studio is the most comfortable place to write a mod. It checks your code while you type, it knows every class of the game, and big mods are easy to organize and search. The price is a short trip to the phone every time you want to try your changes. On this page we install Visual Studio, give it Bunny Loader's description of the game, create an empty mod, build it and install it on the phone. The next page, Your first mod, fills that mod with a sword.
Note
Before you start, Bunny Loader and Terraria need to be installed on your phone (Installing Bunny Loader), and you need a way to copy a file from the computer to the phone: a USB cable is enough. If you would rather do everything on the phone, see Setup on your phone.
Download Visual Studio Community 2026 from visualstudio.microsoft.com, free for individual developers. When the installer asks what you want to build, check .NET desktop development. That one choice brings everything a mod needs: the C# compiler, the .NET SDK and the editor's C# tools.
The version matters. Bunny Loader runs .NET 10, and Visual Studio 2026 is the first version that supports it; Visual Studio 2022 does not. If you already have Visual Studio 2026, open the Visual Studio Installer and make sure it is up to date and has the .NET desktop workload.
Your code talks to the game through a file called BunnyLoader.dll. It is
the whole game described in C#: every class, like Player, Item and NPC,
with every field and every method, plus the classes Bunny Loader adds, like
Mod and ModItem. Visual Studio reads it to know what exists, which is how
it can suggest damage when you type Item..
The file comes inside the Bunny Loader APK, the same file you installed on
your phone. Copy the APK to the computer, rename it from .apk to .zip
(Windows asks you to confirm the change of extension), and open it like any
other zip file. Inside, in the folder assets\dotnet, is BunnyLoader.dll.
Copy it out. If you cannot see the .apk at the end of the file's name,
turn on File name extensions in File Explorer's View menu first.
Now make a folder to keep all your mods together, such as
Documents\Bunny Loader Mods, and put BunnyLoader.dll in it. It stays there
as a shared reference for every mod you make. It never goes inside a mod: the
phone already has its own copy.
Important
BunnyLoader.dll belongs to the version of Bunny Loader it came from. When
you update the app, take the new BunnyLoader.dll out of the new APK too.
Otherwise Visual Studio describes a slightly different game than the one on
your phone.
A Bunny Loader mod is a folder named after the mod's ID, its internal name.
We will call ours FirstMod. The ID may have letters, numbers and _, and it
must start with a letter. Inside the folder go three files to begin with:
Bunny Loader Mods/
  BunnyLoader.dll          the reference from the APK
  FirstMod/
    FirstMod.csproj        tells Visual Studio how to build the mod
    FirstMod.cs            the mod class
    manifest.json          tells Bunny Loader what the mod is
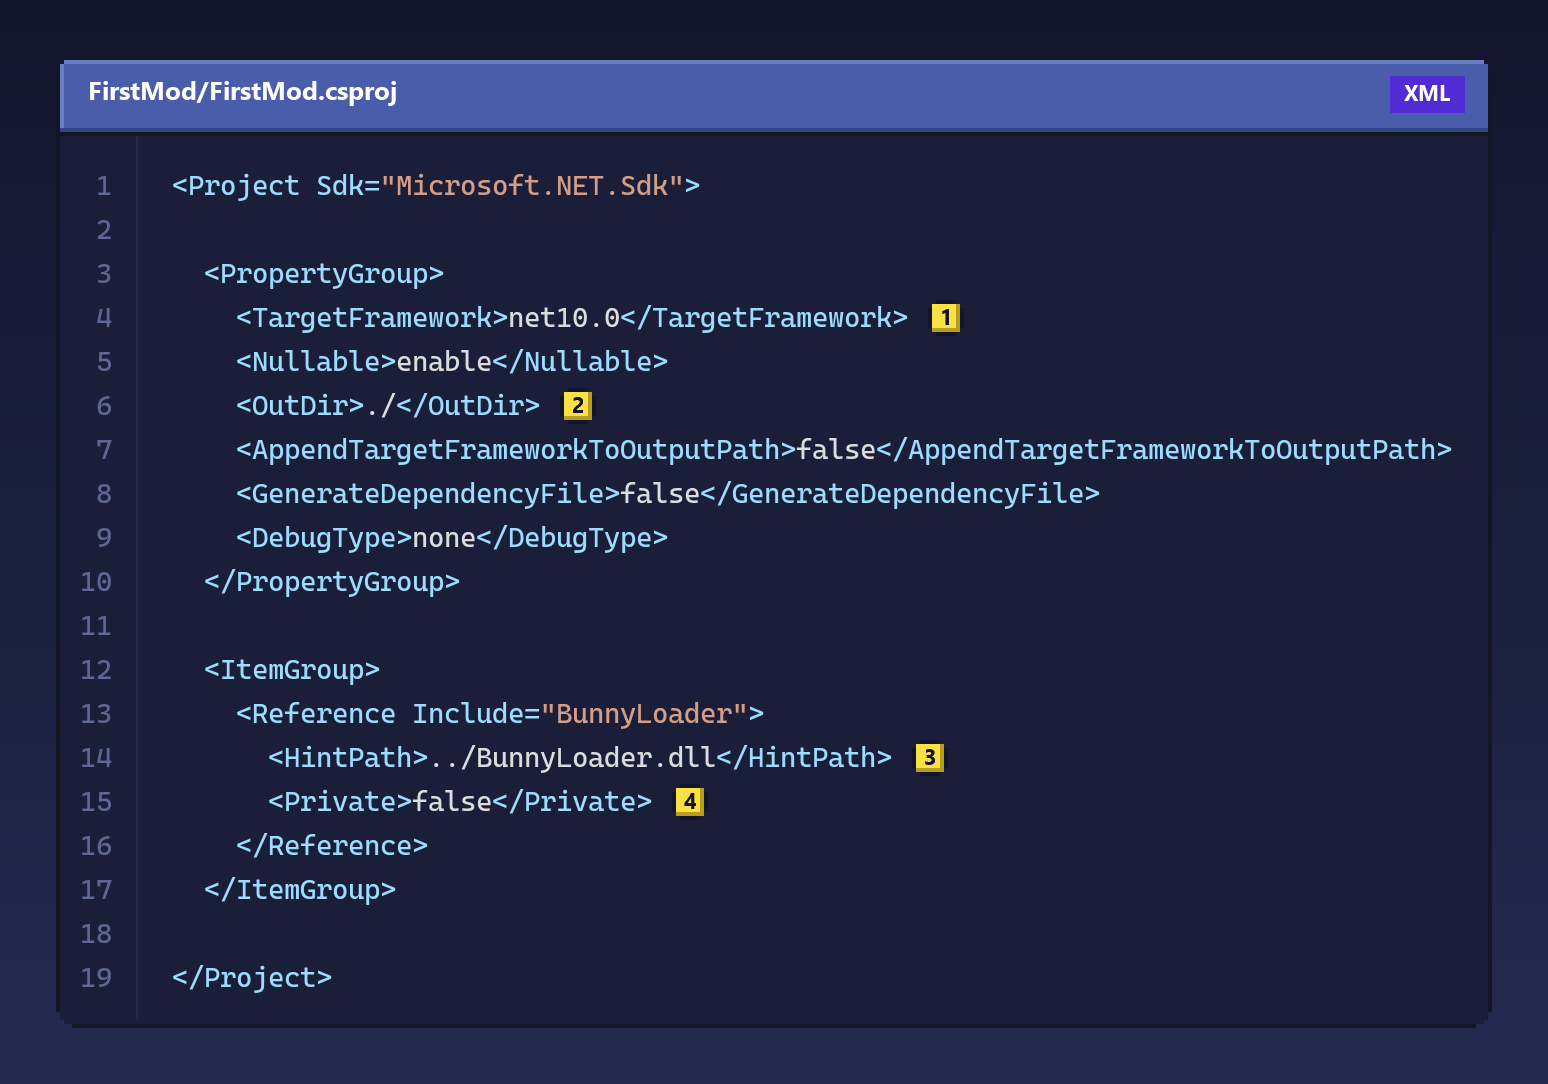
Create the FirstMod folder and, inside it, a text file named
FirstMod.csproj with the following content. Notepad is fine for this; just
make sure the name does not end up as FirstMod.csproj.txt.
Copy this code
<Project Sdk="Microsoft.NET.Sdk">

  <PropertyGroup>
    <TargetFramework>net10.0</TargetFramework> <!-- (1) -->
    <Nullable>enable</Nullable>
    <OutDir>./</OutDir> <!-- (2) -->
    <AppendTargetFrameworkToOutputPath>false</AppendTargetFrameworkToOutputPath>
    <GenerateDependencyFile>false</GenerateDependencyFile>
    <DebugType>none</DebugType>
  </PropertyGroup>

  <ItemGroup>
    <Reference Include="BunnyLoader">
      <HintPath>../BunnyLoader.dll</HintPath> <!-- (3) -->
      <Private>false</Private> <!-- (4) -->
    </Reference>
  </ItemGroup>

</Project>
This is the recipe Visual Studio follows to turn your code into a mod. The
line at (1) says which .NET to build for: net10.0, the version Bunny
Loader runs on the phone. (2) puts the finished FirstMod.dll right next
to the manifest, which is where Bunny Loader looks for it, instead of deep
inside a bin folder. The three lines below it keep the folder clean: no
extra subfolder for the .NET version, no .deps.json file and no debugging
symbols, none of which the phone needs.
(3) tells the compiler where BunnyLoader.dll is: one folder up, in
Bunny Loader Mods. If you keep it somewhere else, change this path. And
(4) is the line that keeps BunnyLoader.dll out of your mod: it is only a
reference for the compiler, never copied next to your files.
Next to it, create FirstMod.cs, the mod class. Every mod has exactly one
class that extends Mod, and its name should match the ID. It can be empty;
Making mods explains why it is there.
using Terraria.ModLoader;

namespace FirstMod;

public class FirstMod : Mod
{
}
The last file is manifest.json, the mod's card: Bunny Loader reads it to
know what the package is before it loads a single line of code.
{
  "uid": "24f03eb3-c4c8-44cf-bddf-9e62105abe24",
  "id": "FirstMod",
  "name": "First Mod",
  "version": "1.0.0",
  "authors": [{ "name": "You" }],
  "type": "mod",
  "blVersion": 3
}
The uid is the mod's identity, and yours must be your own: don't copy the
one above. Open PowerShell and type New-Guid to get a fresh one, and
paste it between the quotes. Two packages with the same uid are the same mod
to Bunny Loader, which is how an update replaces the old version, so never
change it after you share your mod. The id is the ID we chose, written
exactly like the folder and the .cs file. name and version are what
players see, type says this package is a mod, and blVersion is the
package format, which is 3. Mod structure describes every
other field a manifest can have.
Tip
You can also start from Visual Studio's own Class Library template:
create it in the FirstMod folder with the same name, open the project file
by double-clicking the project in Solution Explorer, replace its content
with the one above, and delete Class1.cs.
Start Visual Studio and, on its start window, choose Open a project or
solution. Pick FirstMod.csproj. Visual Studio opens the project and
creates a solution around it, which you can save next to the project when it
asks.
In Solution Explorer, under Dependencies, you will find
BunnyLoader among the assemblies. That is the reference from (3) at
work. To see what it gives you, write Item. inside any method: Visual Studio
lists every field and method of the game's Item class, with the types of
their parameters. This is the best way to discover the game, and you will use
it all the time.
Choose Build → Build Solution, or press Ctrl+Shift+B. When the
Output window ends with Build: 1 succeeded, look in the FirstMod
folder: FirstMod.dll is there, next to the manifest. That file is your
mod's code. BunnyLoader.dll was not copied into it, thanks to (4).
If the build fails, the Error List names the file and the line of every
problem, and a double click takes you there. Two errors are worth knowing
about now. The type or namespace name 'Terraria' could not be found means
the compiler did not find BunnyLoader.dll: check the path at (3) and the
name of the file. NETSDK1045: The current .NET SDK does not support targeting
.NET 10.0 means the Visual Studio or the .NET SDK you have is older than
.NET 10: install Visual Studio 2026, as described above.
The phone installs mods as packages: a .zip file with manifest.json at its
top level. In File Explorer, open the FirstMod folder and select everything
in it except the obj folder, the .csproj file and the solution files that
Visual Studio created (and its hidden .vs folder, if you see it).
Right-click the selection and choose Compress to ZIP file; depending on
your version of Windows it may be under Compress to or Send to →
Compressed (zipped) folder instead. Zipping the
files instead of the folder is what puts manifest.json at the top of the
zip, where Bunny Loader expects it. Name the zip FirstMod.zip and copy it to
the phone, for example into its Download folder through the USB cable.
On the phone, open Bunny Loader and go to the Packages tab:
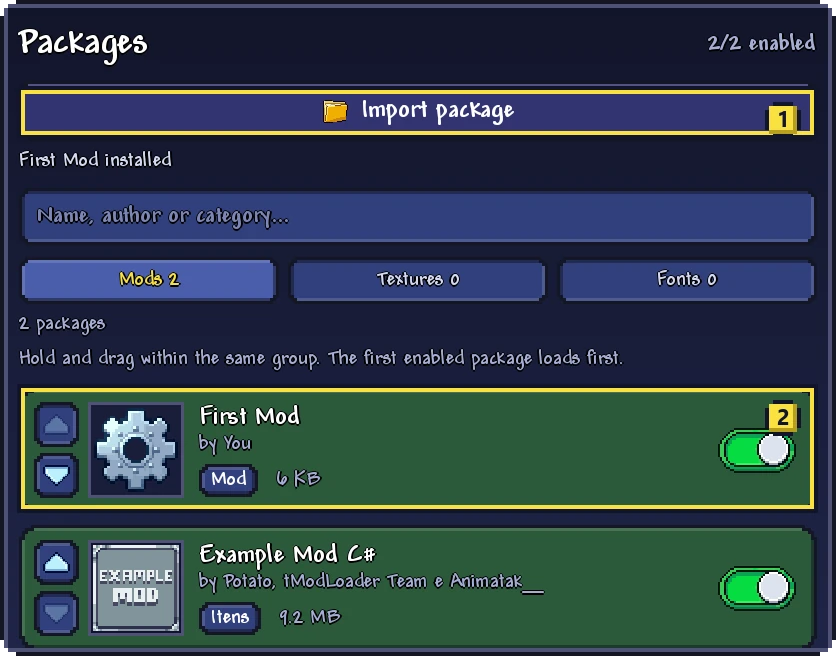
Tap Import package, at (1). Bunny Loader reminds you that a mod runs code inside the game, so you should only install packages from people you trust; this one is yours. Tap Choose file:

Find FirstMod.zip in the file picker and tap it. A moment later Bunny Loader
says First Mod installed, and the mod shows up in the list, at (2) in
the first picture, with its switch on. If the switch is off, tap it. Your
mod will load the next time you press Play.
When you change the code later, the loop is the same: build, zip, import.
Bunny Loader sees that the new package has the same uid as the installed one
and asks before replacing it.
Tip
If you have adb set up for your phone, it can do the copying for you:
adb push FirstMod.zip /sdcard/Download/ sends the zip straight to the
phone's Download folder, ready to import.
Visual Studio only runs on Windows, but nothing in a mod depends on it. On
macOS or Linux, or if you prefer another editor, install the .NET 10 SDK
and use VS Code with the C# Dev Kit extension or JetBrains Rider. The
folder, the three files and BunnyLoader.dll are exactly the same; to build,
open a terminal in the FirstMod folder and run dotnet build -c Release.
Your mod is installed, but it is empty. On the next page, Your first mod, we give it a sword: its code, its picture, its name in the game and its recipe.

