Repository navigation
Setup on Your Phone
You do not need a computer to make mods. BL Editor is a code editor for Android made for Bunny Loader: it knows every class of the game, it builds your mod and installs it in Bunny Loader, and one button opens the game with your changes. On this page we install it, connect it to Bunny Loader, create an empty mod and take a tour of the screen you will spend most of your time in. The next page, Your first mod, fills that mod with a sword.
Note
Before you start, Bunny Loader and Terraria need to be installed on the same phone (Installing Bunny Loader). Everything on this page happens on the phone; if you would rather write code on a computer, see Setup on PC instead.
BL Editor is a separate app, installed next to Bunny Loader. Download it from the same place you downloaded Bunny Loader. It comes in two editions, one that works with Bunny Loader and one that works with Bunny Loader Beta, and each of them only connects to its own, so install the one that matches the Bunny Loader on your phone.
The two apps talk to each other directly, and Android only allows that between apps signed by the same developer. The official builds of both always are. If you build Bunny Loader yourself, BL Editor has to be signed with the same key; BL Editor's README explains how.
The first time you open BL Editor, it asks you to Connect to Bunny Loader. Tap Connect. Bunny Loader keeps your mod projects in a folder of its own, called ModSources, and connecting gives BL Editor access to that folder and to nothing else on your phone. There is no root involved, and you only do this once.
Because the projects live in Bunny Loader's own folder, they are the same projects you see in Bunny Loader's Mod Sources screen: you can start a mod in one app and keep working on it in the other.
If connecting fails, which happens when the two apps were not signed with the same key, Choose the folder manually lets you pick the ModSources folder through Android's file picker. You can edit files that way, but Test will not work, because Bunny Loader will not take orders from an app it does not trust.
Once connected, BL Editor shows its home screen. The four cards on top start
something new: New mod, New texture pack, New font pack, and
Import mod, which opens a mod package you already have (a .bl or .zip
file) as a project you can edit. Below them is the list of your projects, with
a search box and filters for mods, texture packs and font packs.
Tap New mod. The form asks for a few things, and three of them deserve a closer look:
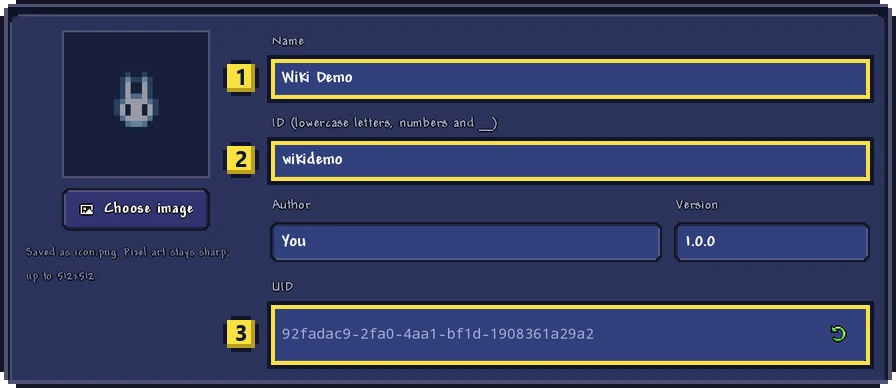
The name at (1) is what players see in the list of mods. You can write anything here, with spaces and accents, and change it whenever you like.
The ID at (2) is different: it is the mod's internal name, and BL
Editor suggests one from the name you typed. It may only have lowercase
letters, numbers and _. The ID becomes the name of your mod's main file and
of the family of names (the namespace) your code lives in, other mods find
yours by it, and your translations start with it. Choose it once and keep it.
The UID at (3) is the mod's identity inside Bunny Loader, a long code generated for you. Two packages with the same UID are the same mod, so installing one replaces the other: that is how updates work. Never change it after you share your mod, or players will end up with two copies of it.
The picture on the left becomes the mod's icon.png. Pixel art stays sharp,
up to 512 by 512 pixels. The author and the version complete the card that you
see in the preview at the bottom of the form. When everything looks right, tap
Create.
The new project opens right away. On the left, in the file list, you will find what every Bunny Loader mod is made of:
Assets/          textures, sounds and music that do not sit next to a class
Common/          code that is not new content: players, systems, globals
Content/         new content: items, projectiles, NPCs, tiles...
Localization/    the names and texts, one file per language
description.md   the text of the mod's page in Bunny Loader
manifest.json    the mod's name, ID, UID, version and author
yourid.cs        the mod class
icon.png         the picture, if you chose one
The folders are only a convention, borrowed from tModLoader, and you can organize your code however you like; Mod structure explains what Bunny Loader expects in each place. The file that matters right now is the one named after your ID. It holds the mod class, the one class every mod must have, and BL Editor has already written it for you:
using Terraria.ModLoader;

namespace yourid;

public class yourid : Mod
{
}
That is a complete mod. It does nothing yet, but Bunny Loader can already load it.
This is the screen where you will write your mods:
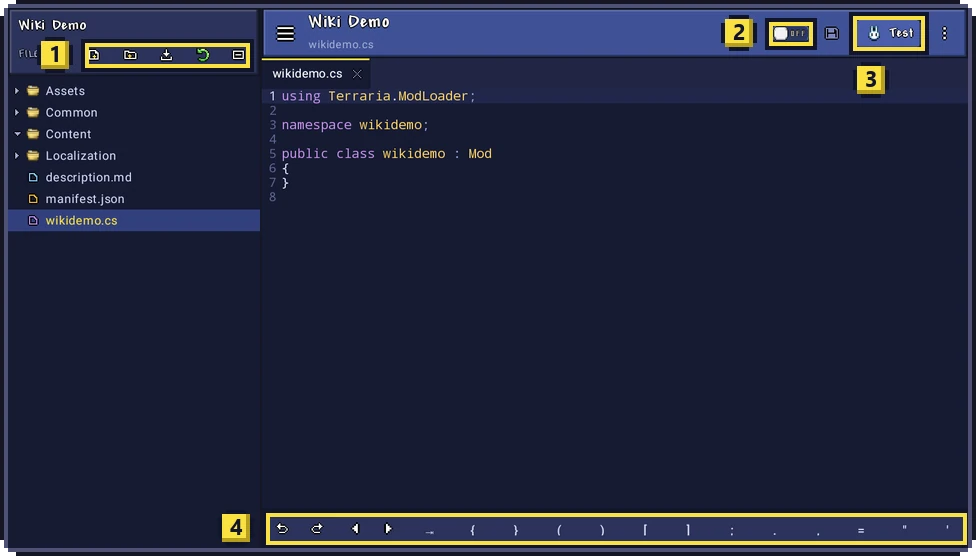
The buttons at (1), above the file list, create a new file, create a new folder, import a file from your phone (a texture, for example), refresh the list and collapse the folders. They act on the folder you selected. A long press on any file or folder opens the same actions, plus rename and delete. On a narrow screen the file list hides itself, and the ☰ button next to the project's name brings it back.
When you create a .cs file, BL Editor offers templates: an empty class, a
ModItem, a sword, a weapon that shoots a projectile, a ModProjectile, an
enemy, a buff, an accessory, a block, a ModPlayer, a ModSystem, a
GlobalItem and a GlobalNPC. Each template writes code that compiles, and the
ones that need a picture or a name also create a placeholder texture and the
entry in Localization/, so the new thing shows up in the game right away.
The code itself goes in the area on the right, with one tab per open file. As
you type, BL Editor suggests the classes, fields and methods of the game and
of Bunny Loader, along whole chains like Main.LocalPlayer.; after
override it lists the methods you can override and writes the chosen one
completely, adding any using line it needs. When you are inside the
parentheses of a call, the names of its parameters appear above the keyboard.
The switch at (2) is autosave. Saving a file in BL Editor does more
than write it to disk: every save also builds the mod and installs it in Bunny
Loader, in the background, and a check mark next to the switch tells you it
worked; a red ! in its place means it did not, and shows the error. With
autosave on, this happens a moment after you stop typing and whenever you
leave the app. With it off, the save button next to the switch saves when you
decide.
(3) is Test, the button you will press the most. It saves every file, and Bunny Loader builds the mod, installs it, turns it on and opens the game. If the game is already open, it restarts with the new version. The first time takes a little longer, because the compiler has to warm up.
The bar at (4) sits above the keyboard and keeps the symbols C# uses the most one tap away, along with undo, redo and the arrows that move the cursor.
Everything else is in the ⋮ menu at the top right: Find in the current file, Find in mod across every file of the project, Structure (the classes and methods of the file, where a tap takes you to the line), Format document, Comment or uncomment, Duplicate line, word wrap, Save all and Close tab.
BL Editor reads your code as you type, but it does not check it for errors: the compiler that builds your mod is inside Bunny Loader. When you press Test and something is wrong, the game does not open. Instead, a panel opens under the code with every error, explained in plain words in the app's language, with the compiler's own message kept below it. Tap an error to jump to its line, which gets underlined.
Many errors have a single right answer, and those come with a button that
fixes them: a missing ;, ) or }, a missing using line, a misspelled
name, or a field written without the Item., NPC. or Projectile. in front
of it. The fix goes into your tab like any other edit, so Undo takes it
back if you change your mind.
You are ready. Your first mod turns this empty project into a sword you can craft and swing in the game, and Testing and errors explains the log, which is where you look when something compiles but does not behave the way you expected.
